Page 141 of 559

CAUTION
Use the headlights with the engine run-
ning to avoid discharging the vehicle
battery.
Autolight system
The autolight system allows the headlights
to turn on and off automatically. The auto-
light system can:∙ Turn on the headlights, front parking, tail, license plate and instrument panel
lights automatically when it is dark.
∙ Turn off all the lights when it is light.
∙ Keep all the lights on for a period of time af ter you place the ignition switch in the
OFF position and all doors are closed. NOTE:
Autolight activation sensitivity and the
time delay for autolight shutoff can be
adjusted. For additional information, re-
fer to “Vehicle information display ” in
this section.
To turn on the autolight system:
1. Turn the headlight switch to the AUTO position
�1.
2. Turn the ignition switch to ON.
3. The autolight system automatically turns the headlights on and off.
Initially, if the ignition switch is placed in the
OFF position and a door is opened and lef t
open, the headlights remain on for a period
of time. If another door is opened while the
headlights are on, then the timer is reset.
To turn the autolight system off, turn the
switch to the OFF (if so equipped),
Page 142 of 559
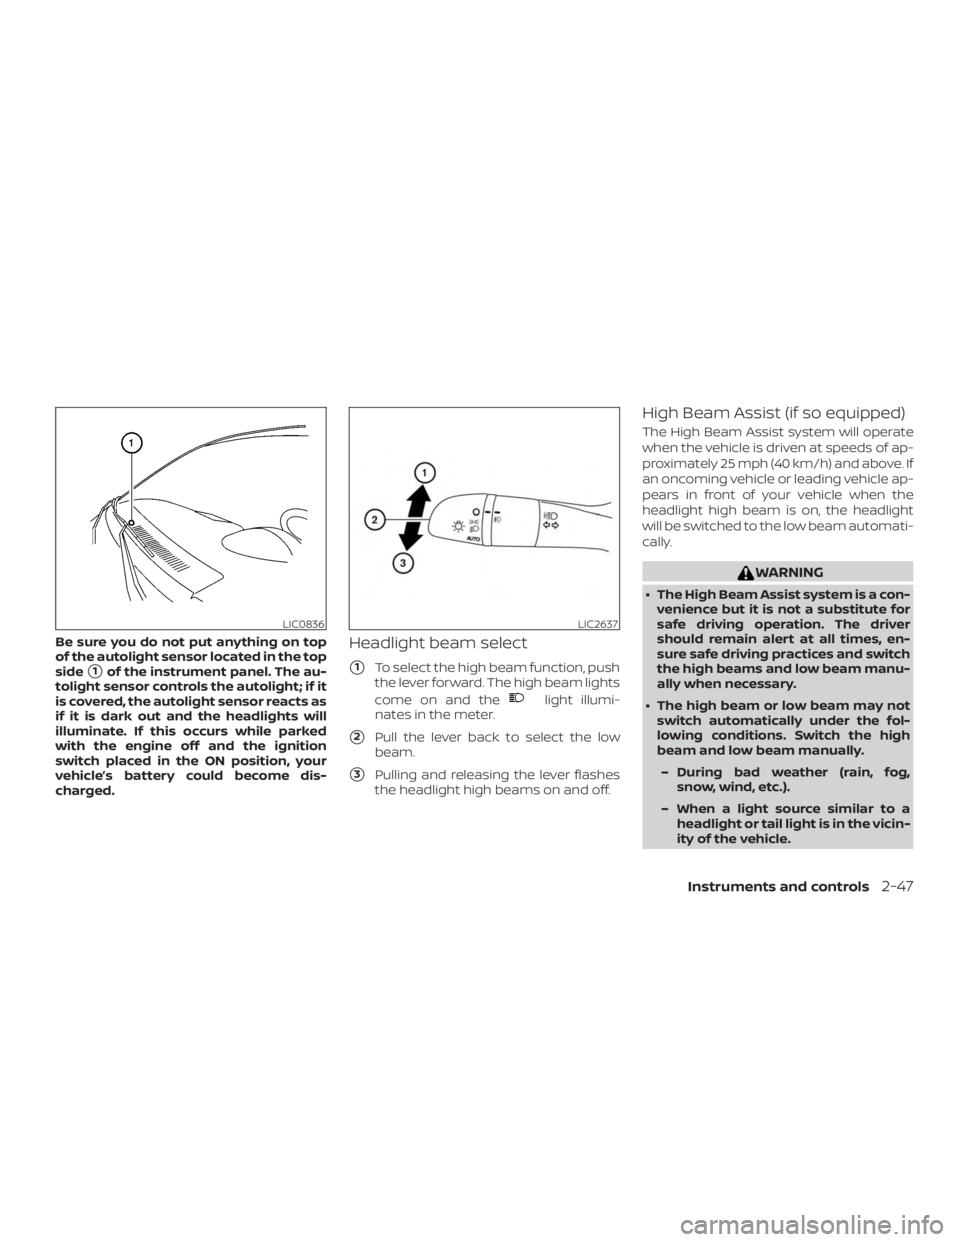
Be sure you do not put anything on top
of the autolight sensor located in the top
side
�1of the instrument panel. The au-
tolight sensor controls the autolight; if it
is covered, the autolight sensor reacts as
if it is dark out and the headlights will
illuminate. If this occurs while parked
with the engine off and the ignition
switch placed in the ON position, your
vehicle’s battery could become dis-
charged.
Headlight beam select
�1To select the high beam function, push
the lever forward. The high beam lights
come on and the
Page 145 of 559
LED DAYTIME RUNNING LIGHTS
(DRL) SYSTEM (if so equipped)
The LED DRL automatically illuminate at
100% intensity when the engine is started
and the parking brake released. The LED
Daytime Running Lights (DRL) operate with
the headlight switch in the OFF position.
When you turn the headlight switch to
the
Page 163 of 559

WARNING
∙ Your vehicle’s engine should beturned off while programming the
HomeLink® Universal Transceiver. For
additional information, refer to
“Push-button ignition switch” in the
“Starting and driving” section of this
manual. Do not breathe exhaust
gases; they contain colorless and
odorless carbon monoxide. Carbon
monoxide is dangerous. It can cause
unconsciousness or death.
∙ Do not use the HomeLink® Universal Transceiver with any garage door
opener that lacks safety stop and re-
verse features as required by federal
safety standards. (These standards
became effective for opener models
manufactured af ter April 1, 1982.) A
garage door opener which cannot de-
tect an object in the path of a closing
garage door and then automatically
stop and reverse does not meet cur-
rent federal safety standards. Using a
garage door opener without these
features increases the risk of serious
injury or death. ∙ During the programming procedure
your garage door or security gate will
open and close (if the transmitter is
within range). Make sure that people
or objects are clear of the garage door,
gate, etc., that you are programming.
PROGRAMMING HOMELINK®
If you have any questions or are having
difficulty programming your HomeLink®
buttons, refer to the HomeLink® web site at:
www.homelink.com or call 1-800-355-3515.
NOTE:
Place the ignition switch in the ON posi-
tion (without starting the engine) when
programming HomeLink®. It is also rec-
ommended that a new battery be placed
in the hand-held transmitter of the de-
vice being programmed to HomeLink®
for quicker programming and accurate
transmission of the radio frequency. 1. Position the end of your hand-held
transmitter 1–3 in (2–8 cm) away from
the HomeLink® surface, keeping the
HomeLink® indicator light
�1in view.
Page 244 of 559

∙ When the climate system is in auto-matic operation and the engine coolant
temperature and outside air tempera-
ture are low, the air flow outlet may de-
fault to defroster mode for a maximum
of 2 minutes 30 seconds. This is not a
malfunction. Af ter the engine coolant
temperature warms up, the air flow out-
let will return to foot mode and opera-
tion will continue normally.
∙ When the outside and interior cabin temperatures are moderate to high, the
intake setting may default to turn off air
recirculation to allow fresh air into the
passenger compartment. You may no-
tice air flow from the foot mode, bi-level
mode, or side demist vent outlets for a
maximum of 15 seconds. This may oc-
cur when the previous climate setting
was turned off. This is not a malfunction.
Af ter the initial warm air is expelled, the
intake will return to automatic control,
the air flow outlet will return to previous
settings, and operation will continue
normally. To exit, press any climate con-
trol button.
∙ Keep the moonroof (if so equipped) closed while the air conditioner is in op-
eration. ∙ If you feel that the air flow mode you
have selected and the outlets the air is
coming out do not match, select
the
Page 259 of 559

∙ Unsecured cargo can be thrownaround when driving over rough ter-
rain. Properly secure all cargo so it will
not be thrown forward and cause in-
jury to you or your passengers.
∙ Exceeding the roof rack capacity can raise the center of gravity excessively
and affect the handling and stability
of the vehicle.
∙ Secure heavy loads in the cargo area as far forward and as low as possible.
Do not equip the vehicle with tires
larger than specified in this manual.
This could cause your vehicle to roll
over.
∙ Do not grip the inside or spokes of the steering wheel when driving off-road.
The steering wheel could move sud-
denly and injure your hands. Instead
drive with your fingers and thumbs on
the outside of the rim.
∙ Before operating the vehicle, ensure that the driver and all passengers
have their seat belts fastened.
∙ Always drive with the floor mats in place as the floor may become hot. ∙ Lower your speed when encountering
strong crosswinds. With a higher cen-
ter of gravity, your NISSAN is more af-
fected by strong side winds. Slower
speeds ensure better vehicle control.
∙ Do not drive beyond the performance capability of the tires, even with AWD
engaged.
∙ For AWD equipped vehicles, do not at- tempt to raise two wheels off the
ground and shif t the transmission to
any drive or reverse position with the
engine running. Doing so may result
in drivetrain damage or unexpected
vehicle movement which could result
in serious vehicle damage or personal
injury. ∙ Do not attempt to test an AWD
equipped vehicle on a 2-wheel dyna-
mometer (such as the dynamometers
used by some states for emissions
testing) or similar equipment even if
the other two wheels are raised off the
ground. Make sure you inform test fa-
cility personnel that your vehicle is
equipped with AWD before it is placed
on a dynamometer. Using the wrong
test equipment may result in drive-
train damage or unexpected vehicle
movement which could result in seri-
ous vehicle damage or personal
injury.
∙ When a wheel is off the ground due to an unlevel surface, do not spin the
wheel excessively.
∙ Accelerating quickly, sharp steering maneuvers or sudden braking may
cause loss of control.
∙ If at all possible, avoid sharp turning maneuvers, particularly at high
speeds. Your NISSAN vehicle has a
higher center of gravity than a pas-
senger car. The vehicle is not de-
signed for cornering at the same
speeds as passenger cars.
5-12Starting and driving
Page 264 of 559

∙ Make sure the area around the vehicle isclear.
∙ Check fluid levels such as engine oil, coolant, brake fluid, and windshield-
washer fluid as frequently as possible,
or at least whenever you refuel.
∙ Check that all windows and lights are clean.
∙ Visually inspect tires for their appear- ance and condition. Also check tires for
proper inflation.
∙ Lock all doors.
∙ Position seat and adjust headrests/head restraints.
∙ Adjust inside and outside mirrors.
∙ Fasten seat belts and ask all passen- gers to do likewise.
∙ Check the operation of warning lights when the ignition switch is pushed to
the ON position. For additional informa-
tion, refer to “Warning lights, indicator
lights and audible reminders” in the “In-
struments and controls” section of this
manual. 1. Apply the parking brake.
2. Move the shif t lever to P (Park) or N
(Neutral). P (Park) is recommended.
The starter is designed not to oper-
ate if the shif t lever is in any of the
driving positions.
3. Push the ignition switch to the ON po- sition. Depress the brake pedal and
push the ignition switch to start the
engine.
To start the engine immediately, push
and release the ignition switch while
depressing the brake pedal with the
ignition switch in any position.
∙ If the engine is very hard to start in extremely cold weather or when re-
starting, depress the accelerator
pedal a little (approximately 1/3 to the
floor) and while holding, crank the en-
gine. Release the accelerator pedal
when the engine starts.
∙ If the engine is very hard to start be- cause it is flooded, depress the accel-
erator pedal all the way to the floor
and hold it. Push the ignition switch
to the ON position to start cranking
the engine. Af ter 5 or 6 seconds, stop
cranking by pushing the ignition switch to the LOCK position. Af ter
cranking the engine, release the ac-
celerator pedal. Crank the engine
with your foot off the accelerator
pedal by depressing the brake pedal
and pushing the ignition switch to
start the engine. If the engine starts,
but fails to run, repeat the above pro-
cedure.
Page 265 of 559
 position and push the
ignition switch to the OFF position.
NOTE:
Care should be taken to avoid situations
that can lead to potential battery")
5. To stop the engine, move the shif t leverto the P (Park) position and push the
ignition switch to the OFF position.
NOTE:
Care should be taken to avoid situations
that can lead to potential battery dis-
charge and potential no-start conditions
such as: 1. Installation or extended use of elec-
tronic accessories that consume bat-
tery power when the engine is not
running (phone chargers, GPS, DVD
players, etc.).
2. The vehicle is not driven regularly
and/or only driven short distances.
In these cases, the battery may need to
be charged to maintain battery health.
REMOTE ENGINE START
Vehicles started with the Remote Engine
Start require the ignition switch to be
placed in the ON position before the shif t
lever can be moved from the P (Park) posi-
tion. To place the ignition switch in the ON
position, follow these steps: 1. Make sure that the Intelligent Key is on you. 2. Apply the brake.
3. Push the ignition switch once to the ON
position.
For additional information, refer to “NISSAN
Intelligent Key®” in the “Pre-driving checks
and adjustments” section of this manual.
CONTINUOUSLY VARIABLE
TRANSMISSION (CVT)
 SYSTEM (if so equipped)
The LED DRL automatically illuminate at
100% intensity when the engine is started
and the parking brake released. The LED
Daytime Running Light")