Page 139 of 559

NOTE:
If the windshield wiper operation is in-
terrupted by snow or ice, the wiper may
stop moving to protect its motor. If this
occurs, turn the wiper switch to the OFF
position and remove the snow or ice that
is on and around the wiper arms. In ap-
proximately 1 minute, turn the switch on
again to operate the wiper.
The windshield wiper and washer operates
when the ignition switch is placed in the ON
position.
Push the lever down to operate the wiper
at the following speed:
�1Intermittent — intermittent operation
can be adjusted by turning the knob
toward
�A(faster) or�B(slower).
�2Low — continuous low speed opera-
tion
�3High — continuous high speed opera-
tion
Push the lever up
�4to have one sweep
operation (MIST) of the wiper.
Pull the lever toward you
�5to operate the
washer. The wiper will also operate several
times. To defrost the rear window glass and out-
side mirrors (if so equipped), place the igni-
tion switch in the ON position and push the
rear window defroster switch on. The rear
window defroster indicator light on the
switch comes on. Push the switch again to
turn the defroster off.
The rear window defroster automatically
turns off af ter approximately 15 minutes.
Page 143 of 559

– When the headlights of the on-coming vehicle or the leading ve-
hicle are turned off, when the color
of the light is affected due to for-
eign materials on the lights, or
when the light beam is out of
position.
– When there is a sudden, continu- ous change in brightness.
– When driving on a road that passes over rolling hills, or a road that has
level differences.
– When driving on a road with many curves.
– When a sign or mirror-like surface is reflecting intense light towards
the front of the vehicle.
– When the container, etc. being towed by a leading vehicle is re-
flecting intense light.
– When a headlight on your vehicle is damaged or dirty.
– When the vehicle is leaning at an angle due to a punctured tire, be-
ing towed, etc. ∙ The timing of switching the low beam
and high beam may change under the
following situations.
– The brightness of the headlights of the oncoming vehicle or leading
vehicle.
– The movement and direction of the oncoming vehicle and the lead-
ing vehicle.
– When only one light on the oncom- ing vehicle or the leading vehicle is
illuminated.
– When the oncoming vehicle or the leading vehicle is a two-wheeled
vehicle.
– Road conditions (incline, curve, the road surface, etc.).
– The number of passengers and the amount of luggage. High Beam Assist operation
To activate the High Beam Assist system,
turn the headlight switch to the AUTO po-
sition
�1and push the lever forward�2
(high beam position). The
Page 197 of 559
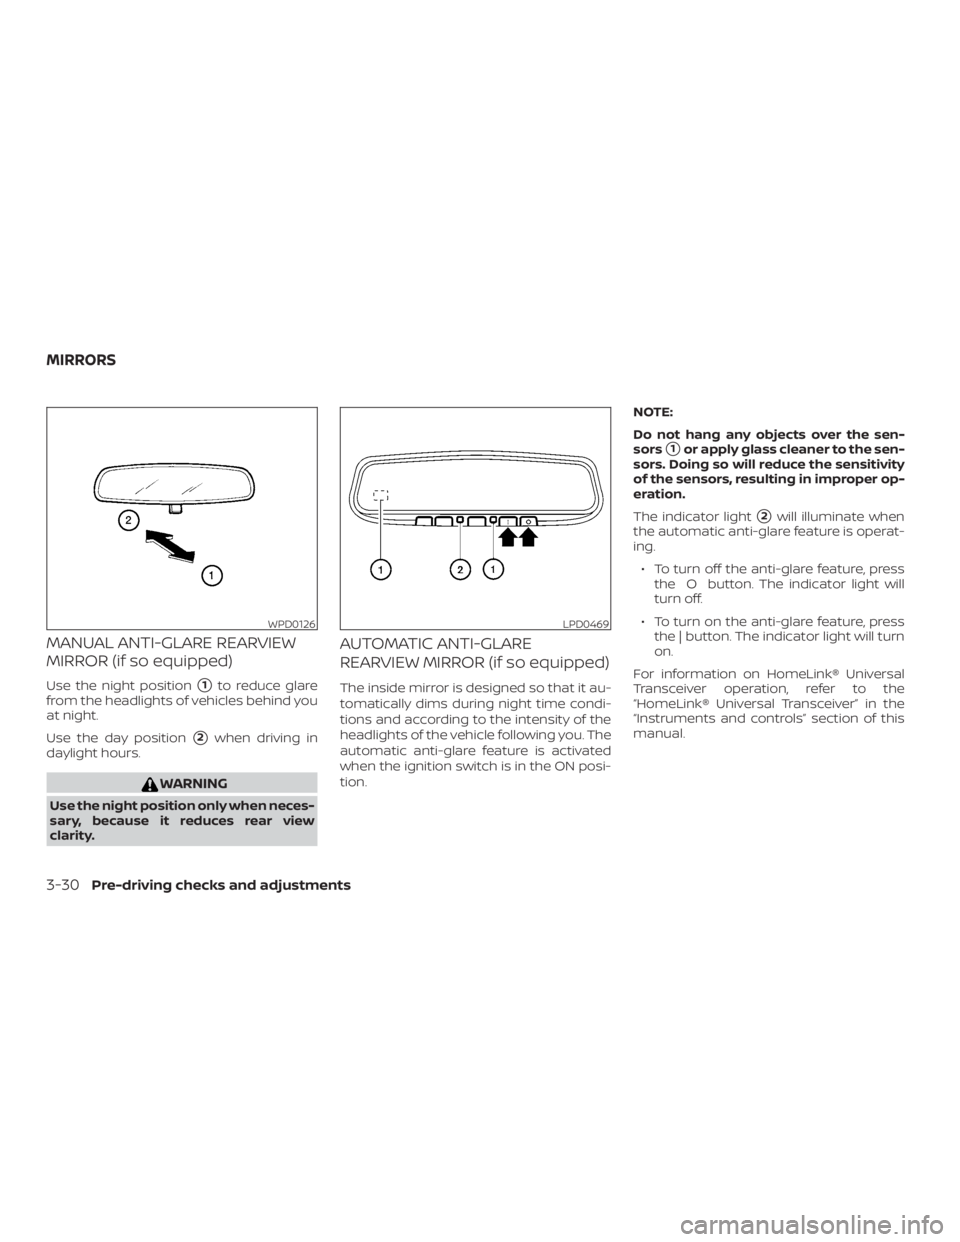
MANUAL ANTI-GLARE REARVIEW
MIRROR (if so equipped)
Use the night position�1to reduce glare
from the headlights of vehicles behind you
at night.
Use the day position
�2when driving in
daylight hours.
Page 198 of 559
Page 207 of 559
WARNING
∙ Failure to follow the warnings and in-structions for proper use of the Rear-
View Monitor system could result in
serious injury or death.
∙ RearView Monitor is a convenience feature and is not a substitute for
proper backing. Always turn and look
out the windows and check mirrors to
be sure that it is safe to move before
operating the vehicle. Always back up
slowly.
∙ The system is designed as an aid to the driver in showing large stationary
objects directly behind the vehicle, to
help avoid damaging the vehicle.
∙ The distance guide lines and the ve- hicle width lines should be used as a
reference only when the vehicle is on a
level paved surface. The distance
viewed on the monitor is for reference
only and may be different than the
actual distance between the vehicle
and displayed objects.
Page 227 of 559
 system could
result in serious injury or death
∙ The MOD system is not a substitutefor p")
WARNING
Failure to follow the warnings and in-
structions for proper use of the Moving
Object Detection (MOD) system could
result in serious injury or death
∙ The MOD system is not a substitutefor proper vehicle operation and is not
designed to prevent contact with ob-
jects surrounding the vehicle. When
maneuvering, always use the outside
mirrors and rearview mirror and turn
and check the surroundings to ensure
it is safe to maneuver.
∙ The system is deactivated at speeds above 5 mph (8 km/h). It is reactivated
at lower speeds.
∙ The MOD system is not designed to detect surrounding stationary
objects.
The MOD system can inform the driver of
moving objects near the vehicle when
backing out of garages, maneuvering in
parking lots and in other such instances.
The MOD system detects moving objects
by using image processing technology on
the image shown in the display.
MOD SYSTEM OPERATION
The MOD system will turn on automatically
under the following conditions: ∙ When the shif t lever is in the R (Reverse) position.
∙ When the CAMERA button is pressed to activate the camera view on the display.
∙ When vehicle speed decreases below approximately 6 mph (10 km/h) and the
camera screen is displayed.
The MOD system operates in the following
conditions when the camera view is dis-
played:∙ When the shif t lever is in the P (Park) or N (Neutral) position and the vehicle is
stopped, the MOD system detects mov-
ing objects in the bird’s-eye view. The
MOD system will not operate if the out-
side mirrors are moving in or out, in the
stowed position, or if either front door is
opened.
Page 264 of 559

∙ Make sure the area around the vehicle isclear.
∙ Check fluid levels such as engine oil, coolant, brake fluid, and windshield-
washer fluid as frequently as possible,
or at least whenever you refuel.
∙ Check that all windows and lights are clean.
∙ Visually inspect tires for their appear- ance and condition. Also check tires for
proper inflation.
∙ Lock all doors.
∙ Position seat and adjust headrests/head restraints.
∙ Adjust inside and outside mirrors.
∙ Fasten seat belts and ask all passen- gers to do likewise.
∙ Check the operation of warning lights when the ignition switch is pushed to
the ON position. For additional informa-
tion, refer to “Warning lights, indicator
lights and audible reminders” in the “In-
struments and controls” section of this
manual. 1. Apply the parking brake.
2. Move the shif t lever to P (Park) or N
(Neutral). P (Park) is recommended.
The starter is designed not to oper-
ate if the shif t lever is in any of the
driving positions.
3. Push the ignition switch to the ON po- sition. Depress the brake pedal and
push the ignition switch to start the
engine.
To start the engine immediately, push
and release the ignition switch while
depressing the brake pedal with the
ignition switch in any position.
∙ If the engine is very hard to start in extremely cold weather or when re-
starting, depress the accelerator
pedal a little (approximately 1/3 to the
floor) and while holding, crank the en-
gine. Release the accelerator pedal
when the engine starts.
∙ If the engine is very hard to start be- cause it is flooded, depress the accel-
erator pedal all the way to the floor
and hold it. Push the ignition switch
to the ON position to start cranking
the engine. Af ter 5 or 6 seconds, stop
cranking by pushing the ignition switch to the LOCK position. Af ter
cranking the engine, release the ac-
celerator pedal. Crank the engine
with your foot off the accelerator
pedal by depressing the brake pedal
and pushing the ignition switch to
start the engine. If the engine starts,
but fails to run, repeat the above pro-
cedure.
Page 278 of 559
∙When the vehicle stops, but the brake
force is not automatically applied, de-
press the brake pedal firmly until the
automatic brake hold indicator light
(green) illuminates.
The TSR system provides the driver with
information about the most recently de-
tected speed limit. The system captures
the road sign information with the multi-
sensing front camera unit
�1located on
the windshield in front of the inside rear-
view mirror and displays the detected
signs in the vehicle information display. For
vehicles equipped with a navigation sys-
tem, the speed limit displayed is based on a
combination of navigation system data
and live camera recognition. TSR informa-
tion is always displayed at the top of the
vehicle information display, and optionally
in the main central area of the display
screen.


 illuminates.
The TSR system provide")