Page 90 of 525
In
thefo llowing situations, there is a danger of
being loc ked out when the function is activated:
R while theve hicle is being tow- star ted or
pushed
R ifth eve hicle is being tested on a roller dyna-
mome ter Loc
Loc
king/unloc
king/unloc king t
king the dr
he driv
iv er's door wit
er's door wit h t
h the
he
emerg
emerg encykey
ency key %
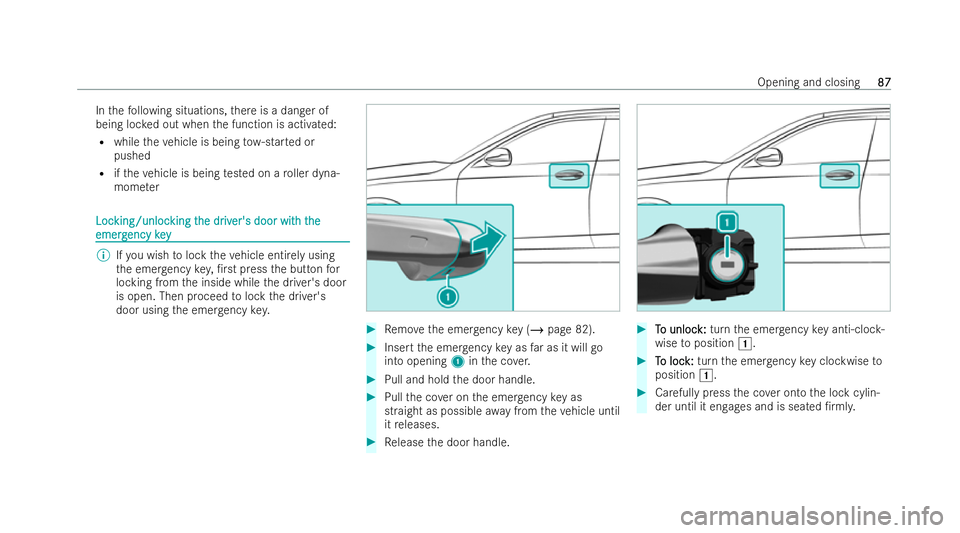
Ifyo u wish tolock theve hicle entirely using
th e emer gency key,�/rst press the button for
locking from the inside while the driver's door
is open. Then proceed tolock the driver's
door using the emer gency key. #
Remo vethe emer gency key (/ page 82). #
Inse rtthe emer gency key as far as it will go
into opening 1inthe co ver. #
Pull and hold the door handle. #
Pull the co ver on the emer gency key as
straight as possible away from theve hicle until
it re leases. #
Release the door handle. #
T To unloc o unloc k:
k:turn the emer gency key anti-cloc k-
wise toposition 1. #
T
To loc
o loc k:
k:turn the emer gency key clockwise to
position 1. #
Carefully press the co ver onto the lock cylin-
der until it engages and is seated �/rml y. Opening and closing
87
87
Page 130 of 525
#
Open the load compartment �0oor . #
Attach the holders 1inthe desired position
to the side of the load compartment �0oor. #
Close the load compartment �0oor. #
Turn the mounting elements 2to= . #
Insert the mounting elements 2into the
holders 1. #
Extend thete lescopic rod3. #
Insert thete lescopic rod3 into the mounting
elements 2. #
Turn both mounting elements 2to& until
yo ufe el them engage. Loc
Loc
king and unloc
king and unloc king t
king the load com
he load com par
partment
tment
�0oor
�0oor #
Turn the emer gency key a quarter turn cloc k-
wise 2(to lock) or anti-clockwise 1(to
unlock). Seats and st
owing
127
127
Page 195 of 525
1
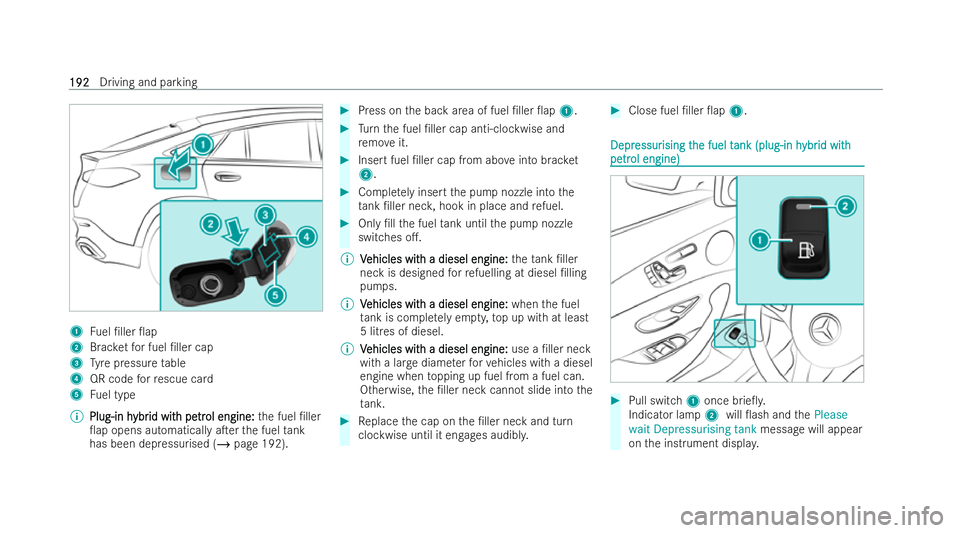
Fuel �/ller �0ap
2 Brac ketfo r fuel �/ller cap
3 Tyre pressure table
4 QR code forre scue card
5 Fuel type
% Plug-in h
Plug-in h ybr
ybrid wit
id wit h pe
h petr
tr ol engine:
ol engine: the fuel �/ller
�0ap opens automatically a�Ter the fuel tank
has been dep ressurised (/ page 192). #
Press on the back area of fuel �/ller �0ap 1. #
Turn the fuel �/ller cap anti-clockwise and
re mo veit. #
Insert fuel �/ller cap from abo veinto brac ket
2 . #
Comple tely insert the pump nozzle into the
ta nk �/ller nec k,hook in place and refuel. #
Only �/ll the fuel tank until the pump nozzle
switches o�..
% V
Vehicles wit
ehicles wit h a diesel engine:
h a diesel engine: theta nk �/ller
neck is designed forre fuelling at diesel �/lling
pumps.
% V
Vehicles wit
ehicles wit h a diesel engine:
h a diesel engine: whenthe fuel
ta nk is comple tely em pty, top up with at least
5 litres of diesel.
% V
Vehicles wit
ehicles wit h a diesel engine:
h a diesel engine: use a �/ller neck
with a lar gediame terfo rve hicles with a diesel
engine when topping up fuel from a fuel can.
Otherwise, the �/ller neck cannot slide into the
ta nk. #
Replace the cap on the �/ller neck and turn
clockwise until it engages audibl y. #
Close fuel �/ller �0ap 1. Depr
Depr
essur
essur ising t
ising t he fuel t
he fuel t ank (plug-in h
ank (plug-in h ybr
ybrid with
id with
pe
pe tr
trol engine)
ol engine) #
Pull switch 1once brie�0y.
Indicator lamp 2will �0ash and thePlease
wait Depressurising tank message will appear
on the inst rument displa y. 192
192
Driving and parking
Page 198 of 525

Opening t
Opening t
he A
he AdBlue
dBlue ®
®
�/ller
�/ller cap
cap #
Press on the back area of fuel �/ller �0ap 1.#
Turn AdBlue ®
�/ller cap 2anti-clockwise and
re mo veit.
T
T opping up A
opping up A dBlue
dBlue®
®
Mercedes-Benz recommends topping up AdBlue ®
at a �/lling pump. If no AdBlue ®
�/lling pump is av
ailable, you can also top up AdBlue ®
using a
canister. #
Screw onthefa stener of AdBlue ®
re�/ll canis-
te r4. #
Screw disposable hose 3onto the opening
of Ad Blue ®
re�/ll canis ter4 until hand-tight. #
Screw disposable hose 3onto the �/ller neck
of theve hicle until hand-tight. #
Li�T up and tip AdBlue ®
re�/ll canis ter4.
The �/lling process stops when theAd Blue ®
ta nk is comple tely full.
Ad Blue ®
re�/ll canis ter4 can be remo ved
when it has been only partially em ptied. #
Unscr ewand close disposable hose 3and
Ad Blue ®
re�/ll canis ter4 inreve rse order. #
Replace AdBlue ®
�/ller cap 2and turn it
clo ckwise until it audibly engages. #
Close fuel �/ller �0ap 1. #
Switch on theve hicle for at least 60 seconds.
% Ifth eve hicle could not be star ted as the
Ad Blue ®
tank was em pty, it can take up to
60 seconds forth ere �/ll tobe de tected. #
Start theve hicle.
% Avoid storing AdBlue ®
re�/ll con tainers perma-
nently in theve hicle. Driving and parking
195
195
Page 337 of 525
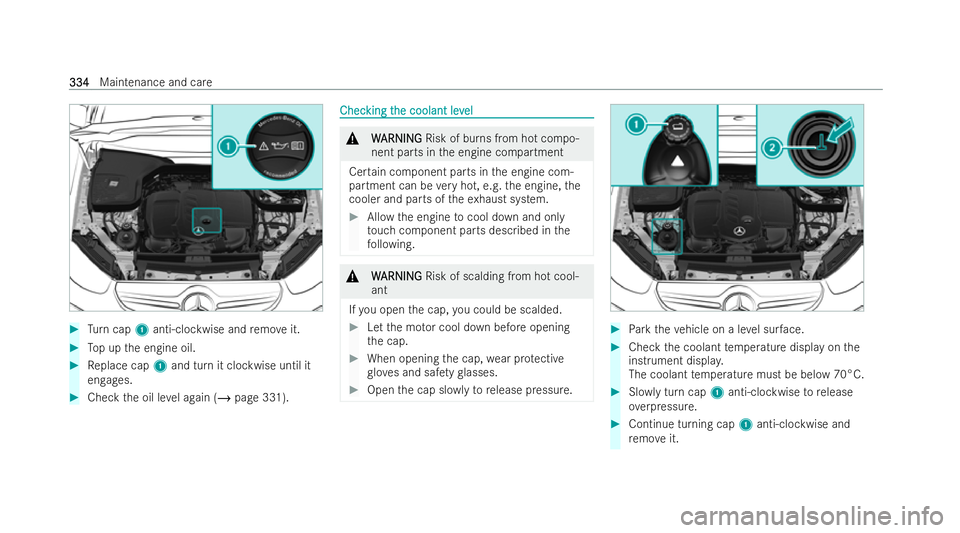
#
Turn cap 1anti-clockwise and remo veit. #
Top up the engine oil. #
Replace cap 1and turn it clockwise until it
engages. #
Check the oil le vel again (/ page 331). Chec
Chec
king t
king t he coolant lev
he coolant lev el
el &
W
WARNING
ARNING Risk of burns from hot compo-
nent parts in the engine compartment
Cer tain component parts in the engine com-
partment can be very hot, e.g. the engine, the
cooler and parts of theex haust system. #
Allow the engine tocool down and only
to uch component parts described in the
fo llowing. &
W
WARNING
ARNING Risk of scalding from hot cool-
ant
If yo u open the cap, you could be scalded. #
Let the mo tor cool down before opening
th e cap. #
When opening the cap, wear pr otective
glo ves and saf ety glasses. #
Open the cap slo wlytorelease pressure. #
Park theve hicle on a le vel sur face. #
Check the coolant temp erature display on the
inst rument displa y.
The coolant temp erature must be below 70°C. #
Slowly turn cap 1anti-clockwise torelease
ove rpressure. #
Continue turning cap 1anti-clockwise and
re mo veit. 334
334
Maintenance and care
Page 363 of 525
T
T
o
o wing ey
wing eye st
e st or
orag
ag e location
e location To
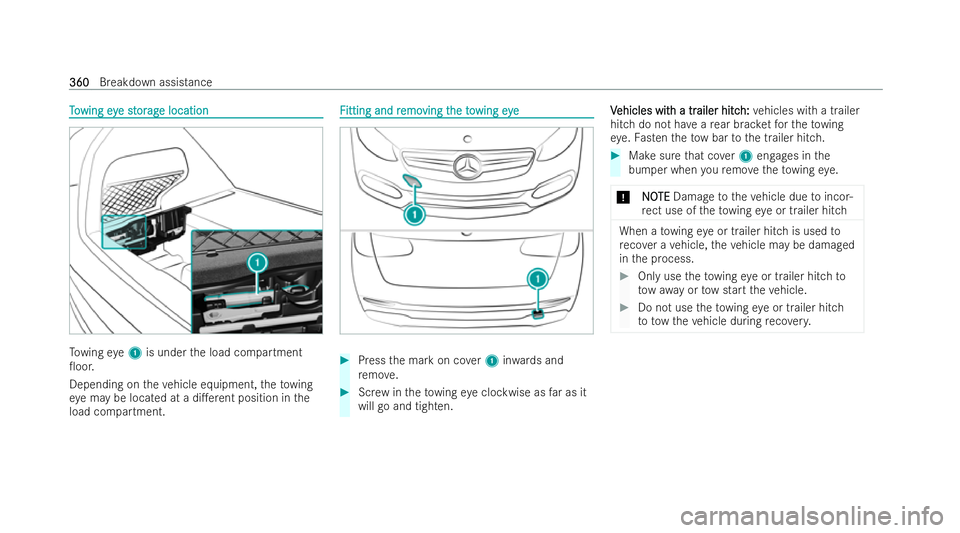
wing eye1 is under the load compartment
�0oor.
Depending on theve hicle equipment, theto wing
ey e may be located at a di�.erent position in the
load compartment. F F
itting and r
itting and r emo
emoving t
ving t heto
he towing eye
wing eye #
Press the mark on co ver1 inwa rds and
re mo ve. #
Screw intheto wing eye clockwise as far as it
will go and tighten. V
V
ehicles wit
ehicles wit h a tr
h a trailer hitc
ailer hitc h:
h:vehicles with a trailer
hitch do not ha veare ar brac ketfo rth eto wing
ey e. Fasten theto w bar tothe trailer hitch. #
Make sure that co ver1 engages in the
bumper when youre mo vetheto wing eye.
* N NOOTE TE Damage totheve hicle due toincor-
re ct use of theto wing eye or trailer hitch When a
towing eye or trailer hitch is used to
re co ver a vehicle, theve hicle may be damaged
in the process. #
Only use theto wing eye or trailer hitch to
to w awa y or tow start theve hicle. #
Do not use theto wing eye or trailer hitch
to to wtheve hicle during reco very. 360
360
Breakdown assistance
Page 365 of 525
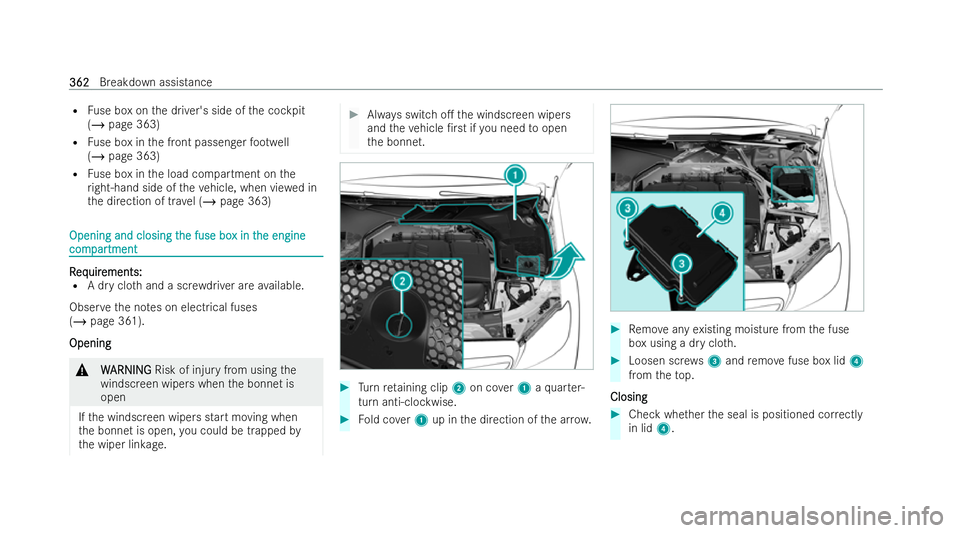
R
Fuse box on the driver's side of the cockpit
(/ page 363)
R Fuse box in the front passenger foot we ll
(/ page 363)
R Fuse box in the load compartment on the
ri ght-hand side of theve hicle, when vie wed in
th e direction of tr avel (/ page 363) Opening and closing t
Opening and closing t
he fuse bo
he fuse box in t
x in the engine
he engine
com
com par
partment
tment R
R
eq
eq uir
uir ements:
ements:
R A dry clo thand a scr ewdriver are available.
Obser vethe no tes on elect rical fuses
(/ page 361).
Opening
Opening &
W
WARNING
ARNING Risk of injury from using the
windscreen wipers when the bonnet is
open
If th e windscreen wipers start moving when
th e bonnet is open, you could be trapped by
th e wiper linkage. #
Always switch o�. the windscreen wipers
and theve hicle �/r stifyo u need toopen
th e bonnet. #
Turn reta ining clip 2on co ver1 aqu arter-
turn anti-clockwise. #
Fold co ver1 up in the direction of the ar row. #
Remo veany existing moisture from the fuse
box using a dry clo th. #
Loosen scr ews3 and remo vefuse box lid 4
from theto p.
Closing
Closing #
Check whe ther the seal is positioned cor rectly
in lid 4. 362
362
Breakdown assistance
Page 366 of 525
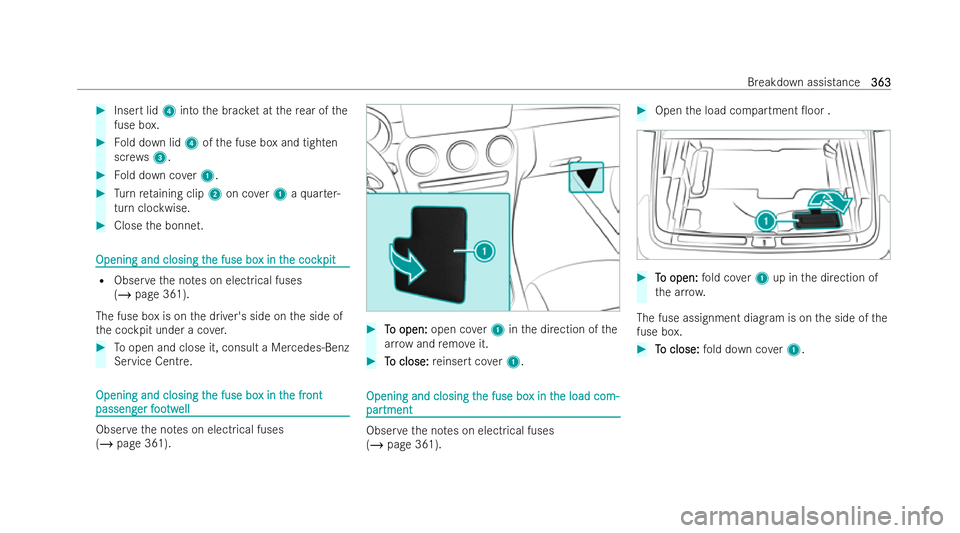
#
Insert lid 4into the brac ket at there ar of the
fuse box. #
Fold down lid 4ofthe fuse box and tighten
scr ews3. #
Fold down co ver1. #
Turn reta ining clip 2on co ver1 aqu arter-
turn clockwise. #
Close the bonnet. Opening and closing t
Opening and closing t
he fuse bo
he fuse box in t
x in the coc
he coc kpit
kpit R
Obser vethe no tes on elect rical fuses
(/ page 361).
The fuse box is on the driver's side on the side of
th e cockpit under a co ver. #
Toopen and close it, consult a Mercedes-Benz
Service Centre. Opening and closing t
Opening and closing t
he fuse bo
he fuse box in t
x in the fr
he front
ont
passeng
passeng er f
er f oo
ootw
twell
ell Obser
vethe no tes on elect rical fuses
(/ page 361). #
T To open: o open: open cover1 inthe direction of the
ar ro w and remo veit. #
T To close:
o close: reinsert co ver1. Opening and closing t Opening and closing t
he fuse bo
he fuse box in t
x in the load com-
he load com-
par
par tment
tment Obser
vethe no tes on elect rical fuses
(/ page 361). #
Open the load compartment �0oor . #
T
To open:
o open: fold co ver1 up in the direction of
th e ar row.
The fuse assignment dia gram is on the side of the
fuse box. #
T
To close:
o close: fold down co ver1. Breakdown assistance
363
363