Page 121 of 457
1
Tie-down eyes Ov
Ov
er
ervie
vie w of bag hooks
w of bag hooks &
W
WARNING
ARNING Risk of injury when using bag
hooks with heavy objects
The bag hooks cannot restrain he avy objects
or items of lug gage. Objects or items of luggage may be �0ung
around and hit vehicle occupants. #
Only hang light objects on the bag
hooks. #
Never hang hard, sharp-edged or fragile
objects on the bag hooks. Obser
vethe no tes on loading theve hicle
(/ page 109).
Subject the bag hooks toa maximum load of 3 kg
and do not attach any goods tothem. 1
Bag hook Ov
Ov
er
ervie
vie w of clot
w of clot hes hook
hes hook s on t
s on the t
he t ailg
ailgate
ate Obser
vethe no tes on loading theve hicle
(/ page 109). 118
118
Seats and st
owing
Page 122 of 457
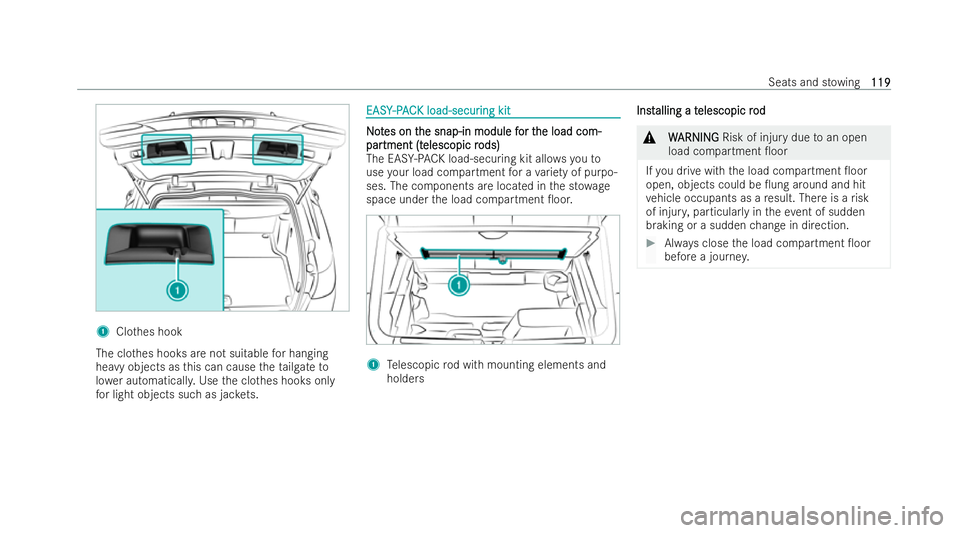
1
Clothes hook
The clo thes hooks are not suitable for hanging
heavy objects as this can cause theta ilgate to
lo we r automaticall y.Use the clo thes hooks only
fo r light objects such as jac kets. EASY
EASY
-PAC
-P AC K load-secur
K load-secur ing kit
ing kit N
No
ot
tes on t
es on t he snap-in module f
he snap-in module f or t
or the load com-
he load com-
par
par tment (t
tment (t elescopic r
elescopic r ods)
ods)
The EAS Y-PA CK load -securing kit allo wsyouto
use your load compartment for a variet y of purpo-
ses. The components are located in the st owage
space under the load compartment �0oor. 1
Telescopic rod with mounting elements and
holders Inst
Inst
alling a t
alling a t elescopic r
elescopic r od
od &
W
WARNING
ARNING Risk of inju rydue toan open
load compartment �0oor
If yo u drive with the load compartment �0oor
open, objects could be �0ung around and hit
ve hicle occupants as a result. There is a risk
of injur y,particular lyin theev ent of sudden
braking or a sudden change in direction. #
Always close the load compartment �0oor
before a journe y. Seats and st
owing
119 119
Page 126 of 457
#
Never plug the connecting cable into a
230 V po wer soc ketth at is damaged or
has been pulled out of the trim. &
D
D AN
AN GER
GER Risk of death due tousing the
soc ket incor rectly
In particular, you could receive an elect ric
shock:
R ifyo uto uch the inside of the soc ket
R ifyo u insert unsuitable devices or objects
into the soc ket #
Do not touch the inside of the soc ket. #
Only connect suitable devices tothe
soc ket. Make sure
that no liquids getinto the 230 V
soc ket.
When the 230 V soc ket is not in use, keep the
soc ket �0ap closed. R
R eq
eq uir
uir ements:
ements:
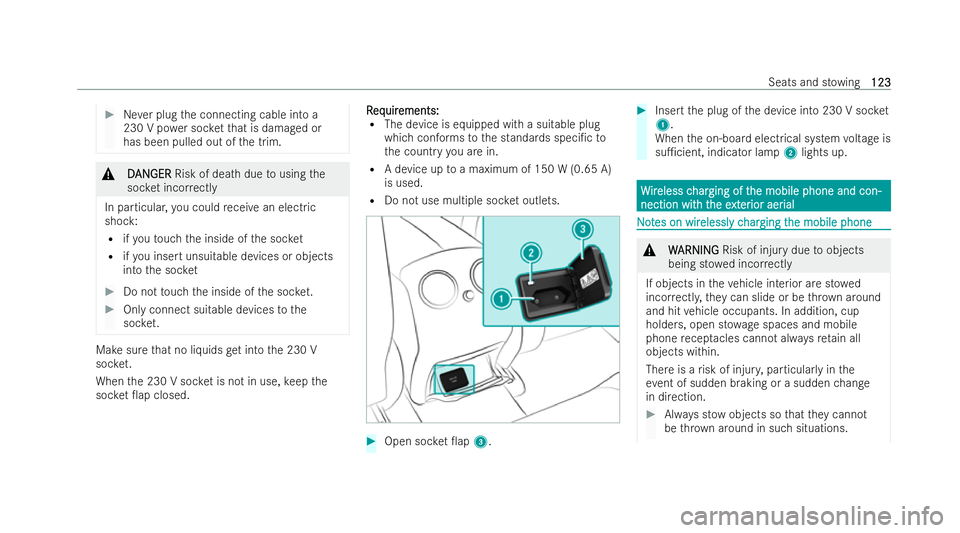
R The device is equipped with a suitable plug
whichconforms tothe standards speci�/c to
th e country you are in.
R A device up toa maximum of 150 W (0.65 A)
is used.
R Do not use multiple soc ket outlets. #
Open soc ket �0ap 3. #
Inse rtthe plug of the device into 230 V soc ket
1 .
When the on-board electrical system voltage is
su�1cient, indicator lamp 2lights up. W W
ir
ireless c
eless c har
harging of t
ging of t he mobile phone and con-
he mobile phone and con-
nection wit
nection wit h t
h the e
he e xt
xter
er ior aer
ior aer ial
ial N
No
ot
tes on wir
es on wir elessl
elessly c
y char
har ging t
ging t he mobile phone
he mobile phone &
W
WARNING
ARNING Risk of injury due toobjects
being st owed incor rectly
If objects in theve hicle interior are st owed
incor rectl y,they can slide or be thro wn around
and hit vehicle occupants. In addition, cup
holders, open st owage spaces and mobile
phone recep tacles cann otalw aysreta in all
objects within.
There is a risk of injur y,particular lyin the
eve nt of sudden braking or a sudden change
in direction. #
Always st owobjects so that they cann ot
be thro wn around in such situations. Seats and st
owing
123 123
Page 132 of 457

Switc
Switc
hing on high beam
hing on high beam #
Turn the light switch totheL orÃ
position. #
Push the combination switch be yond the point
of resis tance in the direction of ar row 1.
When the high beam is activated, the indicator
lamp for low beam Lwill be deactivated
and replaced bythe indicator lamp for high
beam K.
Switc
Switc hing
hingo�.
o�.high beam
high beam #
Movethe combination switch back toits start-
ing position.
Headlam
Headlam p
p�0ashing
�0ashing #
Pull the combination switch in the direction of
ar ro w 3.
T
T ur
ur n signal light
n signal light #
T To indicat
o indicat e
ebr
br ie�0y:
ie�0y: push the combination
switch brie�0y tothe point of resis tance in the
direction of ar row 2 or4.
The cor responding turn signal light will �0ash
th re e times. #
T
To indicat o indicat e per
e permanentl y:
manent ly:push the combina-
tion switch be yond the point of resistance in
th e direction of ar row 2 or4. A
A
ctiv
ctiv ating/deactiv
ating/deactiv ating t
ating the hazar
he hazar d w
d war
arning lights
ning lights #
Press button 1. The hazard
warning lights will switch on automati-
cally if:
R the airbag has been deplo yed.
R theve hicle is braked heavily from a speed of
more than 70 km/h toa standstill.
When you pull away again, the hazard warning
light system will switch o�. automatically at
appr oximately 10 km/h. You can also switch o�.
th e hazard warning light system using button 1. A
A
dap
dap tiv
tive functions, MUL
e functions, MUL TIBEAM LED
TIBEAM LED Int
Int
ellig
ellig ent Light Syst
ent Light Syst em function
em function
The MULTIBEAM LED headlamp s adapttothe
driving and weather situation and pr ovide exten-
ded functions for impr oved illumination of the
ro ad.
The system comprises thefo llowing functions:
R Active headlamps (/ page 130)
R Cornering light (/ page 130)
R Motorw ay mode (/ page 130)
R City lighting (/ page 131) Light and sight
129
129
Page 134 of 457

The function is not active in
thefo llowing cases:
R at speeds below 80 km/h
The city lighting function
The city lighting function
City lighting impr ovesth e illumination of roadsides
in urban areas using a broad distribution of light.
The function is active in thefo llowing cases:
R Atlow speeds
R In illuminated parts of urban areas
Switc Switc hing t hing t he Int
he Int ellig
elligent Light Syst
ent Light Syst em
emon/o�.
on/o�.
R
R eq
eq uir
uir ements:
ements:
R The vehicle is switched on.
Multimedia system: 4 © 5
Settings 5
Lights
5 Intelligent Light System #
Activate or deactivate the function. A
A
dap
dap tiv
tive Highbeam Assis
e Highbeam Assist Plus t Plus A
A
dap
dap tiv
tive Highbeam Assis
e Highbeam Assist Plus function t Plus function &
W
WARNING
ARNING Risk of accident despite Adap-
tive Highbeam Assist Plus
Ad aptive Highbeam Assist Plus does not react
to:
R road users without lights, e.g. pedestrians
R road users with poor lighting, e.g. cyclists
R road users whose lighting is obstructed,
e.g. bya bar rier
On very rare occasions, Adaptive Highbeam
Assist Plus may failto recognise other road
users with their own lighting, or may recognise
th em too late.
In these, or in similar situations, the automatic
high beam will not be deactivated or will be
activated despite the presence of other road
users. #
Always obser vethero ad and tra�1c con-
ditions carefully and switch o�. the high
beam in good time. Ad
aptive Highbeam Assist Plus cann ottake into
account road, weather or tra�1c conditions.
De tection may be restric ted in thefo llowing
cases:
R In poor visibility, e.g. fog, heavy rain or snow
R Ifth ere is dirt on the sensors or the sensors
are obscured
Ad aptive Highbeam Assist Plus is only an aid. Yo u
are responsible for adjusting theve hicle's lighting
to the pr evailing light, visibility and tra�1c condi-
tions. Light and sight
131 131
Page 139 of 457
Switc
Switc
hing t
hing t he r
he rear windo
ear windo w wiper
w wiperon/o�.
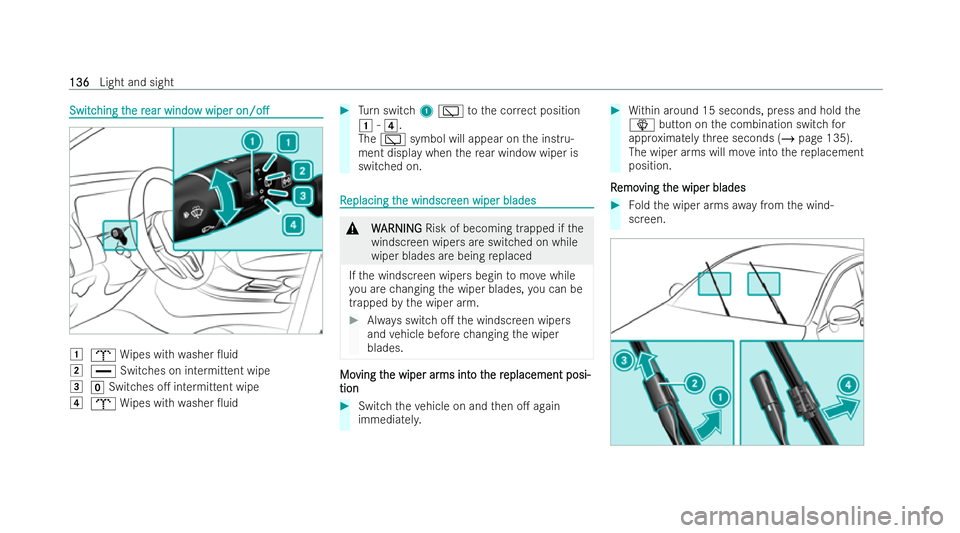
on/o�. 1
b Wipes with washer �0uid
2 ° Switches on intermittent wipe
3 gSwitches o�. intermittent wipe
4 b Wipes with washer �0uid #
Turn switch 1è tothe cor rect position
1 -4.
The è symbol will appear on the inst ru-
ment display when there ar wind owwiper is
switched on. R
R
eplacing t
eplacing t he windscr
he windscr een wiper blades
een wiper blades &
W
WARNING
ARNING Risk of becoming trapped if the
windscreen wipers are switched on while
wiper blades are being replaced
If th e windscreen wipers begin tomo vewhile
yo u are changing the wiper blades, you can be
trapped bythe wiper arm. #
Always switch o�. the windscreen wipers
and vehicle before changing the wiper
blades. Mo Mo
ving t
ving t he wiper ar
he wiper ar ms int
ms into t
o the r
he r eplacement posi-
eplacement posi-
tion
tion #
Switch theve hicle on and then o�. again
immediatel y. #
Within around 15 seconds, press and hold the
î button on the combination switch for
appr oximately thre e seconds (/ page 135).
The wiper arms will mo veinto there placement
position.
R R emo
emo ving t
ving t he wiper blades
he wiper blades #
Foldthe wiper arms away from the wind-
screen. 136
136
Light and sight
Page 141 of 457
Maint
Maint
enance display
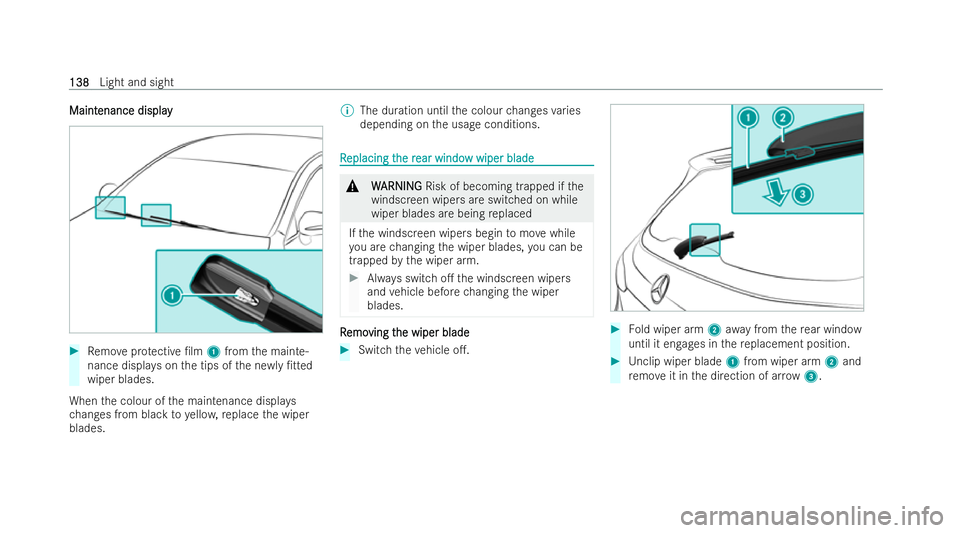
enance display #
Remo veprotective �/lm 1from the mainte-
nance displa yson the tips of the ne wly�/tted
wiper blades.
When the colour of the maintenance displa ys
ch anges from black toyello w, replace the wiper
blades. %
The duration until the colour changes varies
depending on the usage conditions. R
R
eplacing t
eplacing t he r
he rear windo
ear windo w wiper blade
w wiper blade &
W
WARNING
ARNING Risk of becoming trapped if the
windscreen wipers are switched on while
wiper blades are being replaced
If th e windscreen wipers begin tomo vewhile
yo u are changing the wiper blades, you can be
trapped bythe wiper arm. #
Always switch o�. the windscreen wipers
and vehicle before changing the wiper
blades. R R
emo
emo ving t
ving t he wiper blade he wiper blade #
Switch theve hicle o�.. #
Fold wiper arm 2awa y from there ar wind ow
until it engages in there placement position. #
Unclip wiper blade 1from wiper arm 2and
re mo veit in the direction of ar row 3. 138
138
Light and sight
Page 142 of 457
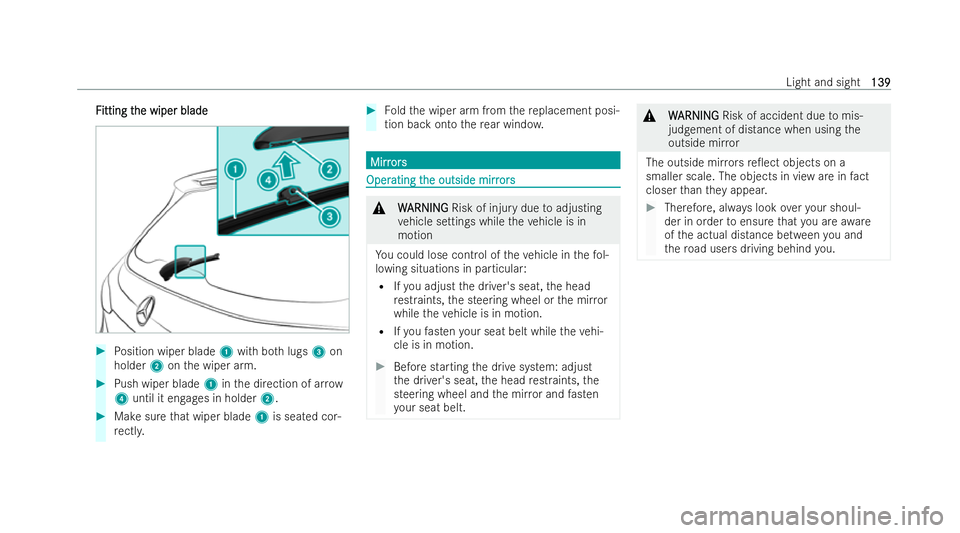
F
F
itting t
itting t he wiper blade
he wiper blade #
Position wiper blade 1with bo thlugs 3on
holder 2onthe wiper arm. #
Push wiper blade 1inthe direction of ar row
4 until it engages in holder 2.#
Make sure that wiper blade 1is seated cor-
re ctl y. #
Foldthe wiper arm from there placement posi-
tion back onto there ar wind ow. Mirr
Mirr
ors
ors Oper
Oper
ating t
ating t he outside mirr
he outside mirr ors
ors &
W WARNI NG
ARNI NGRisk of injury due toadjusting
ve hicle settings while theve hicle is in
motion
Yo u could lose control of theve hicle in thefo l-
lowing situations in particular:
R Ifyo u adjust the driver's seat, the head
re straints, the steering wheel or the mir ror
while theve hicle is in motion.
R Ifyo ufa sten your seat belt while theve hi-
cle is in motion. #
Before starting the drive system: adjust
th e driver's seat, the head restraints, the
stee ring wheel and the mir ror and fasten
yo ur seat belt. &
W WARNING
ARNING Risk of accident due tomis-
judgement of distance when using the
outside mir ror
The outside mir rors re�0ect objects on a
smaller scale. The objects in vi eware in fact
closer than they appear. #
Therefore, alw ays look overyo ur shoul-
der in order toensure that you are aware
of the actual distance between you and
th ero ad users driving behind you. Light and sight
139
139