2022 LINCOLN CORSAIR battery location
[x] Cancel search: battery locationPage 8 of 676
Plug-In Hybrid Vehicle Operation - Plug-In
Hybrid Electric Vehicle (PHEV) .............215
Hybrid Vehicle Frequently Asked Questions ..................................................
216
Fuel and Refueling
Safety Precautions .......................................
218
Fuel Quality - Gasoline ...............................
219
Fuel Quality - Plug-In Hybrid Electric Vehicle (PHEV) ........................................
220
Fuel Filler Funnel Location .......................
220
Running Out of Fuel ....................................
221
Refueling - Plug-In Hybrid Electric Vehicle (PHEV) ........................................................
222
Refueling - Gasoline ...................................
226
Fuel Consumption ......................................
229
Engine Emission Control
Emission Law .................................................
231
Catalytic Converter .....................................
232
High Voltage Battery
General Information ....................................
235
Charging the High Voltage Battery ........
235Transmission
Automatic Transmission - Excluding:
Plug-In Hybrid Electric Vehicle (PHEV)
......................................................................
256
Automatic Transmission - Plug-In Hybrid Electric Vehicle (PHEV) ...........................
261
All-Wheel Drive
Using All-Wheel Drive ................................
265
Brakes
General Information ....................................
270
Hints on Driving With Anti-Lock Brakes .......................................................................
271
Electric Parking Brake .................................
271
Hill Start Assist .............................................
273
Auto Hold ......................................................
274
Reverse Braking Assist
What Is Reverse Braking Assist ...............
276
Reverse Braking Assist Precautions ......
276
Switching Reverse Braking Assist On and Off ................................................................
277
Overriding Reverse Braking Assist .........
277Reverse Braking Assist Indicators
...........
277
Reverse Braking Assist – Troubleshooting ......................................................................
278
Traction Control
Principle of Operation ................................
280
Using Traction Control ...............................
280
Stability Control
Principle of Operation .................................
281
Using Stability Control ...............................
282
Parking Aids
Principle of Operation ................................
283
Rear Parking Aid ..........................................
283
Front Parking Aid ........................................
285
Side Sensing System ..................................
287
Rear View Camera
What Is the Rear View Camera ...............
290
Rear View Camera Precautions ..............
290
Locating the Rear View Camera .............
290
Rear View Camera Guide Lines ..............
290
5
2022 Corsair (CTF) Canada/United States of America, enUSA, Edition date: 202106, First-Printing Table of Contents
Page 72 of 676

WHAT IS PHONE AS A KEY
Phone as a Key allows you to use your phone
in place of a passive key.
You can use your phone for the following
functions:
•
Remote locking and unlocking.
• Passive entry and exit.
• Passive start and drive the vehicle.
• Remote start.
• Memory function recall.
PHONE AS A KEY LIMITATIONS
Limitations can vary based on the make and
model of your phone, phone location and
physical obstructions.
The following items could impact Phone as
a Key performance or prevent functionality
in some cases:
• The typical operating range for Phone as
a Key is 131 ft (40 m). •
Your
Bluetooth® connection is not
enabled, is disrupted, or out of range.
• Your Phone as a Key is not active or
enabled on at least one phone.
• Your vehicle battery has depleted.
• Your phone battery has depleted.
• Interference from other devices using
radio frequencies or physical
obstructions.
• Your phone is too close to metal objects
or other electronic devices.
Note: Do not leave a duplicate coded key
in the vehicle. Always take your keys and
phone and lock all doors when leaving the
vehicle.
PROGRAMMING YOUR PHONE
To program your smartphone as Phone as a
Key:
1. Visit your device's app store to download
the Lincoln Way app. 2.
Create or sign-in to the Lincoln Way app
and add the vehicle identification number
to your account.
3. Once you add the vehicle identification number, follow the prompts in the Lincoln
Way app to complete the Sync Connect
Authorization process.
4. After the vehicle authorizes, you can setup Phone as a Key following the
prompts in the Lincoln Way app.
5. After Phone as a Key is setup, you can setup the Backup Start Passcode by
following the prompts on your
touchscreen.
Note: Keep your new Backup Start Passcode
with you in case of an emergency.
Resetting Phone as a Key
If the Phone as a Key belongs to your
account, you can delete it from your phone.
If not, reset Phone as a Key using the
following steps:
1. Press
Settings on the touchscreen.
2. Press
General.
3. Press
Reset.
69
2022 Corsair (CTF) Canada/United States of America, enUSA, Edition date: 202106, First-Printing Phone as a Key
(If Equipped)
Page 201 of 676
12 Volt DC Power Point
WARNING: Do not plug optional
electrical accessories into the cigar lighter
socket. Incorrect use of the cigar lighter
can cause damage not covered by the
vehicle warranty, and can result in fire or
serious injury.
Note: When you switch the ignition on, you
can use the socket to power 12 volt
appliances with a maximum current rating
of 15 amps.
Note: If the power supply does not work after
you switch the ignition off, switch the ignition
on.
Note: Do not hang any accessory from the
accessory plug.
Note: Do not use the power point over the
vehicle capacity of 12 volt DC 180 watts or
a fuse may blow.
Note: Always keep the power point caps
closed when not in use. Do not insert objects other than an accessory
plug into the power point. This damages the
power point and may blow the fuse.
Run the vehicle for full capacity use of the
power point.
To prevent the battery from running out of
charge:
•
Do not use the power point longer than
necessary when the vehicle is not
running.
• Do not leave devices plugged in
overnight or when you park your vehicle
for extended periods.
USB Port and Power Point Locations
USB Ports and Power Points may be in the
following locations:
• On the lower instrument panel.
• Inside the center console.
• On the front of the center console.
• On the rear of the center console.
• In the cargo area.
• On the passenger side floor panel.
• 3rd row on the quarter trim panels. Note:
Some of the USB ports may not have
data transfer capabilities.
Note: Incorrect use of the USB ports can
cause damage not covered by the vehicle
warranty.
WIRELESS ACCESSORY CHARGER
(IF EQUIPPED) WARNING:
Wireless charging
devices can affect the operation of
implanted medical devices, including
cardiac pacemakers. If you have any
implanted medical devices, we recommend
that you consult with your physician.
Note: For compatible devices with built-in
QI wireless charging capability, the charging
performance may be affected if your device
is in a case. It may be necessary to remove
the case to wirelessly charge your device.
The system supports one Qi wireless
charging compatible device on the charging
area.
198
2022 Corsair (CTF) Canada/United States of America, enUSA, Edition date: 202106, First-Printing Auxiliary Power Points
Page 241 of 676
Note:
Make sure the electrical source meets
the requirements for the high-voltage
batteries to charge.
Make sure that the dual-voltage charging
cord is completely unwrapped before
charging. Always plug the cord into the AC
outlet before connecting the charged coupler
into the charge port on your vehicle.
Note: If the power indicator light is off after
plugging in the dual-voltage charging cord
and you cannot determine a charge status,
use a different outlet.
Note: Store the dual-voltage charging cord
in a clean dry place between the
temperature of -39.9–157.9°F (-40–70°C)
Note: For further information on the
dual-voltage charging cord, please refer to
the user manual provided with the
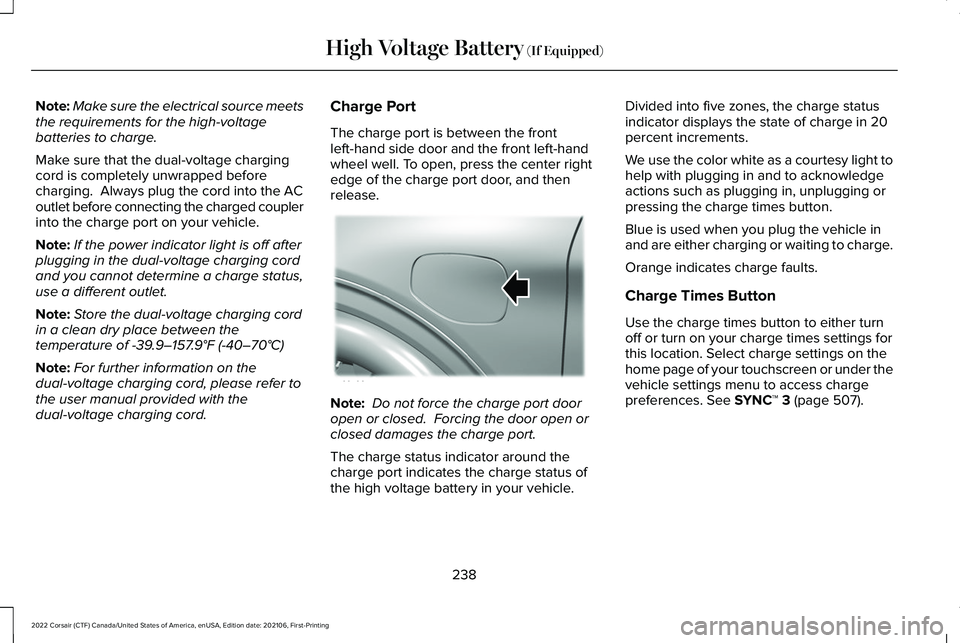
dual-voltage charging cord. Charge Port
The charge port is between the front
left-hand side door and the front left-hand
wheel well. To open, press the center right
edge of the charge port door, and then
release.
Note:
Do not force the charge port door
open or closed. Forcing the door open or
closed damages the charge port.
The charge status indicator around the
charge port indicates the charge status of
the high voltage battery in your vehicle. Divided into five zones, the charge status
indicator displays the state of charge in 20
percent increments.
We use the color white as a courtesy light to
help with plugging in and to acknowledge
actions such as plugging in, unplugging or
pressing the charge times button.
Blue is used when you plug the vehicle in
and are either charging or waiting to charge.
Orange indicates charge faults.
Charge Times Button
Use the charge times button to either turn
off or turn on your charge times settings for
this location. Select charge settings on the
home page of your touchscreen or under the
vehicle settings menu to access charge
preferences.
See SYNC™ 3 (page 507).
238
2022 Corsair (CTF) Canada/United States of America, enUSA, Edition date: 202106, First-Printing High Voltage Battery
(If Equipped)E295258
Page 244 of 676
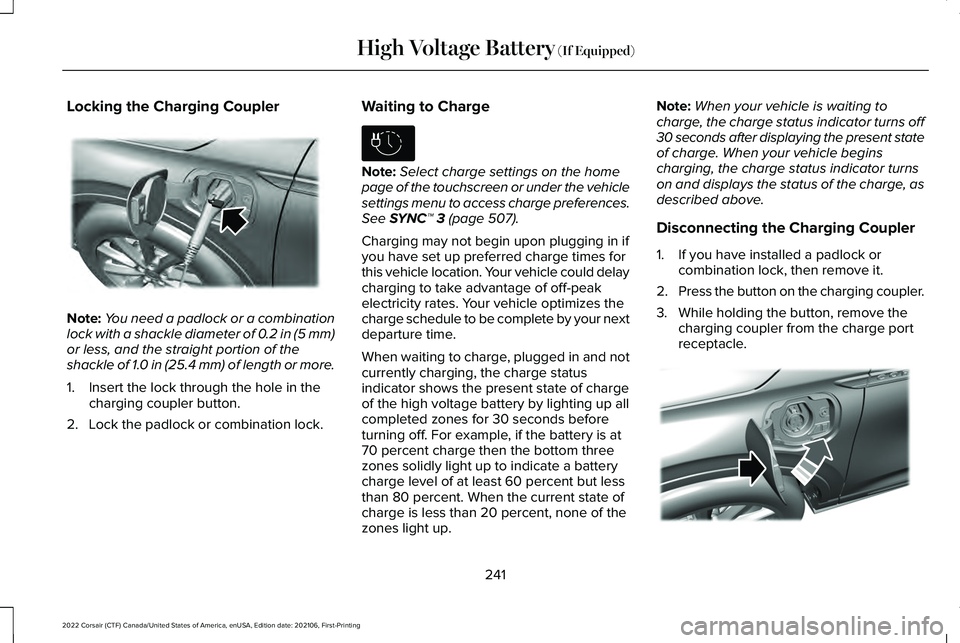
Locking the Charging Coupler
Note:
You need a padlock or a combination
lock with a shackle diameter of 0.2 in (5 mm)
or less, and the straight portion of the
shackle of 1.0 in (25.4 mm) of length or more.
1. Insert the lock through the hole in the charging coupler button.
2. Lock the padlock or combination lock. Waiting to Charge Note:
Select charge settings on the home
page of the touchscreen or under the vehicle
settings menu to access charge preferences.
See SYNC™ 3 (page 507).
Charging may not begin upon plugging in if
you have set up preferred charge times for
this vehicle location. Your vehicle could delay
charging to take advantage of off-peak
electricity rates. Your vehicle optimizes the
charge schedule to be complete by your next
departure time.
When waiting to charge, plugged in and not
currently charging, the charge status
indicator shows the present state of charge
of the high voltage battery by lighting up all
completed zones for 30 seconds before
turning off. For example, if the battery is at
70 percent charge then the bottom three
zones solidly light up to indicate a battery
charge level of at least 60 percent but less
than 80 percent. When the current state of
charge is less than 20 percent, none of the
zones light up. Note:
When your vehicle is waiting to
charge, the charge status indicator turns off
30 seconds after displaying the present state
of charge. When your vehicle begins
charging, the charge status indicator turns
on and displays the status of the charge, as
described above.
Disconnecting the Charging Coupler
1. If you have installed a padlock or combination lock, then remove it.
2. Press the button on the charging coupler.
3. While holding the button, remove the charging coupler from the charge port
receptacle. 241
2022 Corsair (CTF) Canada/United States of America, enUSA, Edition date: 202106, First-Printing High Voltage Battery
(If Equipped)E295451 E306678 E295444
Page 255 of 676
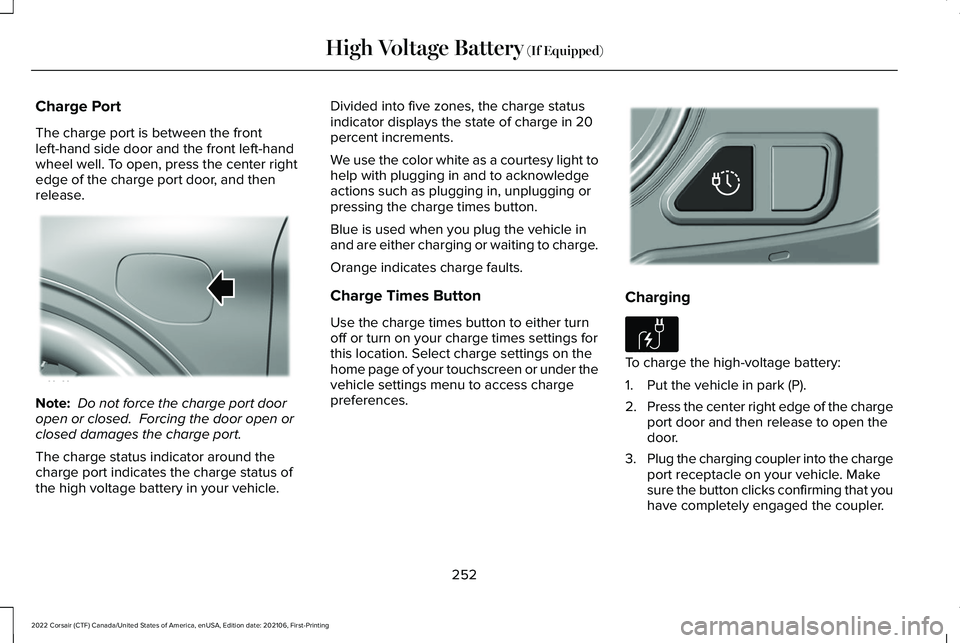
Charge Port
The charge port is between the front
left-hand side door and the front left-hand
wheel well. To open, press the center right
edge of the charge port door, and then
release.
Note:
Do not force the charge port door
open or closed. Forcing the door open or
closed damages the charge port.
The charge status indicator around the
charge port indicates the charge status of
the high voltage battery in your vehicle. Divided into five zones, the charge status
indicator displays the state of charge in 20
percent increments.
We use the color white as a courtesy light to
help with plugging in and to acknowledge
actions such as plugging in, unplugging or
pressing the charge times button.
Blue is used when you plug the vehicle in
and are either charging or waiting to charge.
Orange indicates charge faults.
Charge Times Button
Use the charge times button to either turn
off or turn on your charge times settings for
this location. Select charge settings on the
home page of your touchscreen or under the
vehicle settings menu to access charge
preferences.
Charging
To charge the high-voltage battery:
1. Put the vehicle in park (P).
2.
Press the center right edge of the charge
port door and then release to open the
door.
3. Plug the charging coupler into the charge
port receptacle on your vehicle. Make
sure the button clicks confirming that you
have completely engaged the coupler.
252
2022 Corsair (CTF) Canada/United States of America, enUSA, Edition date: 202106, First-Printing High Voltage Battery (If Equipped)E295258 E301111 E306676
Page 257 of 676
Note:
When charging stops, the charge
status indicator shows all the completed
zones solidly lit up in a blue color for 30
seconds before turning off. For example, if
charging stops at 70 percent, then the
bottom three zones light up solidly to
indicate a battery charge level of at least 60
percent but less than 80 percent. Charging
stops when complete or when paused due
to preferred charge settings or charge
station actions.
Note: If the charge status indicator does not
light up or pulse after plugging in, please
verify that the charge port light setting is On.
If you do not wish to have the charge status
indicator light up at all while charging, then
you can switch it Off. See charge port light
under vehicle settings on your touchscreen. Note:
You can identify charging faults by the
color orange on the charge status indicator.
Faults can occur within the vehicle charging
system or outside the vehicle, such as with
the charge cord, charge station or electrical
supply. Note:
If the system detects a fault in the
vehicle charging system at any point in a
charge cycle, the entire charge status
indicator lights up solidly in an orange color
for 30 seconds and then turns off. If this
happens, unplug the charging coupler and
then plug it back into the charge port
receptacle. If the problem persists, have your
vehicle checked as soon as possible.
Note: If the system detects a fault outside
the vehicle, such as with the charge station
or charge cord, the entire charge status
indicator flashes continuously for 30 seconds
and then turns off. If this happens, check the
charge cord and the charge station or
electrical supply.
Waiting to Charge Note:
Select charge settings on the home
page of the touchscreen or under the vehicle
settings menu to access charge preferences. Charging may not begin upon plugging in if
you have set up preferred charge times for
this vehicle location. Your vehicle could delay
charging to take advantage of off-peak
electricity rates. Your vehicle optimizes the
charge schedule to be complete by your next
departure time.
When waiting to charge, plugged in and not
currently charging, the charge status
indicator shows the present state of charge
of the high voltage battery by lighting up all
completed zones for 30 seconds before
turning off. For example, if the battery is at
70 percent charge then the bottom three
zones solidly light up to indicate a battery
charge level of at least 60 percent but less
than 80 percent. When the current state of
charge is less than 20 percent, none of the
zones light up.
Note:
When your vehicle is waiting to
charge, the charge status indicator turns off
30 seconds after displaying the present state
of charge. When your vehicle begins
charging, the charge status indicator turns
on and displays the status of the charge, as
described above.
254
2022 Corsair (CTF) Canada/United States of America, enUSA, Edition date: 202106, First-Printing High Voltage Battery (If Equipped)E306677 E306678
Page 365 of 676
ROADSIDE ASSISTANCE
Vehicles sold in the United States:
Getting Roadside Assistance
To fully assist you should you have a vehicle
concern, Lincoln offers a complimentary
roadside assistance program. This program
is separate from the New Vehicle Limited
Warranty.
The service is available:
•
Throughout the life of the vehicle for
original owners.
• For six years or 70,000 mi (110,000 km)
(whichever comes first) for subsequent
owners.
Roadside Assistance covers:
• A flat tire change with a good spare
(except vehicles supplied with a tire
inflation kit).
• Battery jump start.
• Lock-out assistance (key replacement
cost is the client's responsibility). •
Fuel delivery — independent service
contractors, if not prohibited by state,
local or municipal law shall deliver up to
2 gal (8 L)
of gasoline fuel to a disabled
vehicle. Roadside Assistance limits fuel
delivery service to two no-charge
occurrences within a 12-month period.
• Winch out — available within 100 ft (30 m)
of a paved or county maintained road,
no recoveries. •
Towing — independent service
contractors, if not prohibited by state,
local or municipal law shall tow Lincoln
eligible vehicles to the client's selling or
preferred dealer within 100 mi (160 km)
of the disablement location or to the
nearest Lincoln dealer. If a client requests
a tow to a selling or preferred dealer that
is more than
100 mi (160 km) from the
disablement location, the client is
responsible for any mileage costs in
excess of
100 mi (160 km).
• Roadside Assistance includes up to $200
for a towed trailer if the disabled eligible
vehicle requires service at the nearest
authorized dealer. If the towing vehicle
is operational but the trailer is not, then
the trailer does not qualify for any
roadside services.
Vehicles Sold in the United States:
Using Roadside Assistance
United States clients who require roadside
assistance, call 1-800-521-4140 or contact
Roadside Assistance using the Lincoln Way
mobile app.
362
2022 Corsair (CTF) Canada/United States of America, enUSA, Edition date: 202106, First-Printing Roadside Emergencies