2022 LINCOLN CORSAIR Rear seat
[x] Cancel search: Rear seatPage 7 of 676

Heated Rear Window
..................................172
Heated Exterior Mirrors ..............................
173
Interior Air Quality
What Is the Cabin Air Filter ........................
174
Locating the Cabin Air Filter ......................
174
Replacing the Cabin Air Filter ...................
174
Seats
Sitting in the Correct Position ...................
175
Head Restraints ............................................
176
Power Seats ...................................................
178
Memory Function .........................................
183
Rear Seats ......................................................
186
Heated Seats ................................................
188
Ventilated Seats ...........................................
189
Rear Occupant Alert System
What is the Rear Occupant Alert System ........................................................................\
191
How Does the Rear Occupant Alert System Work .............................................................
191
Rear Occupant Alert System Precautions ........................................................................\
191 Rear Occupant Alert System Limitations
........................................................................\
191
Switching Rear Occupant Alert System On and Off ........................................................
192
Rear Occupant Alert System Indicators .......................................................................
192
Rear Occupant Alert System Audible Warnings ....................................................
192
Garage Door Opener
What Is the Garage Door Opener ............
193
How Does the Garage Door Opener Work .......................................................................
193
Garage Door Opener Precautions ..........
193
Garage Door Opener Limitations ............
194
Programming the Garage Door Opener to Your Hand-Held Transmitter .................
194
Programming the Garage Door Opener to Your Garage Door Opener Motor ........
195
Programming the Garage Door Opener to Your Gate Opener Motor .......................
195
Clearing the Garage Door Opener ..........
196
Reprogramming the Garage Door Opener .......................................................................
196 Garage Door Opener Radio Frequencies
.......................................................................
196
Auxiliary Power Points
Auxiliary Power Points ................................
198
Wireless Accessory Charger .....................
198
Storage Compartments
Overhead Console ......................................
201
Starting and Stopping the Engine
General Information ...................................
202
Keyless Starting ...........................................
202
Starting a Gasoline Engine .......................
203
Starting a Hybrid Electric Vehicle System ......................................................................
206
Engine Block Heater ..................................
209
Unique Driving Characteristics
Auto-Start-Stop ..............................................
211
Hybrid Vehicle Operation - Hybrid Electric Vehicle (HEV) ............................................
213
4
2022 Corsair (CTF) Canada/United States of America, enUSA, Edition date: 202106, First-Printing Table of Contents
Page 15 of 676

Anti-lock braking system
Avoid smoking, flames or sparks
Battery
Battery acid
Brake fluid - non petroleum based
Brake system
Brake system
Cabin air filter
Check fuel cap Child safety door lock or unlock
Child seat lower anchor
Child seat tether anchor
Cruise control
Do not open when hot
Engine air filter
Engine coolant
Engine coolant temperature
Engine oil Explosive gas
Fan warning
Fasten seatbelt
Flammable
Front airbag
Front fog lamps
Fuel pump reset
Fuse compartment
Hazard flashers
Heated rear window
12
2022 Corsair (CTF) Canada/United States of America, enUSA, Edition date: 202106, First-Printing Introduction E270480 E139223 E141128 E71340 E71880 E231160 E67017
Page 23 of 676

WARNING: You risk death, fire, or
serious injury to yourself and others if you
do not follow the instruction highlighted
by the warning symbol. WARNING:
NEVER use a rearward
facing child restraint on a seat protected
by an ACTIVE AIRBAG in front of it, DEATH
or SERIOUS INJURY to the CHILD can
occur.
On Board Diagnostics Data Link
Connector WARNING: Do not connect wireless
plug-in devices to the data link connector.
Unauthorized third parties could gain
access to vehicle data and impair the
performance of safety related systems.
Only allow repair facilities that follow our
service and repair instructions to connect
their equipment to the data link connector. Your vehicle has an OBD Data Link
Connector that is used in conjunction with a
diagnostic scan tool for vehicle diagnostics,
repairs and reprogramming services.
Installing an aftermarket device that uses the
data link connector during normal driving for
purposes such as remote insurance company
monitoring, transmission of vehicle data to
other devices or entities, or altering the
performance of the vehicle, may cause
interference with or even damage to vehicle
systems. We do not recommend or endorse
the use of unapproved aftermarket plug-in
devices. The vehicle warranty does not cover
damage caused by an aftermarket plug-in
device.
Notice to Owners of Pickup Trucks and
Utility Type Vehicles
WARNING:
Utility vehicles have a
significantly higher rollover rate than other
types of vehicles. WARNING:
Vehicles with a higher
center of gravity (utility and four-wheel
drive vehicles) handle differently than
vehicles with a lower center of gravity
(passenger cars). Avoid sharp turns,
excessive speed and abrupt steering in
these vehicles. Failure to drive cautiously
increases the risk of losing control of your
vehicle, vehicle rollover, personal injury
and death.
Before you drive your vehicle, please read
this Owner’ s Guide carefully. Your vehicle is
not a passenger car. As with other vehicles
of this type, failure to operate this vehicle
correctly may result in loss of vehicle control,
vehicle rollover, personal injury or death.
Using Your Vehicle With a Snowplow
Do not use this vehicle for snowplowing.
Your vehicle does not have a snowplowing
package.
20
2022 Corsair (CTF) Canada/United States of America, enUSA, Edition date: 202106, First-Printing Introduction
Page 32 of 676

•
You are required by law to properly use
child restraints for infants and toddlers in
the United States, Canada and Mexico.
• Many states and provinces require that
small children use approved booster
seats until they reach age eight, a height
of 57 in (1.45 m) tall, or 80 lb (36 kg).
Check your local and state or provincial
laws for specific requirements about the
safety of children in your vehicle.
• When possible, properly restrain children
12 years of age and under in a rear
seating position of your vehicle. Accident
statistics suggest that children are safer
when properly restrained in the rear
seating positions than in a front seating
position.
See Front Passenger Sensing
System (page 55).
• When installing a rear facing child
restraint, adjust the vehicle seats to avoid
interference between the child restraint
and the vehicle seat in front of the child
restraint. INSTALLING CHILD RESTRAINTS
Child Restraints
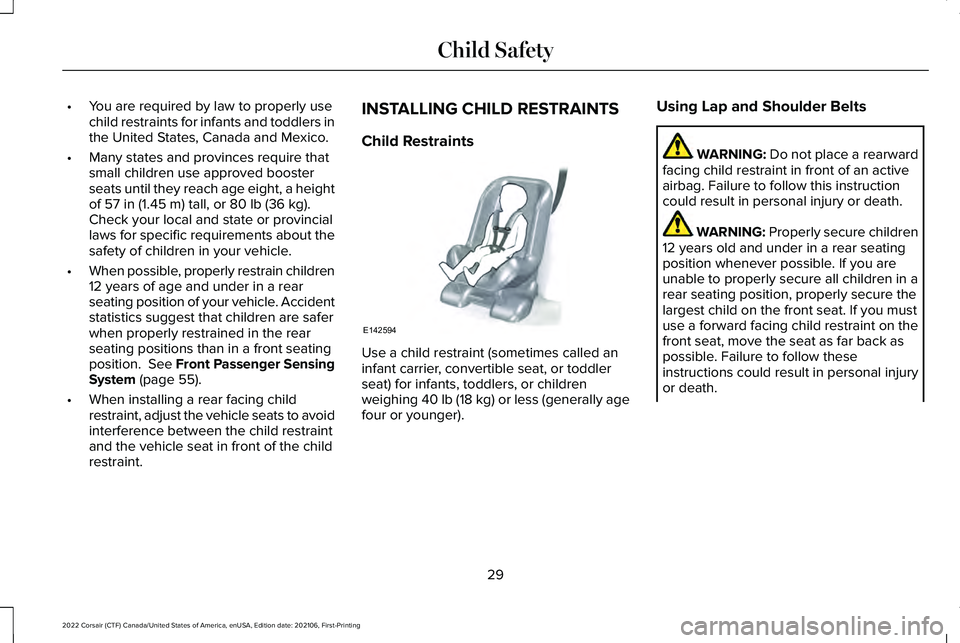
Use a child restraint (sometimes called an
infant carrier, convertible seat, or toddler
seat) for infants, toddlers, or children
weighing
40 lb (18 kg) or less (generally age
four or younger). Using Lap and Shoulder Belts WARNING:
Do not place a rearward
facing child restraint in front of an active
airbag. Failure to follow this instruction
could result in personal injury or death. WARNING:
Properly secure children
12 years old and under in a rear seating
position whenever possible. If you are
unable to properly secure all children in a
rear seating position, properly secure the
largest child on the front seat. If you must
use a forward facing child restraint on the
front seat, move the seat as far back as
possible. Failure to follow these
instructions could result in personal injury
or death.
29
2022 Corsair (CTF) Canada/United States of America, enUSA, Edition date: 202106, First-Printing Child SafetyE142594
Page 33 of 676

WARNING: Depending on where you
secure a child restraint, and depending on
the child restraint design, you may block
access to certain seatbelt buckle
assemblies and LATCH lower anchors,
rendering those features potentially
unusable. To avoid risk of injury, make sure
occupants only use seating positions
where they are able to be properly
restrained.
When installing a child restraint with
combination lap and shoulder belts:
• Use the correct seatbelt buckle for that
seating position.
• Insert the belt tongue into the proper
buckle until you hear a snap and feel it
latch. Make sure the tongue is securely
fastened in the buckle.
• Keep the buckle release button pointing
up and away from the child restraint, with
the tongue between the child restraint
and the release button, to prevent
accidental unbuckling. •
Place the vehicle seat in the upright
position before you install the child
restraint.
• Put the seatbelt in the automatic locking
mode. See Step 5. This vehicle does not
require the use of a locking clip.
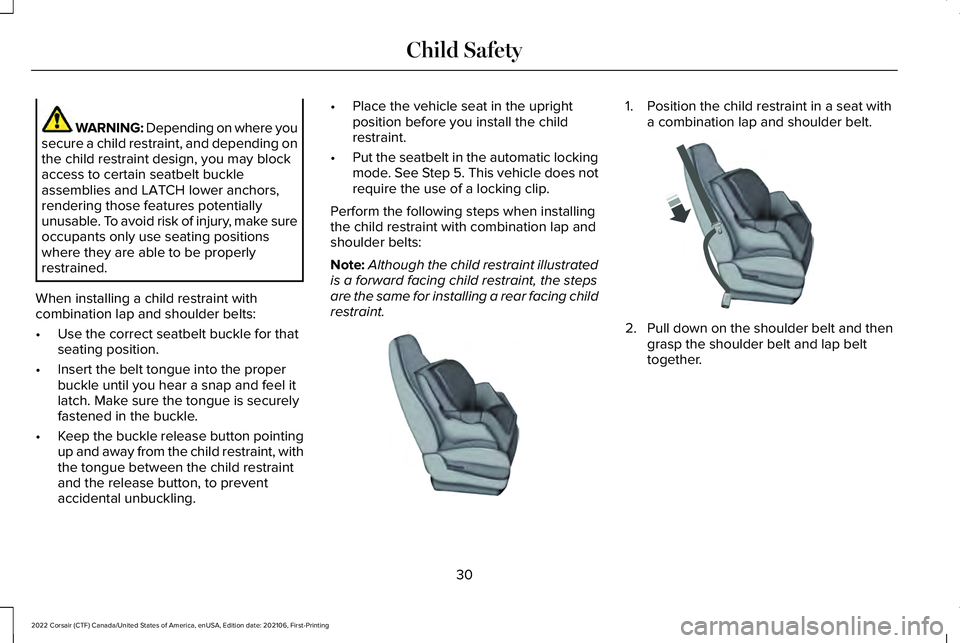
Perform the following steps when installing
the child restraint with combination lap and
shoulder belts:
Note: Although the child restraint illustrated
is a forward facing child restraint, the steps
are the same for installing a rear facing child
restraint. 1. Position the child restraint in a seat with
a combination lap and shoulder belt. 2.
Pull down on the shoulder belt and then
grasp the shoulder belt and lap belt
together.
30
2022 Corsair (CTF) Canada/United States of America, enUSA, Edition date: 202106, First-Printing Child SafetyE142528 E142529
Page 34 of 676

3. While holding the shoulder and lap belt
portions together, route the tongue
through the child restraint according to
the child restraint manufacturer's
instructions. Make sure that you did not
twist the belt webbing. 4. Insert the belt tongue into the proper
buckle (the buckle closest to the direction
the tongue is coming from) for that
seating position until you hear a snap and
feel the latch engage. Make sure the
tongue is latched securely by pulling on
it. 5. To put the retractor in the automatic
locking mode, grasp the shoulder portion
of the belt and pull downward until you
pull all of the belt out.
Note: The automatic locking mode is
available on the front passenger and rear
seats.
6. Allow the belt to retract to remove slack.
The belt clicks as it retracts to indicate it
is in the automatic locking mode.
31
2022 Corsair (CTF) Canada/United States of America, enUSA, Edition date: 202106, First-Printing Child SafetyE142530 E142531 E142875
Page 36 of 676

WARNING: Depending on where you
secure a child restraint, and depending on
the child restraint design, you may block
access to certain seatbelt buckle
assemblies and LATCH lower anchors,
rendering those features potentially
unusable. To avoid risk of injury, make sure
occupants only use seating positions
where they are able to be properly
restrained.
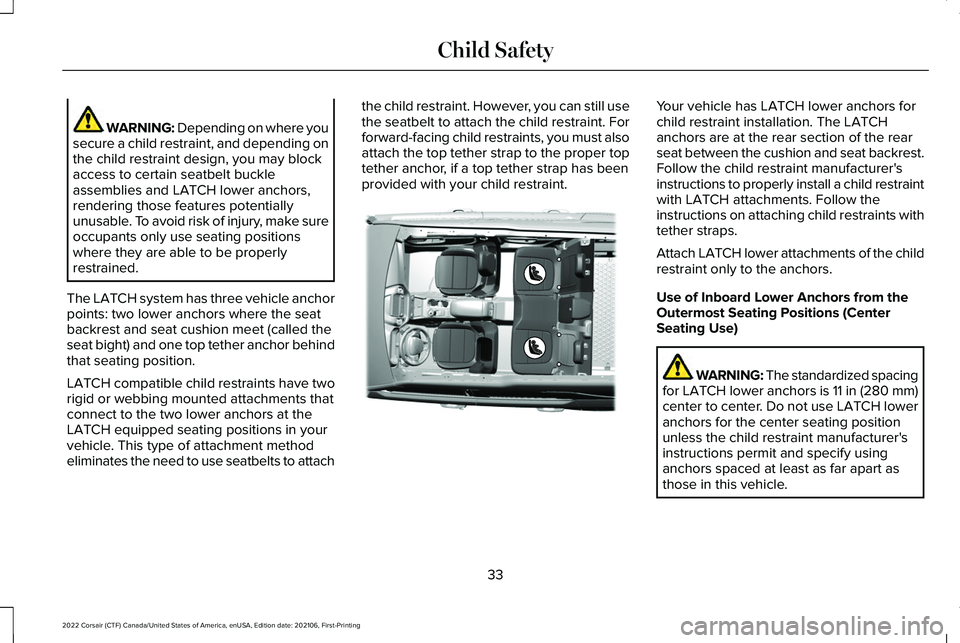
The LATCH system has three vehicle anchor
points: two lower anchors where the seat
backrest and seat cushion meet (called the
seat bight) and one top tether anchor behind
that seating position.
LATCH compatible child restraints have two
rigid or webbing mounted attachments that
connect to the two lower anchors at the
LATCH equipped seating positions in your
vehicle. This type of attachment method
eliminates the need to use seatbelts to attach the child restraint. However, you can still use
the seatbelt to attach the child restraint. For
forward-facing child restraints, you must also
attach the top tether strap to the proper top
tether anchor, if a top tether strap has been
provided with your child restraint. Your vehicle has LATCH lower anchors for
child restraint installation. The LATCH
anchors are at the rear section of the rear
seat between the cushion and seat backrest.
Follow the child restraint manufacturer's
instructions to properly install a child restraint
with LATCH attachments. Follow the
instructions on attaching child restraints with
tether straps.
Attach LATCH lower attachments of the child
restraint only to the anchors.
Use of Inboard Lower Anchors from the
Outermost Seating Positions (Center
Seating Use)
WARNING: The standardized spacing
for LATCH lower anchors is 11 in (280 mm)
center to center. Do not use LATCH lower
anchors for the center seating position
unless the child restraint manufacturer's
instructions permit and specify using
anchors spaced at least as far apart as
those in this vehicle.
33
2022 Corsair (CTF) Canada/United States of America, enUSA, Edition date: 202106, First-Printing Child SafetyE316405
Page 37 of 676

The lower anchors at the center of the
second row rear seat are spaced 18 in
(46 cm) apart. You cannot install a child
restraint with rigid LATCH attachments at the
center seating position. LATCH compatible
child restraints (with attachments on belt
webbing) can only be used at this seating
position provided that the child restraint
manufacturer's instructions permit use with
the anchor spacing stated. Do not attach a
child restraint to any lower anchor if an
adjacent child restraint is attached to that
anchor.
Each time you use the child restraint, check
that the seat is properly attached to the lower
anchors and tether anchor, if applicable. Tug
the child restraint from side to side and
forward and back where it is secured to your
vehicle. The seat should move less than 1 in
(2.5 cm)
when you do this for a proper
installation.
If the child restraint is not anchored properly,
the risk of a child being injured in a crash
greatly increases. Combining Seatbelt and LATCH Lower
Anchors for Attaching Child Restraints
When used in combination, either the
seatbelt or the LATCH lower anchors may
be attached first, provided a proper
installation is achieved. Attach the tether
strap afterward, if included with the child
restraint.
Using Tether Straps
Many forward-facing child
restraints include a tether strap
which extends from the back of the
child restraints and hooks to an anchoring
point called the top tether anchor. Tether
straps are available as an accessory for many
older child restraints.
Contact the manufacturer of your child
restraint for information about ordering a
tether strap, or to obtain a longer tether strap
if the tether strap on your child restraint does
not reach the appropriate top tether anchor
in your vehicle. Once you install the child restraint using
either the seatbelt, the lower anchors of the
LATCH system, or both, you can attach the
top tether strap.
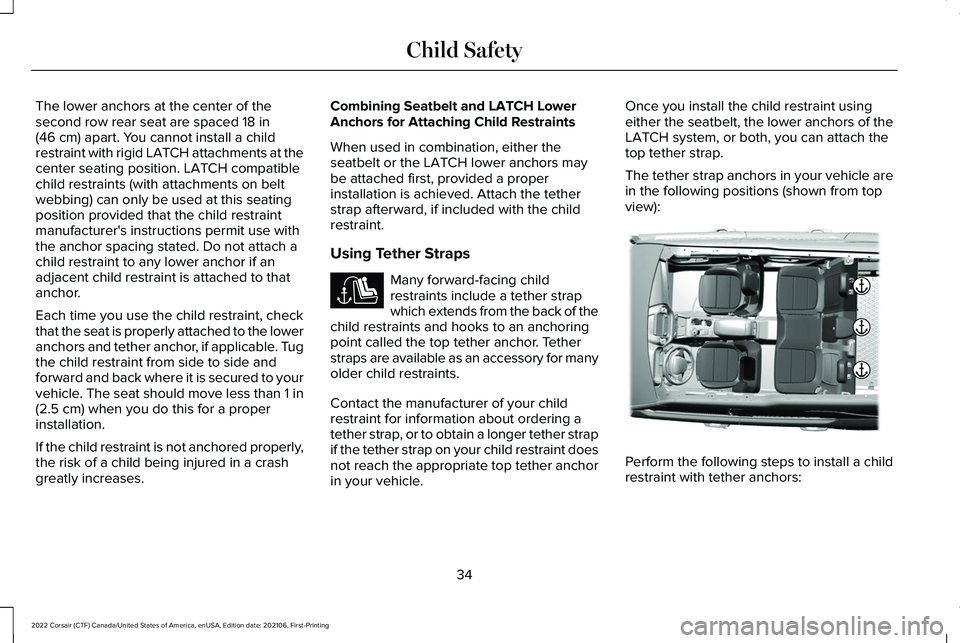
The tether strap anchors in your vehicle are
in the following positions (shown from top
view):
Perform the following steps to install a child
restraint with tether anchors:
34
2022 Corsair (CTF) Canada/United States of America, enUSA, Edition date: 202106, First-Printing Child SafetyE141128 E316413