2022 LEXUS RX350 Turning off
[x] Cancel search: Turning offPage 187 of 508

1854-3. Operating the lights and wipers
4
Driving
Doing so interferes with the sensor detect-
ing the level of ambient light and may cause
the automatic headlight system to malfunc-
tion.
■Automatic light off system
●When the headlights come on: The head-
lights and tail lights tu rn off 30 seconds
after a door is opened and closed if the
engine switch is turned to ACCESSORY
mode or turned off. (The lights turn off
immediately if on the key is pressed
after all the doors are locked.)
●When only the tail lights are on: The tail
lights turn off automatically if the engine
switch is turned to ACCESSORY mode
or turned off and the driver’s door is
opened.
To turn the lights on again, turn the engine
switch to IGNITION ON mode, or turn the
light switch off once and then back to
or .
■Automatic headlight leveling system (if
equipped)
The level of the headlights is automatically
adjusted according to the number of pas-
sengers and the loading condition of the
vehicle to ensure that the headlights do not
interfere with other road users.
■Light reminder buzzer
A buzzer sounds when the engine switch is
turned off or turned to ACCESSORY
mode and the driver’s door is opened while
the lights are turned on.
■Welcome lighting
If the headlight switch is turned to and
the surrounding area is dark, unlocking the
doors using the smart access system with
push-button start or wireless remote con-
trol will turn the parking lights and tail lights
on automatically.
■Windshield wiper linked headlight illu-
mination
When driving during daytime with the
headlight switch turned to , if the wind-
shield wipers are used, the headlights will turn on automatically after several seconds
to help enhance the visibility of your vehicle.
■Battery-saving function
In order to prevent the battery of the vehicle
from discharging, if the headlights and/or
tail lights are on when the engine switch is
turned off the battery saving function will
operate and automatically turn off all the
lights after approximately 20 minutes.
When the engine switch is turned to IGNI-
TION ON mode, the battery-saving func-
tion will be disabled.
When any of the following are performed,
the battery-saving function is canceled
once and then reactivated. All the lights will
turn off automatically 20 minutes after the
battery- saving function has been reacti-
vated:
●When the headlight switch is operated
●When a door is opened or closed
■Customization
Some functions can be customized.
( P.449)
1 With the headlights on, push the
lever away from you to turn on the
high beams.
NOTICE
■To prevent battery discharge
Do not leave the lights on longer than
necessary when the engine is off.
Turning on the high beam head-
lights
Page 189 of 508
1874-3. Operating the lights and wipers
4
Driving
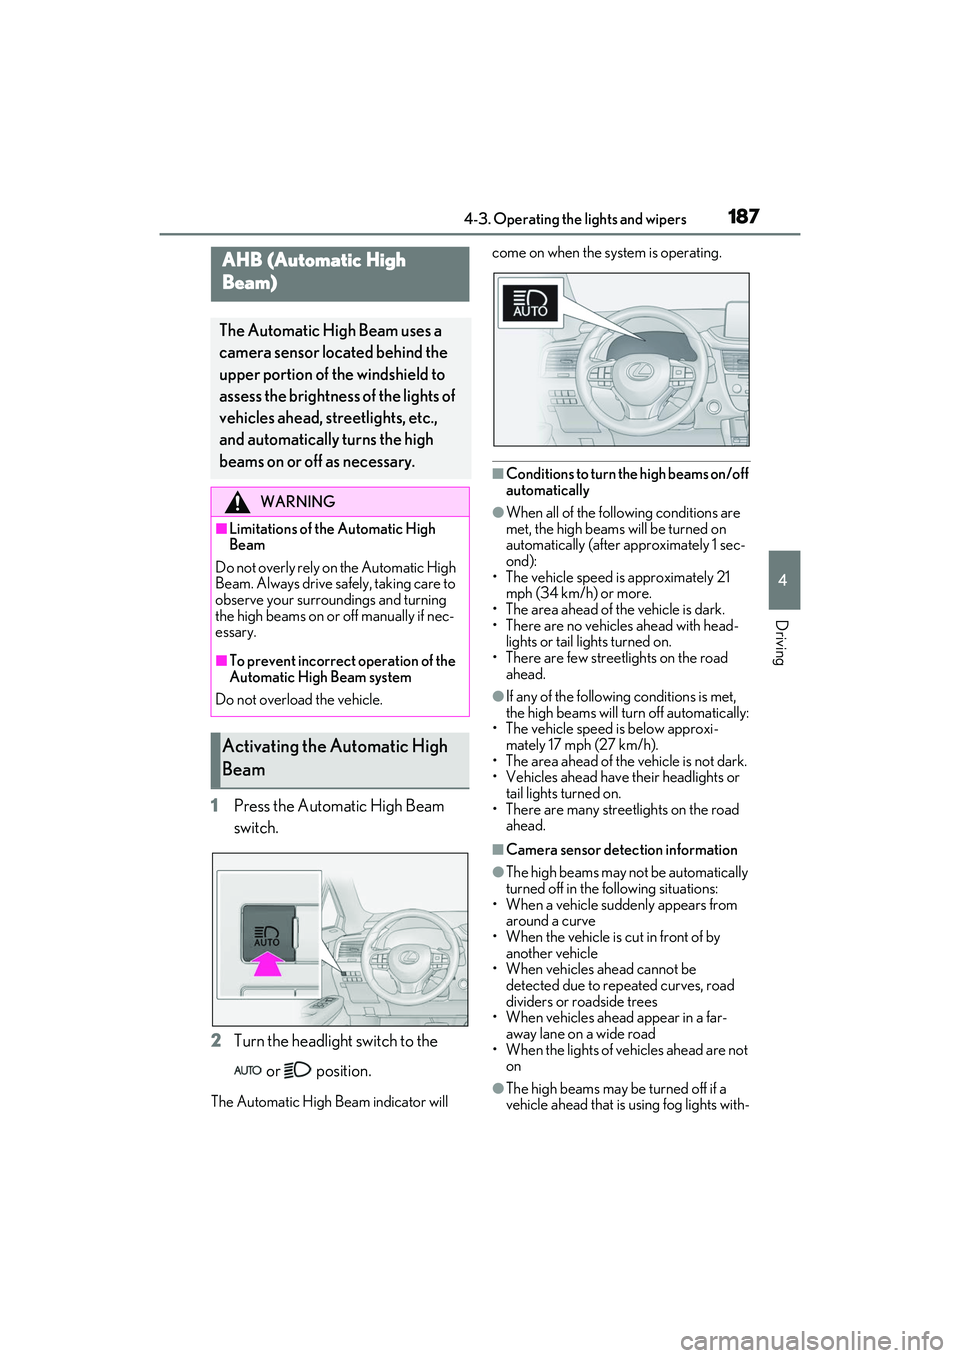
1Press the Automatic High Beam
switch.
2 Turn the headlight switch to the
or position.
The Automatic High Beam indicator will come on when the system is operating.
■Conditions to turn the high beams on/off
automatically
●When all of the follo
wing conditions are
met, the high beams will be turned on
automatically (after approximately 1 sec-
ond):
• The vehicle speed is approximately 21 mph (34 km/h) or more.
• The area ahead of the vehicle is dark.
• There are no vehicles ahead with head- lights or tail lights turned on.
• There are few streetlights on the road ahead.
●If any of the following conditions is met,
the high beams will turn off automatically:
• The vehicle speed is below approxi-
mately 17 mph (27 km/h).
• The area ahead of the vehicle is not dark.
• Vehicles ahead have their headlights or tail lights turned on.
• There are many streetlights on the road ahead.
■Camera sensor dete ction information
●The high beams may not be automatically
turned off in the following situations:
• When a vehicle suddenly appears from around a curve
• When the vehicle is cut in front of by
another vehicle
• When vehicles ahead cannot be detected due to repeated curves, road
dividers or roadside trees
• When vehicles ahead appear in a far- away lane on a wide road
• When the lights of vehicles ahead are not
on
●The high beams may be turned off if a
vehicle ahead that is using fog lights with-
AHB (Automatic High
Beam)
The Automatic High Beam uses a
camera sensor located behind the
upper portion of the windshield to
assess the brightness of the lights of
vehicles ahead, streetlights, etc.,
and automatically turns the high
beams on or off as necessary.
WARNING
■Limitations of the Automatic High
Beam
Do not overly rely on the Automatic High
Beam. Always drive sa fely, taking care to
observe your surroundings and turning
the high beams on or off manually if nec-
essary.
■To prevent incorrect operation of the
Automatic High Beam system
Do not overload the vehicle.
Activating the Automatic High
Beam
Page 191 of 508
1894-3. Operating the lights and wipers
4
Driving
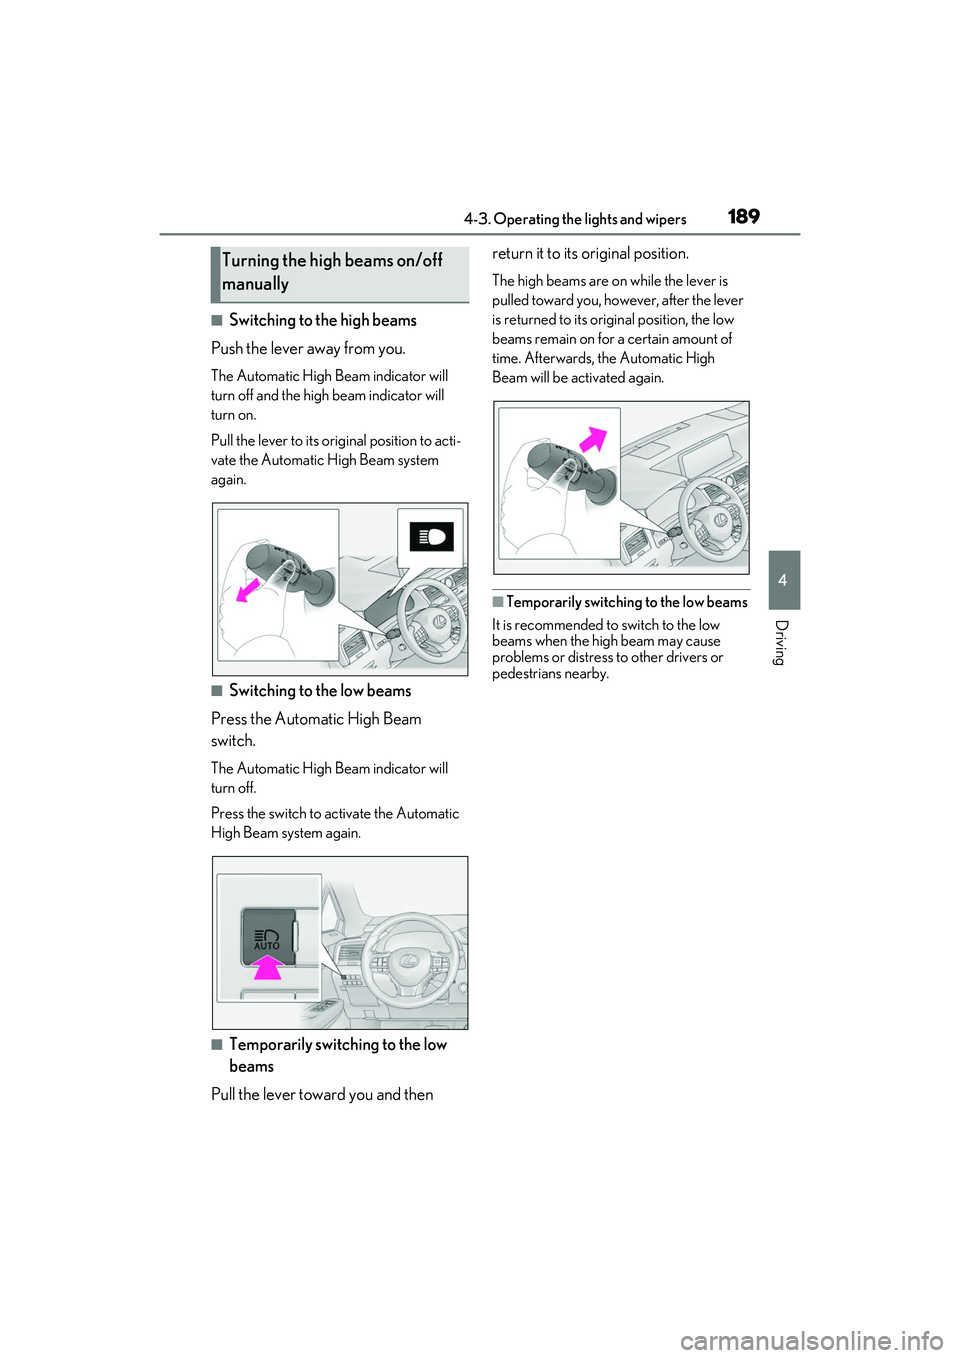
■Switching to the high beams
Push the lever away from you.
The Automatic High Beam indicator will
turn off and the high beam indicator will
turn on.
Pull the lever to its original position to acti-
vate the Automatic High Beam system
again.
■Switching to the low beams
Press the Automatic High Beam
switch.
The Automatic High Beam indicator will
turn off.
Press the switch to activate the Automatic
High Beam system again.
■Temporarily switching to the low
beams
Pull the lever toward you and then return it to its original position.
The high beams are on
while the lever is
pulled toward you, however, after the lever
is returned to its original position, the low
beams remain on for a certain amount of
time. Afterwards, the Automatic High
Beam will be activated again.
■Temporarily switching to the low beams
It is recommended to switch to the low
beams when the high beam may cause
problems or distress to other drivers or
pedestrians nearby.
Turning the high beams on/off
manually
Page 195 of 508
1934-3. Operating the lights and wipers
4
Driving
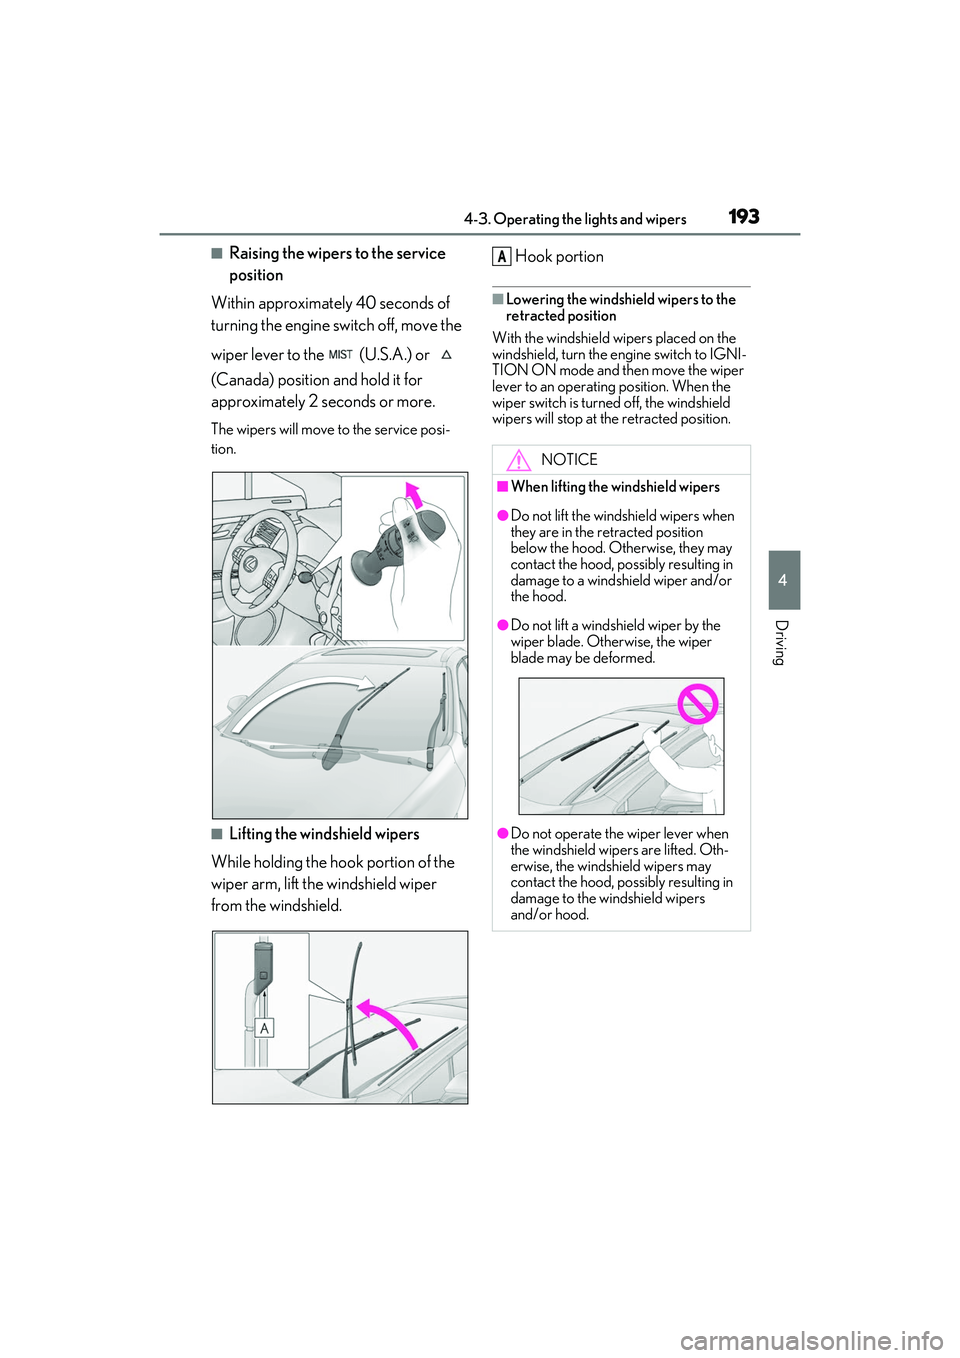
■Raising the wipers to the service
position
Within approximately 40 seconds of
turning the engine switch off, move the
wiper lever to the (U.S.A.) or
(Canada) position and hold it for
approximately 2 seconds or more.
The wipers will move to the service posi-
tion.
■Lifting the windshield wipers
While holding the hook portion of the
wiper arm, lift the windshield wiper
from the windshield. Hook portion
■Lowering the windshield wipers to the
retracted position
With the windshield wipers placed on the
windshield, turn the en gine switch to IGNI-
TION ON mode and then move the wiper
lever to an operating position. When the
wiper switch is turned off, the windshield
wipers will stop at the retracted position.
NOTICE
■When lifting the windshield wipers
●Do not lift the windshield wipers when
they are in the retracted position
below the hood. Otherwise, they may
contact the hood, possibly resulting in
damage to a windshield wiper and/or
the hood.
●Do not lift a windshield wiper by the
wiper blade. Otherwise, the wiper
blade may be deformed.
●Do not operate the wiper lever when
the windshield wipe rs are lifted. Oth-
erwise, the windshield wipers may
contact the hood, possibly resulting in
damage to the windshield wipers
and/or hood.
A
Page 217 of 508
2154-5. Using the driving support systems
4
Driving
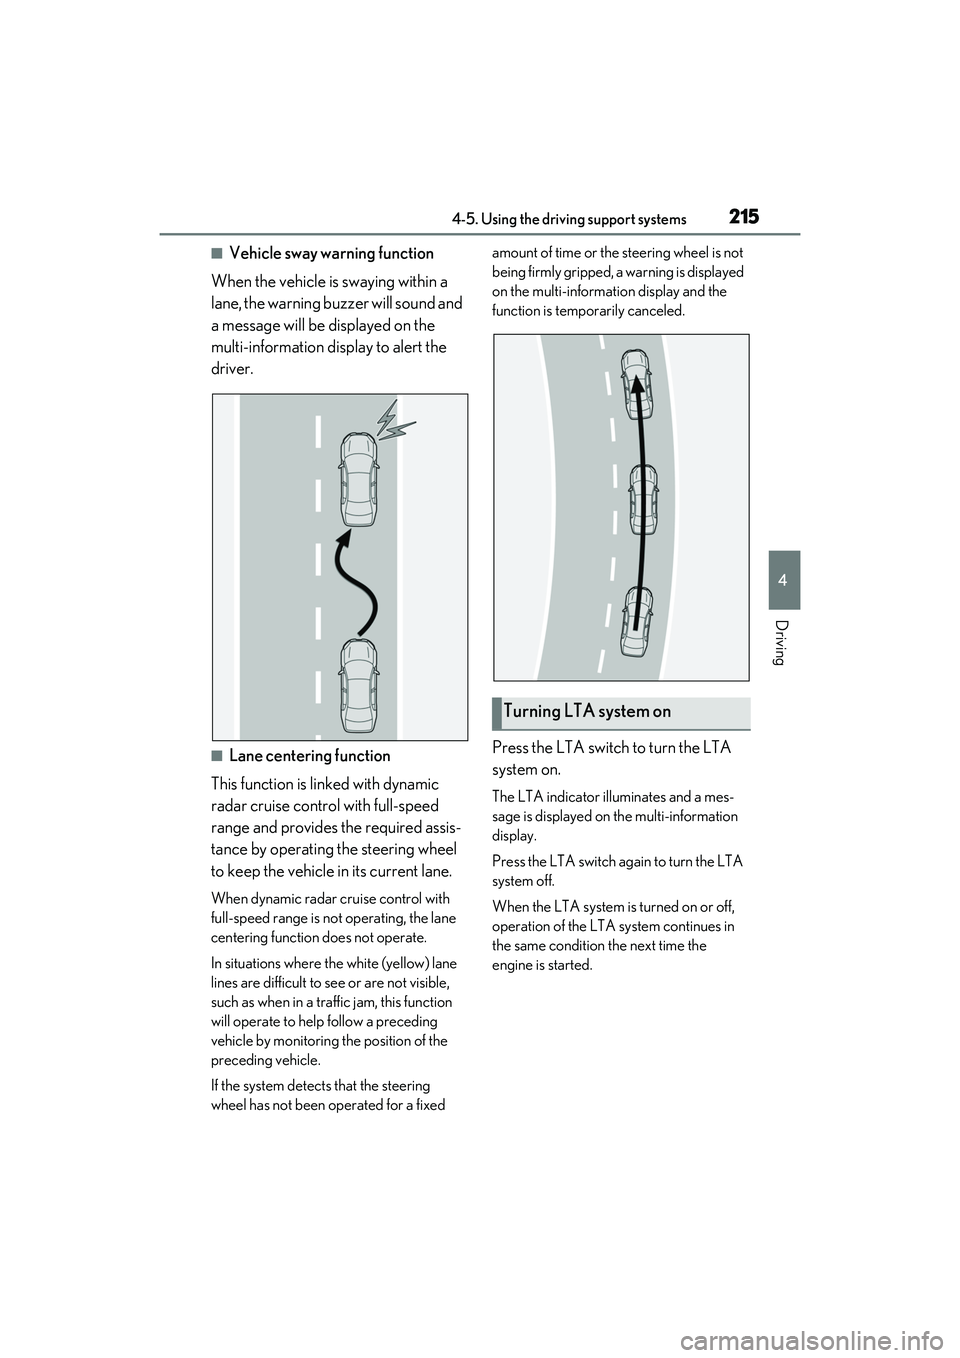
■Vehicle sway warning function
When the vehicle is swaying within a
lane, the warning buzzer will sound and
a message will be displayed on the
multi-information display to alert the
driver.
■Lane centering function
This function is linked with dynamic
radar cruise control with full-speed
range and provides the required assis-
tance by operating the steering wheel
to keep the vehicle in its current lane.
When dynamic radar cruise control with
full-speed range is not operating, the lane
centering function does not operate.
In situations where the white (yellow) lane
lines are difficult to see or are not visible,
such as when in a traffic jam, this function
will operate to help follow a preceding
vehicle by monitoring the position of the
preceding vehicle.
If the system detect s that the steering
wheel has not been operated for a fixed amount of time or the steering wheel is not
being firmly gripped, a warning is displayed
on the multi-informat
ion display and the
function is temporarily canceled.
Press the LTA switch to turn the LTA
system on.
The LTA indicator illuminates and a mes-
sage is displayed on the multi-information
display.
Press the LTA switch ag ain to turn the LTA
system off.
When the LTA system is turned on or off,
operation of the LTA system continues in
the same condition the next time the
engine is started.
Turning LTA system on
Page 223 of 508
2214-5. Using the driving support systems
4
Driving
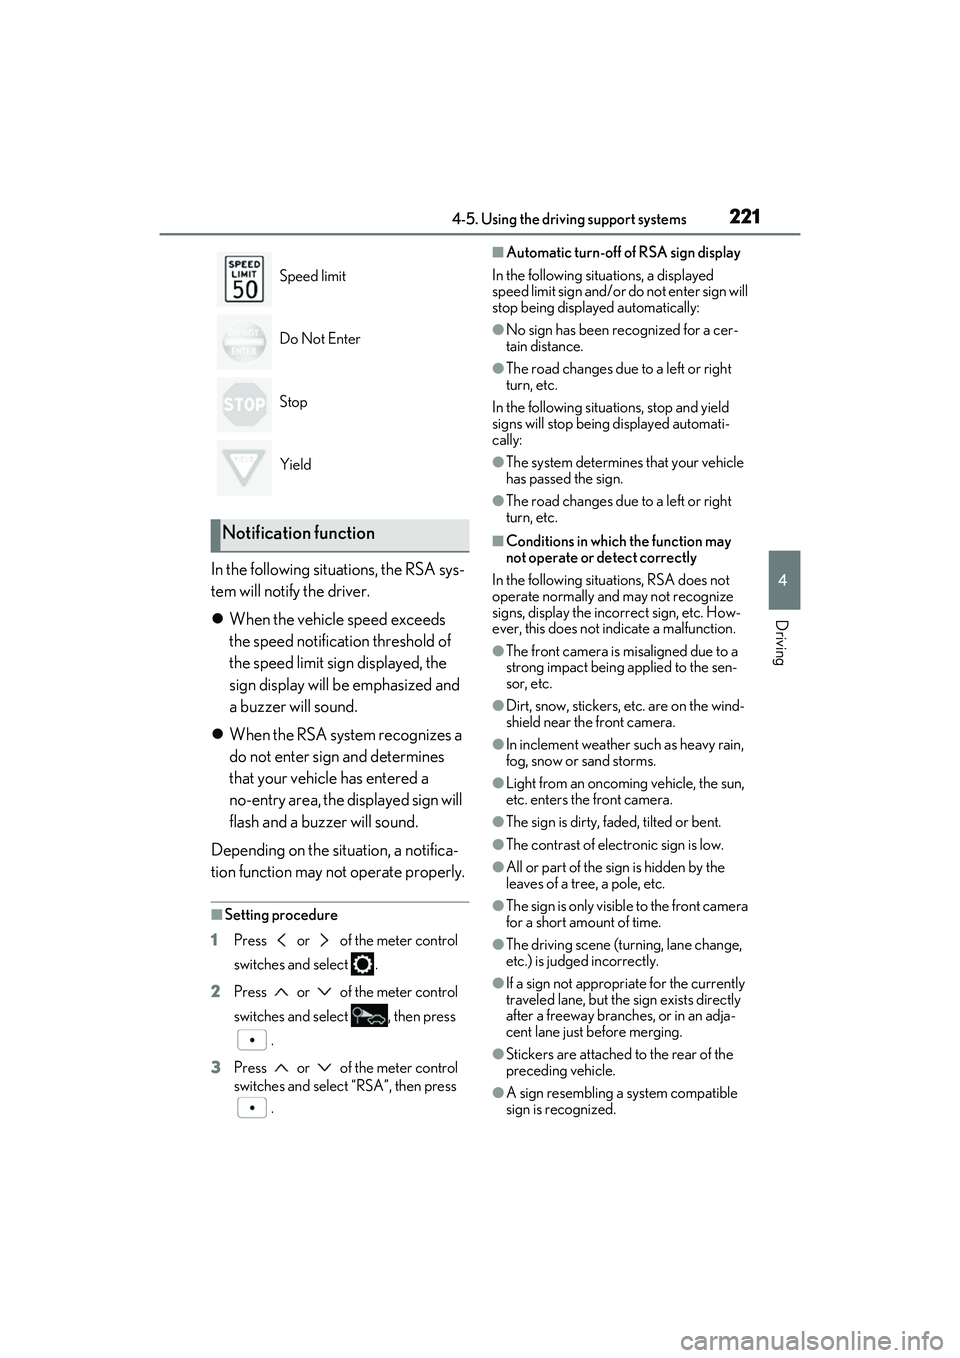
In the following situations, the RSA sys-
tem will notify the driver.
When the vehicle speed exceeds
the speed notification threshold of
the speed limit sign displayed, the
sign display will be emphasized and
a buzzer will sound.
When the RSA system recognizes a
do not enter sign and determines
that your vehicle has entered a
no-entry area, the displayed sign will
flash and a buzzer will sound.
Depending on the situation, a notifica-
tion function may not operate properly.
■Setting procedure
1 Press or of the meter control
switches and select .
2 Press or of the meter control
switches and select , then press
.
3 Press or of the meter control
switches and select “RSA”, then press
.
■Automatic turn-off of RSA sign display
In the following situations, a displayed
speed limit sign and/or do not enter sign will
stop being displayed automatically:
●No sign has been recognized for a cer-
tain distance.
●The road changes due to a left or right
turn, etc.
In the following situations, stop and yield
signs will stop being displayed automati-
cally:
●The system determines that your vehicle
has passed the sign.
●The road changes due to a left or right
turn, etc.
■Conditions in which the function may
not operate or detect correctly
In the following situations, RSA does not
operate normally and may not recognize
signs, display the incorrect sign, etc. How-
ever, this does not indicate a malfunction.
●The front camera is misaligned due to a
strong impact being applied to the sen-
sor, etc.
●Dirt, snow, stickers, etc. are on the wind-
shield near the front camera.
●In inclement weather such as heavy rain,
fog, snow or sand storms.
●Light from an oncoming vehicle, the sun,
etc. enters the front camera.
●The sign is dirty, faded, tilted or bent.
●The contrast of electronic sign is low.
●All or part of the sign is hidden by the
leaves of a tree, a pole, etc.
●The sign is only visible to the front camera
for a short amount of time.
●The driving scene (turning, lane change,
etc.) is judged incorrectly.
●If a sign not appropriate for the currently
traveled lane, but the sign exists directly
after a freeway branches, or in an adja-
cent lane just before merging.
●Stickers are attached to the rear of the
preceding vehicle.
●A sign resembling a system compatible
sign is recognized.
Speed limit
Do Not Enter
Stop
Yield
Notification function
Page 234 of 508

2324-5. Using the driving support systems
*:If equipped
Meter control switches
Turning the Blind Spot Monitor on/off.
Outside rear view mirror indicators
When a vehicle is detected in a blind spot
of the outside rear view mirrors or
approaching rapidly from behind into a
blind spot, the outside rear view mirror
indicator on the detected side will illumi-
nate. If the turn signal lever is operated
toward the detected side, the outside rear
view mirror indicator flashes.
BSM indicator
Illuminates when the Blind Spot Monitor is
enabled
■Outside rear view mirror indicator visi-
bility
In strong sunlight, the outside rear view mir-
ror indicator may be difficult to see.
■When “Blind Spot Monitor Unavailable”
is shown on the multi-information dis-
play
Ice, snow, mud, etc., may be attached to the
rear bumper around the sensors. ( P.232)
The system should return to normal opera-
tion after removing the ice, snow, mud, etc.
from the rear bumper. Additionally, the sen-
sors may not operate normally when driving
in extremely hot or cold environments.
■Customization
Some functions can be customized.
( P.449)
BSM (Blind Spot Monitor)*
The Blind Spot Monitor is a system
that uses rear side radar sensors
installed on the in ner side of the
rear bumper on the left and right
side to assist the driver in confirm-
ing safety when changing lanes.
WARNING
■Cautions regarding the use of the sys-
tem
The driver is solely responsible for safe
driving. Always drive safely, taking care
to observe your surroundings.
The Blind Spot Monitor is a supplemen-
tary function which alerts the driver that a
vehicle is in a blind spot of the outside
rear view mirrors or is approaching rap-
idly from behind into a blind spot. Do not
overly rely on the Blind Spot Monitor. As
the function cannot judge if it is safe to
change lanes, over reliance could lead to
an accident resulting in death or serious
injury.
As the system may not function correctly
under certain conditions, the driver’s own
visual confirmation of safety is necessary.
System components
A
WARNING
■To ensure the system can operate
properly
Blind Spot Monitor sensors are installed
behind the left and right sides of the rear
bumper respectively. Observe the fol-
lowing to ensure the Blind Spot Monitor
can operate correctly.
B
C
Page 235 of 508

2334-5. Using the driving support systems
4
Driving
Use the meter control switches to turn
on/off the function.
1Press or to select .
2 Press or to select and
then press .
WARNING
●Keep the sensors and the surrounding
areas on the rear bumper clean at all
times.
If a sensor or its su rrounding area on the
rear bumper is dirty or covered with
snow, the Blind Spot Monitor may not
operate and a warning message
( P.232) will be displayed. In this situa-
tion, clear off the dirt or snow and drive
the vehicle with the operation conditions
of the BSM function ( P.235) satisfied
for approximately 10 minutes. If the
warning message does not disappear,
have the vehicle inspected by your Lexus
dealer.
●Do not attach stickers to the sensor or
surrounding area on the rear bumper.
●Do not subject a sensor or its sur-
rounding area on the rear bumper to a
strong impact.
If a sensor is moved even slightly off
position, the system may malfunction
and vehicles may not be detected cor-
rectly.
In the following situations, have your
vehicle inspected by your Lexus
dealer.
• A sensor or its surrounding area is subject to a strong impact.
• If the surrounding area of a sensor is scratched or dented, or part of them
has become disconnected.
●Do not disassemb le the sensor.
●Do not modify the sensor or surround-
ing area on the rear bumper.
●If a sensor or the rear bumper needs to
be removed/installed or replaced,
contact your Lexus dealer.
●Do not paint the rear bumper any
color other than an official Lexus color.
Turning the Blind Spot Monitor
on/off