Page 57 of 70

OTHER KEY FEATURES
ALWAYS CHECK THE OWNER ’S MANUAL FOR COMPLETE OPER ATING INFORMATION AND SAFET Y WARNINGS . †LEGAL DISCL AIMERS ON BACK INSIDE COVER*IF EQUIPPED55
OTHER KEY
FEATURES
Smart Key†7
Refer to the inside front cover for more information on QR codes .www .youtube .com/KiaFeatureVideos
Kia Smart & Folding Key Fobs Video
Remote Start Video
QR CODES
•
If the Smar t Key bat ter y is weak or not working properly, hold the Smar t Key fob up to the Engine Star t/Stop but ton (lock but ton side closest) and press to star t engine
•The Smar t Key ’s signal can be blocked by the normal operation of a cellular phone or smar tphone . To help prevent this, store each device separately
•When reinser ting the mechanical key into the fob, make sure it is pushed all the way in until there is a click sound
QUICK TIPS
AB
Unlock
Lock
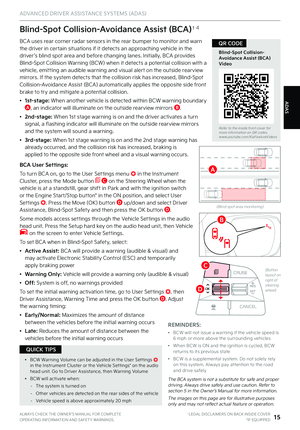
A Press to lock all doors
B Press to unlock driver ’s door . Press twice within 4 seconds to unlock all doors
C Press and hold for more than 1 second to unlock the liftgate and open manually (or automatically if Smart Power Liftgate)
D Press and hold more than half a second for panic alarm . To turn off alarm, press any button
E Press to release mechanical key F
G
Remote Start: Press for more than two (2) seconds within four (4) seconds after locking doors to start the vehicle . Press once to turn off
Driver ’s Door Lock/Unlock Button H :
To unlock door(s):
•Press button once to unlock driver ’s door
•Press again within 4 seconds to unlock all doors
To lock all doors:
•Press again to lock all doors
Mechanical Key:
•Use to unlock/lock driver ’s door:
1 . Remove door handle keyhole cover with mechanical key by pressing up into slot in the bottom of the handle as shown I
2 . Insert mechanical key J and turn left to unlock driver ’s door
3 . Insert mechanical key J and turn right to lock driver ’s door
4 . Return mechanical key to its original location
•Use to lock and unlock glove box
HOLD
HOLD
HOLD
CDE
F
G
H
I
J
REMINDERS:
•
The liftgate unlocks when the Smar t Key is within close proximit y of the vehicle
•
Remote but ton configuration may var y depending on vehicle options
•
Repeated removal could ruin the integrit y of the keyhole cover
See section 4 in the Owner’s Manual for more information .
For illustrative purposes only . Your actual display, buttons and/or features may vary .
Page 58 of 70

OTHER KEY FEATURES
OTHER KEY
FEATURES
Smart Power Liftgate*†16
Refer to the inside front cover for more information on QR codes .www .youtube .com/KiaFeatureVideos
Smart Power Liftgate Video
QR CODE
•To cancel the Smar t Power Liftgate while automatically opening or closing, press any but ton on the Smar t Key fob
QUICK TIP
REMINDERS:
•
When closing, be mindful of any objects or persons
•All doors are closed and locked after about 15 seconds
•
The Smar t Power Liftgate feature will not operate when the following occurs:
–Doors are recently closed and locked
–The Smar t Key is still detected after 15 seconds near the vehicle or within 60 inches of the door handles
–A door is not locked or closed
–The Smar t Key is in the vehicle
•
Pulling the Liftgate upward by the handle or pressing the but ton a second time will interrupt the automatic opening of the Smar t Power Liftgate
See section 4 in the Owner’s Manual for more information .
For illustrative purposes only . Your actual display, buttons and/or features may vary .
(But ton located on driver ’s panel, left of the steering wheel)
(located inside Liftgate lid)
The Smart Power Liftgate can be operated from several controls to either open, close or lock the Liftgate .
To turn the Smart Power Liftgate features ON, go to the User Setting mode in the LCD Instrument Cluster Modes, select DOOR and set to ON .
The Smart Power Liftgate will close the Liftgate, lock all doors and Liftgate and then arm the vehicle .
Opening from Inside the Vehicle:
Press and hold the Smart Power Liftgate Open/Close button* A to automatically open/close the Liftgate .
Opening from Outside the Vehicle:
To open the Smart Power Liftgate* automatically, press the Liftgate Release button B on the exterior of the Liftgate .
Automatically close by pressing the Smart Power Liftgate Close button* C located inside the Liftgate lid .
A
B
C
†LEGAL DISCL AIMERS ON BACK INSIDE COVER*IF EQUIPPED56TELLURIDE FEATURES & FUNCTIONS GUIDE
Page 59 of 70

See section 4 in the Owner’s Manual for more information .
Refer to the inside front cover for more information on Q")
OTHER KEY FEATURES
OTHER KEY
FEATURES
Smart Power Liftgate*† 16 (continued)
See section 4 in the Owner’s Manual for more information .
Refer to the inside front cover for more information on QR codes .www .youtube .com/KiaFeatureVideos
Kia Smart & Folding Key Fobs Video
QR CODE
E
•The liftgate must be unlocked before it can be opened by the liftgate Release but ton
•The liftgate unlocks automatically and then can be opened manually when the Smar t Key is within close proximit y to the vehicle
QUICK TIPS
REMINDERS:
•
Smar t Power Liftgate may be damaged if at tempting to open or close manually
•When not in use, keep the Liftgate Lid Control but ton in the OFF position
•
If going through a car wash, remind the at tendant to keep the vehicle in Neutral (N) and keep the engine running . Also, disable the Smar t Power Liftgate lid control using the but ton inside the glove compar tment, turn off the auto rain-sensing wipers and fold in the mirrors
•
Ensure all obstacles are out of the way of the liftgate lid when operating the Smar t Power Liftgate
•The default liftgate opening/closing speed is set to fast
•
The liftgate opening/closing speed set ting cannot be changed when the Power Liftgate function is turned off or if the liftgate is not completely closed
Opening with no-touch activation:
When the Smart Key fob is on your person and you are near the back of the
vehicle, within close proximity, the hazard lights will blink and a chime will sound for about 3 seconds as an alert that the Smart Power Liftgate* is about to open .
Then the alert system will blink and chime two additional times before opening the Smart Power Liftgate* .
The Smart Power Liftgate* feature is OFF by default . To enable the Smart Power Liftgate*, go to User Settings in the LCD Instrument Cluster modes .
Smart Key:
To open the Smart Power Liftgate*, press and hold the Smart Key Liftgate button E until the Liftgate begins opening . Press again and hold to close .
Power Liftgate Height Adjustment:
For your convenience, the liftgate opening height is adjustable . To program the opening height, per form the following:
1 . Open liftgate and manually position the liftgate to your preferred opening height
2 . Depress and hold the close button on the liftgate for 3 seconds or more
3 . Once the system sounds the alert that the programming is complete, manually close the liftgate
Power Liftgate Opening/Closing Speed Setting:
Go to the User Settings in the Instrument Cluster . Select Door, then Power Liftgate Speed, and select Fast or Normal .
HOLDHOLD
ALWAYS CHECK THE OWNER ’S MANUAL FOR COMPLETE OPER ATING INFORMATION AND SAFET Y WARNINGS . †LEGAL DISCL AIMERS ON BACK INSIDE COVER*IF EQUIPPED57
Page 60 of 70

UVO
FRONTREAR
ONOFFDOOR
Automatic Turn Off Function
The interior lights automatically turn off approximately 20 seconds after the Engine Start/Stop button is
turned OFF
.
Map/Room Lamp Operation
Map Lamps – These lights produce spot beams for convenient use as map lamps or as personal lamps for the driver or the front passenger . Press the buttons A to turn the map lamps ON/OFF .
Room button – Press the button B to turn the front and rear lamps ON/OFF .
Door button – When the Door button C is pressed the front and rear lamps will turn ON as follows:
•When a door is opened or doors are unlocked with the Smart Key, the lamps will turn ON for approximately 30 seconds
•If the Engine Start/Stop button is in the ACC/OFF position and a door is open, the lamps will stay ON for approximately 20 minutes
•If the Engine Start/Stop button is in the ACC/ON position and a door is open, the lamps will stay ON
The lamps will turn OFF immediately if the Engine Start/Stop button is turned ON or all doors are locked .
OTHER KEY FEATURES
Map/Room Lamps
See section 4 in the Owner’s Manual for more information .
*IF EQUIPPED58TELLURIDE FEATURES & FUNCTIONS GUIDE
A
BC
A
OTHER KEY
FEATURES
•
When doors are unlocked by the Smar t Key, the lamp turns ON for approximately 30 seconds
•
If your vehicle is equipped with the theft alarm system, the interior lights automatically turn off approximately 3 seconds after the system is in armed stage
•
Using interior lights for an extended period of time may cause bat ter y discharge
QUICK TIPS
REMINDER: When room lamp lens is pressed ON it will remain ON, even when the map lamp switch is in the OFF position .
(Overhead lamp console)
Page 61 of 70

UVO
FRONTREAR
ONOFFDOOR
The sunroof and sunshade operation is controlled by a multidirectional switch/lever for the front and rear sunroofs
. The ignition needs to be in the ON position to operate the sunroof/sunshade .
Slide the sunshade and sunroof A :
Auto Open – Slide lever backward to the farthest position and release .
Auto Close – Slide the lever forward to the farthest position and release (manually close the Sunshade) .
Tilt the sunroof (front only) A :
Raise – Press lever upward
Lower – Push lever forward
Slide the rear sunshade B :
Auto Open – Slide the lever backward
Auto Close – Slide the lever forward
OTHER KEY FEATURES
See section 4 in the Owner’s Manual for more information .
Your vehicle’s sunroof controls may differ from that in the illustration .
Sunroof Operation*
Refer to the inside front cover for more information on QR codes .www .youtube .com/KiaFeatureVideos
Sunroof Operation Video
QR CODE
Refer to the inside front cover for more information on QR codes .www .youtube .com/KiaFeatureVideos
Cargo Cover & Storage Video
QR CODE
ALWAYS CHECK THE OWNER ’S MANUAL FOR COMPLETE OPER ATING INFORMATION AND SAFET Y WARNINGS . *IF EQUIPPED59
AB
OTHER KEY
FEATURES
•To stop the sunroof/sunshade at any position, press or pull the sunroof control lever in any direction
QUICK TIP
•Inser t the third-row seat belts into the retaining clips on the left and right sides before removing/installing Cargo Cover
QUICK TIP
REMINDERS:
•When closing, be mindful of any objects or persons
•
Sunshade must remain OPEN while sunroof is open
•
If the ignition is turned off with the Sunroof not fully closed, the Instrument Cluster LCD will display a warning message and a chime will sound for a few seconds
•
Do not adjust the sunroof or sunshade while driving . This could result in loss of control of the vehicle
(But ton located within overhead lamp console)
Cargo Cover Storage*
To store the Cargo Cover*, close the Cargo Cover and remove it from the slots by pulling the Cargo Cover ends inward C . Remove the luggage box cover .
On the left side, remove the small storage cover D to expose the Cargo Cover storage slot . Insert the Cargo Cover on the right side first . Compress the left end of the Cargo
Cover to slide it into the left slot . Replace the small storage cover and the luggage box cover .
C
D
(View from the rear looking in;left end of the cover shown)
Page 62 of 70

OTHER KEY FEATURES
Refer to the inside front cover for more information on QR codes .www .youtube .com/KiaFeatureVideos
HomeLink® Support Video
QR CODE
REMINDERS:
•
A ladder may be needed to access the garage door opener
•A second person may be needed to help
•Some of the steps are time sensitive
OTHER KEY
FEATURES
•If the indicator C flashes rapidly in red continuously, but if the garage door opener does not operate, please continue to follow Rolling Code Programming steps below
QUICK TIP
•Erasing programmed but tons will delete all trained transmitters
QUICK TIP
A HomeLink® button
B HomeLink® button
C Indicator light
D HomeLink® button
E Glare detection sensor
F Automatic dimming ON
G Automatic dimming OFF
Auto-Dimming Rearview Mirror
Designed to help reduce glare from a vehicle’s headlights located in the rear and also connect up to three electronic transmitters in one location . Press the on/off button F to turn the auto-dimming function on or off .
How to Sync Transmitter
1 . Press and release A , B or D button
–If the indicator C flashes slowly in red, go to Step 3 (Programming)
–If the indicator C is continuously turned ON or flashes rapidly in red several times, go to Step 2 (Erasing)
2 . Press and hold the button you wish to erase the program for approximately 15-25 seconds until the LED flashes slowly in Red
3 . Hold the Garage Door Opener Original Transmitter near the HomeLink Mirror
4 .
Press and hold the desired button (A , B or D ) and the Original Transmitter button until the indicator C is turned on continuously or flashes rapidly in red . This indicates the programming is completed
To complete programming of a Rolling Code garage door opener:
1 . Firmly press and release the “Learn,” “Smart,” or “Program” button of the garage door opener while the indicator C flashes slowly in red . Once the button is pressed, you have approximately 30 seconds to initiate the next step
2 . Return to the vehicle and firmly press and hold the HomeLink button for two seconds and release . Repeat this up to three times to complete the programming . Do not press the HomeLink button rapidly . At this point, programming is complete and your device should operate
Operating HomeLink®: Press one of the programmed HomeLink® buttons .
Erasing programmed buttons: Press and hold the left A and center D buttons simultaneously for approximately 20 seconds, until the indicator light begins to flash, and then release both buttons within 30 seconds .
HomeLink® with Auto-Dimming Rearview Mirror*†3
For more information, go to HomeLink .com or call (800) 355-3515 .
See section 4 in the Owner’s Manual for more information .
REMINDER: Mirror indicator light will illuminate when automatic dimming is on .
ABCDEFG
†LEGAL DISCL AIMERS ON BACK INSIDE COVER*IF EQUIPPED60TELLURIDE FEATURES & FUNCTIONS GUIDE
Page 63 of 70
(Located inside of Hood’s center)
OTHER KEY FEATURES
REMINDERS:
•
Sunvisor may not shield all direct light
•
Sunvisor may impair visibilit y if not adjus")
(Located on Driver side kick panel)(Located inside of Hood’s center)
OTHER KEY FEATURES
REMINDERS:
•
Sunvisor may not shield all direct light
•
Sunvisor may impair visibilit y if not adjusted properly
•
Be aware of seating position when adjusting or swinging sunvisor around to or from the front or side windows
•
Do not operate the vehicle if the sunvisor is impairing your visibility
REMINDERS:
•While lowering and closing, keep hands away from under the Hood
•
Open the Hood only after turning the engine off, on a flat sur face, with the gear shift in P (Park) position and set ting the parking brake
•Make sure the hood is securely closed before driving
OTHER KEY
FEATURES
B
B
Sunvisor†1 8
Use the sunvisor to shield direct light through the front or side windows . Slide the sunvisor out and adjust as needed .
See section 4 in the Owner’s Manual for more information .
Opening the Hood:
1 .
Pull the hood release lever A to unlatch the hood
2 . In the front of the vehicle, lift the hood slightly, push the secondary latch B to the left inside of the hood’s center and lift the hood
Closing the Hood:
Lower the hood about halfway and then release hood to drop into place and securely latch .
Hood Release Lever and Latch
A
See section 4 in the Owner’s Manual for more information .
ALWAYS CHECK THE OWNER ’S MANUAL FOR COMPLETE OPER ATING INFORMATION AND SAFET Y WARNINGS . †LEGAL DISCL AIMERS ON BACK INSIDE COVER*IF EQUIPPED61
Page 64 of 70

*IF EQUIPPED62TELLURIDE FEATURES & FUNCTIONS GUIDE
CB
DREMINDER: The fuel filler lid lock will unlock/open only when driver ’s side door is unlocked .
See section 4 in the Owner’s Manual for more information .
•Place the Fuel Cap on the inside of the Fuel Filler Lid when fueling D
QUICK TIP
Fuel Cap / Malfunction Indicator (Check Engine Light)
To access the Fuel Cap, press the Fuel Filler Lid to open . Tighten for ONE CLICK to prevent malfunction indicator from illuminating .
Fuel Filler Lid Release
To open the Fuel Filler lid:
1 . Press the right edge of the Fuel Filler lid A
2 . Pull the Fuel Filler lid out to fully open B
To open the Fuel Cap, turn it counterclockwise C
See section 4 in the Owner’s Manual for more information .
Refer to the inside front cover for more information on QR codes .www .youtube .com/KiaFeatureVideos
One-Click Fuel Cap Video
QR CODE
REMINDER: It is normal operation when tightening to hear one click and then when Fuel Cap is released, it clicks back .
A
OTHER KEY FEATURES
OTHER KEY
FEATURES