Page 25 of 70

ALWAYS CHECK THE OWNER ’S MANUAL FOR COMPLETE OPER ATING INFORMATION AND SAFET Y WARNINGS . †LEGAL DISCL AIMERS ON BACK INSIDE COVER*IF EQUIPPED23
Re")
ADAS
ADVANCED DRIVER ASSISTANCE SYSTEMS (ADAS)
ALWAYS CHECK THE OWNER ’S MANUAL FOR COMPLETE OPER ATING INFORMATION AND SAFET Y WARNINGS . †LEGAL DISCL AIMERS ON BACK INSIDE COVER*IF EQUIPPED23
Rear View Monitor (RVM)†4
Rear View Monitor is a supplemental system that displays the view behind the vehicle through the Navigation screen* while the vehicle is in Reverse .
Rear View Monitor activates when the:
•Engine Start/Stop button is in the ON position
•Gear Shift Lever is in the R (Reverse) position
REMINDERS:
•
Rear View Monitor is not a substitute for proper and safe backing-up procedures
•
Rear View Monitor may not display ever y object behind the vehicle
•
Always drive carefully and use caution when backing up
•
Through normal use and after inclement weather or washing, the rear camera may become dir t y . Use a clean, microfiber cloth to remove any dir t, debris or spots that may have accumulated on the lens
•
While the Rear View Monitor is active the volume will be lowered on all audio modes
See section 4 in the Owner’s Manual for more information . Images are for illustrative purposes only and may not reflect actual feature or operation .P
R
N
DSHIFTL OCK
RELEASE
Page 26 of 70

†LEGAL DISCL AIMERS ON BACK INSIDE COVER*IF EQUIPPED24TELLURIDE FEATURES & FUNCTIONS GUIDE
REMINDERS:
•
The SVM camera is equipped with an optical")
ADAS
ADVANCED DRIVER ASSISTANCE SYSTEMS (ADAS)
†LEGAL DISCL AIMERS ON BACK INSIDE COVER*IF EQUIPPED24TELLURIDE FEATURES & FUNCTIONS GUIDE
REMINDERS:
•
The SVM camera is equipped with an optical lens to provide a wider range of vision and may appear different from the actual distance . The Surround View Monitor system is only a supplemental device . Drivers should not rely solely on the SVM information when parking and backing up . Drivers should always pay at tention and directly check the left/right and rear
•
While SVM is active the volume will be lowered on all audio modes
•
Through normal use and after washing or inclement weather, the rear camera may need cleaning . Use a clean, microfiber cloth to remove any dir t, debris or spots that may have accumulated on the lens .
Images are for illustrative purposes only and may not reflect actual feature or operation .
See section 4 in the Owner’s Manual for more information .
(But ton located below gear shift)
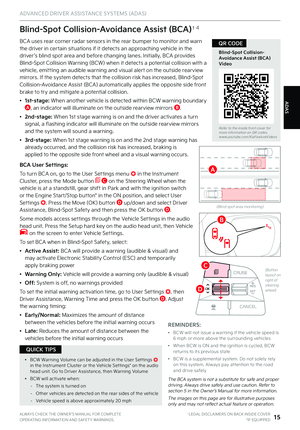
Surround View Monitor (SVM)*†4
Surround View Monitor (SVM) is a parking support system that shows the areas around the front, rear, left and right sides of the vehicle via four cameras displayed onto the audio head unit screen .
•
Press the Parking/ View button A to turn on Surround View Monitor . Press the button again to turn off the function
•
Other view modes can be selected by touching the view icons B on the Surround View Monitor screen
•
Surround View Monitor Auto On: With Driver Assistance > Parking Safety > Surround View Monitor Auto On selected from the Settings menu, the front parking assist view screen is displayed when Parking Distance Warning warns the driver while driving in D (Drive)
To change the SVM settings, press the onscreen settings icon C, while SVM is operating .
Refer to the inside front cover for more information on QR codes .www .youtube .com/KiaFeatureVideos
Surround View Monitor (SVM) Video
QR CODE
B
C
VIEW
VIEW
A
Page 27 of 70

ALWAYS CHECK THE OWNER ’S MANUAL FOR COMPLETE OPER ATING INFORMATION AND SAFET Y WARNINGS . †LEGAL DISCL AIMERS ON BACK INSIDE COVER*IF EQUIPPED25
CR")
ADAS
ADVANCED DRIVER ASSISTANCE SYSTEMS (ADAS)
ALWAYS CHECK THE OWNER ’S MANUAL FOR COMPLETE OPER ATING INFORMATION AND SAFET Y WARNINGS . †LEGAL DISCL AIMERS ON BACK INSIDE COVER*IF EQUIPPED25
CRUISE
MODE
CRUISE
CANCEL
RES
OK SET
CRUISE
CANCEL
RES
OK SET
MODE CRUISE
CANCEL
RES
OK SET
MODE
CANCEL
RES
OK SET
MODECRUISE
CANCEL
RES
OK SET
CRUISE
CANCEL
RES
OK SET
Watch for traffic
Rear Cross-Traffic Collision-Avoidance Assist (RCCA) is designed to warn the driver under certain conditions . It may activate the Electronic Stability Control (ESC) and temporarily apply braking if it detects cross traffic
approaching the vehicle when the vehicle is in reverse .
When the RCCA rear-corner radar sensors detect approaching vehicles from the rear left or rear right side of the vehicle A, RCCA will sound a warning, the warning indicators on the outside rearview mirror will illuminate and a message will appear on the Instrument Cluster LCD B and the audio head unit .* If RCCA detects that the collision risk has increased, RCCA automatically applies the brakes to reduce your speed, potentially helping to minimize the effects of a possible collision .
RCCA is designed to operate under the following conditions:
•When the gear shift is in Reverse
•When the vehicle is moving slower than 6 mph
RCCA User Settings:
•To go to the User Settings menu in the Instrument Cluster, press the Mode button C on the Steering Wheel when the vehicle is at a standstill, gear shift in Park and with the ignition on or the Engine Start/Stop button* in the ON position, and select User Settings
•
To turn RCCA on when in User Settings , press the Move (OK) button D up/down, select Driver Assistance, Parking Safety, Rear Cross-Traffic Safety and then press OK D
•
To set the warning timing, go to User Settings , press the Move (OK) button D up/down, then go to Driver Assistance, Warning Timing and press the OK button D
•Select one of the settings:
–
Early/Normal/Standard: Maximizes the amount of distance between the vehicles before the initial warning occurs
– L a t e : Reduces the amount of distance between the vehicles before the initial warning occurs
•The default Warning Timing is set to Normal . If the Warning Timing is changed, the warning time of other Driver Assistance systems may also change
•
Some models access settings through the Vehicle Settings in the audio head unit . Press the Setup hard key on the audio head unit, then VEHICLE on the screen to enter Vehicle Settings
Rear Cross-Traffic Collision-Avoidance Assist (RCCA)†4
See section 5 in the Owner’s Manual for more information .
Refer to the inside front cover for more information on QR codes .www .youtube .com/KiaFeatureVideos
Rear Cross-Traffic Collision-Avoidance Assist (RCCA) Video
QR CODE
A
B
C
D
REMINDERS:
•
The RCCA feature can be activated or deactivated in User Set tings, under Driver Assistance, Parking Safet y
•
When vehicle power is cycled, RCCA will remain in the previous state
•
When a vehicle is approaching within the sensing range, and traveling faster than 3 mph, the RCCA system will show a warning
•
RCCA is a supplemental system . Do not solely rely on this system and always pay at tention to the road and its conditions
•RCCA Warning Volume can be adjusted in the User Set tings in the Instrument Cluster or the Vehicle Set tings on the audio head unit . Go to Driver Assistance, then Warning Volume
QUICK TIP
(But ton layout on right of steering wheel)
Page 28 of 70

†LEGAL DISCL AIMERS ON BACK INSIDE COVER*IF EQUIPPED26TELLURIDE FEATURES & FUNCTIONS GUIDE
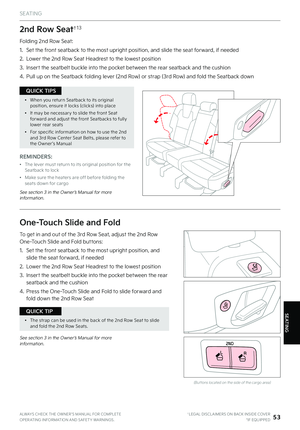
Forward/Reverse Parking Distance Warning (PDW)†4
PDW A is")
ADAS
ADVANCED DRIVER ASSISTANCE SYSTEMS (ADAS)
†LEGAL DISCL AIMERS ON BACK INSIDE COVER*IF EQUIPPED26TELLURIDE FEATURES & FUNCTIONS GUIDE
Forward/Reverse Parking Distance Warning (PDW)†4
PDW A is a supplemental system that is designed to assist the driver by chiming if an object is detected within the sensing areas in the front or rear of the vehicle when parking or backing up .
When the Engine Start/Stop button is ON and the shift lever is in R (Reverse), PDW is activated and the PDW button indicator is illuminated .
(Rear sensors shown)
Forward*/Reverse Parking Distance Warning is not a substitute for proper and safe backing-up procedures . Always drive safely and use caution when backing up . Forward*/Reverse Parking Distance Warning (PDW) may not detect every object in front of or behind the vehicle .
See section 4 in the Owner’s Manual for more information .
Refer to the inside front cover for more information on QR codes .www .youtube .com/KiaFeatureVideos
Forward/Reverse Parking Distance Warning (PDW) Video
QR CODE
REMINDERS:
•
If the vehicle is moving at speeds over 6 mph, the system may not activate
•
When more than t wo objects are sensed at the same time, the closest one will be recognized first
•
PDW is not a substitute for proper and safe backing-up procedures . Always drive safely and use caution when backing up . PDW may not detect ever y object behind or in front of the vehicle
A
(But ton below gear shift oncenter console)
Page 29 of 70

ALWAYS CHECK THE OWNER ’S MANUAL FOR COMPLETE OPER ATING INFORMATION AND SAFET Y WARNINGS . †LEGAL DISCL AIMERS ON BACK INSIDE COVER*IF EQUIPPED27
Refer to the inside front cover for more information on QR codes .www .youtube .com/KiaFeatureVideos
Head-Up DisplayVideo
QR CODE
ADAS
ADVANCED DRIVER ASSISTANCE SYSTEMS (ADAS)
REMINDERS:
•
The HUD image on the windshield glass may not be visible in these cases:
–
The driver has poor sit ting posture
–The driver is wearing polarized sunglasses
–There is an object covering the HUD
–Driving on a wet road
–Excessive lighting inside or outside the vehicle
–
Modifications made to the windshield, such as tinting or other aftermarket treatments, could affect the HUD . When replacing the front windshield glass of vehicles equipped with the HUD, owners must replace it with windshield glass designed for HUD operation . Other wise, duplicated images may be displayed on the windshield glass
–If Turn By Turn (TBT) navigation information is selected as HUD content, TBT information will not be displayed on the LCD
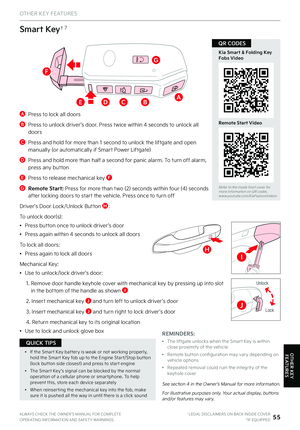
Head-Up Display (HUD)*†9
See section 4 in the Owner’s Manual for more information .
The Head-Up Display is a supplemental system . Do not solely rely on the system, always drive safely, and pay attention to the driving conditions on the road .
Images are for illustrative purposes only and may not reflect actual feature or operation .
The Head-Up Display (HUD) is a semi-transparent display that projects a snippet of information from the instrument cluster and navigation system* onto the windshield glass .
To turn the HUD ON or OFF, go to User Settings in the LCD Modes .
The HUD displays:
•Turn By Turn (TBT) navigation information*
•Road signs*
•Speedometer
•SCC set speed information
•SCC Vehicle Distance information
•Blind-Spot Safety
•Lane Safety
•Highway Driving Assist information*
•Lane Following Assist
•HDA system automatic speed setting information*
•Warning lights (low fuel)
•AV mode information
Head-Up Display (HUD) User Settings
Drivers can adjust the HUD settings from the LCD Instrument Cluster modes in User Settings . HUD settings include:
•Display Height: Adjust the height of the HUD image on the windshield glass
•
Rotation: Adjust the degree of HUD rotation
•
Brightness: Adjust the intensity of the HUD brightness
•
Contents Selection: Activate or deactivate HUD content
•
Speedometer Size: Choose the size of the HUD speedometer
•
Speedometer Color: Choose the color of the HUD speedometer
MPH
0.5 mi
FM
95.7
60
60HDA
SPEED LIMITAUTO
Page 30 of 70

†LEGAL DISCL AIMERS ON BACK INSIDE COVER*IF EQUIPPED28TELLURIDE FEATURES & FUNCTIONS GUIDE
Refer to the inside front cover for more information on QR codes .www .youtube .com/KiaFeatureVideos
Electronic Stability Control Video
QR CODE
REMINDERS:
•
ESC is active by default at vehicle star tup . When ignition is cycled, ESC will turn ON again
•
The ESC indicator light in the instrument cluster will be lit momentarily whenever ESC is active
REMINDERS:
•
HAC does not operate when the gear shift is in P (Park) or N (Neutral) position
•
HAC does not replace the need to apply brakes while the vehicle is stopped on an incline
•
In the event of HAC system malfunction, see an Authorized Kia Dealer for ser vice
•When HAC is active (e .g ., during initial acceleration from a stop on an incline), you may notice that the brakes will momentarily remain engaged after you depress the accelerator
•HAC provides a t wo-second delay before the vehicle may star t rolling backwards
QUICK TIPS
Electronic Stability Control (ESC)†6 /
Traction Control System (TCS)†6
Electronic Stability Control (ESC) is designed to help stabilize the vehicle during certain cornering maneuvers . The Traction Control System (TCS) can help improve traction . It is a good idea to keep both ESC and TCS turned on for daily driving whenever possible .
Press the ESC button B to turn the Traction Control System OFF/ON .
To turn both Electronic Stability Control and the Traction Control System OFF, press and hold the ESC button for more than 3 seconds . Press again to turn ON .
Instrument Cluster Control (Instrument Panel Dimmer)
With the Engine Start/Stop button on or the parking lights/headlights on, press A (+) or (-) to adjust the brightness of the instrument panel illumination .
(But ton located on driver ’s panel, left of the steering wheel)
See section 4 in the Owner’s Manual for more information .
See section 5 in the Owner’s Manual for more information .
See section 5 in the Owner’s Manual for more information .
Hill-Start Assist Control (HAC)†6
Hill-Start Assist Control (HAC) is designed to prevent the vehicle from rolling backwards when accelerating from a stop while on a steep incline .
HAC automatically activates whether ESC is OFF or ON but does NOT activate when ESC has malfunctioned .
AB
DRIVER’S PANEL
DRIVER’S PANEL
Page 31 of 70

ALWAYS CHECK THE OWNER ’S MANUAL FOR COMPLETE OPER ATING INFORMATION AND SAFET Y WARNINGS . †LEGAL DISCL AIMERS ON BACK INSIDE COVER*IF EQUIPPED29
DRIVER’S PANEL
DRIVER’S PANEL
REMINDER: When the but tons are not pressed, the Reverse Parking Aid Function will not operate and the outside rear view mirrors will not rotate downward .See section 4 in the Owner’s Manual for more information .
For illustrative purposes only . Your actual display, buttons and/or features may vary .
Reverse Parking Aid Function†4
When the gear shift lever is moved into R (Reverse) and the vehicle is moving backwards, the outside rearview mirrors will rotate downward to aid in reverse parking .
To turn Reverse Parking Aid Function ON, move switch A to either the right or to the left . To turn OFF, move switch to the center position .
The outside rearview mirrors will automatically return to their original positions when:
•The Engine Start/Stop button is in the OFF position
•The gear shift lever is moved out of R (Reverse)
•
The outside rearview mirror switch is in the center position
R
L
A
REMINDERS:
•The Engine Star t/Stop but ton needs to be on
•The Gear Shift needs to be in (P) Park
See section 4 in the Owner’s Manual for more information .
For illustrative purposes only . Your actual display, buttons and/or features may vary .(But ton located on driver ’s panel, left of the steering wheel)
Power Liftgate Open/Close Button*
Press and hold the Power Liftgate Open/Close button B to open or close the Liftgate automatically .
B
Manual Folding Mirrors*
To fold the mirrors in manually, pull the mirror towards the window .
Refer to section 4 in the Owner’s Manual for more information .
For illustrative purposes only . Your actual display, buttons and/or features may vary .
If needed, pull the mirror firmly until it folds .
QUICK TIP
Page 32 of 70
 positi")
R
L
DRIVER’S PANEL
DRIVER’S PANEL
•Pull/
Press but ton A again to stop Auto Up/Down function
•Auto Door Lock/Unlock* will engage when gear shift is moved into or out of the P (Park) position
•To turn Auto Door Lock/Unlock* OFF, go to User Set tings* in the LCD Instrument Cluster Modes
•While driving with the rear windows down or with the sunroof* in an open or par tially open position, a wind buffeting or pulsation noise may be heard . This noise is a normal occurrence and can be reduced or eliminated by the following::
–If the noise occurs with one or both of the rear windows down, par tially lower both front windows approximately 1 inch
–If the noise occurs with the sunroof open, slightly reduce the size of the sunroof opening
QUICK TIPS
A
B
B
C
DE
G
F
REMINDERS:
• When pressed C, the rear window controls for the Rear Passenger Windows are disabled
•
When closing, be mindful of any objects or persons
Button configuration may vary depending on vehicle model .
See section 4 in the Owner’s Manual for more information .
A Pull/Press to operate driver and front
passenger ’s window auto up/down
B Press to unlock/lock all doors
C Press to disable the rear passenger window controls
Power Windows, Window Lock & Central Door Lock
D Toggle switch D to the L or R to select the left or right mirrors
E Press button arrows left/right or up/down to adjust mirror position
F Toggle button left/right to unfold/fold the outside rearview mirrors
F Toggle button to center to automatically fold/unfold mirrors when:
•Smart Key lock/unlock buttons are pressed
•Outside door handle button is pressed
•Driver approaches the vehicle with the Smart Key (if activated in User Settings)
REMINDERS:
•
When the mirror toggle but ton is in the center, press the lock but ton t wice on the Smar t Key to automatically fold mirrors when exiting vehicle
•
To lock the mirror position, toggle but ton to the neutral (center) position
•The mirrors will automatically unfold when the Smar t Key* is within close proximit y to the vehicle (if activated in User Set tings)
QUICK TIP
Power Folding Outside Mirrors*
See section 4 in the Owner’s Manual for more information .
Heated Outside Mirrors
Mirror heaters automatically turn ON/OFF at the same time the Rear Window Defroster is turned ON/OFF . Rear Window Defroster button is located on the climate control system panel .
See section 4 in the Owner’s Manual for more information .
See section 4 in the Owner’s Manual for more information .
Auto Door Lock/Unlock
Auto Door Lock/Unlock will engage when the gear shift is moved into or out of the P (Park) position . Refer to the User Settings on how to turn Auto Door Lock/Unlock ON/OFF .
*IF EQUIPPED30TELLURIDE FEATURES & FUNCTIONS GUIDE