2022 KIA SPORTAGE radio
[x] Cancel search: radioPage 93 of 630
• Floor mat anchor (s) . . . . . . . . . . . . . . . . . . . . . . . . . 4-185
• Luggage net holder . . . . . . . . . . . . . . . . . . . . . . . . . . 4-185
• Cargo security screen . . . . . . . . . . . . . . . . . . . . . . . . 4-186
Exterior features . . . . . . . . . . . . . . . . . . . . . . . . . . 4-188
• Roof rack . . . . . . . . . . . . . . . . . . . . . . . . . . . . . . . . . . 4-18\
8
Audio system . . . . . . . . . . . . . . . . . . . . . . . . . . . . . 4-190
• Antenna. . . . . . . . . . . . . . . . . . . . . . . . . . . . . . . . .\
. . . 4-190
• Steering wheel audio controls. . . . . . . . . . . . . . . . . . 4-190
• Aux, USB port . . . . . . . . . . . . . . . . . . . . . . . . . . . . . . 4-192
• How vehicle radio works . . . . . . . . . . . . . . . . . . . . . 4-192
Declaration of Conformity . . . . . . . . . . . . . . . . . 4-195
• FCC . . . . . . . . . . . . . . . . . . . . . . . . . . . . . . . . . . . . \
. . . 4-195
4
Page 96 of 630
47
Features of your vehicle
Liftgate unlock (3)
The liftgate is unlocked if the button
is pressed for more than 1 second.
Also, once the liftgate is opened and
then closed, the liftgate will be locked
automatically.
For Power Liftgate Only:
The Power Liftgate will open if the
button is pressed for more than 1
second. Also, once the liftgate is
opened and then closed, the liftgate
will be locked again automatically.
❈For detailed information refer to the
"Power liftgate" in this chapter.
Panic (4)
The horn sounds and hazard warn-
ing lights flash for about 27 seconds
if this button is pressed for more than
0.5 second. To stop the horn and
lights, press any button on the trans-
mitter.
Transmitter precautions
The transmitter will not work if any
of following occur:
- The ignition key is in the ignitionswitch.
- You exceed the operating dis- tance limit (about 30 feet [10 m]).
- The battery in the transmitter is weak.
- Other vehicles or objects may be blocking the signal.
- The weather is extremely cold.
- The transmitter is close to a radio transmitter such as a radio sub-
station or an airport which can
interfere with normal operation of
the transmitter.
Page 104 of 630
415
Features of your vehicle
Mechanical key
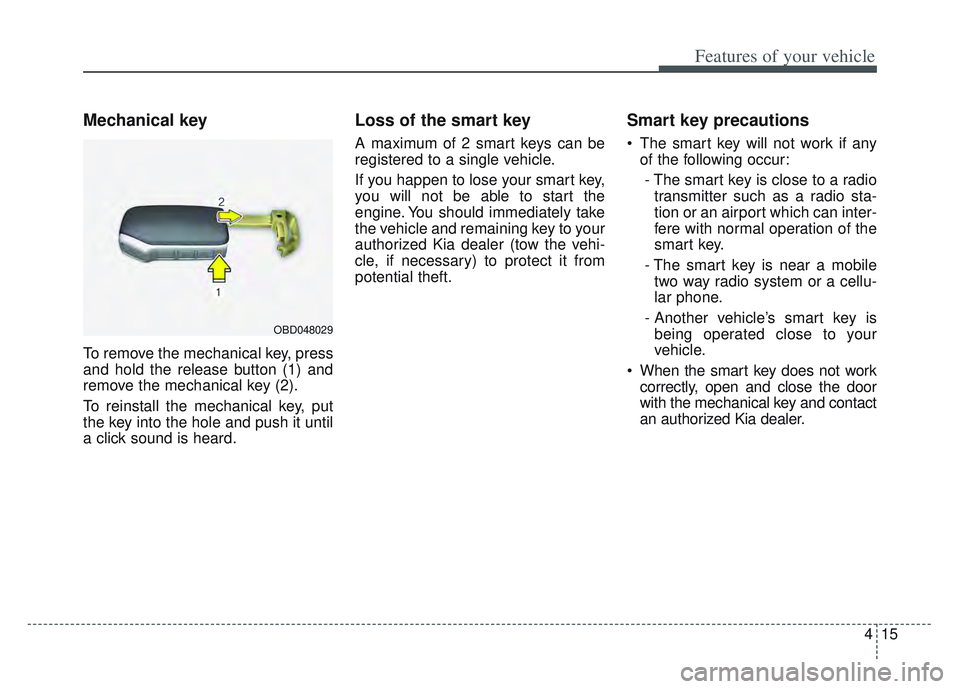
To remove the mechanical key, press
and hold the release button (1) and
remove the mechanical key (2).
To reinstall the mechanical key, put
the key into the hole and push it until
a click sound is heard.
Loss of the smart key
A maximum of 2 smart keys can be
registered to a single vehicle.
If you happen to lose your smart key,
you will not be able to start the
engine. You should immediately take
the vehicle and remaining key to your
authorized Kia dealer (tow the vehi-
cle, if necessary) to protect it from
potential theft.
Smart key precautions
The smart key will not work if anyof the following occur:
- The smart key is close to a radio transmitter such as a radio sta-
tion or an airport which can inter-
fere with normal operation of the
smart key.
- The smart key is near a mobile two way radio system or a cellu-
lar phone.
- Another vehicle’s smart key is being operated close to your
vehicle.
When the smart key does not work correctly, open and close the door
with the mechanical key and contact
an authorized Kia dealer.
OBD048029
Page 129 of 630
Features of your vehicle
40
4
✽ ✽
NOTICE
• If you press the door unlock but-
ton (2), the Smart Power Liftgate
function will be deactivated tem-
porarily. But, if you do not open
any door for 30 seconds, the smart
power liftgate function will be
activated again.
• If you press the liftgate open but- ton (3) for more than 1 second, the
liftgate opens.
• If you press the door lock button (1) or liftgate open button (3) when
the Smart Power Liftgate function
is not in the Detect and Alert stage,
the smart power liftgate function
will not be deactivated.
• In case you have deactivated the Smart Power Liftgate function by
pressing the smart key button and
opened a door, the smart power
liftgate function can be activated
again by closing and locking all
doors.
Detecting area
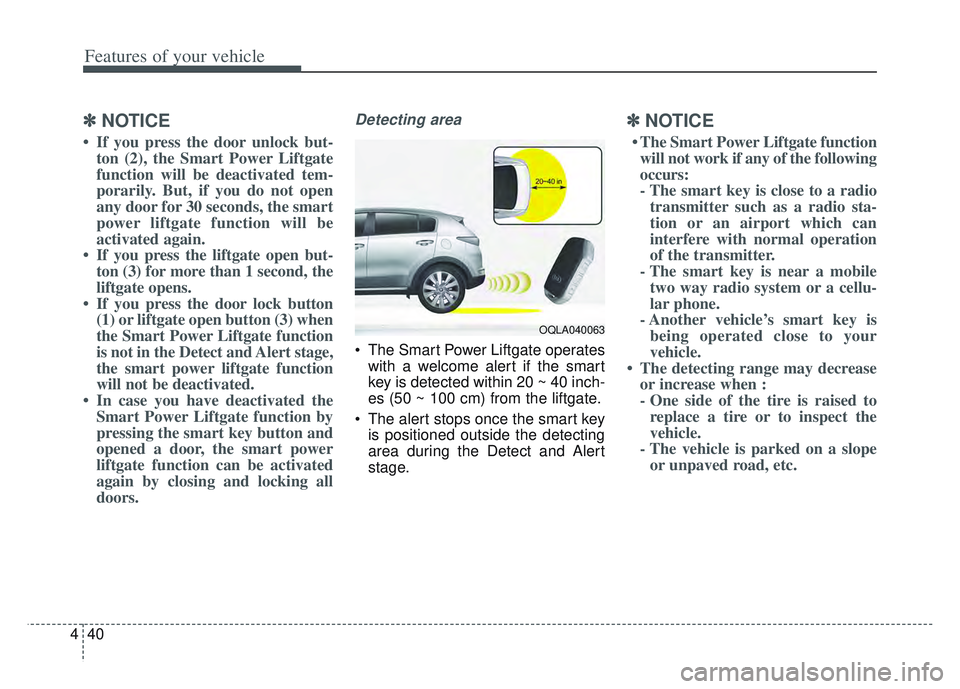
The Smart Power Liftgate operates
with a welcome alert if the smart
key is detected within 20 ~ 40 inch-
es (50 ~ 100 cm) from the liftgate.
The alert stops once the smart key is positioned outside the detecting
area during the Detect and Alert
stage.
✽ ✽ NOTICE
• The Smart Power Liftgate function
will not work if any of the following
occurs:
- The smart key is close to a radio transmitter such as a radio sta-
tion or an airport which can
interfere with normal operation
of the transmitter.
- The smart key is near a mobile two way radio system or a cellu-
lar phone.
- Another vehicle’s smart key is being operated close to your
vehicle.
• The detecting range may decrease or increase when :
- One side of the tire is raised toreplace a tire or to inspect the
vehicle.
- The vehicle is parked on a slope or unpaved road, etc.
OQLA040063
Page 154 of 630
465
Features of your vehicle
Programming
Your vehicle may require the ignition
switch to be turned to the ACC posi-
tion for programming and/or opera-
tion of HomeLink. It is also recom-
mended that a new battery be
replaced in the hand-held transmitter
of the device being programmed to
HomeLink for quicker training and
accurate transmission of the radio-
frequency.
Follow these steps to train your
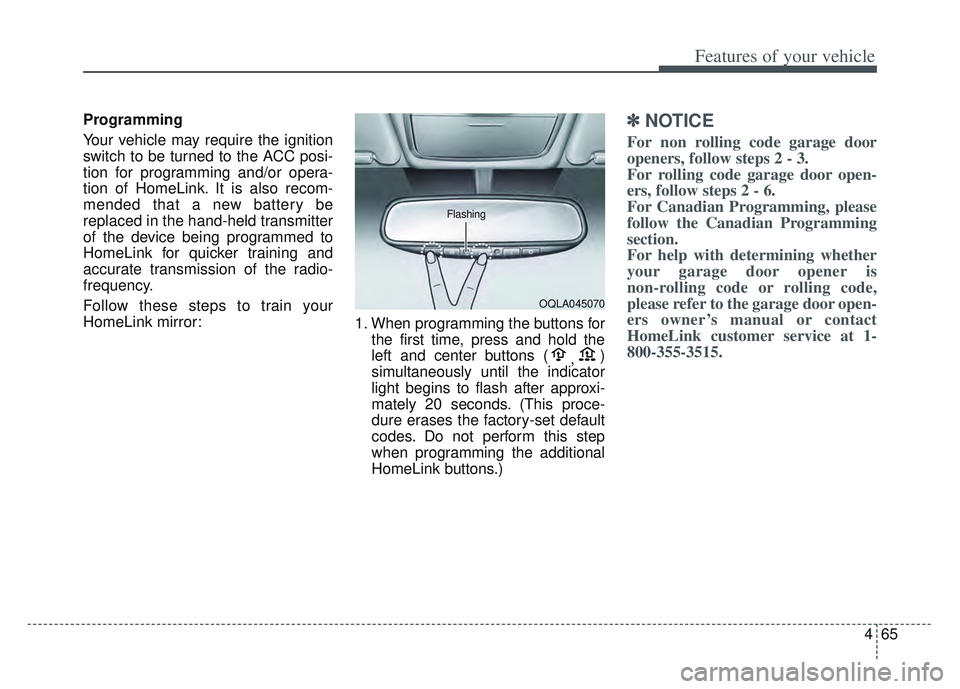
HomeLink mirror:1. When programming the buttons for
the first time, press and hold the
left and center buttons ( ,)
simultaneously until the indicator
light begins to flash after approxi-
mately 20 seconds. (This proce-
dure erases the factory-set default
codes. Do not perform this step
when programming the additional
HomeLink buttons.)✽ ✽ NOTICE
For non rolling code garage door
openers, follow steps 2 - 3.
For rolling code garage door open-
ers, follow steps 2 - 6.
For Canadian Programming, please
follow the Canadian Programming
section.
For help with determining whether
your garage door opener is
non-rolling code or rolling code,
please refer to the garage door open-
ers owner’s manual or contact
HomeLink customer service at 1-
800-355-3515.
OQLA045070
Flashing
Page 161 of 630
Features of your vehicle
72
4
If you need to recalibrate the com-
pass:
1. Press and hold the button for
more than 9 seconds. When the
compass memory is cleared a "C"
will appear in the display.
2. Drive the vehicle in 2 complete cir- cles at less than 5 mph (8 km/h). Integrated HomeLink®Wireless
Control System
The HomeLink
®Wireless Control
System can replace up to three
hand-held radio-frequency (RF)
transmitters with a single built-in
device. This innovative feature will
learn the radio frequency codes of
most current transmitters to operate
devices such as gate operators,
garage door openers, entry door
locks, security systems, even home
lighting. Both standard and rolling
code-equipped transmitters can be
programmed by following the out-
lined procedures.
Additional HomeLink
®information
can be found at: www.homelink.com
or by calling 1-800-355-3515.
Retain the original transmitter of the
RF device you are programming for
use in other vehicles as well as for
future HomeLink
®programming. It is
also suggested that upon the sale of
the vehicle, the programmed
HomeLink
®buttons be erased for
security purposes.
WARNING
Before programming
HomeLink®to a garage door
opener or gate operator, make
sure people and objects are out
of the way of the device to pre-
vent potential harm or damage.
Do not use the HomeLink
®with
any garage door opener that
lacks the safety stop and
reverse features required by
U.S. federal safety standards
(this includes any garage door
opener model manufactured
before April 1, 1982). A garage
door that cannot detect an
object - signaling the door to
stop and reverse - does not
meet current U.S. federal safety
standards. Using a garage door
opener without these features
increases the risk of serious
injury or death.
Page 162 of 630
473
Features of your vehicle
Programming HomeLink®
Please note the following:
When programming a garage dooropener, it is advised to park the
vehicle outside of the garage.
It is recommended that a new bat- tery be placed in the hand-held
transmitter of the device being pro-
grammed to HomeLink
®for quicker
training and accurate transmission
of the radio-frequency signal.
Some vehicles may require the ignition switch to be placed in the
ACC (or "Accessories") position for
programming and/or operation of
HomeLink
®.
In the event that there are still pro- gramming difficulties or questions
after following the programming
steps listed below, contact
HomeLink
®at: www.homelink.com
or by calling 1-800-355-3515.
Programming
To train most devices, follow these
instructions:
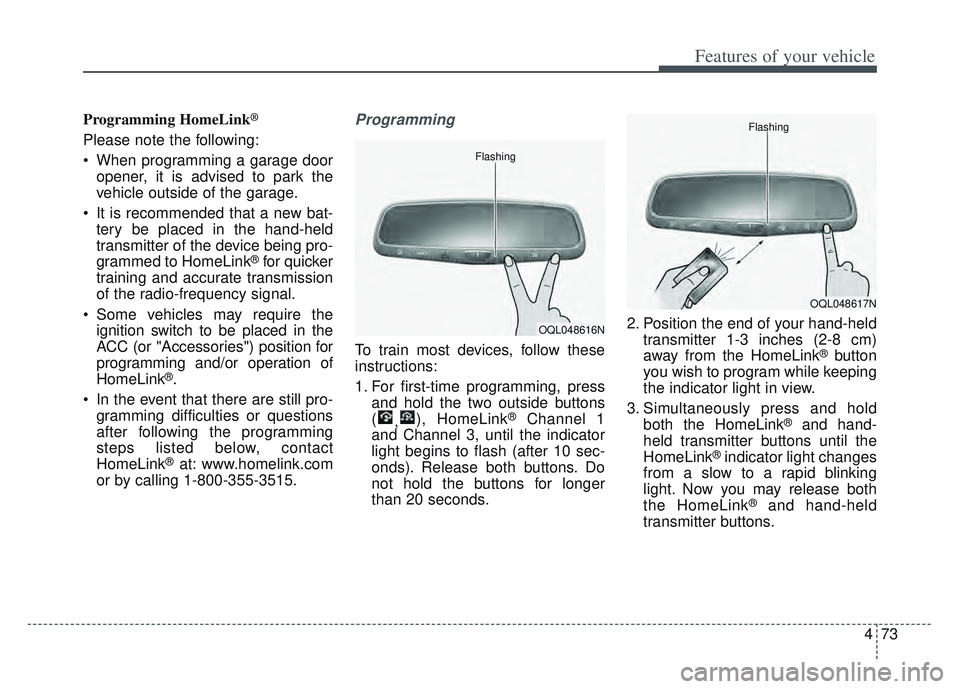
1. For first-time programming, press and hold the two outside buttons
( ,), HomeLink
®Channel 1
and Channel 3, until the indicator
light begins to flash (after 10 sec-
onds). Release both buttons. Do
not hold the buttons for longer
than 20 seconds. 2. Position the end of your hand-held
transmitter 1-3 inches (2-8 cm)
away from the HomeLink
®button
you wish to program while keeping
the indicator light in view.
3. Simultaneously press and hold both the HomeLink
®and hand-
held transmitter buttons until the
HomeLink
®indicator light changes
from a slow to a rapid blinking
light. Now you may release both
the HomeLink
®and hand-held
transmitter buttons.
OQL048616N
Flashing
OQL048617N
Flashing
Page 272 of 630
4183
Features of your vehicle
✽ ✽NOTICE
• When the interior temperature of
the wireless charging system rises
above a set temperature, the wire-
less charging will cease to func-
tion. After the interior tempera-
ture drops below the threshold,
the wireless charging function will
resume.
• The wireless charging may not function properly when there is a
heavy accessory cover on the
smart phone.
• The wireless charging will stop when using the wireless smart key
search function to prevent radio
wave disruption.
• The wireless charging will stop when the smart key is moved out
of the vehicle with the ignition in
ON.
• The wireless charging will stop when any of the doors is opened
(applicable for vehicles equipped
with smart keys).
• The wireless charging will stop when the vehicle is turned OFF.
(Continued)(Continued)
• The wireless charging will stop
when the smart phone is not in
complete contact with the wireless
charging pad.
• Items equipped with magnetic components such as credit cards,
telephone cards, bankbooks or a
transportation ticket may become
damaged during wireless charg-
ing.
• Place the smart phone on the cen- ter of the charge pad for best
results. The smart phone may not
charge when placed near the rim
of the charging pad. When the
smart phone does get charged, it
may heat up excessively.
• For smart phones without built-in wireless charging system, an
appropriate accessory has to be
equipped.
• Smart phones of some manufac- turers may display messages on
weak current. This is due to the
particular characteristic of the
smart phone and does not imply a
malfunction on wireless charging
function. (Continued)(Continued)
• The indicator light of some manu-
facturers’ smart phones may still
be orange after the smart phone is
fully charged. This is due to the
particular characteristic of the
smart phone and not a malfunc-
tion of the wireless charging.
• When any smart phone without a wireless charging function or a
metallic object is placed on the
charging pad, a small noise may
sound. This small sound is due to
the vehicle discerning compatibili-
ty of the object placed on the
charging pad. It does not affect
your vehicle or the smart phone in
any way.