2022 KIA SPORTAGE cluster
[x] Cancel search: clusterPage 8 of 630
Introduction
41
Other fuels
Using fuels that contain Silicone (Si),
MMT (Manganese, Mn), Ferrocene
(Fe), and Other metalic additives,
may cause vehicle and engine dam-
age or cause misfiring, poor acceler-
ation, engine stalling, catalyst melt-
ing, clogging, abnormal corrosion,
life cycle reduction, etc.
Also, the Malfunction Indicator Lamp
(MIL) may illuminate.
✽ ✽
NOTICE
Damage to the fuel system or per-
formance problem caused by the use
of these fuels may not be covered by
your New Vehicle Limited
Warranty.
Gasoline containing MMT
Some gasoline contains harmful man-
ganese-based fuel additives Such as
MMT(Methylcyclopentadienyl
Manganese Tricarbonyl). Kia does not
recommend the use of gasoline con-
taining MMT. This type of fuel can
reduce vehicle performance and affect
your emission control system. The
Malfunction Indicator Lamp on the
cluster may come on.
Do not use methanol
Fuels containing methanol (wood alco-
hol) should not be used in your vehicle.
This type of fuel can reduce vehicle
performance and damage components
of the fuel system, engine control sys-
tem and emission control system.
Fuel Additives
Kia recommends that you use good
quality gasolines treated with deter-
gent additives such as TOP TIER
Detergent Gasoline, which help pre-
vent deposit formation in the engine.
These gasolines will help the engine
run cleaner and enhance performance
of the Emission Control System. For
more information on TOP TIER
Detergent Gasoline, please go to the
website www.toptiergas.com
For customers who do not use TOP
TIER Detergent Gasoline regularly,
and have problems starting or the
engine does not run smoothly, addi-
tives that you can buy separately may
be added to the gasoline.
If TOP TIER Detergent Gasoline is not
available, one bottle of additive should
be added to the fuel tank at every
7,500 miles or every engine oil
change is recommended. Additives
are available from your authorized Kia
dealer along with information on how
to use them. Do not mix other addi-
tives.
Page 16 of 630
25
Your vehicle at a glance
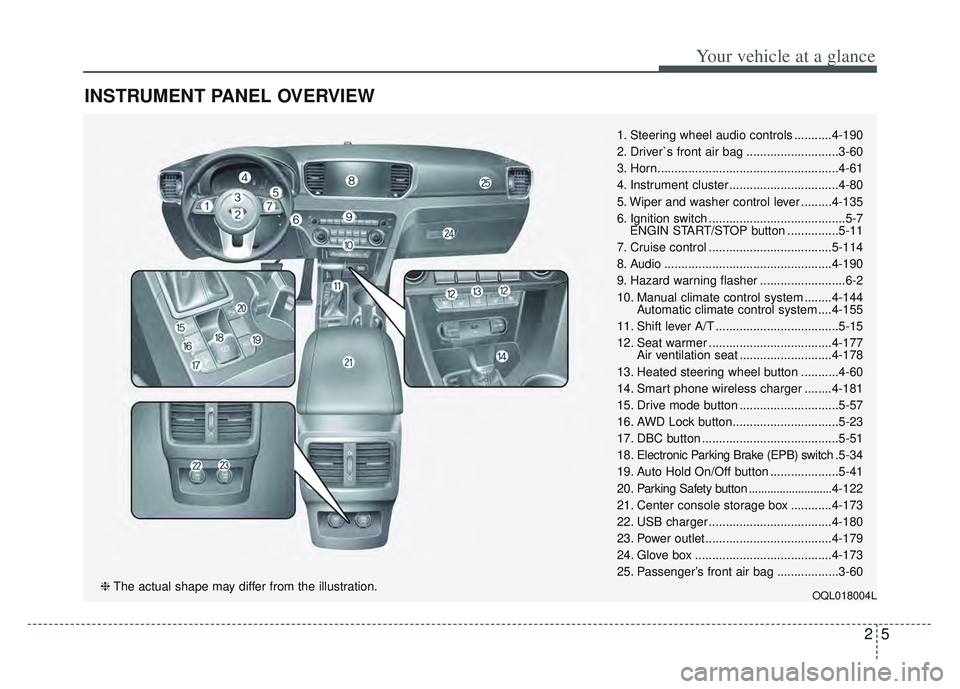
INSTRUMENT PANEL OVERVIEW
1. Steering wheel audio controls ...........4-190
2. Driver`s front air bag ...........................3-60
3. Horn.....................................................4-61
4. Instrument cluster ................................4-80
5. Wiper and washer control lever .........4-135
6. Ignition switch ........................................5-7ENGIN START/STOP button ...............5-11
7. Cruise control ....................................5-114
8. Audio .................................................4-190
9. Hazard warning flasher .........................6-2
10. Manual climate control system ........4-144 Automatic climate control system ....4-155
11. Shift lever A/T ....................................5-15
12. Seat warmer ....................................4-177 Air ventilation seat ...........................4-178
13. Heated steering wheel button ...........4-60
14. Smart phone wireless charger ........4-181
15. Drive mode button .............................5-57
16. AWD Lock button...............................5-23
17. DBC button ........................................5-51
18. Electronic Parking Brake (EPB) switch .5-34
19. Auto Hold On/Off button ....................5-41
20. Parking Safety button ...........................4-122
21. Center console storage box ............4-173
22. USB charger ....................................4-180
23. Power outlet.....................................4-179
24. Glove box ........................................4-173
25. Passenger’s front air bag ..................3-60
OQL018004L❈ The actual shape may differ from the illustration.
Page 91 of 630
Steering wheel . . . . . . . . . . . . . . . . . . . . . . . . . . . . . 4-58
• Electronic Power Steering (EPS) . . . . . . . . . . . . . . . . 4-58
• Tilt and telescopic steering . . . . . . . . . . . . . . . . . . . . . 4-59
• Heated steering wheel . . . . . . . . . . . . . . . . . . . . . . . . . 4-60
• Horn . . . . . . . . . . . . . . . . . . . . . . . . . . . . . . . . . . . . \
. . . 4-61
Mirrors . . . . . . . . . . . . . . . . . . . . . . . . . . . . . . . . . . 4-62\
• Inside rearview mirror . . . . . . . . . . . . . . . . . . . . . . . . 4-62
• Outside rearview mirror. . . . . . . . . . . . . . . . . . . . . . . 4-76
Instrument cluster . . . . . . . . . . . . . . . . . . . . . . . . . 4-80
• Instrument cluster control . . . . . . . . . . . . . . . . . . . . . 4-81
• LCD display control . . . . . . . . . . . . . . . . . . . . . . . . . . 4-81
• Gauges . . . . . . . . . . . . . . . . . . . . . . . . . . . . . . . . . . . . \
. 4-82
• Transmission shift indicator . . . . . . . . . . . . . . . . . . . . 4-85
LCD display . . . . . . . . . . . . . . . . . . . . . . . . . . . . . . 4-86
• LCD modes. . . . . . . . . . . . . . . . . . . . . . . . . . . . . . . . . . 4-86\
• User settings mode. . . . . . . . . . . . . . . . . . . . . . . . . . . . 4-89
Trip modes (Trip computer) . . . . . . . . . . . . . . . . . 4-94
• Trip modes . . . . . . . . . . . . . . . . . . . . . . . . . . . . . . . . . . 4-94\
• Fuel economy . . . . . . . . . . . . . . . . . . . . . . . . . . . . . . . . 4-94
• Warning messages . . . . . . . . . . . . . . . . . . . . . . . . . . . . 4-97
Warning and indicator lights . . . . . . . . . . . . . . . 4-104
• Warning lights . . . . . . . . . . . . . . . . . . . . . . . . . . . . . . 4-104
• Indicator lights . . . . . . . . . . . . . . . . . . . . . . . . . . . . . . 4-111
Rear View Monitor (RVM) . . . . . . . . . . . . . . . . . 4-117Reverse Parking Distance Warning (PDW). . . . 4-118
• Operation of Reverse Parking Distance Warning . . . 4-118
• Non-operational conditions of Reverse Parking
Distance Warning . . . . . . . . . . . . . . . . . . . . . . . . . . 4-119
• Reverse Parking Distance Warning precautions . . 4-119
• Self-diagnosis . . . . . . . . . . . . . . . . . . . . . . . . . . . . . . . 4-121
Forward/Reverse Parking Distance Warning (PDW) . . . . . . . . . . . . . . . . . . . . . . . . . . . . . . . . . 4-122
• Operation of Parking Distance Warning . . . . . . . . 4-122
• Non-operational conditions of Parking Distance
Warning . . . . . . . . . . . . . . . . . . . . . . . . . . . . . . . . . . 4-12\
4
• Self-diagnosis . . . . . . . . . . . . . . . . . . . . . . . . . . . . . . . 4-126
Lighting . . . . . . . . . . . . . . . . . . . . . . . . . . . . . . . . . 4-127
• Battery saver function. . . . . . . . . . . . . . . . . . . . . . . . 4-127
• Daytime running light . . . . . . . . . . . . . . . . . . . . . . . . 4-127
• Lighting control . . . . . . . . . . . . . . . . . . . . . . . . . . . . . 4-127
• High beam operation. . . . . . . . . . . . . . . . . . . . . . . . . 4-129
• High Beam Assist (HBA) . . . . . . . . . . . . . . . . . . . . . 4-130
• Turn signals and lane change signals . . . . . . . . . . . 4-132
• Front fog light . . . . . . . . . . . . . . . . . . . . . . . . . . . . . . 4-133
• Check headlight . . . . . . . . . . . . . . . . . . . . . . . . . . . . . 4-133
• Dynamic Bending Light (DBL) . . . . . . . . . . . . . . . . 4-134
Wipers and washers . . . . . . . . . . . . . . . . . . . . . . . 4-135
• Windshield wipers . . . . . . . . . . . . . . . . . . . . . . . . . . . 4-135
• Front windshield washers . . . . . . . . . . . . . . . . . . . . . 4-136
4
Page 147 of 630
Features of your vehicle
58
4
Electronic power steering
(EPS)
The power steering uses a motor to
assist you in steering the vehicle. If
the engine is off or if the power steer-
ing system becomes inoperative, the
vehicle may still be steered, but it will
require increased steering effort.
Electronic power steering is con-
trolled by a power steering control
unit which senses the steering wheel
torque and vehicle speed to com-
mand the motor.
The steering becomes heavier as the
vehicle’s speed increases and
becomes lighter as the vehicle’s
speed decreases for optimum steer-
ing control.
Should you notice any change in the
effort required to steer during normal
vehicle operation, have the power
steering checked by an authorized
Kia dealer. If the Electronic Power Steering
System does not operate normally,
the warning light will illuminate on
the instrument cluster. The steering
wheel may require increased
steering effort. Take your vehicle to
an authorized Kia dealer and have
the vehicle checked as soon as
possible.
When you operate the steering wheel in low temperature, the steer-
ing effort may be high or abnormal
noise may occur. If temperature
rises, the noise will likely disappear.
This is a normal condition.
When the vehicle is stationary, and the steering wheel is turned all the
way to the left or right continuous-
ly, the steering wheel becomes
harder to turn. The power assist is
limited to protect the motor from
overheating.
As time passes, the steering wheel
will return to its normal condition.
✽ ✽ NOTICE
The following symptoms may occur
during normal vehicle operation:
• The EPS warning light does not
illuminate.
• The steering gets heavy immedi- ately after turning the ignition
switch on. This happens as the sys-
tem performs the EPS system
diagnostics. When the diagnostics
are completed, the steering wheel
will return to its normal condition.
• A click noise may be heard from the EPS relay after the ignition
switch is turned to the ON or
LOCK (OFF) position.
• A motor noise may be heard when the vehicle is at a stop or at a low
driving speed.
• If the Electronic Power Steering System does not operate normally,
the warning light will illuminate on
the instrument cluster. The steer-
ing wheel may become difficult to
control or operate abnormally.
Take your vehicle to an authorized
Kia dealer and have the vehicle
checked as soon as possible. (Continued)
STEERING WHEEL
Page 169 of 630
Features of your vehicle
80
4
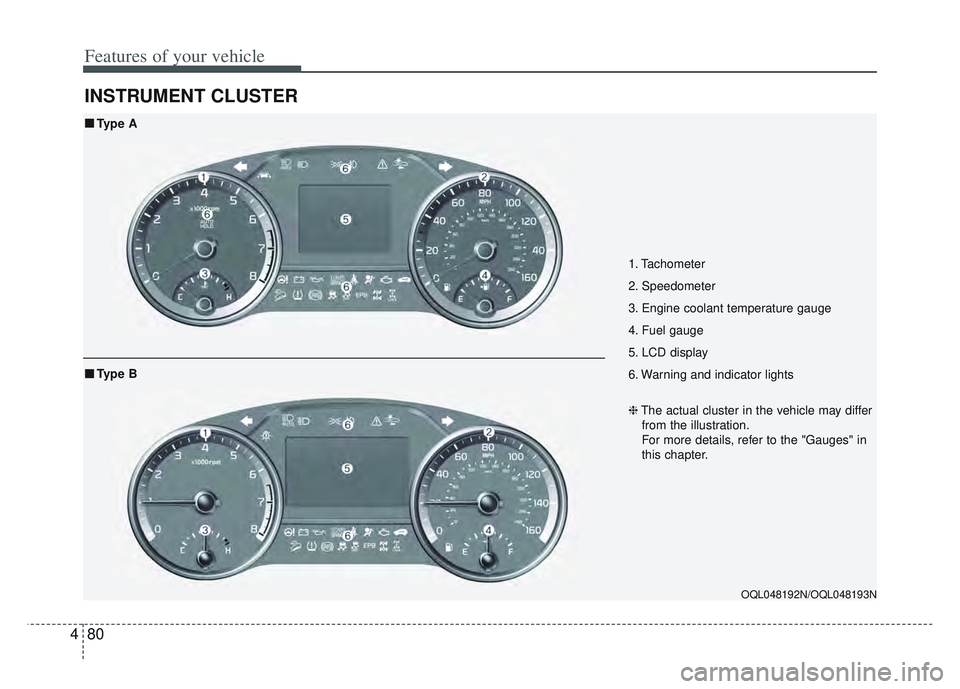
INSTRUMENT CLUSTER
1. Tachometer
2. Speedometer
3. Engine coolant temperature gauge
4. Fuel gauge
5. LCD display
6. Warning and indicator lights
OQL048192N/OQL048193N
■ ■
Type A
❈The actual cluster in the vehicle may differ
from the illustration.
For more details, refer to the "Gauges" in
this chapter.
■ ■ Type B
Page 170 of 630
481
Features of your vehicle
Instrument Cluster Control
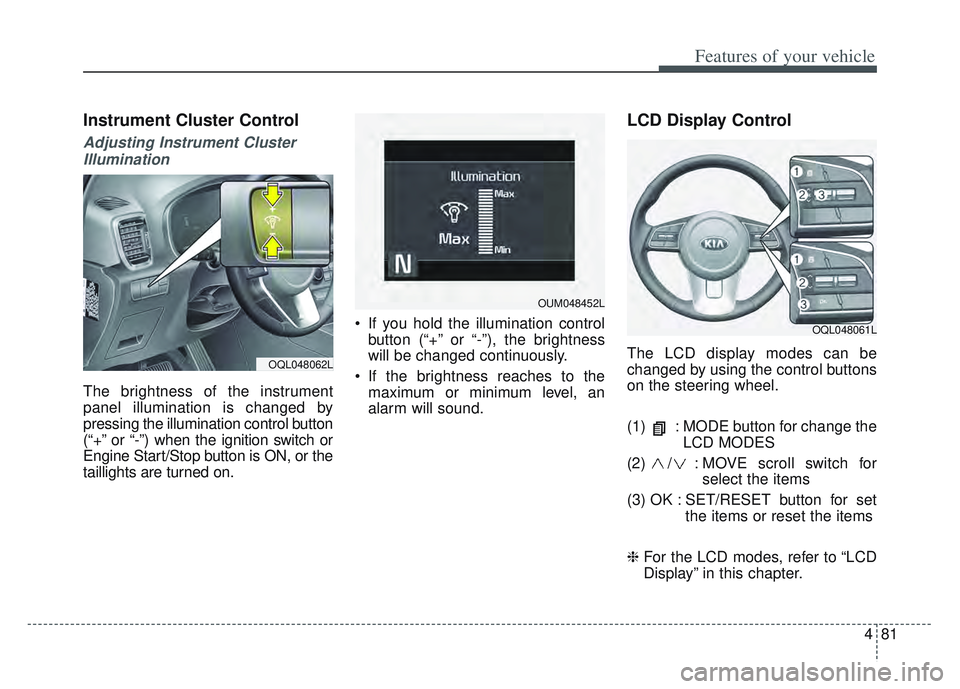
Adjusting Instrument ClusterIllumination
The brightness of the instrument
panel illumination is changed by
pressing the illumination control button
(“+” or “-”) when the ignition switch or
Engine Start/Stop button is ON, or the
taillights are turned on. If you hold the illumination control
button (“+” or “-”), the brightness
will be changed continuously.
If the brightness reaches to the maximum or minimum level, an
alarm will sound.
LCD Display Control
The LCD display modes can be
changed by using the control buttons
on the steering wheel.
(1) : MODE button for change the LCD MODES
(2) / : MOVE scroll switch for select the items
(3) OK : SET/RESET button for set the items or reset the items
❈ For the LCD modes, refer to “LCD
Display” in this chapter.OQL048062L
OQL048061L
OUM048452L
Page 181 of 630
Features of your vehicle
92
4
Sound
Cluster Voice Guidance Volume (if
equipped) :
- This used to set/adjust the voiceguidance volume.
Parking Distance Warning Volume (if equipped) :
- Adjust the Park Assist Systemvolume. (Level 1 ~ 3)
Welcome Sound (if equipped) : - If this item is checked, the wel-come sound function will be acti-
vated. Convenience
Welcome Mirror/Light (if equipped) :
- If this item is checked, the wel-come mirror/light function will be
activated.
Wireless Charging System (if equipped) :
- If this is checked, the wirelesscharging system function will be
activated.
Wiper/Light Display (if equipped) : - If this item is checked, thewiper/light display will be activated.
Auto rear wiper (in R) (if equipped) : - If this is checked, the rear wiper willautomatically activated when the
front wiper is in ON position and
shift lever is in R (reverse) position.
Gear Position Pop-up (if equipped) : - If this item is checked, the gearposition pop-up display will be
activated.
Icy Road Warning (if equipped) : - If this item is checked, the icyroad warning display will be acti-
vated. Service interval
Enable Service Interval :
- To activate or deactivate the serv-ice interval function.
Adjust Interval : - To adjust the interval by mileageand period.
Reset : - To reset the service interval func-tion.
✽ ✽ NOTICE
To use the service interval menu,
consult an authorized Kia dealer.
Page 270 of 630
4181
Features of your vehicle
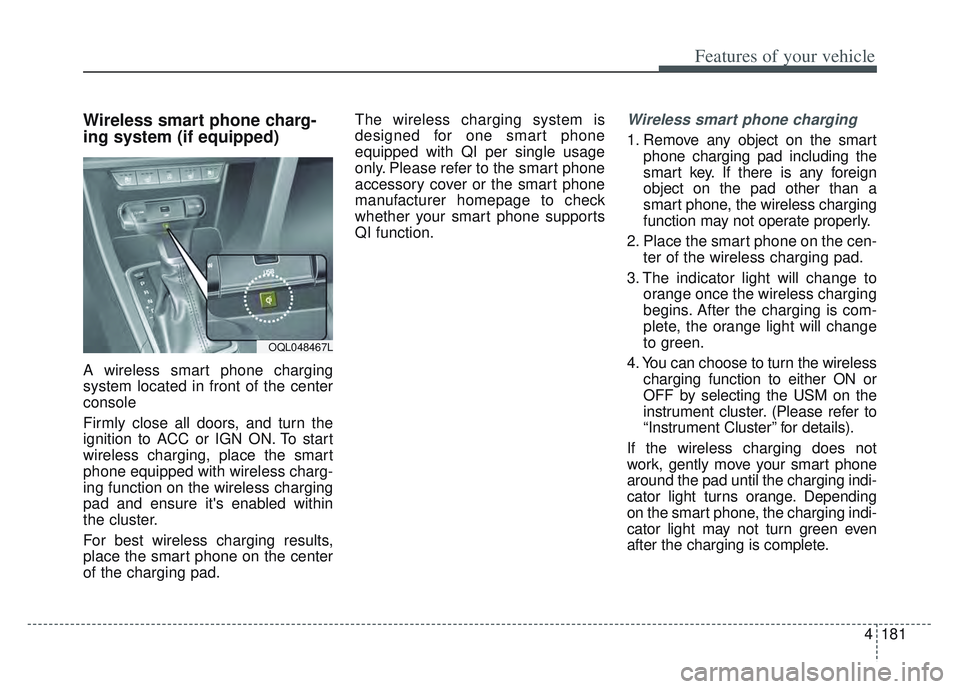
Wireless smart phone charg-
ing system (if equipped)
A wireless smart phone charging
system located in front of the center
console
Firmly close all doors, and turn the
ignition to ACC or IGN ON. To start
wireless charging, place the smart
phone equipped with wireless charg-
ing function on the wireless charging
pad and ensure it's enabled within
the cluster.
For best wireless charging results,
place the smart phone on the center
of the charging pad.The wireless charging system is
designed for one smart phone
equipped with QI per single usage
only. Please refer to the smart phone
accessory cover or the smart phone
manufacturer homepage to check
whether your smart phone supports
QI function.
Wireless smart phone charging
1. Remove any object on the smart
phone charging pad including the
smart key. If there is any foreign
object on the pad other than a
smart phone, the wireless charging
function may not operate properly.
2. Place the smart phone on the cen- ter of the wireless charging pad.
3. The indicator light will change to orange once the wireless charging
begins. After the charging is com-
plete, the orange light will change
to green.
4. You can choose to turn the wireless charging function to either ON or
OFF by selecting the USM on the
instrument cluster. (Please refer to
“Instrument Cluster” for details).
If the wireless charging does not
work, gently move your smart phone
around the pad until the charging indi-
cator light turns orange. Depending
on the smart phone, the charging indi-
cator light may not turn green even
after the charging is complete.
OQL048467L