Page 206 of 630

4117
Features of your vehicle
Rear View Monitor will activate with
the ignition switch or ENGINE
START/STOP button in the ON and
the shift lever in the R (Reverse) posi-
tion.
The rear view monitor may be turned
off by pressing the ON/OFF button
when the rear view monitor is activat-
ed.To turn the camera on again, press
the ON/OFF button again when the
ignition switch is on and the shift
lever is in R (Reverse). Also, the
camera will turn on automatically
whenever the ignition switch is
turned off and on again.
• This system is a supplementary
function only. It is the responsibility
of the driver to always check the
inside/outside rearview mirrors and
the area behind the vehicle before
and while backing up because
there is a dead zone that can't be
seen by the camera.
If the camera lens is covered with foreign material, the Rear View
Monitor may not operate normally.
Always keep the camera lens
clean.
However, do not use chemical sol-
vents such as strong detergents
containing high alkaline or volatile
organic solvents (gasoline, ace-
tone etc.). This may damage the
camera lens
❈If your vehicle is equipped with an
Infotainment System, rearview dis-
play will show through the
Infotainment System, monitor
while backing-up. Refer to a sepa-
rately supplied manual for detailed
information.
REAR VIEW MONITOR (RVM)
OQL048403L
OQL048404N
WARNING - Backing up &
using camera
Never rely solely on the rear view
camera when backing. You must
always use methods of viewing
the area behind you including
looking over both shoulders as
well as continuously checking all
three rear view mirrors. Due to
the difficulty of ensuring that the
area behind you remains clear,
always back slowly and stop
immediately if you even suspect .
This system is a supplemental
system that shows behind the
vehicle through the rearview dis-
play mirror while backing up. If
the vehicle is equipped with a
navigation system, then the sys-
tem will display on the screen.
Page 208 of 630
4119
Features of your vehicle
This system will activate whenbacking up with the ignition switch
ON.
If the vehicle is moving at a speed
over 3 mph (5 km/h), the system
may not be activated correctly.
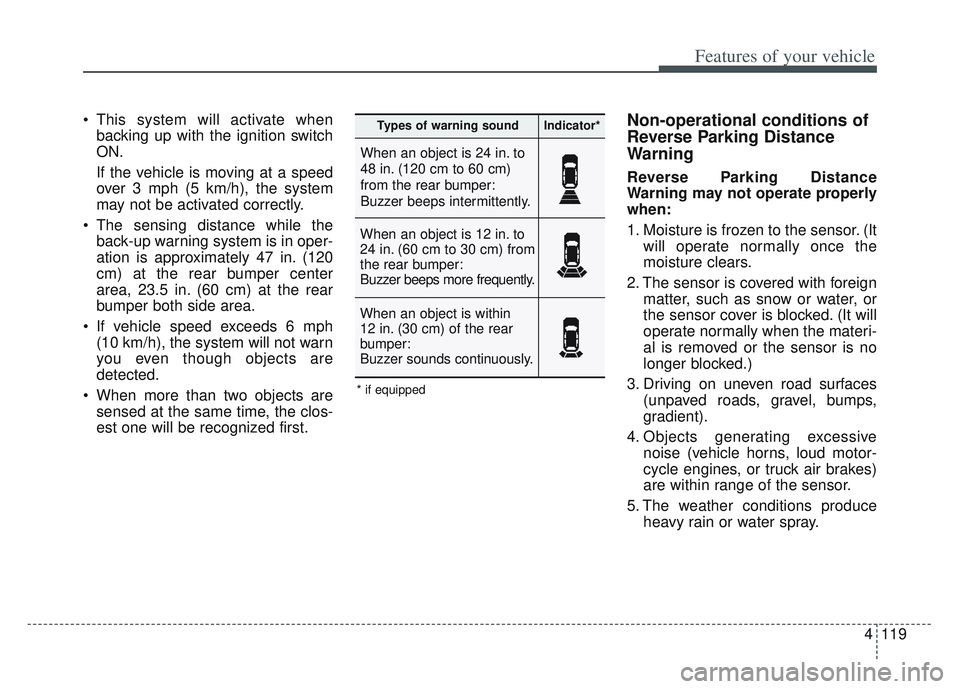
The sensing distance while the back-up warning system is in oper-
ation is approximately 47 in. (120
cm) at the rear bumper center
area, 23.5 in. (60 cm) at the rear
bumper both side area.
If vehicle speed exceeds 6 mph (10 km/h), the system will not warn
you even though objects are
detected.
When more than two objects are sensed at the same time, the clos-
est one will be recognized first.Non-operational conditions of
Reverse Parking Distance
Warning
Reverse Parking Distance
Warning may not operate properly
when:
1. Moisture is frozen to the sensor. (It will operate normally once the
moisture clears.
2. The sensor is covered with foreign matter, such as snow or water, or
the sensor cover is blocked. (It will
operate normally when the materi-
al is removed or the sensor is no
longer blocked.)
3. Driving on uneven road surfaces (unpaved roads, gravel, bumps,
gradient).
4. Objects generating excessive noise (vehicle horns, loud motor-
cycle engines, or truck air brakes)
are within range of the sensor.
5. The weather conditions produce heavy rain or water spray.
When an object is 24 in. to
48 in. (120 cm to 60 cm)
from the rear bumper:
Buzzer beeps intermittently.
When an object is 12 in. to
24 in. (60 cm to 30 cm) from
the rear bumper:
Buzzer beeps more frequently.
When an object is within
12 in. (30 cm) of the rear
bumper:
Buzzer sounds continuously.
Types of warning soundIndicator*
* if equipped
Page 211 of 630
Features of your vehicle
122
4
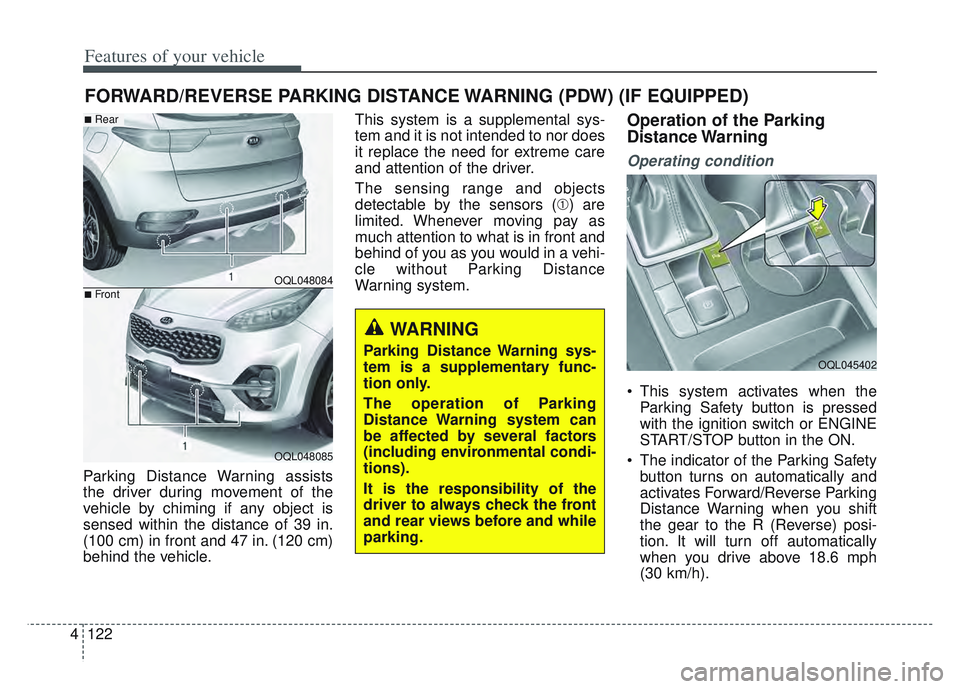
Parking Distance Warning assists
the driver during movement of the
vehicle by chiming if any object is
sensed within the distance of 39 in.
(100 cm) in front and 47 in. (120 cm)
behind the vehicle. This system is a supplemental sys-
tem and it is not intended to nor does
it replace the need for extreme care
and attention of the driver.
The sensing range and objects
detectable by the sensors (➀) are
limited. Whenever moving pay as
much attention to what is in front and
behind of you as you would in a vehi-
cle without Parking Distance
Warning system.
Operation of the Parking
Distance Warning
Operating condition
This system activates when the
Parking Safety button is pressed
with the ignition switch or ENGINE
START/STOP button in the ON.
The indicator of the Parking Safety button turns on automatically and
activates Forward/Reverse Parking
Distance Warning when you shift
the gear to the R (Reverse) posi-
tion. It will turn off automatically
when you drive above 18.6 mph
(30 km/h).
FORWARD/REVERSE PARKING DISTANCE WARNING (PDW) (IF EQUIPPED)
WARNING
Parking Distance Warning sys-
tem is a supplementary func-
tion only.
The operation of Parking
Distance Warning system can
be affected by several factors
(including environmental condi-
tions).
It is the responsibility of the
driver to always check the front
and rear views before and while
parking.
OQL048084
OQL048085
■Rear
■Front
OQL045402
Page 213 of 630
Features of your vehicle
124
4
✽ ✽
NOTICE
• This system can only sense objects
within the range and location of
the sensors. It cannot detect
objects in other areas where sen-
sors are not installed. Also, small
or slim objects, such as poles or
objects located between sensors
may not be detected by the sen-
sors. Always visually check behind
the vehicle when backing up.
• Be sure to inform any drivers of the vehicle that may be unfamiliar
with the system regarding the sys-
tems capabilities and limitations.
Non-operational conditions of
Parking Distance Warning
Parking Distance Warning may
not operate normally when:
1. Moisture is frozen to the sensor. (It will operate normally when mois-
ture melts.)
2. Sensor is covered with foreign matter, such as snow or water, or
the sensor cover is blocked. (It will
operate normally when the materi-
al is removed or the sensor is no
longer blocked.)
3. Sensor is stained with foreign mat- ter such as snow or water.
(Sensing range will return to nor-
mal when Cleaned.)
4.The Parking Distance Warning sys- tem button is off.
There is a possibility of Parking
Distance Warning malfunctionwhen:
1. Driving on uneven road surfaces such as unpaved roads, gravel,
bumps, or gradient.
2. Objects generating excessive noise such as vehicle horns, loud
motorcycle engines, or truck air
brakes can interfere with the sen-
sor.
3. The weather conditions produce heavy rain or water spray
4. Wireless transmitters or mobile phones are present near the sen-
sor.
5. Sensor is covered with snow.
Page 216 of 630
4127
Features of your vehicle
Battery saver function
The purpose of this feature is toprevent the battery from being dis-
charged if the lights are left in the
ON position. The system automati-
cally shuts off the parking lights 30
seconds after the ignition key is
removed and the driver’s door is
opened and closed.
With this feature, the parking lights will turn off automatically if the driver
parks on the side of the road at night
and opens the driver’s side door.
If necessary, to keep the parking
lights on when the ignition key is
removed, perform the following:
1) Open the driver-side door.
2) Turn the parking lights OFF and ON again using the light switch
on the steering column.
Daytime running light
(if equipped)
The Daytime Running Lights (DRL)
can make it easier for others to see the
front of your vehicle during the day.
DRL can be helpful in many different
driving conditions, and it is especially
helpful after dawn and before sunset.
The DRL system turns OFF when:
1. The headlight switch is ON.
2. The engine is OFF.
3. Engaging the Parking Brake
4. The front fog light is ON.
Lighting control
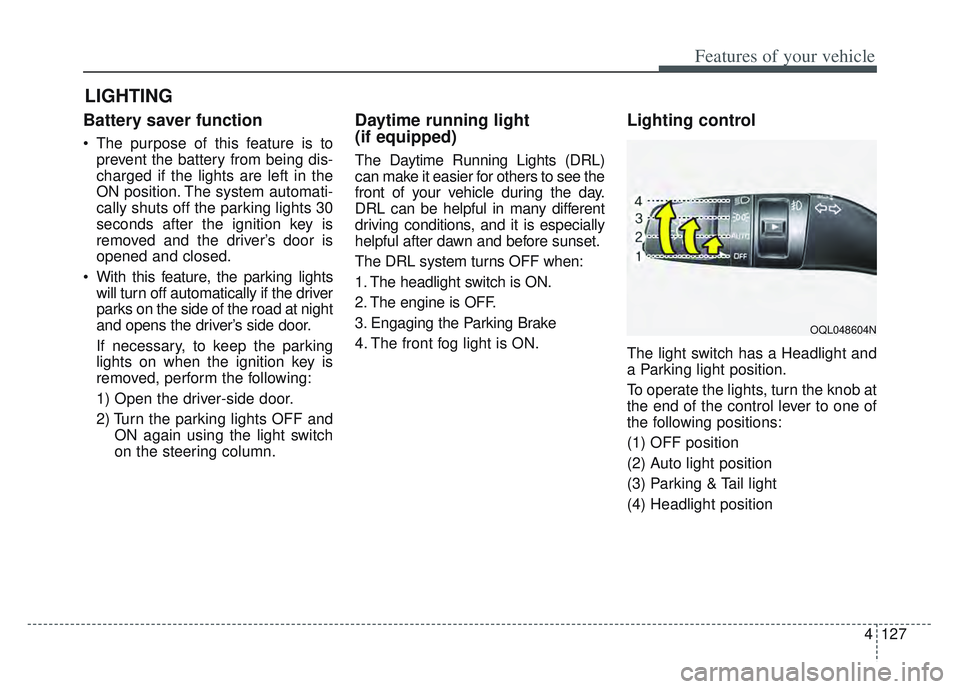
The light switch has a Headlight and
a Parking light position.
To operate the lights, turn the knob at
the end of the control lever to one of
the following positions:
(1) OFF position
(2) Auto light position
(3) Parking & Tail light
(4) Headlight position
LIGHTING
OQL048604N
Page 218 of 630
4129
Features of your vehicle
High beam operation
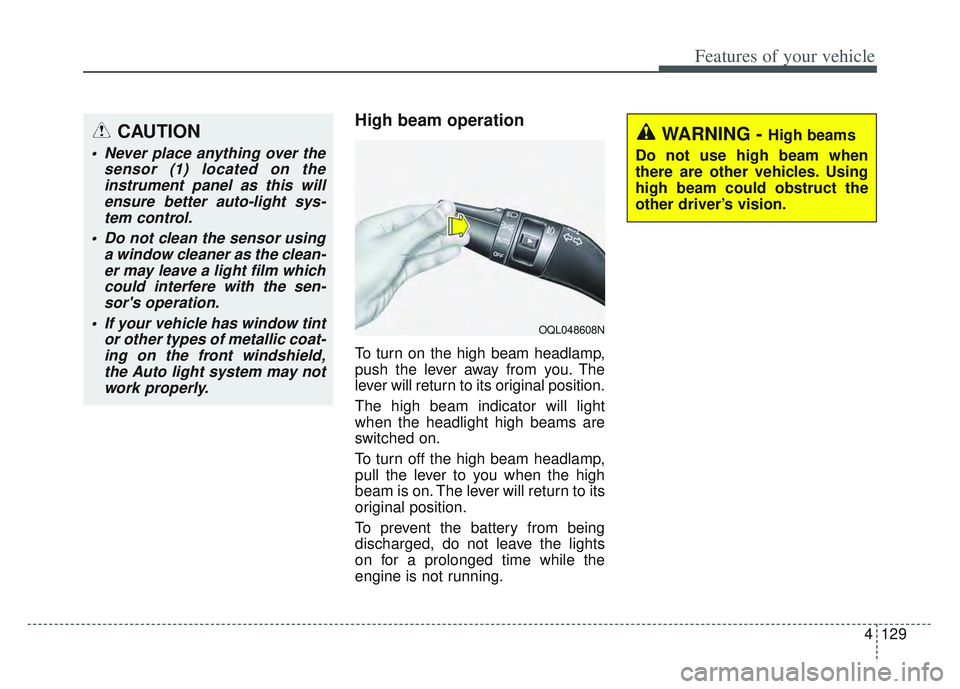
To turn on the high beam headlamp,
push the lever away from you. The
lever will return to its original position.
The high beam indicator will light
when the headlight high beams are
switched on.
To turn off the high beam headlamp,
pull the lever to you when the high
beam is on. The lever will return to its
original position.
To prevent the battery from being
discharged, do not leave the lights
on for a prolonged time while the
engine is not running.
CAUTION
Never place anything over thesensor (1) located on theinstrument panel as this willensure better auto-light sys-tem control.
Do not clean the sensor using a window cleaner as the clean-er may leave a light film whichcould interfere with the sen-sor's operation.
If your vehicle has window tint or other types of metallic coat-ing on the front windshield,the Auto light system may notwork properly.
WARNING - High beams
Do not use high beam when
there are other vehicles. Using
high beam could obstruct the
other driver’s vision.
OQL048608N
Page 223 of 630
Features of your vehicle
134
4
Dynamic Bending Light (DBL)
(if equipped)
Dynamic Bending Light (DBL) uses
the steering angle and vehicle
speed, to keep your field of vision
wide by swiveling and leveling the
headlamp.
Change the switch to the AUTO posi-
tion when the engine is running. The
Dynamic Bending Light (DBL) sys-
tem will operate when the headlamp
is ON. To turn off the DBL, change
the switch to other positions. After
turning the DBL off, headlamp
swiveling no longer occurs, but level-
ing operates continuously. If the DBL malfunction indicator
comes on, the DBL is not working
properly. Drive to the nearest safe
location and restart the engine. If the
indicator continuously remains on,
have the system checked by an
authorized Kia dealer.
OQL048607N
Page 225 of 630
Features of your vehicle
136
4
✽ ✽
NOTICE
If there is heavy accumulation of
snow or ice on the windshield,
defrost the windshield for about 10
minutes, or until the snow and/or ice
is removed before using the wind-
shield wipers to ensure proper oper-
ation.
If you do not remove the snow
and/or ice before using the wiper
and washer, it may damage the
wiper and washer system.
Front windshield washers
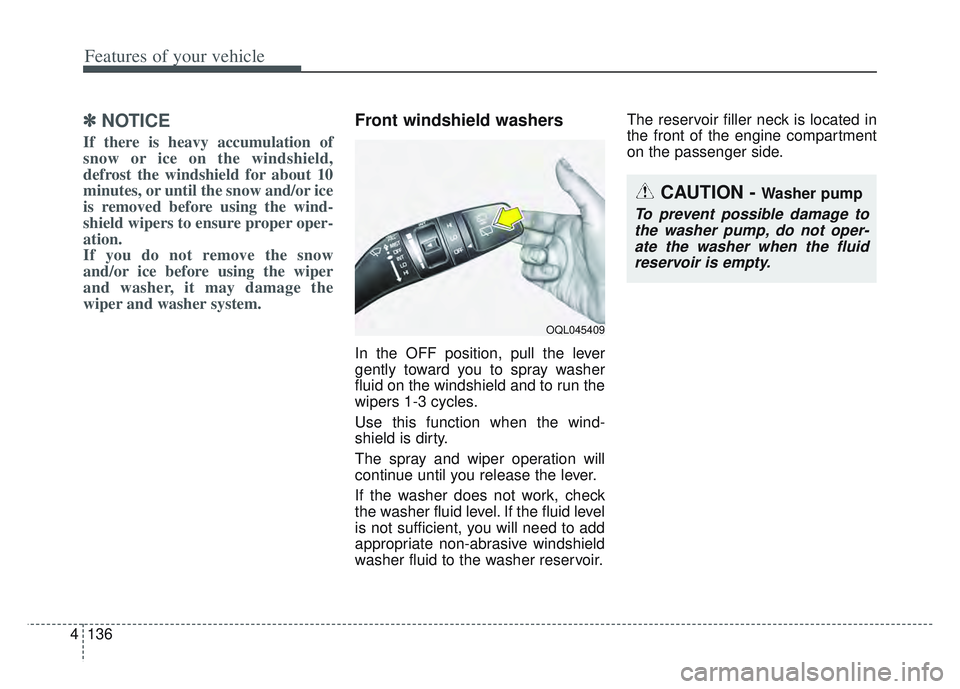
In the OFF position, pull the lever
gently toward you to spray washer
fluid on the windshield and to run the
wipers 1-3 cycles.
Use this function when the wind-
shield is dirty.
The spray and wiper operation will
continue until you release the lever.
If the washer does not work, check
the washer fluid level. If the fluid level
is not sufficient, you will need to add
appropriate non-abrasive windshield
washer fluid to the washer reservoir. The reservoir filler neck is located in
the front of the engine compartment
on the passenger side.
OQL045409
CAUTION - Washer pump
To prevent possible damage to
the washer pump, do not oper-ate the washer when the fluidreservoir is empty.