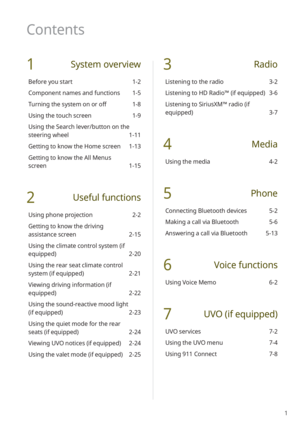
Page 121 of 156

8-17
System Volumes (if equipped)
You can adjust the volume for various
sounds and change the volume-related
settings.
[System Sound /Subsystem
Volumes
You can adjust the volume levels for
individual system features.
\333 Note
To restore the default volume settings for
system features, press Reset.
[Phone Projection /Connected
Devices
You can adjust the volume levels for
phone projection features individually.
\333 Note
To restore the default volume settings for
phone projection, press Reset.
[Speed Dependent Volume
Control
You can set the volume to be adjusted
automatically according to your driving
speed.
[Start-up Volume Limit
You can set to automatically lower the
system volume upon vehicle start-up, if
the volume has been previously set to a
high level.
Radio Noise (if equipped)
You can select the FM radio noise
reduction option for the sound quality of
the incoming signal.
\225 Original Sound : The original sound will
be maintained. Radio noise may be loud.
\225 Minimum Noise Reduction : The
original sound will be maintained
and noise reduction will be adjusted
automatically.
\225 Max. Noise Reduction : Radio noise is
minimized. The volume may be reduced.
Page 122 of 156
8-18
Configuring the
display settings
You can change the settings for the screen
display.
Depending on the vehicle model or
specifications, displayed screens and
available options may vary.
On the Home screen, press All
Menus > Setup > Display and
select an option to change.
Mode (if equipped)
You can set the screen brightness mode.
[ Automatic
You can set the system brightness to
be adjusted according to the ambient
lighting conditions or the headlamp
status.
Reset (if equipped)
You can reset your sound settings to
default values.
Touch sound ( Beep)
You can turn the touch sound on or off
by pressing Beep on the sound settings
screen.
Page 123 of 156

8-19
[Brightness Auto-Adjusts (if
equipped)
You can set the system brightness to
be adjusted according to the ambient
lighting conditions or the headlamp
status, or adjust the brightness manually.
[ Auto-adjust Brightness (if
equipped)
You can set the system brightness
to be switched to day mode or night
mode, according to the ambient lighting
conditions or the headlamp status. To
adjust the screen brightness level in each
mode, press
.
[ Adjust Manually (if equipped)
You can adjust the screen brightness
manually.
[Mode (if equipped)
You can set the screen brightness mode.
\225 Automatic : The system brightness
is adjusted according to the ambient
lighting conditions or the headlamp
status.
\225 Daylight : The screen will stay bright.
\225Night: The screen will stay dimmed.
[Daylight
This option is available when you
deactivate the Automatic option. The
screen will stay bright.
[ Night
This option is available when you
deactivate the Automatic option. The
screen will stay dimmed.
Illumination
You can adjust the screen brightness for
each brightness mode.
Option A
Option B
Page 124 of 156

8-20
Blue Light Filter
The blue light filter reduces eye fatigue by
adjusting the levels of blue light displayed
by the screen.
[Use Blue Light Filter
You can set to use the blue light filter.
After enabling the blue light filter, you can
adjust the intensity.
\333 Note
Depending on the vehicle model or
specifications, adjusting the intensity may
not be available.
[Blue Light Filter Settings
You can set the system to activate the blue
light filter automatically according to the
ambient lighting conditions or manually
enter a period for when to use the blue
light filter.
\225 Automatic : The blue light filter will
function automatically according to the
ambient lighting conditions.
\225 Scheduled Time: The blue light filter will
function during the set period.
[Link to Cluster Illumination
Control
(if equipped)
You can set system brightness to be
adjusted to match the instrument cluster′s
brightness. If deactivated, this feature
allows you to adjust screen brightness
in day or night mode, depending on the
mode selected.
[Daylight (if equipped)
You can adjust screen brightness in day
mode when you select Daylight in the
Mode option.
[ Night (if equipped)
You can adjust screen brightness in night
mode when you select Night in the Mode
option.
\333 Note
To restore the default settings for the
brightness modes, press Reset.
Page 125 of 156

8-21
Home Screen (if equipped)
You can change the widgets and
menus displayed on the Home screen.
Personalize the Home screen by adding
your favorite menus.
> See ″Changing the
Home screen widgets″ or
″ Changing the Home
screen menu icons.″
Media Change
Notifications
(if equipped)
You can set to briefly display media
information at the top of the screen
when not on the main media screen. If
you change the media item by using any
controls on the control panel or steering
wheel, media information will appear
regardless of this setting.
Screen Saver (if equipped)
You can select a screen saver option after
turning off your screen by pressing and
holding the Power button on the control
panel.
\225Analog Clock : The analog clock is
displayed. To change the clock type,
press
.
\225 Digital Clock : The digital clock is
displayed.
\225 None: No screen saver is displayed.
Extend Rear Camera Use (if
equipped)
You can set the rear view screen to remain
active even if you shift to any position
other than ″R″ (Reverse) after backing up.
When you shift to ″P″ (Park) or drive at a
predetermined speed or faster, the rear
view screen will be deactivated and the
system will display the previous screen
automatically.
Page 126 of 156
8-22
Reset (if equipped)
You can reset your display settings to
default values.
Display Off
You can turn off the screen by pressing
Display Off on the display settings screen.
Press the screen to turn it back on.
Configuring the UVO
settings
(if equipped)
You can access the settings and
information for UVO services.
Depending on the vehicle model or
specifications, displayed screens and
available options may vary.
On the Home screen, press All
Menus > Setup > UVO and select
an option to change.
Activate UVO
You can activate UVO services by creating
a new account in your system or entering
the verification code received from
Owners.kia.com.
> See ″Activating UVO
services.″
911 Connect
You can enable or disable automatic
connection to 911 in the event of
emergency.
> See ″Using 911 Connect .″
Modem Information
You can view your vehicle′s modem
information or update your modem.
Modem Status
You can check the current modem status.
Page 127 of 156
8-23
Configuring the Wi-Fi
settings
(if equipped)
You can change the Wi-Fi connection
settings for wireless phone projection.
Depending on the vehicle model or
specifications, displayed screens and
available options may vary.
On the Home screen, press All
Menus > Setup > Wi-Fi and
select an option to change.
Use Wi-Fi for Phone
Projection
You can activate or deactivate wireless
connectivity for phone projection.
Generate New Wi-Fi
Passkey
You can generate a new Wi-Fi passkey
for wireless connections. If your wireless
connection is poor, renew the passkey
and try again.
Page 128 of 156