2022 KIA NIRO PHEV change wheel
[x] Cancel search: change wheelPage 9 of 66

7*IF EQUIPPEDALWAYS CHECK THE OWNER ’S MANUAL FOR COMPLETE OPER ATING INFORMATION AND SAFET Y WARNINGS
A
•To help improve your fuel economy:
-Drive at a moderate speed, accelerating smoothly and at a moderate rate
-Keep tires inflated to the recommended pressure
-Be sure the wheels are properly aligned
QUICK TIPS
There are several factors that contribute to your vehicle’s fuel economy, such as maintenance of your vehicle, driving style, environmental conditions, vehicle weight and vehicle aerodynamics Below are some tips on how to help improve fuel economy:
•Keep your vehicle in good condition with regular maintenance
•Don’t let the engine idle longer than necessary
•Drive at a moderate speed, accelerating smoothly and at a moderate rate
•Keep tires inflated to the recommended pressure
•Travel lightly, without carrying unnecessary weight in your vehicles
•Avoid placing large or heavy items on roof racks
•Avoid hilly, winding or poorly maintained roads
When the Instrument Cluster LCD screen is in the Trip Computer mode, the screen displays fuel economy information related to the driving range and average fuel economy
To change modes, go to User Settings in the LCD Instrument Cluster modes
Average Fuel Consumption - Calculates average fuel consumption from the distance driven and amount of fuel injected into the engine / total fuel used
(Hybrid screen shown)
The shift modes can be changed A between Sport/Manual mode and ECO mode by moving the shift lever from D to the left gate and back:
•(D) - ECO Mode
•(S) - Sport/Manual Mode - When shift lever is moved into the left gate from (D) If shift lever is not moved through the gears, then the vehicle will shift automatically Sport Mode changes the Niro’s shift points and steering feel
The LCD screen on the instrument cluster will display the mode the vehicle is in
Refer to section 5 in the Owner ’s Manual for more information
ECOSPORT
ECO
Sport
REMINDER: Steering effor t may be slightly increased in Spor t mode
Refer to Section 4 in the Owner ’s Manual for more information
Refer to the inside front cover for more information on QR codes www youtube com/KiaFeatureVideos
Fuel Economy Video
QR CODE
INSTRUMENT CLUSTERINSTRUMENTCLUSTER
Fuel Economy
Average 16.8 MPG
Sport/ECO ModesFuel Economy
A
Page 10 of 66
8*IF EQUIPPEDNIRO HYBRID / PLUG-IN HYBRID FEATURES & FUNCTIONS GUIDE
Trip Modes / Trip Computer
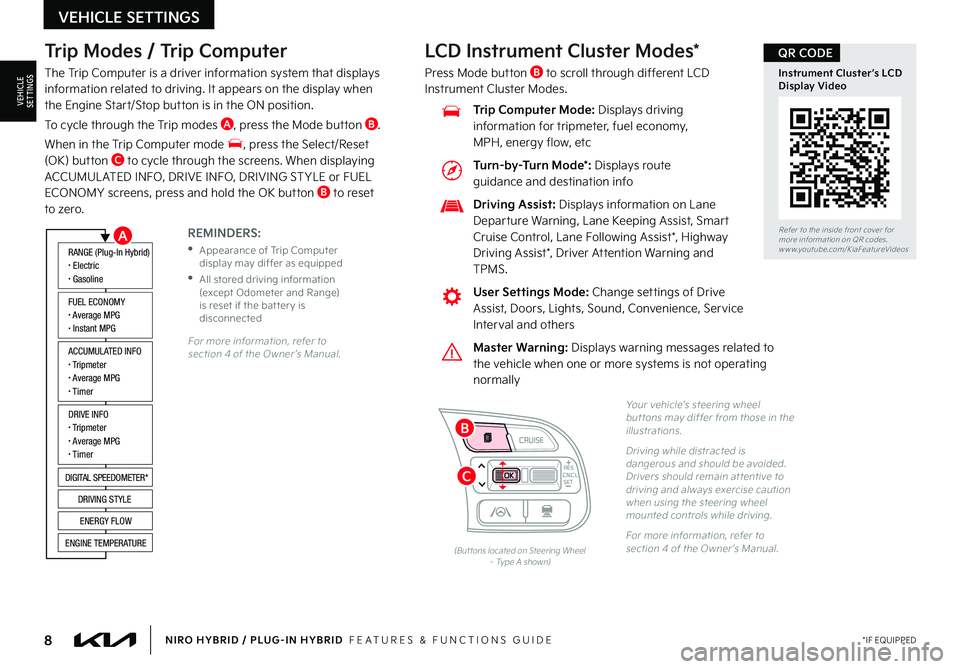
The Trip Computer is a driver information system that displays information related to driving It appears on the display when the Engine Start/Stop button is in the ON position
To cycle through the Trip modes A, press the Mode button B
When in the Trip Computer mode , press the Select/Reset (OK) button C to cycle through the screens When displaying ACCUMUL ATED INFO, DRIVE INFO, DRIVING ST YLE or FUEL ECONOMY screens, press and hold the OK button B to reset to zero
For more information, refer to section 4 of the Owner ’s Manual
REMINDERS:
•
Appearance of Trip Computer display may differ as equipped
•
All stored driving information (except Odometer and Range) is reset if the bat ter y is disconnected
ACCUMULATED INFO• Tripmeter• Average MPG• T imer
RANGE (Plug-In Hybrid)• Electric• Gasoline
FUEL ECONOMY• Average MPG• Instant MPG
DRIVE INFO• Tripmeter• Average MPG• T imer
DIGITAL SPEEDOMETER*
DRIVING STYLE
ENERGY FLOW
ENGINE TEMPERATURE
LCD Instrument Cluster Modes*
Press Mode button B to scroll through different LCD Instrument Cluster Modes
Yo u r vehicle’s steering wheel but tons may differ from those in the illustrations
Driving while distracted is dangerous and should be avoided Drivers should remain at tentive to driving and always exercise caution when using the steering wheel mounted controls while driving
For more information, refer to section 4 of the Owner ’s Manual (But tons located on Steering Wheel – Type A shown)
CNCLRES
CRUISE
SETCNCLRES
CRUISE
SET
Refer to the inside front cover for more information on QR codes
www youtube com/KiaFeatureVideos
Instrument Cluster’s LCD Display Video
QR CODE
Master Warning: Displays warning messages related to the vehicle when one or more systems is not operating normally
User Settings Mode: Change settings of Drive Assist, Doors, Lights, Sound, Convenience, Service Interval and others
Driving Assist: Displays information on Lane Departure Warning, Lane Keeping Assist, Smart Cruise Control, Lane Following Assist*, Highway
Driving Assist*, Driver Attention Warning and TPMS
Trip Computer Mode: Displays driving information for tripmeter, fuel economy, MPH, energy flow, etc
VEHICLE SETTINGS
VEHICLESETTINGS
A
C
B
Turn-by-Turn Mode*: Displays route guidance and destination info
Page 11 of 66
9*IF EQUIPPEDALWAYS CHECK THE OWNER ’S MANUAL FOR COMPLETE OPER ATING INFORMATION AND SAFET Y WARNINGS
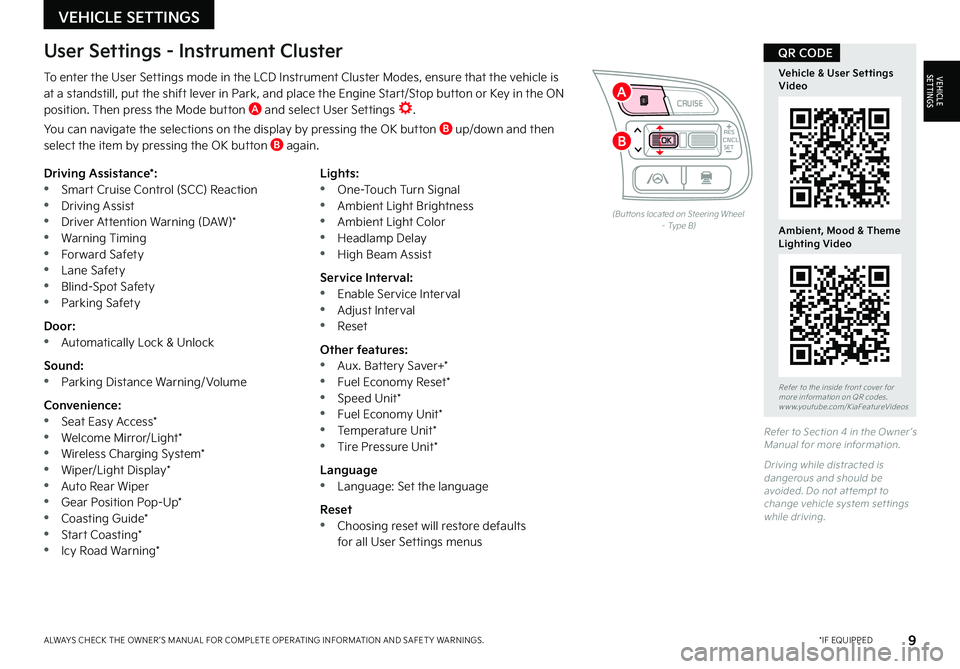
To enter the User Settings mode in the LCD Instrument Cluster Modes, ensure that the vehicle is at a standstill, put the shift lever in Park, and place the Engine Start/Stop button or Key in the ON position Then press the Mode button A and select User Settings
You can navigate the selections on the display by pressing the OK button B up/down and then select the item by pressing the OK button B again
Driving Assistance*: •Smart Cruise Control (SCC) Reaction •Driving Assist •Driver Attention Warning (DAW)* •Warning Timing •Forward Safety •Lane Safety •Blind-Spot Safety •Parking Safety
Door: •Automatically Lock & Unlock
Sound: •Parking Distance Warning/ Volume
Convenience: •Seat Easy Access* •Welcome Mirror/Light* •Wireless Charging System* •Wiper/Light Display* •Auto Rear Wiper •Gear Position Pop-Up* •Coasting Guide* •Start Coasting* •Icy Road Warning*
Lights: •One-Touch Turn Signal •Ambient Light Brightness •Ambient Light Color •Headlamp Delay •High Beam Assist
Service Interval: •Enable Service Interval •Adjust Interval •Reset
Other features: •Aux Battery Saver+* •Fuel Economy Reset* •Speed Unit* •Fuel Economy Unit* •Temperature Unit* •Tire Pressure Unit*
Language •Language: Set the language
Reset •Choosing reset will restore defaults for all User Settings menus
(But tons located on Steering Wheel – Type B)
Refer to Section 4 in the Owner ’s Manual for more information
Driving while distracted is dangerous and should be avoided Do not at tempt to change vehicle system set tings while driving
Refer to the inside front cover for more information on QR codes www youtube com/KiaFeatureVideos
Vehicle & User Settings Video
Ambient, Mood & Theme Lighting Video
QR CODEUser Settings - Instrument Cluster
CNCLRES
CRUISE
SETCNCLRES
CRUISE
SET
VEHICLE SETTINGS
VEHICLESETTINGS
B
A
Page 20 of 66
18*IF EQUIPPEDNIRO HYBRID / PLUG-IN HYBRID FEATURES & FUNCTIONS GUIDE
AUTOOFF
(But tons are located left of the Steering Wheel)
AB
Scheduled Charging*
(Plug-In Hybrid Only)
Charging Connector Auto/Lock Mode
(Plug-In Hybrid Only)
Charging time can be set in the Plug-In Hybrid audio system home screen, under charge management, or using the Kia Access with UVO link app
Charging with the UVO link Smartphone App:
The Kia Access with UVO link app can help you find the nearest charging station and displays charging-status and the Scheduled Charging information On your Smartphone, go to an app store or marketplace to download the Kia Access with UVO link app
REMINDER: When Scheduled Charging is set and the charger is plugged in, charging will not begin until the set time & date are met to complete the charging The green charge indicator on top of the dash will temporar y flash ON/OFF to show that scheduled/reser ve charging is set
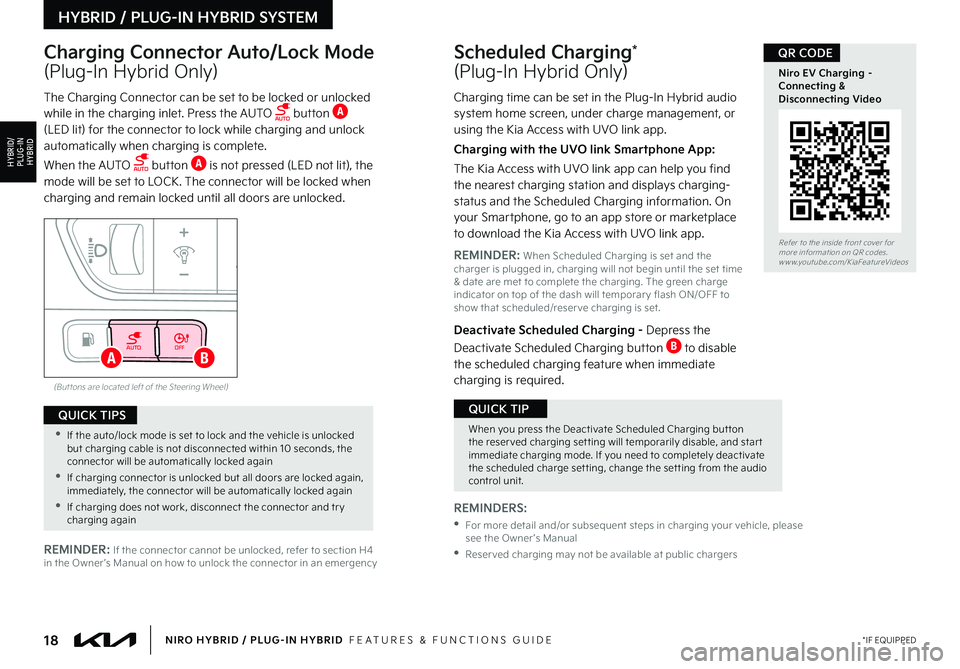
Deactivate Scheduled Charging - Depress the
Deactivate Scheduled Charging button B to disable the scheduled charging feature when immediate charging is required
The Charging Connector can be set to be locked or unlocked while in the charging inlet Press the AUTO button A (LED lit) for the connector to lock while charging and unlock automatically when charging is complete
When the AUTO button A is not pressed (LED not lit), the mode will be set to LOCK The connector will be locked when charging and remain locked until all doors are unlocked
REMINDERS:
• For more detail and/or subsequent steps in charging your vehicle, please see the Owner ’s Manual
•Reser ved charging may not be available at public chargersREMINDER: If the connector cannot be unlocked, refer to section H4 in the Owner ’s Manual on how to unlock the connector in an emergency
Refer to the inside front cover for more information on QR codes www youtube com/KiaFeatureVideos
Niro EV Charging – Connecting & Disconnecting Video
QR CODE
When you press the Deactivate Scheduled Charging but ton the reser ved charging set ting will temporarily disable, and star t immediate charging mode If you need to completely deactivate the scheduled charge set ting, change the set ting from the audio control unit
QUICK TIP
•If the auto/lock mode is set to lock and the vehicle is unlocked but charging cable is not disconnected within 10 seconds, the connector will be automatically locked again
•If charging connector is unlocked but all doors are locked again, immediately, the connector will be automatically locked again
•If charging does not work, disconnect the connector and tr y charging again
QUICK TIPS
HYBRID / PLUG-IN HYBRID SYSTEM
HYBRID/PLUG-IN
HYBRID
Page 25 of 66
CNCLRES
CRUISE
SETCNCLRES
CRUISE
SET
•Cruise Control is designed to function above 20 mph
•The Cruise Control system will not activate until the brake pedal has been depressed at least once after ignition ON or engine star t
QUICK TIPSStandard Cruise Control†1 6
D
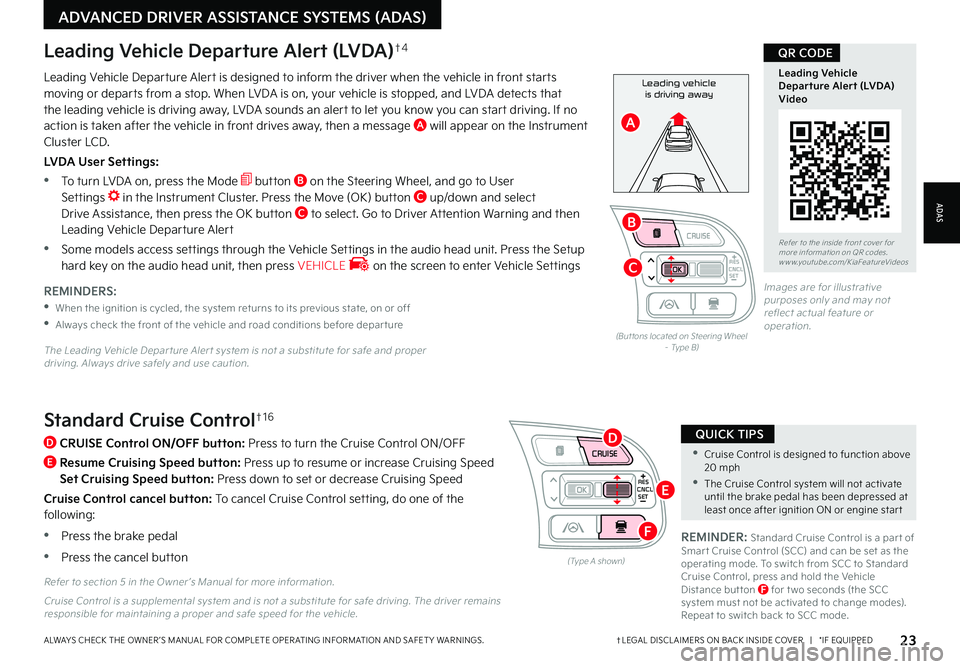
CRUISE Control ON/OFF button: Press to turn the Cruise Control ON/OFF
E
Resume Cruising Speed button: Press up to resume or increase Cruising Speed
Set Cruising Speed button: Press down to set or decrease Cruising Speed
Cruise Control cancel button: To cancel Cruise Control setting, do one of the following:
•Press the brake pedal
•Press the cancel button(Type A shown)
REMINDER: Standard Cruise Control is a par t of Smar t Cruise Control (SCC) and can be set as the operating mode To switch from SCC to Standard Cruise Control, press and hold the Vehicle Distance but ton F for t wo seconds (the SCC system must not be activated to change modes) Repeat to switch back to SCC mode
Refer to section 5 in the Owner ’s Manual for more information
23†LEGAL DISCL AIMERS ON BACK INSIDE COVER | *IF EQUIPPEDALWAYS CHECK THE OWNER ’S MANUAL FOR COMPLETE OPER ATING INFORMATION AND SAFET Y WARNINGS
Refer to the inside front cover for more information on QR codes www youtube com/KiaFeatureVideos
Leading Vehicle Departure Alert (LVDA)Video
QR CODE
Leading vehicle
is driving awayLeading Vehicle Departure Alert is designed to inform the driver when the vehicle in front starts moving or departs from a stop When LVDA is on, your vehicle is stopped, and LVDA detects that the leading vehicle is driving away, LVDA sounds an alert to let you know you can start driving If no action is taken after the vehicle in front drives away, then a message A will appear on the Instrument Cluster LCD
LVDA User Settings:
•
To turn LVDA on, press the Mode button B on the Steering Wheel, and go to User Settings in the Instrument Cluster Press the Move (OK) button C up/down and select Drive Assistance, then press the OK button C to select Go to Driver Attention Warning and then Leading Vehicle Departure Alert
•Some models access settings through the Vehicle Settings in the audio head unit Press the Setup hard key on the audio head unit, then press VEHICLE on the screen to enter Vehicle Settings
Leading Vehicle Departure Alert (LVDA)†4
REMINDERS:
•
When the ignition is cycled, the system returns to its previous state, on or off
•
Always check the front of the vehicle and road conditions before depar ture
The Leading Vehicle Depar ture Aler t system is not a substitute for safe and proper driving Always drive safely and use caution
(But tons located on Steering Wheel – Type B)
Images are for illustrative purposes only and may not reflect actual feature or operation
Cruise Control is a supplemental system and is not a substitute for safe driving The driver remains responsible for maintaining a proper and safe speed for the vehicle
ADAS
ADVANCED DRIVER ASSISTANCE SYSTEMS (ADAS)
CNCLRES
CRUISE
SETCNCLRES
CRUISE
SET
B
A
C
D
E
F
Page 26 of 66
24†LEGAL DISCL AIMERS ON BACK INSIDE COVER | *IF EQUIPPEDNIRO HYBRID / PLUG-IN HYBRID FEATURES & FUNCTIONS GUIDE
The Smart Cruise Control with Stop & Go* system is designed to maintain a predetermined distance from vehicles detected ahead by
automatically adjusting the driving speed as needed When traffic is detected, the vehicle will automatically slow to maintain a set
distance between traffic without depressing the accelerator or brake pedal
With the SCC on and activated and the vehicle distance set, when the system detects a vehicle slowing or stopping, it can bring the
vehicle to a complete stop When the vehicle ahead starts to move forward, the SCC system re-engages If the vehicle ahead stops
for more than 3 seconds, the accelerator pedal or the RES+ button must be pressed to start moving the vehicle
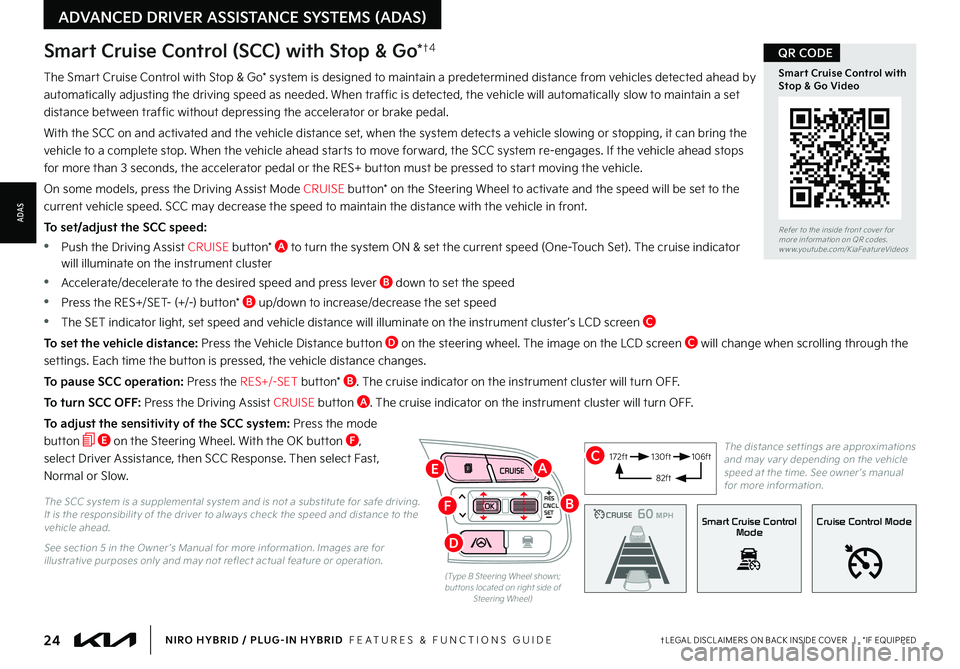
On some models, press the Driving Assist Mode CRUISE button* on the Steering Wheel to activate and the speed will be set to the
current vehicle speed SCC may decrease the speed to maintain the distance with the vehicle in front
To set/adjust the SCC speed:
•Push the Driving Assist CRUISE button* A to turn the system ON & set the current speed (One-Touch Set) The cruise indicator will illuminate on the instrument cluster
•Accelerate/decelerate to the desired speed and press lever B down to set the speed
•Press the RES+/SET- (+/-) button* B up/down to increase/decrease the set speed
•The SET indicator light, set speed and vehicle distance will illuminate on the instrument cluster ’s LCD screen C
To set the vehicle distance: Press the Vehicle Distance button D on the steering wheel The image on the LCD screen C will change when scrolling through the
settings Each time the button is pressed, the vehicle distance changes
To pause SCC operation: Press the RES+/-SET button* B The cruise indicator on the instrument cluster will turn OFF
To turn SCC OFF: Press the Driving Assist CRUISE button A The cruise indicator on the instrument cluster will turn OFF
To adjust the sensitivity of the SCC system: Press the mode
button E on the Steering Wheel With the OK button F,
select Driver Assistance, then SCC Response Then select Fast,
Normal or Slow
Smart Cruise Control (SCC) with Stop & Go*†4
The SCC system is a supplemental system and is not a substitute for safe driving It is the responsibilit y of the driver to always check the speed and distance to the vehicle ahead
See section 5 in the Owner ’s Manual for more information Images are for illustrative purposes only and may not reflect actual feature or operation
CRUISE100 MPHCRUISE100 MPH
CRUISE60 MPHCRUISE100 MPHSmart Cruise Control
ModeCruise Control Mode
The distance set tings are approximations and may var y depending on the vehicle speed at the time See owner ’s manual for more information
172ft130ft
82ft
106ft
(Type B Steering Wheel shown; but tons located on right side of Steering Wheel)
CNCLRES
CRUISE
SET
Refer to the inside front cover for more information on QR codes
www youtube com/KiaFeatureVideos
Smart Cruise Control with Stop & Go Video
QR CODE
ADVANCED DRIVER ASSISTANCE SYSTEMS (ADAS)
ADAS
B
AC
D
E
F
Page 29 of 66
27†LEGAL DISCL AIMERS ON BACK INSIDE COVER | *IF EQUIPPEDALWAYS CHECK THE OWNER ’S MANUAL FOR COMPLETE OPER ATING INFORMATION AND SAFET Y WARNINGS
REMINDERS:
•
Current highway speeds and controlled or limited access road information may var y Future navigation updates may change this information
•
If the driver changes the speed while in automatic speed set ting mode, it deactivates and enters a manual mode
•
When the ignition is cycled, the system returns to its previous state, on or off
60mph
Highway Driving Assist (HDA)*†4
Highway Driving Assist (HDA) is designed to adjust the speed of the vehicle when driving on limited/controlled access highways/freeways The system can adjust the vehicle’s speed based on available highway speed information The automatic speed setting mode is designed to set the speed automatically by adjusting to the current speed limits of the highway the vehicle is traveling on
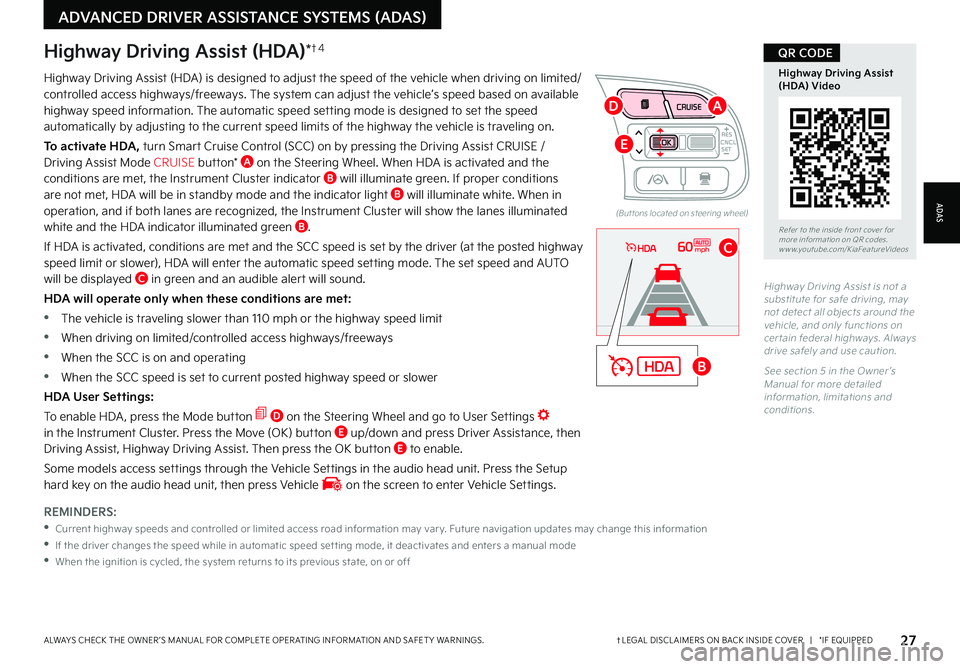
To activate HDA, turn Smart Cruise Control (SCC) on by pressing the Driving Assist CRUISE / Driving Assist Mode CRUISE button* A on the Steering Wheel When HDA is activated and the conditions are met, the Instrument Cluster indicator B will illuminate green If proper conditions are not met, HDA will be in standby mode and the indicator light B will illuminate white When in operation, and if both lanes are recognized, the Instrument Cluster will show the lanes illuminated white and the HDA indicator illuminated green B
If HDA is activated, conditions are met and the SCC speed is set by the driver (at the posted highway
speed limit or slower), HDA will enter the automatic speed setting mode The set speed and AUTO will be displayed C in green and an audible alert will sound
HDA will operate only when these conditions are met:
•
The vehicle is traveling slower than 110 mph or the highway speed limit
•
When driving on limited/controlled access highways/freeways
•
When the SCC is on and operating
•
When the SCC speed is set to current posted highway speed or slower
HDA User Settings:
To enable HDA , press the Mode button D on the Steering Wheel and go to User Settings in the Instrument Cluster Press the Move (OK) button E up/down and press Driver Assistance, then Driving Assist, Highway Driving Assist Then press the OK button E to enable
Some models access settings through the Vehicle Settings in the audio head unit Press the Setup hard key on the audio head unit, then press Vehicle on the screen to enter Vehicle Settings
Highway Driving Assist is not a substitute for safe driving, may not detect all objects around the vehicle, and only functions on cer tain federal highways Always drive safely and use caution
See section 5 in the Owner ’s Manual for more detailed information, limitations and conditions
Refer to the inside front cover for more information on QR codes www youtube com/KiaFeatureVideos
Highway Driving Assist (HDA) Video
QR CODE
ADAS
ADVANCED DRIVER ASSISTANCE SYSTEMS (ADAS)
CNCLRES
CRUISE
SET
(But tons located on steering wheel)
B
A
C
D
E
Page 32 of 66
30†LEGAL DISCL AIMERS ON BACK INSIDE COVER | *IF EQUIPPEDNIRO HYBRID / PLUG-IN HYBRID FEATURES & FUNCTIONS GUIDE
•When HAC is active (e g , accelerating from a stop on an incline), you may notice that the brakes will momentarily remain engaged after you depress the accelerator This is normal HAC operation
•HAC provides a 2-second delay before the vehicle may star t rolling backward
QUICK TIPS
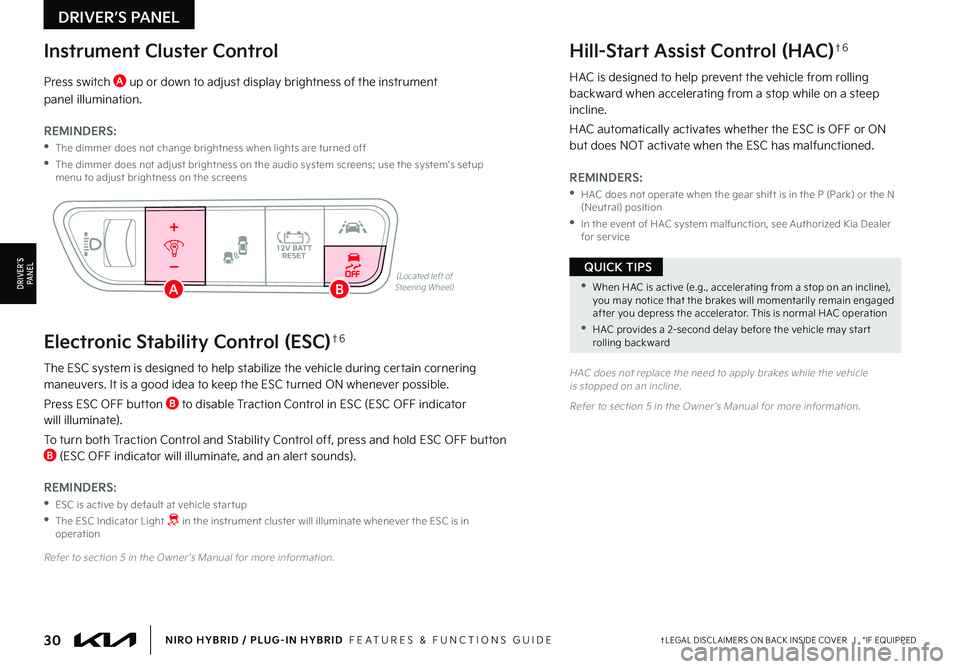
The ESC system is designed to help stabilize the vehicle during certain cornering maneuvers It is a good idea to keep the ESC turned ON whenever possible
Press ESC OFF button B to disable Traction Control in ESC (ESC OFF indicator will illuminate)
To turn both Traction Control and Stability Control off, press and hold ESC OFF button B (ESC OFF indicator will illuminate, and an alert sounds)
REMINDERS:
•ESC is active by default at vehicle star tup
•
The ESC Indicator Light in the instrument cluster will illuminate whenever the ESC is in operation
Refer to section 5 in the Owner ’s Manual for more information
HAC does not replace the need to apply brakes while the vehicle is stopped on an incline
Refer to section 5 in the Owner ’s Manual for more information
(Located left of Steering Wheel)
Press switch A up or down to adjust display brightness of the instrument
panel illumination
REMINDERS:
•
The dimmer does not change brightness when lights are turned off
•
The dimmer does not adjust brightness on the audio system screens; use the system’s setup menu to adjust brightness on the screens
HAC is designed to help prevent the vehicle from rolling backward when accelerating from a stop while on a steep incline
HAC automatically activates whether the ESC is OFF or ON but does NOT activate when the ESC has malfunctioned
REMINDERS:
•
HAC does not operate when the gear shift is in the P (Park) or the N (Neutral) position
•
In the event of HAC system malfunction, see Authorized Kia Dealer for ser vice
AUTOOFF
Instrument Cluster ControlHill-Start Assist Control (HAC)†6
Electronic Stability Control (ESC)†6
DRIVER’S PANEL
DRIVER’SPA N ELAB