2022 KIA NIRO HYBRID EV engine
[x] Cancel search: enginePage 179 of 684
441
Features of your vehicle
✽ ✽
NOTICE
• Add fuel into the fuel tank within
20 minutes after opening the fuel
filler door. After 20 minutes, the
fuel tank may shut off, causing
fuel to overflow. In this case, re-
press the fuel filler door opening
button.
• Do not leave the fuel filler door
opened for an extended period of
time. It may discharge the battery.
• Close the fuel filler door after fuel-
ing the vehicle. If you start the
vehicle with the fuel filler door
opened, the message, “Check fuel
door”, illuminates on the LCD dis-
play.
Closing the fuel filler door
1. To install the cap, turn it clockwise
until it “clicks”. This indicates that
the cap is securely tightened.
2. Close the fuel filler door and push
it lightly and make sure that it is
securely closed.
Always check that the fuel cap is
installed securely to prevent fuel
spillage in the event of an accident.
✽ ✽
NOTICE
• There may be an intermittent
noise near the refueling hole while
the engine is idling if the fuel cap is
not closed securely. This occurs
normally with the OBD system.
• When refueling on unlevel
ground, the fuel gauge may not
point to the F position.
It is not a malfunction. If you
move your vehicle to a level
ground, the fuel gauge will move
to the full position.
• Tighten the cap until it clicks once,
otherwise the fuel cap open warn-
ing indicator light will illumi-
nate.
WARNING - For Plug-in
Hybrid
Avoid refueling the vehicle
while charging the (high-volt-
age) hybrid battery. It may
cause a fire or an explosion due
to static electricity.
WARNING
Before refueling, be sure to
check what type of fuel is used
for your vehicle.
If you put diesel fuel into a
gasoline-powered vehicle or
gasoline into a diesel-powered
vehicle, it may affect the fuel
system and cause serious dam-
age to the vehicle.
Page 181 of 684
443
Features of your vehicle
Make sure to refuel your vehicle
according to the “Fuel requirements”
suggested in chapter 1.
If the fuel filler cap requires replace-
ment, use only a genuine Kia cap or
the equivalent specified for your vehi-
cle. An incorrect fuel filler cap can
result in a serious malfunction of the
fuel system or emission control sys-
tem.
WARNING- Smoking
DO NOT use matches or a
lighter and DO NOT SMOKE or
leave a lit cigarette in your vehi-
cle while at a gas station espe-
cially during refueling.
Automotive fuel is highly flam-
mable and can, when ignited,
result in fire.
WARNING- Refueling &
Vehicle fires
When refueling, always shut the
engine off. Sparks produced by
electrical components related
to the engine can ignite fuel
vapors causing a fire. Once
refueling is complete, check to
make sure the filler cap and
filler door are securely closed,
before starting the engine.
WARNING
In case of using EV drive mode
for a certain time without run-
ning Engine, EMM(Engine
Maintenance Mode) will auto-
matically activate by the system
to protect fuel system and the
engine.
Therefore, even though if it is
possible to use EV drive mode
with enough battery power, the
engine may run by the system
to protect fuel system and the
engine.
If you leave the fuel without
refueling or using for over 6
months, the remained fuel in the
fuel system may be deteriorat-
ed. From this, corrosion or
blocking problem may occur.
It is recommended using mini-
mum 40% of remained fuel at
least every 6 months by select-
ing Hybrid (CS) mode and refu-
el the vehicle with new fuel.
CAUTION- Exterior paint
Do not spill fuel on the exterior
surfaces of the vehicle. Any
type of fuel spilled on painted
surfaces may damage the paint.
Page 182 of 684
Features of your vehicle
44 4
If your vehicle is equipped with a
sunroof, you can slide or tilt your
sunroof with the sunroof switch locat-
ed on the overhead console.
The sunroof can only be operated
when the ignition switch or Engine
Start/Stop button is in the ON or
START position.
The sunroof can be operated for
approximately 30 seconds the igni-
tion switch or Engine Start/Stop but-
ton is in the ACC or LOCK/OFF posi-
tion. However, if the front door is
open, the sunroof cannot be operat-
ed even within the 30 seconds peri-
od.
✽ ✽
NOTICE
Do not operate the sunroof when
roof bars are installed on the vehicle
or when there is luggage on the roof.
Sunshade
Use the sunshade to block direct
sunlight coming through the sunroof
glass.
Open or close the sunshade by
hand.
SUNROOF (IF EQUIPPED)
ODEEV041620
WARNING
Never adjust the sunroof or
sunshade while driving. This
could result in loss of control
and an accident that may
cause injury, or property dam-
age.
Do not leave the engine run-
ning and the key in your vehi-
cle with unsupervised chil-
dren. Unattended children
could operate the sunroof,
which could result in serious
injury.
Do not sit on the top of the
vehicle. It may cause injury or
vehicle damage.
OBK049019
Page 186 of 684
Features of your vehicle
48 4
Sunroof resetting procedure:
1. It is recommended to perform the
reset procedure with the vehicle
engine running. Start the vehicle in
P (Park).
2. Make sure the sunroof glass is in
the fully closed position. If the sun-
roof glass is open, push the switch
forward until the sunroof glass is
fully closed.
3. Release the switch when the sun-
roof glass is fully closed.
4. Push the switch forward until the
sunroof glass moves slightly. Then
release the switch.
5. Once again push and hold the
sunroof switch forward until the
sunroof glass slides open and
close. Do not release the switch
until the operation is completed. If
you release the switch during
operation, start the procedure
again from step 2.
✽ ✽
NOTICE
If the sunroof does reset when the
vehicle battery is disconnected or dis-
charged, or the sunroof fuse is blown,
the sunroof may not operate normally.
Sunroof open warning
If the driver turns off the engine
when the sunroof is not fully closed,
the warning chime will sound for sev-
eral seconds and the sunroof open
warning will appear on the cluster
LCD display.
Close the sunroof securely when
leaving your vehicle.
ODEP041627
CAUTION
Make sure the sunroof is closed
fully when leaving your vehicle.
If the sunroof is left open, rain
or snow may wet the interior of
the vehicle. Also, leaving the
sunroof open when the vehicle
is unattended may invite theft.
Page 187 of 684

449
Features of your vehicle
Electric Power Steering
(EPS)
The power steering uses a motor to
assist you in steering the vehicle. If
the engine is off or if the power steer-
ing system becomes inoperative, the
vehicle may still be steered, but it will
require increased steering effort.
The EPS is controlled by a power
steering control unit which senses
the steering wheel torque and vehi-
cle speed to command the motor.
The steering becomes heavier as the
vehicle’s speed increases and
becomes lighter as the vehicle’s
speed decreases for optimum steer-
ing control.
Should you notice any change in the
effort required to steer during normal
vehicle operation, have the power
steering checked by an authorized
Kia dealer. When you operate the steering
wheel in low temperature, noise
may occur. If temperature rises, the
noise will likely disappear. This is a
normal condition.
When the vehicle is stationary, and
the steering wheel is turned all the
way to the left or right continuous-
ly, the steering wheel becomes
harder to turn. The power assist is
limited to protect the motor from
overheating.
As time passes, the steering wheel
will return to its normal condition.
✽ ✽
NOTICE
The following symptoms may occur
during normal vehicle operation:
• The EPS warning light does not
illuminate.
• The steering gets heavy immedi-
ately after turning the ENGINE
START/STOP button is ON posi-
tion. This happens as the system
performs the EPS system diagnos-
tics. When the diagnostics are
completed, the steering wheel will
return to its normal condition.
• A click noise may be heard from
the EPS relay after turning the
ENGINE START/STOP button is
ON or OFF position.
• A motor noise may be heard when
the vehicle is at a stop or at a low
driving speed.
• If the Electric Power Steering
System does not operate normally,
the warning light will illuminate on
the instrument cluster. The steer-
ing wheel may become difficult to
control or operate abnormally.
Take your vehicle to an authorized
Kia dealer and have the vehicle
checked as soon as possible.
(Continued)
STEERING WHEEL
Page 189 of 684
451
Features of your vehicle
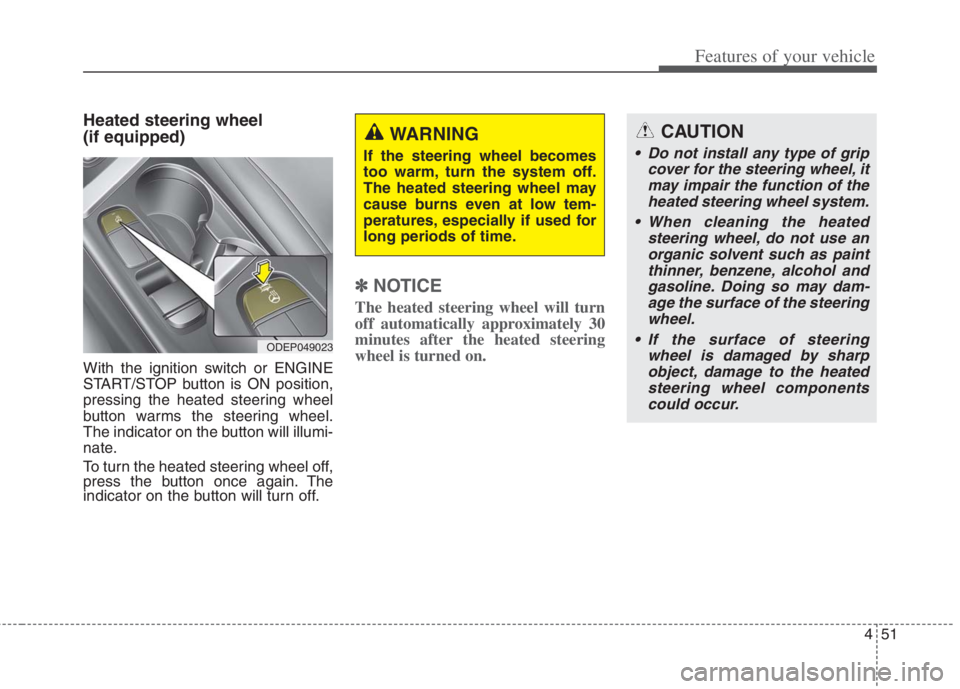
Heated steering wheel
(if equipped)
With the ignition switch or ENGINE
START/STOP button is ON position,
pressing the heated steering wheel
button warms the steering wheel.
The indicator on the button will illumi-
nate.
To turn the heated steering wheel off,
press the button once again. The
indicator on the button will turn off.
✽ ✽
NOTICE
The heated steering wheel will turn
off automatically approximately 30
minutes after the heated steering
wheel is turned on.
CAUTION
Do not install any type of grip
cover for the steering wheel, it
may impair the function of the
heated steering wheel system.
When cleaning the heated
steering wheel, do not use an
organic solvent such as paint
thinner, benzene, alcohol and
gasoline. Doing so may dam-
age the surface of the steering
wheel.
If the surface of steering
wheel is damaged by sharp
object, damage to the heated
steering wheel components
could occur.
ODEP049023
WARNING
If the steering wheel becomes
too warm, turn the system off.
The heated steering wheel may
cause burns even at low tem-
peratures, especially if used for
long periods of time.
Page 192 of 684
Features of your vehicle
54 4
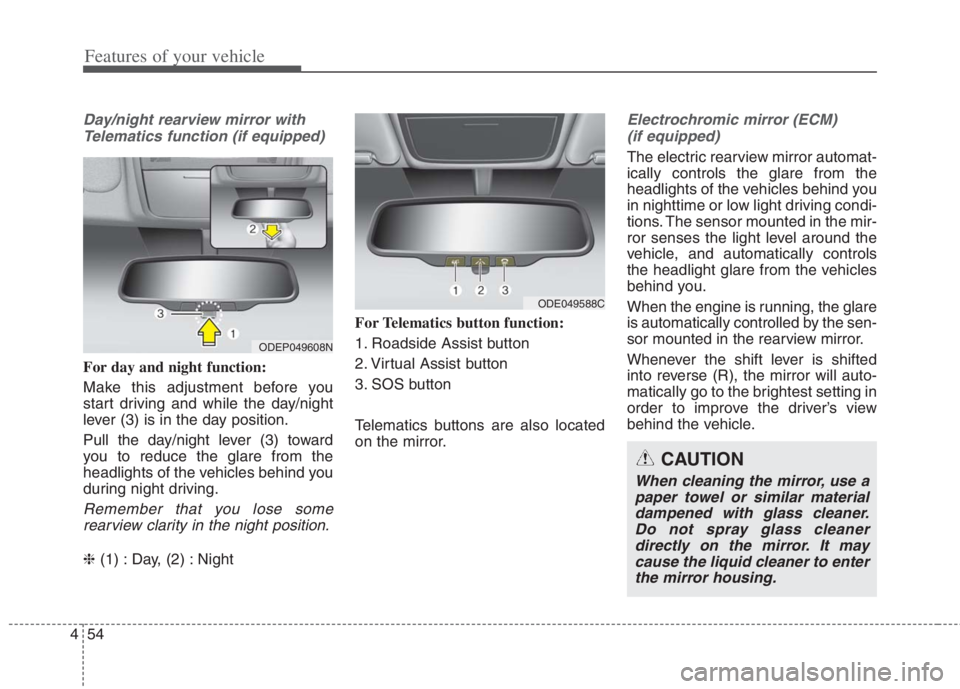
Day/night rearview mirror with
Telematics function (if equipped)
For day and night function:
Make this adjustment before you
start driving and while the day/night
lever (3) is in the day position.
Pull the day/night lever (3) toward
you to reduce the glare from the
headlights of the vehicles behind you
during night driving.
Remember that you lose some
rearview clarity in the night position.
❈(1) : Day, (2) : NightFor Telematics button function:
1. Roadside Assist button
2. Virtual Assist button
3. SOS button
Telematics buttons are also located
on the mirror.
Electrochromic mirror (ECM)
(if equipped)
The electric rearview mirror automat-
ically controls the glare from the
headlights of the vehicles behind you
in nighttime or low light driving condi-
tions. The sensor mounted in the mir-
ror senses the light level around the
vehicle, and automatically controls
the headlight glare from the vehicles
behind you.
When the engine is running, the glare
is automatically controlled by the sen-
sor mounted in the rearview mirror.
Whenever the shift lever is shifted
into reverse (R), the mirror will auto-
matically go to the brightest setting in
order to improve the driver’s view
behind the vehicle.
ODEP049608N
ODE049588C
CAUTION
When cleaning the mirror, use a
paper towel or similar material
dampened with glass cleaner.
Do not spray glass cleaner
directly on the mirror. It may
cause the liquid cleaner to enter
the mirror housing.
Page 193 of 684
455
Features of your vehicle
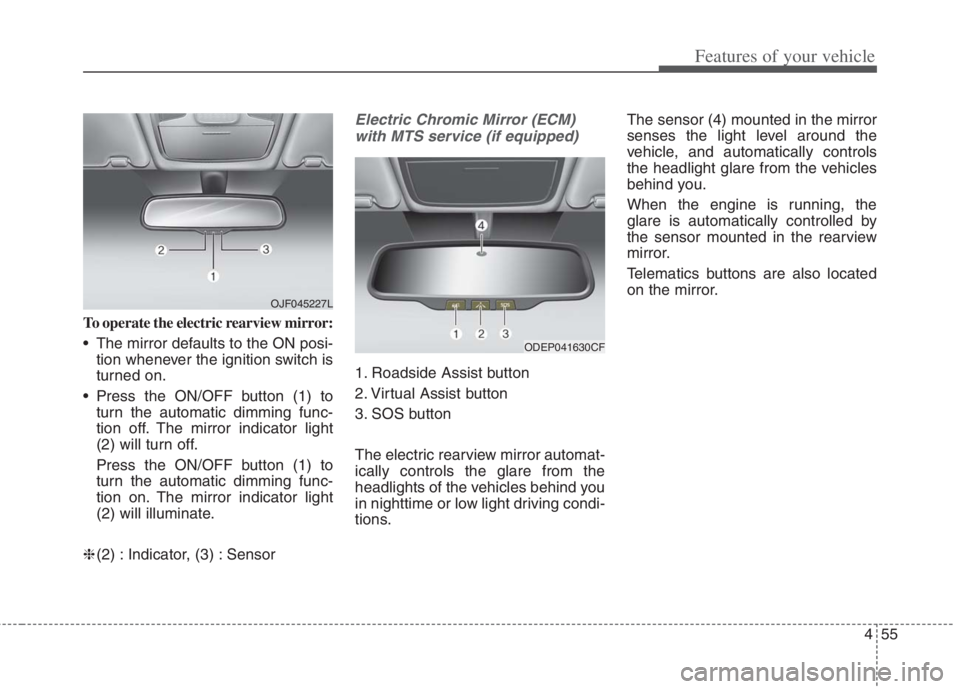
To operate the electric rearview mirror:
The mirror defaults to the ON posi-
tion whenever the ignition switch is
turned on.
Press the ON/OFF button (1) to
turn the automatic dimming func-
tion off. The mirror indicator light
(2) will turn off.
Press the ON/OFF button (1) to
turn the automatic dimming func-
tion on. The mirror indicator light
(2) will illuminate.
❈(2) : Indicator, (3) : Sensor
Electric Chromic Mirror (ECM)
with MTS service (if equipped)
1. Roadside Assist button
2. Virtual Assist button
3. SOS button
The electric rearview mirror automat-
ically controls the glare from the
headlights of the vehicles behind you
in nighttime or low light driving condi-
tions.The sensor (4) mounted in the mirror
senses the light level around the
vehicle, and automatically controls
the headlight glare from the vehicles
behind you.
When the engine is running, the
glare is automatically controlled by
the sensor mounted in the rearview
mirror.
Telematics buttons are also located
on the mirror.
ODEP041630CF
OJF045227L