2022 KIA NIRO HYBRID EV charging
[x] Cancel search: chargingPage 41 of 684
H38
AUX. BATTERY SAVER+ (For
Plug-in Hybrid, if equipped)
The Aux. Battery Saver+ is a function
that monitors the charging status of
the 12V auxiliary battery.
If the auxiliary battery level is low, the
main high voltage battery charges
the auxiliary battery.
✽ ✽
NOTICE
The Aux. Battery Saver+ function will
be ON when the vehicle is delivered. If
the function is not needed, you may
turn it off in the Users Settings mode
on the LCD display. For more infor-
mation, refer to the "System setting"
on the following page.
Mode
When the vehicle is OFF with all
doors, hood and liftgate closed, the
Aux. Battery Saver+ periodically acti-
vates according to the auxiliary bat-
tery status.
When the engine start/stop button is
in the ON position with the charging
connector plugged in, this function
activates according to the auxiliary
battery status to prevent over-dis-
charge of the auxiliary battery.
✽ ✽
NOTICE
The Aux. Battery Saver+ activates
for a maximum of 20 minutes. If the
Aux. Battery Saver+ function acti-
vates more than 10 times consecu-
tively, in the Automatic Mode, this
function will stop activating, judg-
ing that there is a problem with the
auxiliary battery. In this case, drive
the vehicle for some period of time.
The function will start activating if
the auxiliary battery returns to nor-
mal.
✽ ✽
NOTICE
If the Aux. Battery Saver+ function
was activated, the high voltage bat-
tery level may have decreased.
CAUTION
The Aux. Battery Saver+ func-
tion cannot prevent battery dis-
charge if the auxiliary battery is
damaged, worn out, used as a
power supply or if unauthorized
electronic devices are used.
PLUG-IN HYBRID ENERGY FLOW
Page 42 of 684
H39
System setting
The driver can activate the Aux.
Battery Saver+ function by placing
the engine start/stop button to the
ON position and by selecting:
"User Settings ➞Other Features ➞
Aux. Battery Saver+"WARNING
The Aux. Battery Saver+ relies
on the high voltage battery to
charge the 12V battery. The
charging indicator lamp will blink
rapidly when this is occurring.
To reduce the risk of electrical
shock, do not touch any high
voltage components (orange-
colored) or other electrical
devices while charging is occur-
ring.
Page 51 of 684
H48
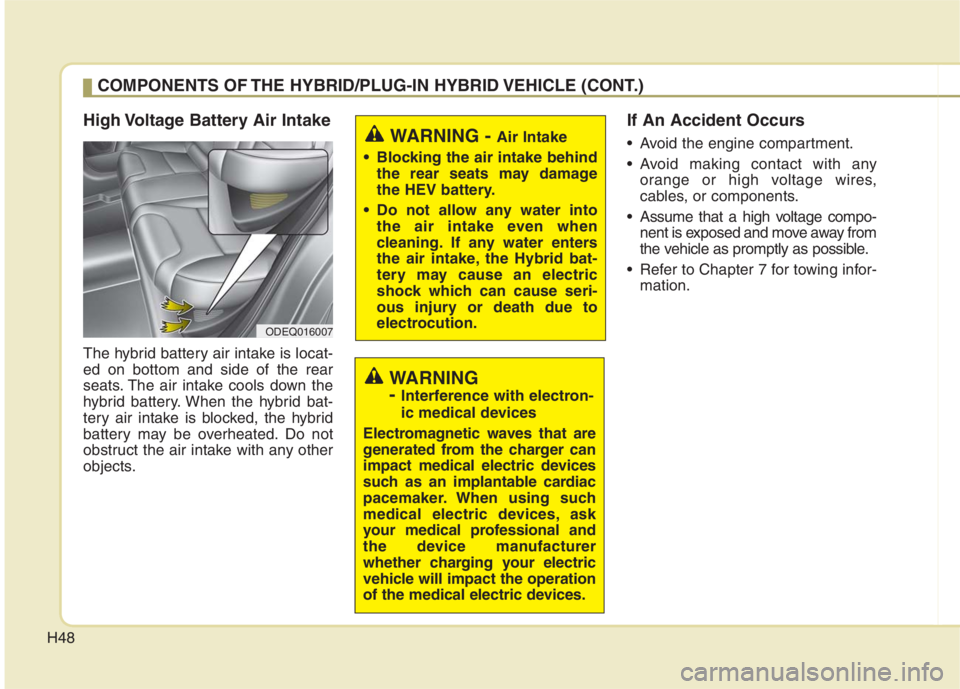
High Voltage Battery Air Intake
The hybrid battery air intake is locat-
ed on bottom and side of the rear
seats. The air intake cools down the
hybrid battery. When the hybrid bat-
tery air intake is blocked, the hybrid
battery may be overheated. Do not
obstruct the air intake with any other
objects.
If An Accident Occurs
Avoid the engine compartment.
Avoid making contact with any
orange or high voltage wires,
cables, or components.
Assume that a high voltage compo-
nent is exposed and move away from
the vehicle as promptly as possible.
Refer to Chapter 7 for towing infor-
mation.WARNING - Air Intake
Blocking the air intake behind
the rear seats may damage
the HEV battery.
Do not allow any water into
the air intake even when
cleaning. If any water enters
the air intake, the Hybrid bat-
tery may cause an electric
shock which can cause seri-
ous injury or death due to
electrocution.
ODEQ016007
WARNING
-
Interference with electron-
ic medical devices
Electromagnetic waves that are
generated from the charger can
impact medical electric devices
such as an implantable cardiac
pacemaker. When using such
medical electric devices, ask
your medical professional and
the device manufacturer
whether charging your electric
vehicle will impact the operation
of the medical electric devices.
COMPONENTS OF THE HYBRID/PLUG-IN HYBRID VEHICLE (CONT.)
Page 61 of 684
Your vehicle at a glance
2 2
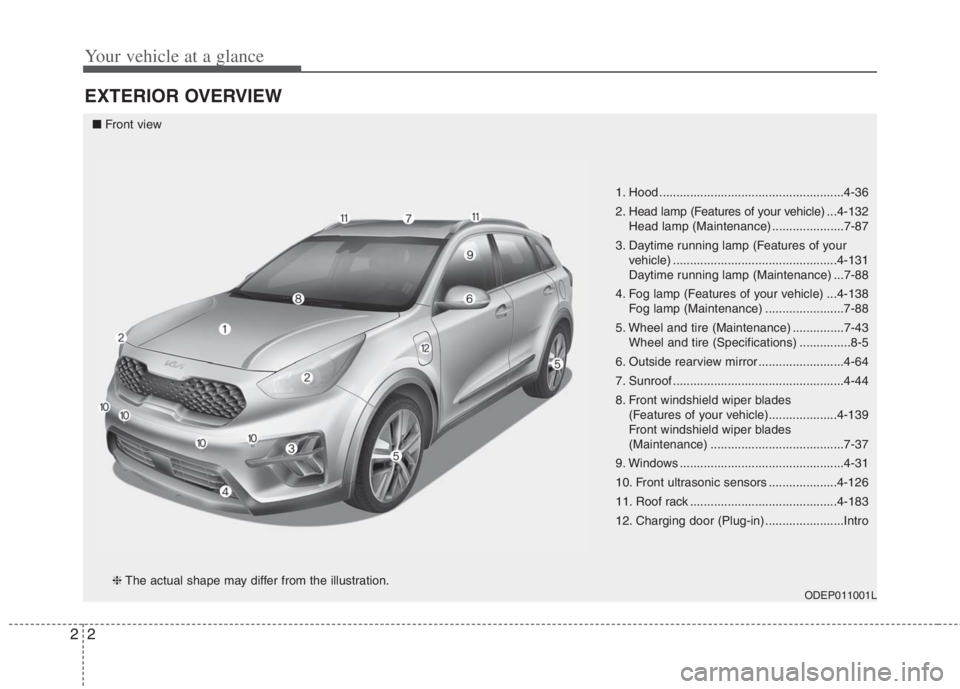
EXTERIOR OVERVIEW
1. Hood ......................................................4-36
2. Head lamp (Features of your vehicle) ...4-132
Head lamp (Maintenance) .....................7-87
3. Daytime running lamp (Features of your
vehicle) ................................................4-131
Daytime running lamp (Maintenance) ...7-88
4. Fog lamp (Features of your vehicle) ...4-138
Fog lamp (Maintenance) .......................7-88
5. Wheel and tire (Maintenance) ...............7-43
Wheel and tire (Specifications) ...............8-5
6. Outside rearview mirror .........................4-64
7. Sunroof ..................................................4-44
8. Front windshield wiper blades
(Features of your vehicle)....................4-139
Front windshield wiper blades
(Maintenance) .......................................7-37
9. Windows ................................................4-31
10. Front ultrasonic sensors ....................4-126
11. Roof rack ...........................................4-183
12. Charging door (Plug-in) .......................Intro
ODEP011001L
■Front view
❈The actual shape may differ from the illustration.
Page 63 of 684
Your vehicle at a glance
4 2
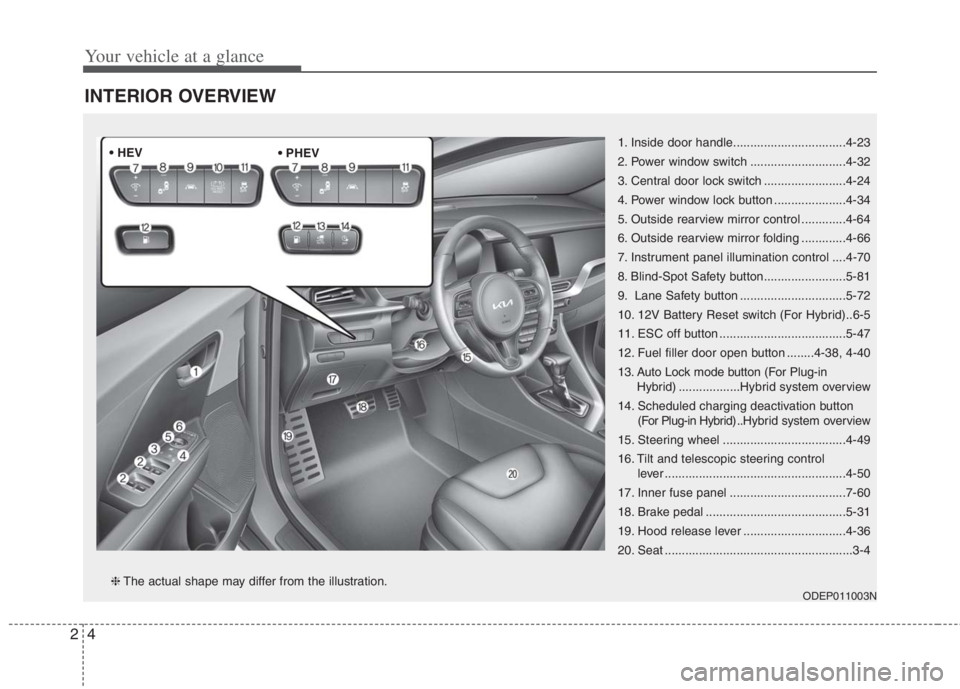
INTERIOR OVERVIEW
1. Inside door handle.................................4-23
2. Power window switch ............................4-32
3. Central door lock switch ........................4-24
4. Power window lock button .....................4-34
5. Outside rearview mirror control .............4-64
6. Outside rearview mirror folding .............4-66
7. Instrument panel illumination control ....4-70
8. Blind-Spot Safety button........................5-81
9. Lane Safety button ...............................5-72
10. 12V Battery Reset switch (For Hybrid)..6-5
11. ESC off button .....................................5-47
12. Fuel filler door open button ........4-38, 4-40
13. Auto Lock mode button (For Plug-in
Hybrid)..................Hybrid system overview
14. Scheduled charging deactivation button
(For Plug-in Hybrid) ..Hybrid system overview
15. Steering wheel ....................................4-49
16. Tilt and telescopic steering control
lever .....................................................4-50
17. Inner fuse panel ..................................7-60
18. Brake pedal .........................................5-31
19. Hood release lever ..............................4-36
20. Seat .......................................................3-4
ODEP011003N❈The actual shape may differ from the illustration. • HEV
Page 179 of 684
441
Features of your vehicle
✽ ✽
NOTICE
• Add fuel into the fuel tank within
20 minutes after opening the fuel
filler door. After 20 minutes, the
fuel tank may shut off, causing
fuel to overflow. In this case, re-
press the fuel filler door opening
button.
• Do not leave the fuel filler door
opened for an extended period of
time. It may discharge the battery.
• Close the fuel filler door after fuel-
ing the vehicle. If you start the
vehicle with the fuel filler door
opened, the message, “Check fuel
door”, illuminates on the LCD dis-
play.
Closing the fuel filler door
1. To install the cap, turn it clockwise
until it “clicks”. This indicates that
the cap is securely tightened.
2. Close the fuel filler door and push
it lightly and make sure that it is
securely closed.
Always check that the fuel cap is
installed securely to prevent fuel
spillage in the event of an accident.
✽ ✽
NOTICE
• There may be an intermittent
noise near the refueling hole while
the engine is idling if the fuel cap is
not closed securely. This occurs
normally with the OBD system.
• When refueling on unlevel
ground, the fuel gauge may not
point to the F position.
It is not a malfunction. If you
move your vehicle to a level
ground, the fuel gauge will move
to the full position.
• Tighten the cap until it clicks once,
otherwise the fuel cap open warn-
ing indicator light will illumi-
nate.
WARNING - For Plug-in
Hybrid
Avoid refueling the vehicle
while charging the (high-volt-
age) hybrid battery. It may
cause a fire or an explosion due
to static electricity.
WARNING
Before refueling, be sure to
check what type of fuel is used
for your vehicle.
If you put diesel fuel into a
gasoline-powered vehicle or
gasoline into a diesel-powered
vehicle, it may affect the fuel
system and cause serious dam-
age to the vehicle.
Page 188 of 684
Features of your vehicle
50 4
(Continued)
• When abnormality is detected in
the electric power steering system,
to prevent a deadly accident, the
steering assist function will stop.
At this time, the warning light
turns on or blinks on the cluster.
The steering wheel may become
difficult to control or operate.
Have your vehicle checked imme-
diately, after moving the vehicle to
a safe zone.
• When the charging system warning
light comes on due to low voltage
(when the alternator or battery
does not operate normally or mal-
function), the steering wheel may
require increased steering effort.
• If the vehicle needs to be jump
started due to battery discharge,
the steering wheel may not function
normally. This is a temporary situ-
ation caused by low battery volt-
age. It will be solved once the bat-
tery is charged. Check for normal
steering function by turning the
steering wheel slowly before driv-
ing the vehicle.Tilt and telescopic steering
Tilt and telescopic steering allows
you to adjust the steering wheel
before you drive. You can also raise it
to give your legs more space when
you get on or off the vehicle.
The steering wheel should be posi-
tioned so that it is comfortable for
you to drive, while permitting you to
see the instrument panel warning
lights and gauges.
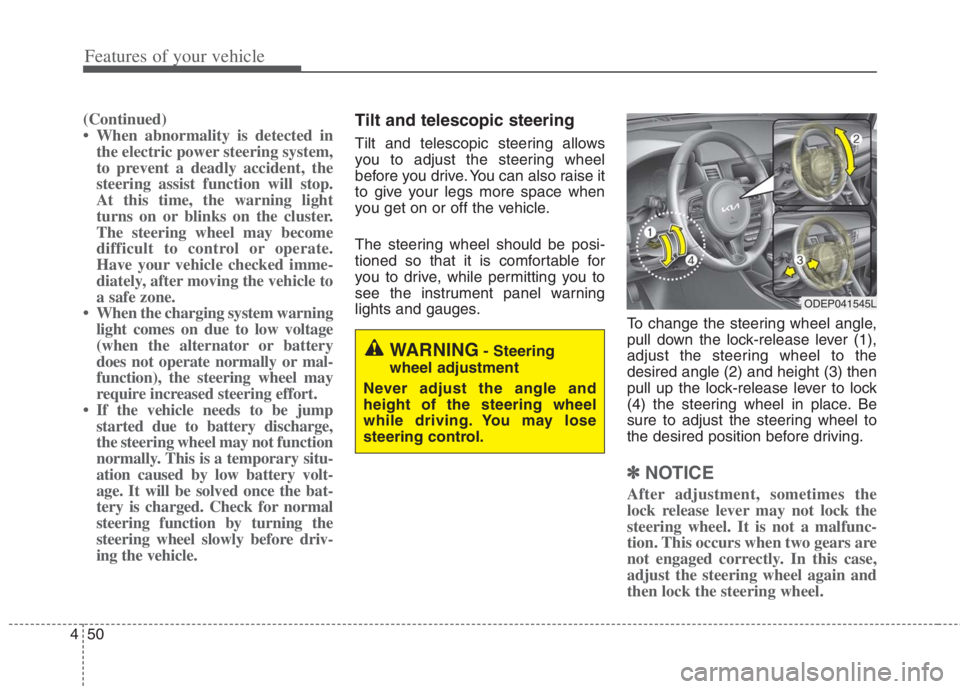
To change the steering wheel angle,
pull down the lock-release lever (1),
adjust the steering wheel to the
desired angle (2) and height (3) then
pull up the lock-release lever to lock
(4) the steering wheel in place. Be
sure to adjust the steering wheel to
the desired position before driving.
✽ ✽
NOTICE
After adjustment, sometimes the
lock release lever may not lock the
steering wheel. It is not a malfunc-
tion. This occurs when two gears are
not engaged correctly. In this case,
adjust the steering wheel again and
then lock the steering wheel.
WARNING- Steering
wheel adjustment
Never adjust the angle and
height of the steering wheel
while driving. You may lose
steering control.
ODEP041545L
Page 225 of 684
487
Features of your vehicle
ItemsExplanation
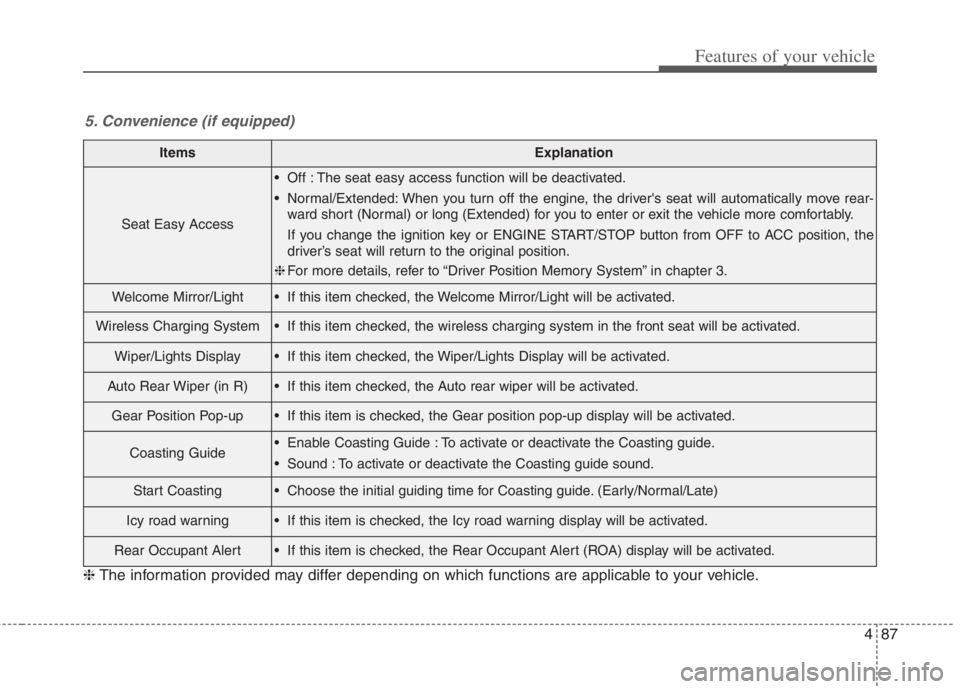
Seat Easy Access
Off : The seat easy access function will be deactivated.
Normal/Extended: When you turn off the engine, the driver's seat will automatically move rear-
ward short (Normal) or long (Extended) for you to enter or exit the vehicle more comfortably.
If you change the ignition key or ENGINE START/STOP button from OFF to ACC position, the
driver’s seat will return to the original position.
❈For more details, refer to “Driver Position Memory System” in chapter 3.
Welcome Mirror/Light If this item checked, the Welcome Mirror/Light will be activated.
Wireless Charging System If this item checked, the wireless charging system in the front seat will be activated.
Wiper/Lights Display If this item checked, the Wiper/Lights Display will be activated.
Auto Rear Wiper (in R) If this item checked, the Auto rear wiper will be activated.
Gear Position Pop-up If this item is checked, the Gear position pop-up display will be activated.
Coasting Guide Enable Coasting Guide : To activate or deactivate the Coasting guide.
Sound : To activate or deactivate the Coasting guide sound.
Start Coasting Choose the initial guiding time for Coasting guide. (Early/Normal/Late)
Icy road warning If this item is checked, the Icy road warning display will be activated.
Rear Occupant Alert If this item is checked, the Rear Occupant Alert (ROA) display will be activated.
5. Convenience (if equipped)
❈The information provided may differ depending on which functions are applicable to your vehicle.