2022 KIA NIRO HYBRID EV warning
[x] Cancel search: warningPage 585 of 684
743
Maintenance
TIRES AND WHEELS
Tire care
For proper maintenance, safety, and
maximum fuel economy, you must
always maintain recommended tire
inflation pressures and stay within
the load limits and weight distribution
recommended for your vehicle.
Recommended cold tire infla-
tion pressures
All tire pressures (including the
spare) should be checked when the
tires are cold. “Cold Tires” means the
vehicle has not been driven for at
least three hours or driven less than
1.6 km (1 mile).
Recommended pressures must be
maintained for the best ride, top vehi-
cle handling, and minimum tire wear.
For recommended inflation pressure
refer to “Tires and wheels” in chapter
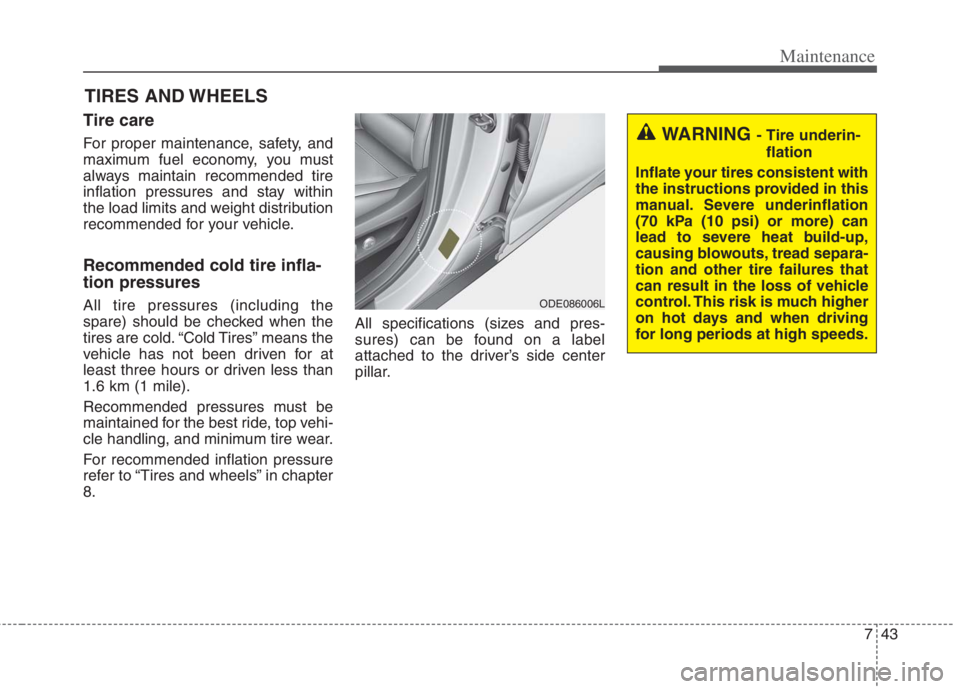
8.All specifications (sizes and pres-
sures) can be found on a label
attached to the driver’s side center
pillar.
WARNING - Tire underin-
flation
Inflate your tires consistent with
the instructions provided in this
manual. Severe underinflation
(70 kPa (10 psi) or more) can
lead to severe heat build-up,
causing blowouts, tread separa-
tion and other tire failures that
can result in the loss of vehicle
control. This risk is much higher
on hot days and when driving
for long periods at high speeds.
ODE086006L
Page 586 of 684
Maintenance
44 7
Underinflation also results in
excessive wear, poor handling and
reduced fuel economy. Wheel
deformation also is possible. Keep
your tire pressures at the proper
levels. If a tire frequently needs
refilling, have it checked by an
authorized Kia dealer.
Overinflation produces a harsh
ride, excessive wear at the center
of the tire tread, and a greater pos-
sibility of damage from road haz-
ards.
Warm tires normally exceed rec-
ommended cold tire pressures by
28 to 41 kPa (4 to 6 psi). Do not
release air from warm tires to
adjust the pressure or the tires will
be underinflated.
Be sure to reinstall the tire inflation
valve caps. Without the valve cap,
dirt or moisture could get into the
valve core and cause air leakage. If
a valve cap is missing, install a
new one as soon as possible.Tire pressure
Always observe the following:
Check tire pressure when the tires
are cold. (After vehicle has been
parked for at least three hours or
hasn't been driven more than 1.6
km (1 mile) since startup.)
Check the pressure of your spare
tire each time you check the pres-
sure of other tires.
Never overload your vehicle. Be
careful not to overload a vehicle
luggage rack if your vehicle is
equipped with one.
Checking tire inflation pres-
sure
Check your tires once a month or
more.
Also, check the tire pressure of the
spare tire.
How to check
Use a good quality gauge to check
tire pressure. You cannot tell if your
tires are properly inflated simply by
looking at them. Radial tires may
look properly inflated even when
they're underinflated.
Check the tire's inflation pressure
when the tires are cold. - "Cold"
means your vehicle has been sitting
for at least three hours or driven no
more than 1.6 km (1 mile).
WARNING - Tire Inflation
Overinflation or underinflation
can reduce tire life, adversely
affect vehicle handling, and
lead to sudden tire failure. This
could result in loss of vehicle
control and potential injury.
Page 588 of 684
Maintenance
46 7
Disc brake pads should be inspected
for wear whenever tires are rotated.
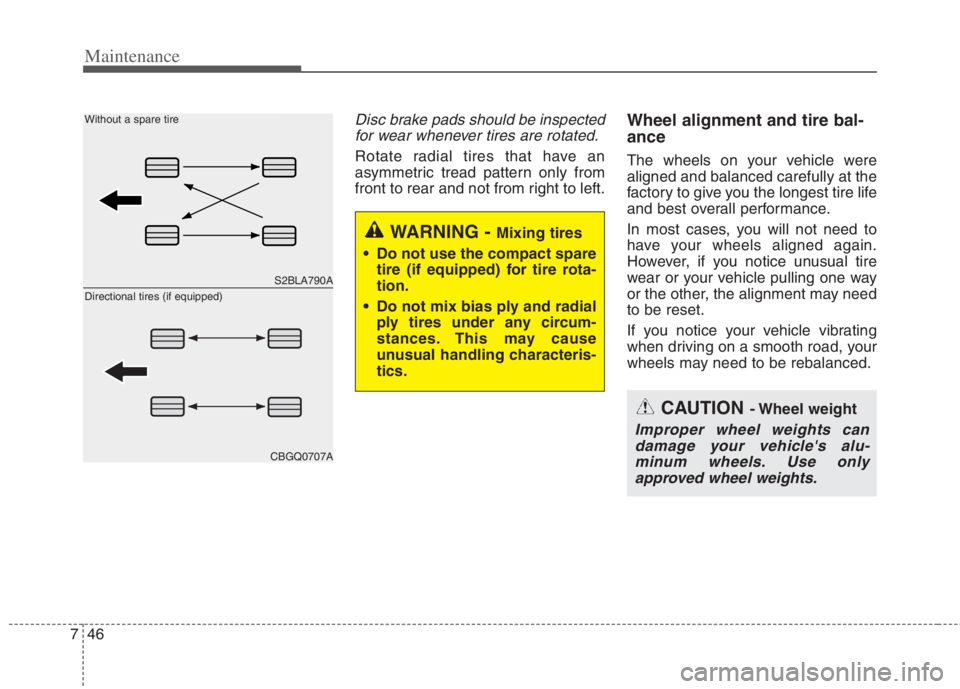
Rotate radial tires that have an
asymmetric tread pattern only from
front to rear and not from right to left.
Wheel alignment and tire bal-
ance
The wheels on your vehicle were
aligned and balanced carefully at the
factory to give you the longest tire life
and best overall performance.
In most cases, you will not need to
have your wheels aligned again.
However, if you notice unusual tire
wear or your vehicle pulling one way
or the other, the alignment may need
to be reset.
If you notice your vehicle vibrating
when driving on a smooth road, your
wheels may need to be rebalanced.
WARNING - Mixing tires
Do not use the compact spare
tire (if equipped) for tire rota-
tion.
Do not mix bias ply and radial
ply tires under any circum-
stances. This may cause
unusual handling characteris-
tics.
CAUTION - Wheel weight
Improper wheel weights can
damage your vehicle's alu-
minum wheels. Use only
approved wheel weights.
S2BLA790A
CBGQ0707A
Without a spare tire
Directional tires (if equipped)
Page 592 of 684
Maintenance
50 7
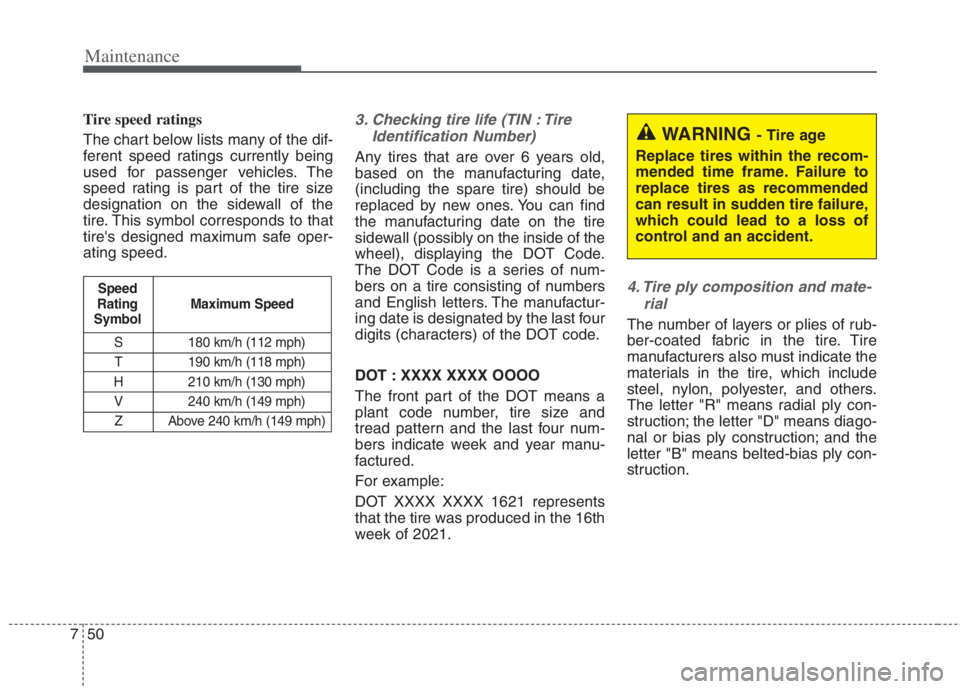
Tire speed ratings
The chart below lists many of the dif-
ferent speed ratings currently being
used for passenger vehicles. The
speed rating is part of the tire size
designation on the sidewall of the
tire. This symbol corresponds to that
tire's designed maximum safe oper-
ating speed.3. Checking tire life (TIN : Tire
Identification Number)
Any tires that are over 6 years old,
based on the manufacturing date,
(including the spare tire) should be
replaced by new ones. You can find
the manufacturing date on the tire
sidewall (possibly on the inside of the
wheel), displaying the DOT Code.
The DOT Code is a series of num-
bers on a tire consisting of numbers
and English letters. The manufactur-
ing date is designated by the last four
digits (characters) of the DOT code.
DOT : XXXX XXXX OOOO
The front part of the DOT means a
plant code number, tire size and
tread pattern and the last four num-
bers indicate week and year manu-
factured.
For example:
DOT XXXX XXXX 1621 represents
that the tire was produced in the 16th
week of 2021.
4. Tire ply composition and mate-
rial
The number of layers or plies of rub-
ber-coated fabric in the tire. Tire
manufacturers also must indicate the
materials in the tire, which include
steel, nylon, polyester, and others.
The letter "R" means radial ply con-
struction; the letter "D" means diago-
nal or bias ply construction; and the
letter "B" means belted-bias ply con-
struction.
S 180 km/h (112 mph)
T 190 km/h (118 mph)
H 210 km/h (130 mph)
V 240 km/h (149 mph)
Z Above 240 km/h (149 mph)
Maximum Speed Speed
Rating
Symbol
WARNING - Tire age
Replace tires within the recom-
mended time frame. Failure to
replace tires as recommended
can result in sudden tire failure,
which could lead to a loss of
control and an accident.
Page 598 of 684
Maintenance
56 7
Snow tires
If you equip your car with snow tires,
they should be the same size and
have the same load capacity as the
original tires. Snow tires should be
installed on all four wheels; other-
wise, poor handling may result.
Snow tires should carry 28 kPa (4
psi) more air pressure than the pres-
sure recommended for the standard
tires on the tire label on the driver's
side of the center pillar, or up to the
maximum pressure shown on the tire
sidewall, whichever is less.
Do not drive faster than 120 km/h (75
mph) when your vehicle is equipped
with snow tires.
Radial-ply tires
Radial-ply tires provide improved
tread life, road hazard resistance and
smoother high speed ride. The radi-
al-ply tires used on this vehicle are
of belted construction and are select-
ed to complement the ride and han-
dling characteristics of your vehicle.
Radial-ply tires have the same load
carrying capacity as bias-ply or bias
belted tires of the same size and use
the same recommended inflation
pressure. Mixing of radial-ply tires
with bias-ply or bias belted tires is
not recommended. Any combina-
tions of radial-ply and bias-ply or bias
belted tires when used on the same
vehicle will seriously deteriorate
vehicle handling. The best rule to fol-
low is: identical radial-ply tires should
always be used as a set of four.WARNING
Do not use summer tires at tem-
peratures below 7°C (45°F) or
when driving on snow or ice. At
temperatures below 7°C (45°F),
summer tires can lose elastici-
ty, and therefore traction and
braking power as well. Change
the tires on your vehicle to win-
ter or all-weather tires of the
same size as the standard tires
of the vehicle. Both types of
tires are identified by the M+S
(Mud and Snow) marking. Using
summer tires at very cold tem-
peratures could cause cracks to
form, thereby damaging the
tires permanently.
Page 601 of 684
759
Maintenance
FUSES
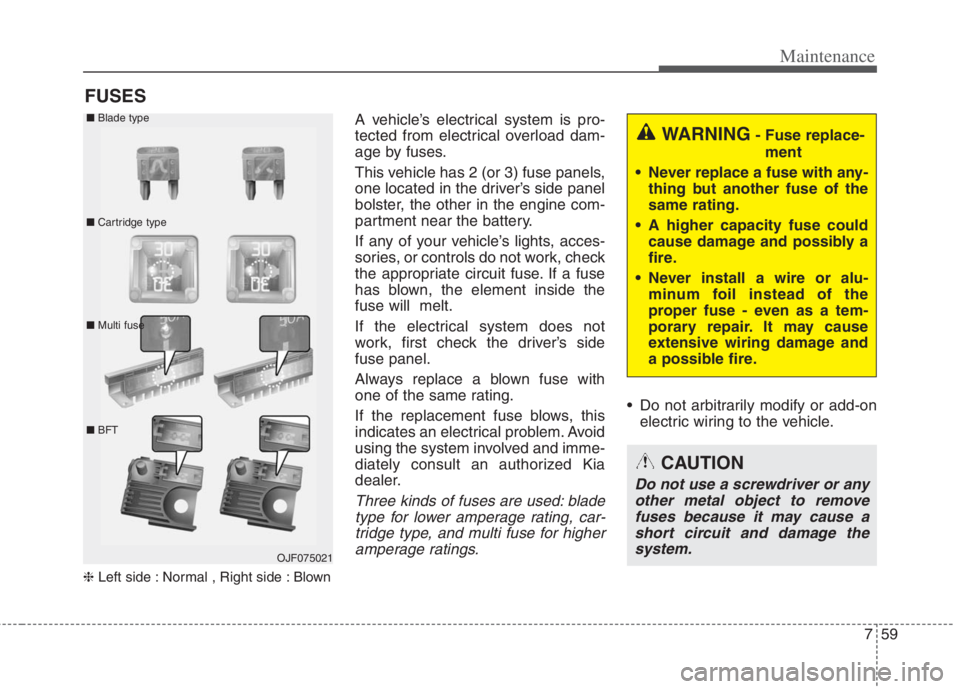
❈Left side : Normal , Right side : Blown
A vehicle’s electrical system is pro-
tected from electrical overload dam-
age by fuses.
This vehicle has 2 (or 3) fuse panels,
one located in the driver’s side panel
bolster, the other in the engine com-
partment near the battery.
If any of your vehicle’s lights, acces-
sories, or controls do not work, check
the appropriate circuit fuse. If a fuse
has blown, the element inside the
fuse will melt.
If the electrical system does not
work, first check the driver’s side
fuse panel.
Always replace a blown fuse with
one of the same rating.
If the replacement fuse blows, this
indicates an electrical problem. Avoid
using the system involved and imme-
diately consult an authorized Kia
dealer.
Three kinds of fuses are used: blade
type for lower amperage rating, car-
tridge type, and multi fuse for higher
amperage ratings.
Do not arbitrarily modify or add-on
electric wiring to the vehicle.
WARNING- Fuse replace-
ment
Never replace a fuse with any-
thing but another fuse of the
same rating.
A higher capacity fuse could
cause damage and possibly a
fire.
Never install a wire or alu-
minum foil instead of the
proper fuse - even as a tem-
porary repair. It may cause
extensive wiring damage and
a possible fire.
CAUTION
Do not use a screwdriver or any
other metal object to remove
fuses because it may cause a
short circuit and damage the
system.
OJF075021 ■Blade type
■Cartridge type
■Multi fuse
■BFT
Page 602 of 684

Maintenance
60 7
✽
✽
NOTICE
• When replacing fuse, turn the
ignition “OFF” and turn off
switches of all electrical devices
then remove battery (-) terminal.
• The actual fuse/relay panel label
may differ from equipped items.
Inner panel fuse replacement
1. Turn the engine start/stop button
to the OFF position and all other
switches off.
2. Open the fuse panel cover.
If the switch is located in the “OFF”
position, a caution indicator will be
displayed in the cluster.
WARNING- Electrical Fire
Always ensure replacements
fuses and relays are securely
fastened when installed. Failure
to do so can result in a vehicle
fire.
CAUTION
When replacing a blown fuse
or relay, make sure the new
fuse or relay fits tightly into
the clips. Failure to tightly
install the fuse or relay may
cause damage to the wiring
and electric systems.
Do not remove fuses, relays
and terminals fastened with
bolts or nuts. The fuses, relays
and terminals may not be fas-
tened correctly which may
cause vehicle damage.
ODEP071017L
Page 606 of 684
Maintenance
64 7
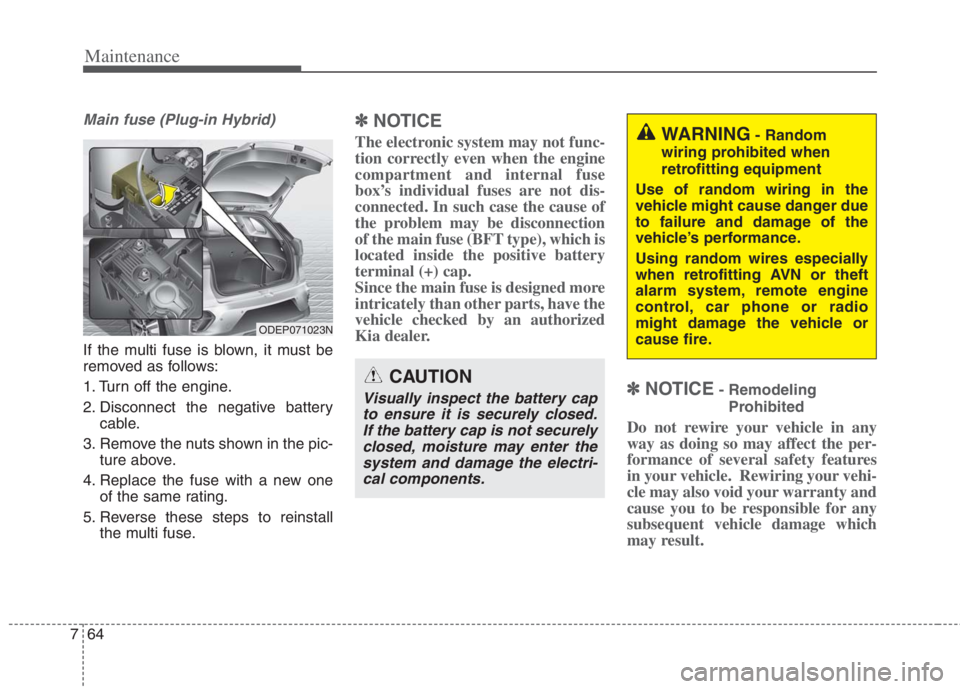
Main fuse (Plug-in Hybrid)
If the multi fuse is blown, it must be
removed as follows:
1. Turn off the engine.
2. Disconnect the negative battery
cable.
3. Remove the nuts shown in the pic-
ture above.
4. Replace the fuse with a new one
of the same rating.
5. Reverse these steps to reinstall
the multi fuse.
✽ ✽
NOTICE
The electronic system may not func-
tion correctly even when the engine
compartment and internal fuse
box’s individual fuses are not dis-
connected. In such case the cause of
the problem may be disconnection
of the main fuse (BFT type), which is
located inside the positive battery
terminal (+) cap.
Since the main fuse is designed more
intricately than other parts, have the
vehicle checked by an authorized
Kia dealer.
✽ ✽
NOTICE- Remodeling
Prohibited
Do not rewire your vehicle in any
way as doing so may affect the per-
formance of several safety features
in your vehicle. Rewiring your vehi-
cle may also void your warranty and
cause you to be responsible for any
subsequent vehicle damage which
may result.
CAUTION
Visually inspect the battery cap
to ensure it is securely closed.
If the battery cap is not securely
closed, moisture may enter the
system and damage the electri-
cal components.
WARNING- Random
wiring prohibited when
retrofitting equipment
Use of random wiring in the
vehicle might cause danger due
to failure and damage of the
vehicle’s performance.
Using random wires especially
when retrofitting AVN or theft
alarm system, remote engine
control, car phone or radio
might damage the vehicle or
cause fire.
ODEP071023N