2022 KIA NIRO HYBRID EV service
[x] Cancel search: servicePage 299 of 684
4161
Features of your vehicle
System cancellation
1. ENGINE START/STOP button is
On or ignition switch ON.
2. Select Floor-Level ( ) air flow
direction by pressing
Mode Selection button.
3. With pressing Air Conditioning but-
ton, press the Recirculated Air but-
ton more than 4 times within 2
seconds.
4. If the system is cancelled, the indi-
cator on Recirculated Air button
will blinks 3 times.
Climate control air filter
(if equipped)
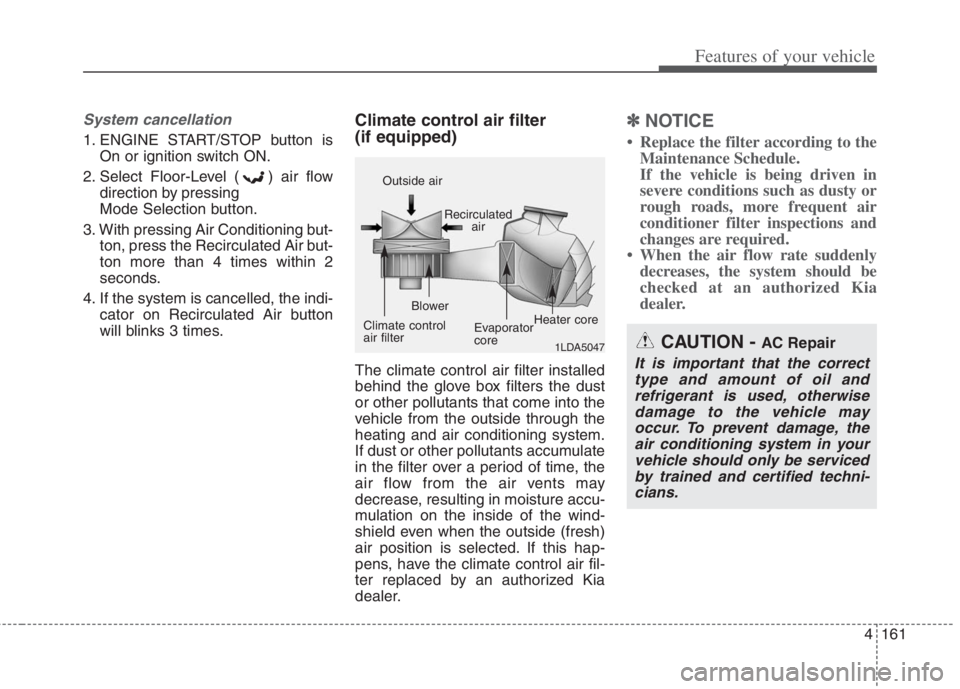
The climate control air filter installed
behind the glove box filters the dust
or other pollutants that come into the
vehicle from the outside through the
heating and air conditioning system.
If dust or other pollutants accumulate
in the filter over a period of time, the
air flow from the air vents may
decrease, resulting in moisture accu-
mulation on the inside of the wind-
shield even when the outside (fresh)
air position is selected. If this hap-
pens, have the climate control air fil-
ter replaced by an authorized Kia
dealer.
✽ ✽
NOTICE
• Replace the filter according to the
Maintenance Schedule.
If the vehicle is being driven in
severe conditions such as dusty or
rough roads, more frequent air
conditioner filter inspections and
changes are required.
• When the air flow rate suddenly
decreases, the system should be
checked at an authorized Kia
dealer.
1LDA5047
Outside air
Recirculated
air
Climate control
air filterBlower
Evaporator
coreHeater core
CAUTION - AC Repair
It is important that the correct
type and amount of oil and
refrigerant is used, otherwise
damage to the vehicle may
occur. To prevent damage, the
air conditioning system in your
vehicle should only be serviced
by trained and certified techni-
cians.
Page 345 of 684

Driving your vehicle
18 5
When driving downhill, you may
use Sports Mode or press the pad-
dle shifters (if equipped) to down-
shift to a lower gear in order to con-
trol your speed without using the
brake pedal excessively.
When you turn the engine on and
off, you may hear clicking sounds
as the system foes through a self-
test. This is a normal sound for the
dual clutch transmission.
During the first 1,000 miles (1,500
km), you may feel that the vehicle
may not be smooth when acceler-
ating at low speed. During this
break-in period, the shift quality
and performance of your new vehi-
cle is continuously optimized.DCT warning messages
This warning message is displayed
when the vehicle is driven slowly on
a grade and the vehicle detects that
the brake pedal is not applied.Steep grade
Driving up hills or on steep grades:
To hold the vehicle on an incline,
use the foot brake or the parking
brake.
When in stop-and-go traffic on an
incline, keep some distance ahead
before moving the vehicle forward.
Then hold the vehicle on the incline
with the foot brake.
If the vehicle is held on a hill by
applying the accelerator pedal or
by creeping with the brake pedal
dis-engaged, the clutch and trans-
mission may overheat which can
result in damage. In this situation, a
warning message will appear on
the LCD display.
If the LCD warning is active, the
foot brake must be applied.
Ignoring the warnings can lead to
damage to the transmission.
CAUTION
To avoid damage to your
transaxle, do not try to accel-
erate in R (Reverse) or any for-
ward gear position with the
brakes on.
When stopped on slope, do
not hold the vehicle with accel-
erator pedal. Use the service
brake or the parking brake.
OBDM059150L
Page 359 of 684
Driving your vehicle
32 5
Wet brakes may impair the vehicle’s
ability to safely slow down; the vehi-
cle may also pull to one side when
the brakes are applied. Applying the
brakes lightly will indicate whether
they have been affected in this way.
Always test your brakes in this fash-
ion after driving through deep water.
To dry the brakes, apply them lightly
while maintaining a safe forward
speed until brake performance
returns to normal.
✽ ✽
NOTICE
Do not depress the brake pedal con-
tinuously without the “ ” indica-
tor ON. The battery may be dis-
charged.
In the event of brake failure
If service brakes fail to operate while
the vehicle is in motion, you can
make an emergency stop with the
parking brake. The stopping dis-
tance, however, will be much greater
than normal.
Disc brakes wear indicator
When your brake pads are worn and
new pads are required, you will hear
a high-pitched warning sound from
your front brakes or rear brakes. You
may hear this sound come and go or
it may occur whenever you depress
the brake pedal.
Please remember that some driving
conditions or climates may cause a
brake squeal when you first apply (or
lightly apply) the brakes. This is nor-
mal and does not indicate a problem
with your brakes.
Always replace the front or rear
brake pads as pairs.
WARNING- Parking
brake
Avoid applying the parking
brake to stop the vehicle while it
is moving except in an emer-
gency situation. Applying the
parking brake while the vehicle
is moving at normal speeds can
cause a sudden loss of control
of the vehicle. If you must use
the parking brake to stop the
vehicle, use great caution in
applying the brake.
CAUTION- Replace brake
pads
Do not continue to drive with
worn brake pads. Continuing to
drive with worn brake pads can
damage the braking system and
result in costly brake repairs.
Page 456 of 684
5129
Driving your vehicle
The navigation cannot detect the
current vehicle position (ex: elevat-
ed roads including overpass adja-
cent to general roads or nearby
roads exist in a parallel way)
The vehicle enters a service sta-
tion or rest area
The speed limit of some sections
changes depending on the road
situations
Android Auto or Car Play is operat-
ing
The navigation is being updated
while driving
The navigation is being restarted
while driving
There is bad weather, such as
heavy rain, heavy snow, etc.
Driving on a road under construc-
tion
Driving on a road that is controlled
Driving on a road that is sharply
curved
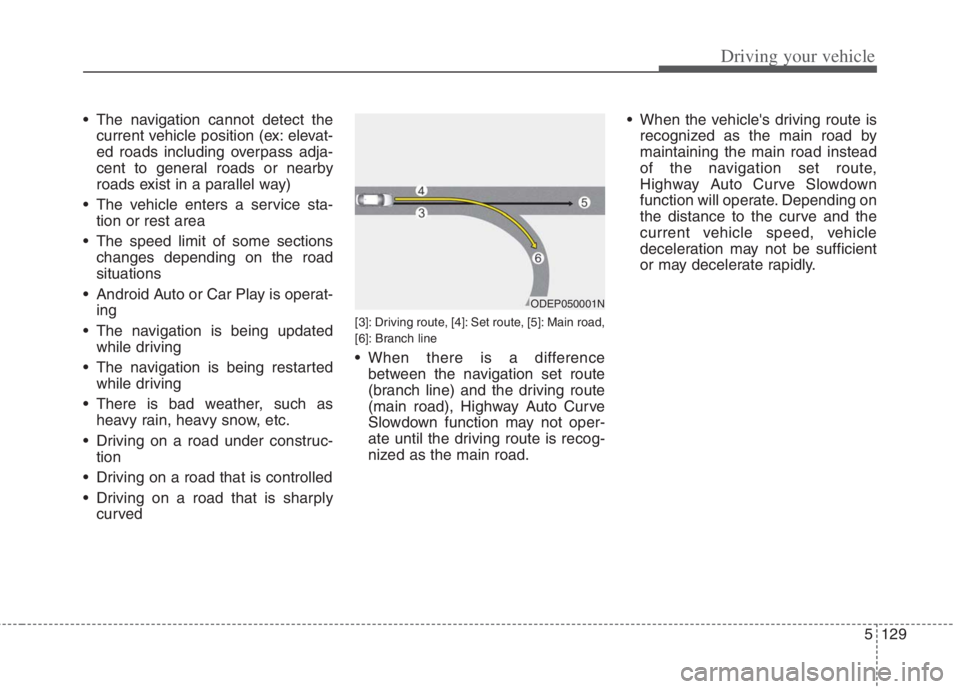
[3]: Driving route, [4]: Set route, [5]: Main road,
[6]: Branch line
When there is a difference
between the navigation set route
(branch line) and the driving route
(main road), Highway Auto Curve
Slowdown function may not oper-
ate until the driving route is recog-
nized as the main road. When the vehicle's driving route is
recognized as the main road by
maintaining the main road instead
of the navigation set route,
Highway Auto Curve Slowdown
function will operate. Depending on
the distance to the curve and the
current vehicle speed, vehicle
deceleration may not be sufficient
or may decelerate rapidly.
ODEP050001N
Page 484 of 684
5157
Driving your vehicle
Your vehicle's fuel economy depends
mainly on your style of driving, where
you drive and when you drive.
Each of these factors affects how
many kilometers (miles) you can get
from a liter (gallon) of fuel. To operate
your vehicle as economically as pos-
sible, use the following driving sug-
gestions to help save money in both
fuel and repairs:
Drive smoothly. Accelerate at a
moderate rate. Don't make "jack-
rabbit" starts or full-throttle shifts
and maintain a steady cruising
speed. Don't race between stop-
lights. Try to adjust your speed to
the traffic so you don't have to
change speeds unnecessarily.
Avoid heavy traffic whenever pos-
sible. Always maintain a safe dis-
tance from other vehicles so you
can avoid unnecessary braking.
This also reduces brake wear.
Drive at a moderate speed. The
faster you drive, the more fuel your
vehicle uses. Driving at a moderate
speed, especially on the highway,
is one of the most effective ways to
reduce fuel consumption. Don't "ride" the brake pedal. This
can increase fuel consumption and
also increase wear on these com-
ponents. In addition, driving with
your foot resting on the brake pedal
may cause the brakes to overheat,
which reduces their effectiveness
and may lead to more serious con-
sequences.
Take care of your tires. Keep them
inflated to the recommended pres-
sure. Incorrect inflation, either too
much or too little, results in unnec-
essary tire wear. Check the tire
pressures at least once a month.
Be sure that the wheels are
aligned correctly. Improper align-
ment can result from hitting curbs
or driving too fast over irregular
surfaces. Poor alignment causes
faster tire wear and may also result
in other problems as well as
greater fuel consumption. Keep your vehicle in good condi-
tion. For better fuel economy and
reduced maintenance costs, main-
tain your vehicle in accordance
with the maintenance schedule in
chapter 8. If you drive your vehicle
in severe conditions, more frequent
maintenance is required (see
chapter 8 for details).
Keep your vehicle clean. For maxi-
mum service, your vehicle should
be kept clean and free of corrosive
materials. It is especially important
that mud, dirt, ice, etc. not be
allowed to accumulate on the
underside of the vehicle. This extra
weight can result in increased fuel
consumption and also contribute to
corrosion.
Travel lightly. Don't carry unneces-
sary weight in your vehicle. Weight
reduces fuel economy.
Don't let the engine idle longer
than necessary. If you are waiting
(and not in traffic), turn off your
engine and restart only when
you're ready to go.
ECONOMICAL OPERATION
Page 492 of 684

Use high quality ethylene gly-
col coolant
Your vehicle is delivered with high
quality ethylene glycol coolant in the
cooling system. It is the only type of
coolant that should be used because
it helps prevent corrosion in the cool-
ing system, lubricates the water
pump and prevents freezing. Be sure
to replace or replenish your coolant
in accordance with the maintenance
schedule in chapter 8. Before winter,
have your coolant tested to assure
that its freezing point is sufficient for
the temperatures anticipated during
the winter.
Check battery and cables
Winter puts additional burdens on
the battery system. Visually inspect
the battery and cables as described
in chapter 8. The level of charge in
your battery can be checked by an
authorized Kia dealer or a service
station.
Change to "winter weight" oil
if necessary
In some climates it is recommended
that a lower viscosity "winter weight"
oil be used during cold weather. See
chapter 9 for recommendations. If
you aren't sure what weight oil you
should use, consult an authorized
Kia dealer.
Check spark plugs and ignition
system
Inspect your spark plugs as
described in chapter 8 and replace
them if necessary. Also check all
ignition wiring and components to be
sure they are not cracked, worn or
damaged in any way.
To keep locks from freezing
To keep the locks from freezing,
squirt an approved de-icer fluid or
glycerine into the key opening. If a
lock is covered with ice, squirt it with
an approved de-icing fluid to remove
the ice. If the lock is frozen internally,
you may be able to thaw it out by
using a heated key. Handle the heat-
ed key with care to avoid injury.
Use approved window washer
anti-freeze in system
To keep the water in the window
washer system from freezing, add an
approved window washer anti-freeze
solution in accordance with instruc-
tions on the container. Window wash-
er anti-freeze is available from an
authorized Kia dealer and most auto
parts outlets. Do not use engine
coolant or other types of anti-freeze
as these may damage the paint fin-
ish.
Driving your vehicle
165 5
Page 499 of 684

What to do in an emergency
Road warning . . . . . . . . . . . . . . . . . . . . . . . . . . . . . . 6-2
• Hazard warning flasher . . . . . . . . . . . . . . . . . . . . . . . . 6-2
In case of an emergency while driving . . . . . . . . . . 6-3
• If the engine stalls at a crossroad or crossing. . . . . . . 6-3
• If you have a flat tire while driving . . . . . . . . . . . . . . . 6-3
• If the engine stalls while driving . . . . . . . . . . . . . . . . . 6-3
If the engine will not start . . . . . . . . . . . . . . . . . . . . 6-4
• If engine doesn't turn over or turns over slowly . . . . 6-4
• If engine turns over normally but does not start . . . . 6-4
Emergency starting . . . . . . . . . . . . . . . . . . . . . . . . . 6-5
• Before Jump Starting (For Hybrid) . . . . . . . . . . . . . . 6-5
• Method to disconnect the (-) cable for regular
maintenance (For Hybrid) . . . . . . . . . . . . . . . . . . . . . 6-7
• Jump starting . . . . . . . . . . . . . . . . . . . . . . . . . . . . . . . . . 6-8
• Push-starting . . . . . . . . . . . . . . . . . . . . . . . . . . . . . . . . 6-10
If the engine overheats . . . . . . . . . . . . . . . . . . . . . . 6-11
Tire Pressure Monitoring System (TPMS) . . . . . 6-13
• Check tire pressure . . . . . . . . . . . . . . . . . . . . . . . . . . . 6-13
• Low tire pressure telltale . . . . . . . . . . . . . . . . . . . . . . 6-15
• Low tire pressure position telltale . . . . . . . . . . . . . . . 6-15
• Changing a tire with TPMS . . . . . . . . . . . . . . . . . . . . 6-17
If you have a flat tire (with spare tire) . . . . . . . . . 6-19
• Jack and tools . . . . . . . . . . . . . . . . . . . . . . . . . . . . . . . 6-19
• Removing and storing the spare tire . . . . . . . . . . . . . 6-20
• Changing tires . . . . . . . . . . . . . . . . . . . . . . . . . . . . . . . 6-20
If you have a flat tire (with Tire Mobility Kit) . . 6-28
• Introduction . . . . . . . . . . . . . . . . . . . . . . . . . . . . . . . . . 6-29
• Notes on the safe use of the Tire Mobility Kit . . . . . 6-30
• Components of the Tire Mobility Kit . . . . . . . . . . . . 6-32
• Using the Tire Mobility Kit . . . . . . . . . . . . . . . . . . . . 6-33
• Distributing the sealant. . . . . . . . . . . . . . . . . . . . . . . . 6-35
• Checking the tire inflation pressure . . . . . . . . . . . . . 6-36
• Technical Data . . . . . . . . . . . . . . . . . . . . . . . . . . . . . . . 6-38
Towing . . . . . . . . . . . . . . . . . . . . . . . . . . . . . . . . . . . 6-39
• Towing service . . . . . . . . . . . . . . . . . . . . . . . . . . . . . . . 6-39
• Removable towing hook . . . . . . . . . . . . . . . . . . . . . . . 6-40
• Emergency towing . . . . . . . . . . . . . . . . . . . . . . . . . . . . 6-41
If An Accident Occurs . . . . . . . . . . . . . . . . . . . . . . 6-446
Page 505 of 684
67
What to do in an emergency
External power source using 12V
battery
(Except the use of dash cameras)
The use of external power acces-
sories may reduce performance and
function of the vehicle. Especially,
the use of dash cameras may cause
a shut off the power of the vehicle
prior to the dash camera’s automatic
shut-down.
If the power of the car is shut off,
start the vehicle as explained above
(refer to “Over discharge of 12V bat-
tery”).
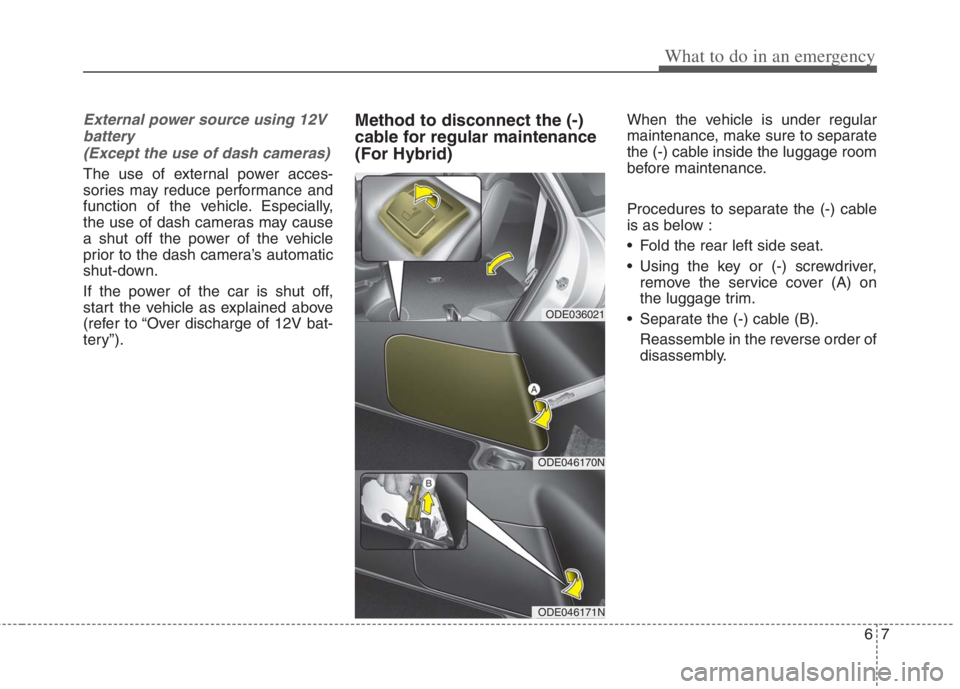
Method to disconnect the (-)
cable for regular maintenance
(For Hybrid)When the vehicle is under regular
maintenance, make sure to separate
the (-) cable inside the luggage room
before maintenance.
Procedures to separate the (-) cable
is as below :
Fold the rear left side seat.
Using the key or (-) screwdriver,
remove the service cover (A) on
the luggage trim.
Separate the (-) cable (B).
Reassemble in the reverse order of
disassembly.
ODE036021
ODE046170N
ODE046171N