Page 187 of 684

449
Features of your vehicle
Electric Power Steering
(EPS)
The power steering uses a motor to
assist you in steering the vehicle. If
the engine is off or if the power steer-
ing system becomes inoperative, the
vehicle may still be steered, but it will
require increased steering effort.
The EPS is controlled by a power
steering control unit which senses
the steering wheel torque and vehi-
cle speed to command the motor.
The steering becomes heavier as the
vehicle’s speed increases and
becomes lighter as the vehicle’s
speed decreases for optimum steer-
ing control.
Should you notice any change in the
effort required to steer during normal
vehicle operation, have the power
steering checked by an authorized
Kia dealer. When you operate the steering
wheel in low temperature, noise
may occur. If temperature rises, the
noise will likely disappear. This is a
normal condition.
When the vehicle is stationary, and
the steering wheel is turned all the
way to the left or right continuous-
ly, the steering wheel becomes
harder to turn. The power assist is
limited to protect the motor from
overheating.
As time passes, the steering wheel
will return to its normal condition.
✽ ✽
NOTICE
The following symptoms may occur
during normal vehicle operation:
• The EPS warning light does not
illuminate.
• The steering gets heavy immedi-
ately after turning the ENGINE
START/STOP button is ON posi-
tion. This happens as the system
performs the EPS system diagnos-
tics. When the diagnostics are
completed, the steering wheel will
return to its normal condition.
• A click noise may be heard from
the EPS relay after turning the
ENGINE START/STOP button is
ON or OFF position.
• A motor noise may be heard when
the vehicle is at a stop or at a low
driving speed.
• If the Electric Power Steering
System does not operate normally,
the warning light will illuminate on
the instrument cluster. The steer-
ing wheel may become difficult to
control or operate abnormally.
Take your vehicle to an authorized
Kia dealer and have the vehicle
checked as soon as possible.
(Continued)
STEERING WHEEL
Page 188 of 684

Features of your vehicle
50 4
(Continued)
• When abnormality is detected in
the electric power steering system,
to prevent a deadly accident, the
steering assist function will stop.
At this time, the warning light
turns on or blinks on the cluster.
The steering wheel may become
difficult to control or operate.
Have your vehicle checked imme-
diately, after moving the vehicle to
a safe zone.
• When the charging system warning
light comes on due to low voltage
(when the alternator or battery
does not operate normally or mal-
function), the steering wheel may
require increased steering effort.
• If the vehicle needs to be jump
started due to battery discharge,
the steering wheel may not function
normally. This is a temporary situ-
ation caused by low battery volt-
age. It will be solved once the bat-
tery is charged. Check for normal
steering function by turning the
steering wheel slowly before driv-
ing the vehicle.Tilt and telescopic steering
Tilt and telescopic steering allows
you to adjust the steering wheel
before you drive. You can also raise it
to give your legs more space when
you get on or off the vehicle.
The steering wheel should be posi-
tioned so that it is comfortable for
you to drive, while permitting you to
see the instrument panel warning
lights and gauges.
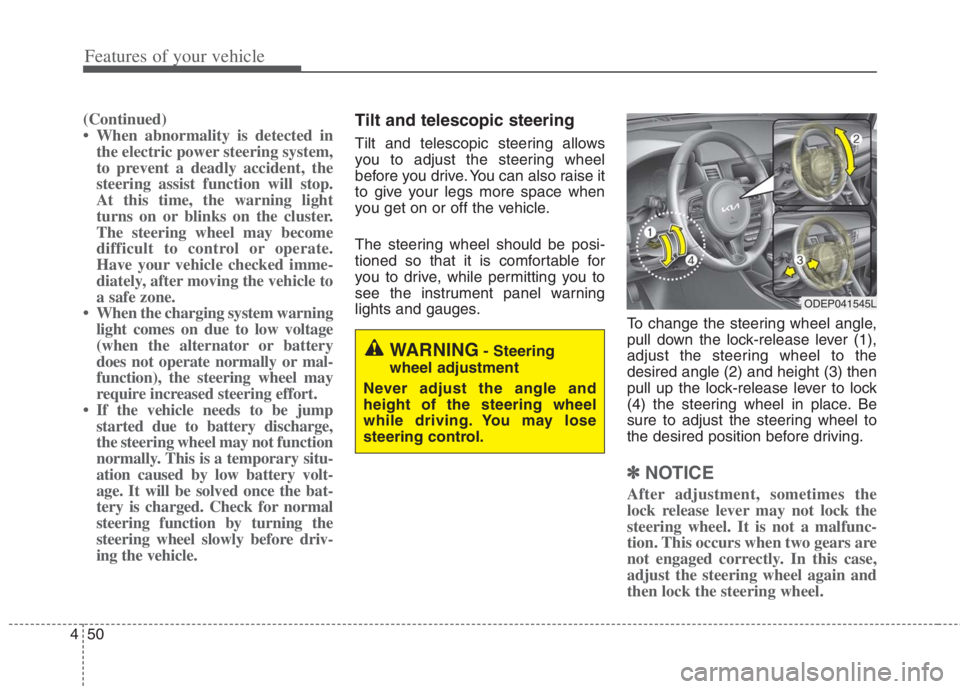
To change the steering wheel angle,
pull down the lock-release lever (1),
adjust the steering wheel to the
desired angle (2) and height (3) then
pull up the lock-release lever to lock
(4) the steering wheel in place. Be
sure to adjust the steering wheel to
the desired position before driving.
✽ ✽
NOTICE
After adjustment, sometimes the
lock release lever may not lock the
steering wheel. It is not a malfunc-
tion. This occurs when two gears are
not engaged correctly. In this case,
adjust the steering wheel again and
then lock the steering wheel.
WARNING- Steering
wheel adjustment
Never adjust the angle and
height of the steering wheel
while driving. You may lose
steering control.
ODEP041545L
Page 206 of 684
Features of your vehicle
68 4
INSTRUMENT CLUSTER
1. Hybrid system gauge
2. Fuel gauge
3. Speedometer
4. Warning and indicator lights
5. LCD display
6. Battery SOC (State of Charge) gauge
7. Distance To Empty
ODEP049100C/ODEP049538C
■ ■
Type A for Hybrid
❈For more details, refer to the “Gauges” in
this chapter.
■ ■
Type B for Hybrid
❈The actual cluster and contents of the LCD display in the vehicle may differ from the illustration.
Page 208 of 684
Features of your vehicle
70 4
Instrument Cluster Control
Adjusting Instrument Cluster
Illumination
The brightness of the instrument
panel illumination is changed by
pressing the illumination control but-
ton (“+” or “-”) when the ignition
switch or ENGINE START/STOP but-
ton is ON, or the taillights are turned
on. If you hold the illumination control
button (“+” or “-”), the brightness
will be changed continuously.
If the brightness reaches to the
maximum or minimum level, an
alarm will sound.
Gauges
Speedometer
The speedometer indicates the
speed of the vehicle and is calibrated
in kilometers per hour (km/h) and/or
miles per hour (mph) .
ODEP041545N
ODEP049543L
ODEP049105C
ODEP049539C ■Type A
■Type B
Page 220 of 684
Features of your vehicle
82 4
User settings mode (if equipped)
In this mode, you can change the
settings of the instrument cluster,
doors, lamps, etc.
1. Driver Assistance
2. Door
3. Lights
4. Sound
5. Convenience
6. Service Interval
7. Other
8. Language
9. ResetThe information provided may differ
depending on which functions are
applicable to your vehicle.
Shift to P to edit settings
This warning message appears if
you try to adjust the User Settings
while driving.
For your safety, change the User
Settings after parking the vehicle,
applying the parking brake and mov-
ing the shift lever to P (Park).
ODEP049584L
ODEP049586L
Page 234 of 684
Features of your vehicle
96 4
Warning messages
Warning messages appear on the
LCD to warn the driver. It is located in
the center of the instrument cluster.
The warning message may appear
differently depending on the type of
instrument cluster and some may not
show the warning message at all.
The warning message is shown in
either symbol, symbol and text, or
text type only. You can choose the
preferred language by selecting the
User setting menu in LCD mode.
Door Open
It means that any door is open.
Liftgate Open
It means that the liftgate is open.
ODEP041628ODEP041625
Page 241 of 684

4103
Features of your vehicle
❈Example of a deceleration event is
going down an extended hill, slow-
ing down approaching a toll booth,
and approaching reduced speed
zones.
The driver can activate or deactivate
the Coasting Guide by placing the igni-
tion switch or ENGINE START/STOP
in the ON position and by selecting
“User Settings Convenience
Coasting Guide Enable Coasting
Guide”.
For the explanation of the system,
press and hold the [OK] button.
To activate the system, take the fol-
lowing procedures. Enter your desti-
nation information on the navigation
and select the driving route. Select
the ECO mode by driving the vehicle
in D (Drive). Then, satisfy the follow-
ing.
- The driving speed should be
between 60 km/h (37 mph) and 160
km/h (99 mph).
❈The operating speed may vary due
to difference between instrument
cluster and navigation effected by
tire inflation level.Unplug vehicle to start
(Plug-in hybrid)
The message is displayed when you
start the engine without unplugging
the charging cable. Unplug the
charging cable, and then start the
vehicle.
Remaining Time (Plug-in hybrid)
The message is displayed to notify
the remaining time to fully charge the
battery.
Page 315 of 684

4177
Features of your vehicle
For best wireless charging results,
place the smart phone on the center
of the charging pad.
The wireless charging system is
designed for one smart phone
equipped with QI per single usage
only. Please refer to the smart phone
accessory cover or the smart phone
manufacturer homepage to check
whether your smart phone supports
QI function.Wireless smart phone charging
1. Remove any object on the smart
phone charging pad including the
smart key. If there is any foreign
object on the pad other than a
smart phone, the wireless charging
function may not operate properly.
2. Place the smart phone on the cen-
ter of the wireless charging pad.
3. The indicator light will change to
orange once the wireless charging
begins. After the charging is com-
plete, the orange light will change
to green.
4. You can choose to turn the wireless
charging function to either ON or
OFF by selecting the USM on the
instrument cluster. (Please refer to
“Instrument Cluster” for details).
If the wireless charging does not
work, gently move your smart phone
around the pad until the charging
indicator light turns orange.
Depending on the smart phone, the
charging indicator light may not turn
green even after the charging is com-
plete.If the wireless charging is not func-
tioning properly, the orange light will
blink and flash for ten seconds then
turn off. In such cases, remove the
smart phone from the pad and
replace it on the pad again, or double
check the charging status.
If you leave the smart phone on the
charging pad when the vehicle igni-
tion is in OFF, the vehicle will alert
you through warning messages and
sound (applicable for vehicles with
voice guidance function) after the
‘Good bye’ function on the instru-
ment cluster ends.