Page 521 of 684

623
What to do in an emergency
Wheels may have sharp edges.
Handle them carefully to avoid possi-
ble severe injury. Before putting the
wheel into place, be sure that there
is nothing on the hub or wheel (such
as mud, tar, gravel, etc.) that pre-
vents the wheel from fitting solidly
against the hub.10. To install the wheel, hold it on the
studs, put the wheel nuts on the
studs and tighten them finger
tight. Jiggle the tire to be sure it is
completely seated, then tighten
the nuts as much as possible
with your fingers again.
11. Insert the wrench into the jack
and lower the vehicle to the
ground by turning the wheel nut
wrench counterclockwise.
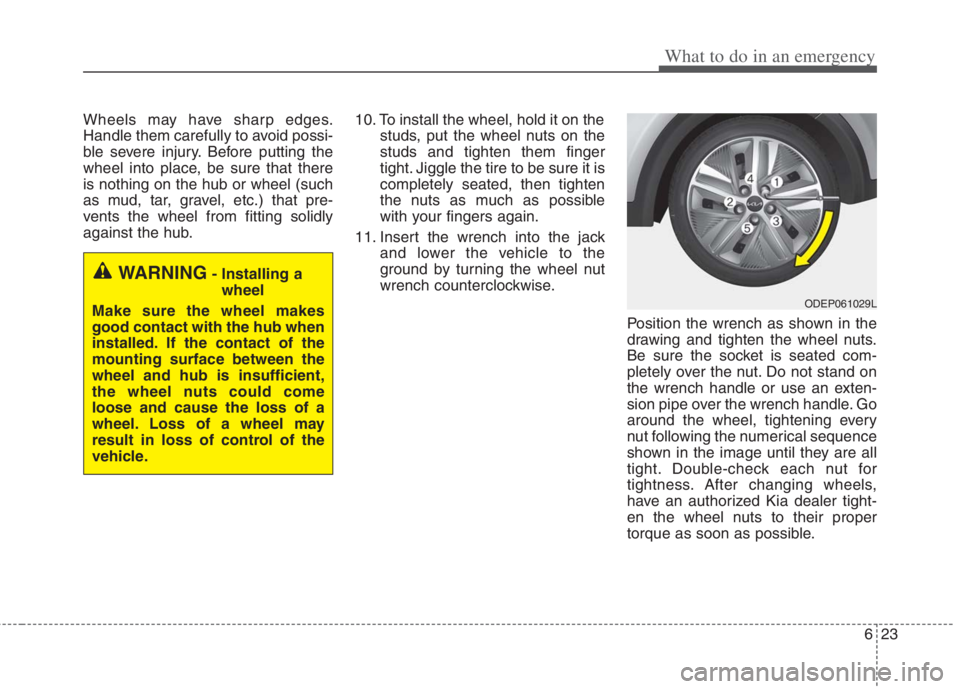
Position the wrench as shown in the
drawing and tighten the wheel nuts.
Be sure the socket is seated com-
pletely over the nut. Do not stand on
the wrench handle or use an exten-
sion pipe over the wrench handle. Go
around the wheel, tightening every
nut following the numerical sequence
shown in the image until they are all
tight. Double-check each nut for
tightness. After changing wheels,
have an authorized Kia dealer tight-
en the wheel nuts to their proper
torque as soon as possible.
WARNING- Installing a
wheel
Make sure the wheel makes
good contact with the hub when
installed. If the contact of the
mounting surface between the
wheel and hub is insufficient,
the wheel nuts could come
loose and cause the loss of a
wheel. Loss of a wheel may
result in loss of control of the
vehicle.
ODEP061029L
Page 539 of 684

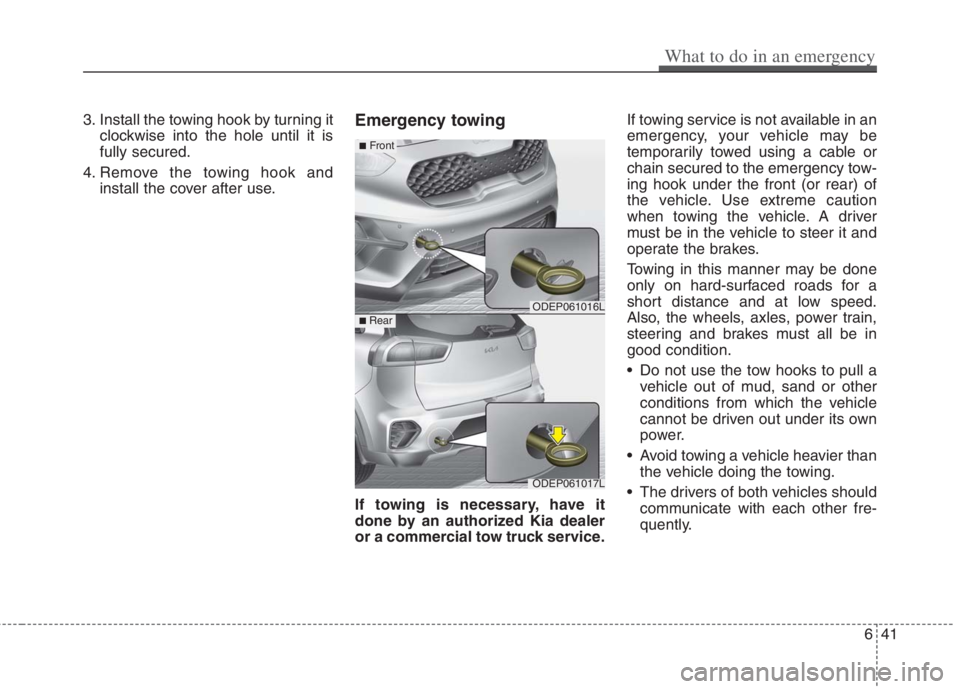
3. Install the towing hook by turning it
clockwise into the hole until it is
fully secured.
4. Remove the towing hook and
install the cover after use.Emergency towing
If towing is necessary, have it
done by an authorized Kia dealer
or a commercial tow truck service.If towing service is not available in an
emergency, your vehicle may be
temporarily towed using a cable or
chain secured to the emergency tow-
ing hook under the front (or rear) of
the vehicle. Use extreme caution
when towing the vehicle. A driver
must be in the vehicle to steer it and
operate the brakes.
Towing in this manner may be done
only on hard-surfaced roads for a
short distance and at low speed.
Also, the wheels, axles, power train,
steering and brakes must all be in
good condition.
Do not use the tow hooks to pull a
vehicle out of mud, sand or other
conditions from which the vehicle
cannot be driven out under its own
power.
Avoid towing a vehicle heavier than
the vehicle doing the towing.
The drivers of both vehicles should
communicate with each other fre-
quently.
ODEP061016L
ODEP061017L
■Front
■ Rear
What to do in an emergency
41 6
Page 564 of 684

Maintenance
22 7
COOLANT
The high-pressure cooling system
has a reservoir filled with year round
antifreeze coolant. The reservoir is
filled at the factory.
Check the antifreeze protection and
coolant level at least once a year: at
the beginning of the winter season,
and before traveling to a colder cli-
mate.Checking the coolant level Turn the engine off and wait until it
cools down. Use extreme care
when removing the radiator cap.
Wrap a thick towel around it, and
turn it counterclockwise slowly to
the first stop. Step back while the
pressure is released from the cool-
ing system.
When you are sure all the pressure
has been released, press down on
the cap, using a thick towel, and
continue turning counterclockwise
to remove it.
Even if the engine is not operating,
do not remove the radiator cap or
the drain plug while the engine and
radiator are hot. Hot coolant and
steam may still blow out under
pressure, causing serious injury.
The engine coolant and/or inverter
coolant level is influenced by the
hybrid system temperature. Before
checking or refilling the engine
coolant and/or inverter coolant,
turn the hybrid vehicle off.
WARNING
Removing radiator
cap
Never attempt to remove the
radiator cap while the engine is
operating or hot. Doing so
might lead to cooling system
and engine damage and could
result in serious personal injury
from escaping hot coolant or
steam.
CAUTION - Radiator cap
Never attempt to remove the
radiator cap while the engine is
operating or hot. Doing so
might lead to cooling system
and engine damage.
Page 604 of 684

Maintenance
62 7
Fuse switch
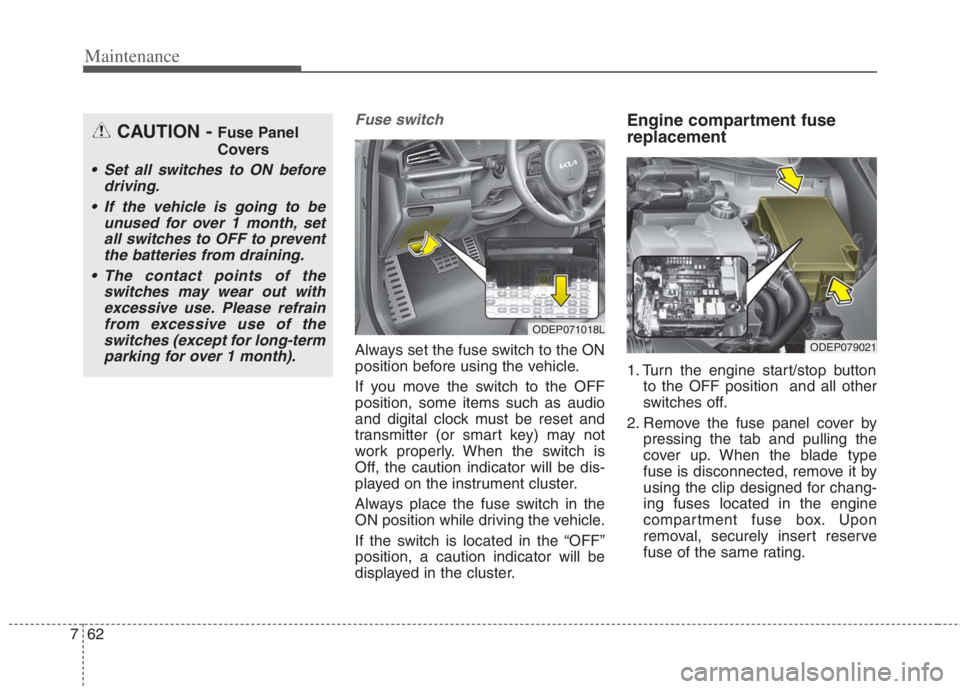
Always set the fuse switch to the ON
position before using the vehicle.
If you move the switch to the OFF
position, some items such as audio
and digital clock must be reset and
transmitter (or smart key) may not
work properly. When the switch is
Off, the caution indicator will be dis-
played on the instrument cluster.
Always place the fuse switch in the
ON position while driving the vehicle.
If the switch is located in the “OFF”
position, a caution indicator will be
displayed in the cluster.
Engine compartment fuse
replacement
1. Turn the engine start/stop button
to the OFF position and all other
switches off.
2. Remove the fuse panel cover by
pressing the tab and pulling the
cover up. When the blade type
fuse is disconnected, remove it by
using the clip designed for chang-
ing fuses located in the engine
compartment fuse box. Upon
removal, securely insert reserve
fuse of the same rating.
ODEP071018L
ODEP079021
CAUTION - Fuse Panel
Covers
Set all switches to ON before
driving.
If the vehicle is going to be
unused for over 1 month, set
all switches to OFF to prevent
the batteries from draining.
The contact points of the
switches may wear out with
excessive use. Please refrain
from excessive use of the
switches (except for long-term
parking for over 1 month).
Page 633 of 684
791
Maintenance
Headlamp (High/Low beam)
(Bulb type) bulb replacement
(Headlamp type A)
1. Open the hood.
2. Remove the headlamp bulb cover
by turning it counterclockwise.
3. Disconnect the headlamp bulb
socket-connector.
4. Remove the bulb-socket from the
headlamp assembly by turning the
bulb-socket counterclockwise until
the tabs on the bulb-socket align
with the slots on the headlamp
assembly.5. Install a new bulb-socket assem-
bly in the headlamp assembly by
aligning the tabs on the bulb-sock-
et with the slots in the headlamp
assembly. Push the bulb-socket
into the headlamp assembly and
turn the bulb-socket clockwise.
6. Install the headlamp bulb cover by
turning it clockwise.
Headlamp bulb
ODE076035
OQL075058
WARNING- Halogen
bulbs
Halogen bulbs contain pres-
surized gas that will produce
flying pieces of glass if broken.
(Continued)
Page 634 of 684

Maintenance
92 7
Front turn signal lamp (Bulb
type) bulb replacement
(Headlamp type A)
1. Open the hood.
2. Remove the dust cover (A) from
the headlamp assembly then bulb-
socket by turning the counter-
clockwise until the tabs on the
bulb-socket align with the slots on
the headlamp assembly.
3. Remove the bulb from the bulb-
socket by pressing it in and rotat-
ing it counterclockwise until the
tabs on the bulb align with the
slots in the bulb-socket. Pull the
bulb out of the bulb-socket.4. Insert a new bulb by inserting it
into the bulb-socket and rotating it
until it locks into place.
5. Install the socket in the headlamp
assembly by aligning the tabs on
the bulb-socket with the slots in
the assembly. Push the bulb-sock-
et into the headlamp assembly
and turn the socket clockwise.
(Continued)
Always handle them carefully,
and avoid scratches and abra-
sions. If the bulbs are lit, avoid
contact with liquids. Never
touch the glass with bare
hands. Residual oil may cause
the bulb to overheat and burst
when lit.
A bulb should be operated
only when installed in a head-
light.
If a bulb becomes damaged or
cracked, replace it immediate-
ly and carefully dispose of it.
Wear eye protection when
changing a bulb. Allow the bulb
to cool down before handling it.
ODE076058L
Page 635 of 684

793
Maintenance
Front side marker (Bulb type)
bulb replacement (Headlamp
type A)
1. Open the hood.
2. Remove the bulb-socket from the
headlamp assembly by turning the
bulb-socket counterclockwise until
the tabs on the bulb-socket align
with the slots on the headlamp
assembly.
3. Remove the bulb from the bulb-
socket by pulling it out.
4. Insert a new bulb by inserting it
into the bulb-socket.5. Install the socket in the headlamp
assembly by aligning the tabs on
the bulb-socket with the slots in
the assembly. Push the bulb-sock-
et into the headlamp assembly
and turn the socket clockwise.
Headlamp (High/Low beam)
(LED type) bulb replacement
(Headlamp type B)
If the headlamp (LED type) (1) does
not operate, have the vehicle
checked by an authorized Kia dealer.
The LED lamp cannot be replaced
as a single component because it is
an integrated unit. The LED lamp has
to be replaced with the unit.
A skilled technician should check or
repair the headlamp (LED type), for it
may damage related parts of the
vehicle.
ODEP079124NODEP077068
Page 638 of 684
Maintenance
96 7
6. Remove the socket from the
assembly by turning the socket
counterclockwise until the tabs on
the socket align with the slots on
the assembly.
7. Remove the bulb from the socket by
pressing it in and rotating it counter-
clockwise until the tabs on the bulb
align with the slots in the socket.
Pull the bulb out of the socket.
8. Insert a new bulb by inserting it
into the socket and rotating it until
it locks into place.9. Install the socket in the assembly
by aligning the tabs on the socket
with the slots in the assembly.
Push the socket into the assembly
and turn the socket clockwise.
10. Install the rear combination lamp
assembly to the body of the vehi-
cle.
11. Install the service cover.
Tail lamp (inside) (Bulb type)
bulb replacement
1. Open the liftgate.
2. Remove the service cover.
ODE076039
ODE076040