Page 103 of 446
3-25
Convenient features of your vehicle
3
Hood
Opening the hood
1. Park the vehicle and set the park-
ing brake.
2. Pull the release lever to unlatch
the hood. The hood should pop
open slightly.3. Go to the front of the vehicle, raise
the hood slightly, push up the sec-
ondary latch (1) inside of the hood
center and lift the hood (2).4. Pull out the support rod and hold
the hood open with the support
rod (1).
EXTERIOR FEATURES
•When handling the support
rod, grasp the rod in the area
wrapped with rubber only. In
some cases where the engine
has been running the support
rod may be hot. Caution should
be taken to avoid getting
burned by the support rod.
WARNING
OBU048017N
OBU048018NOJS048019
Page 104 of 446

3-26
Convenient features of your vehicle
Closing the hood
1. Before closing the hood, check in
and around the engine compart-
ment to ensure the following:
- Any tools or other loose objects
are removed from the engine
room area or hood opening area
- All glove, rags, or other com-
bustible material is removed
from the engine compartment
- All filler caps are tightly and cor-
rectly installed
2. Lower the hood halfway (lifted
approximately 12 inches (30 cm)
from the closed position) and push
down to securely lock in place.
Then double check to be sure the
hood is secure. If the hood can be
raised slightly, it is not securely
locked. Open it again and close it
with more force.
Liftgate
Opening the liftgate
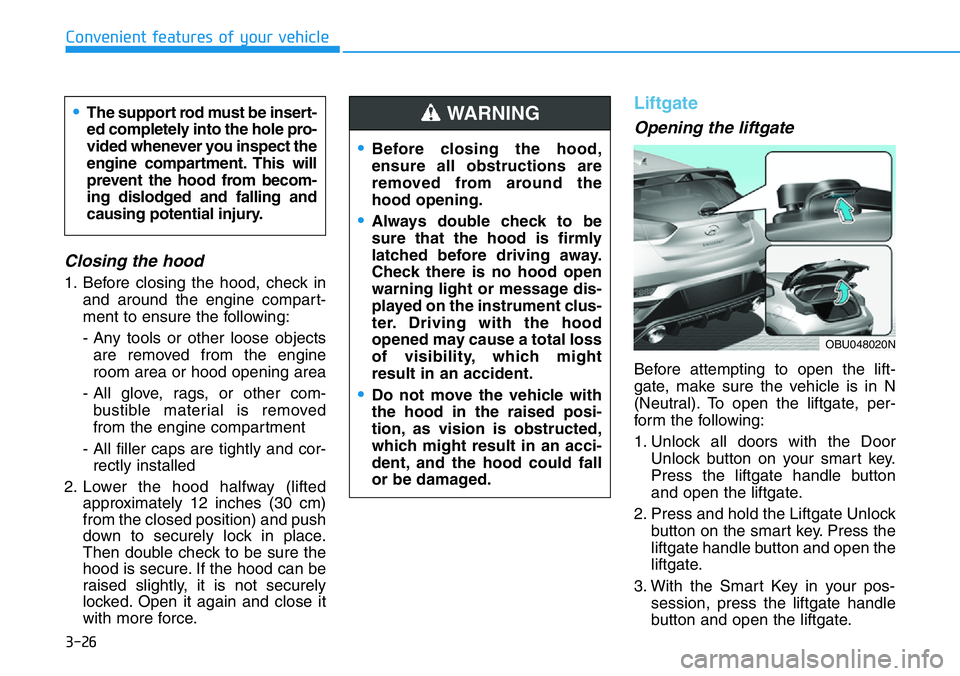
Before attempting to open the lift-
gate, make sure the vehicle is in N
(Neutral). To open the liftgate, per-
form the following:
1. Unlock all doors with the Door
Unlock button on your smart key.
Press the liftgate handle button
and open the liftgate.
2. Press and hold the Liftgate Unlock
button on the smart key. Press the
liftgate handle button and open the
liftgate.
3. With the Smart Key in your pos-
session, press the liftgate handle
button and open the liftgate.
•Before closing the hood,
ensure all obstructions are
removed from around the
hood opening.
•Always double check to be
sure that the hood is firmly
latched before driving away.
Check there is no hood open
warning light or message dis-
played on the instrument clus-
ter. Driving with the hood
opened may cause a total loss
of visibility, which might
result in an accident.
•Do not move the vehicle with
the hood in the raised posi-
tion, as vision is obstructed,
which might result in an acci-
dent, and the hood could fall
or be damaged.
WARNING •The support rod must be insert-
ed completely into the hole pro-
vided whenever you inspect the
engine compartment. This will
prevent the hood from becom-
ing dislodged and falling and
causing potential injury.
OBU048020N
Page 105 of 446

3-27
Convenient features of your vehicle
3
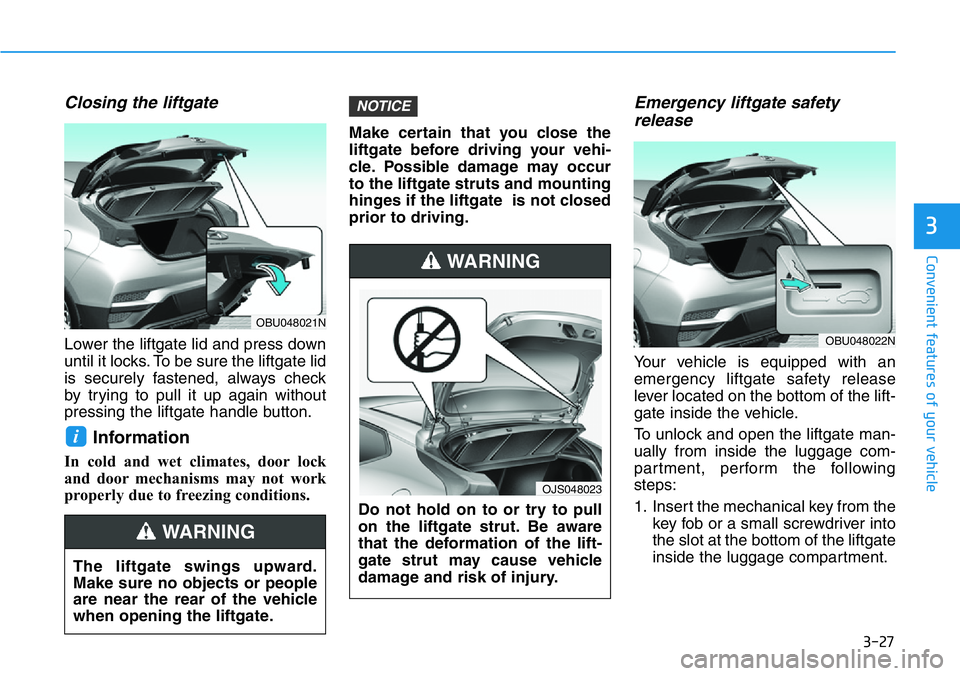
Closing the liftgate
Lower the liftgate lid and press down
until it locks. To be sure the liftgate lid
is securely fastened, always check
by trying to pull it up again without
pressing the liftgate handle button.
Information
In cold and wet climates, door lock
and door mechanisms may not work
properly due to freezing conditions.Make certain that you close the
liftgate before driving your vehi-
cle. Possible damage may occur
to the liftgate struts and mounting
hinges if the liftgate is not closed
prior to driving.
Emergency liftgate safety
release
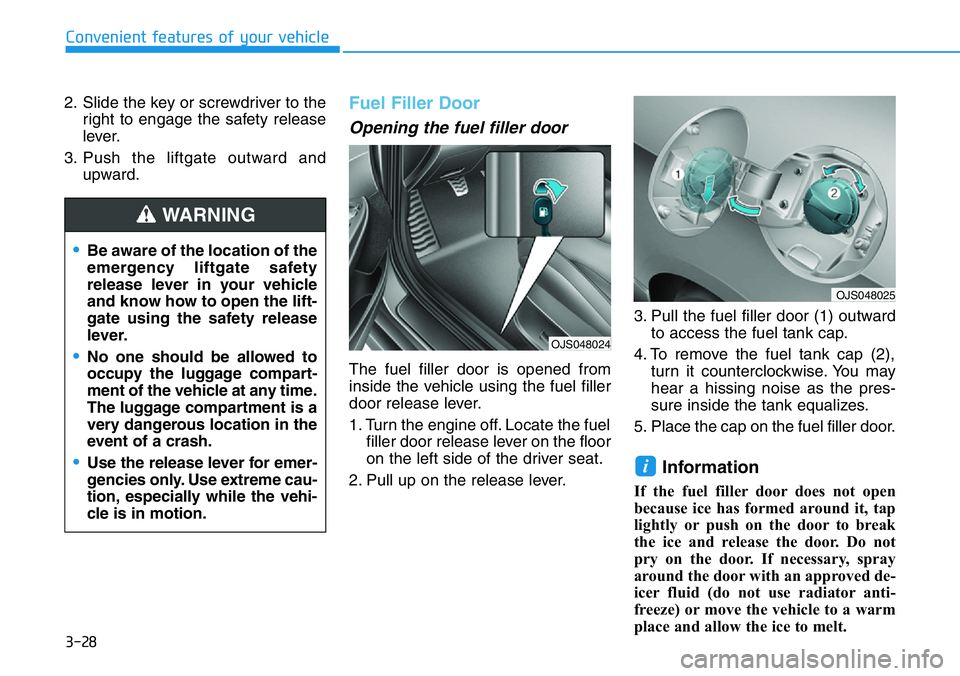
Your vehicle is equipped with an
emergency liftgate safety release
lever located on the bottom of the lift-
gate inside the vehicle.
To unlock and open the liftgate man-
ually from inside the luggage com-
partment, perform the following
steps:
1. Insert the mechanical key from the
key fob or a small screwdriver into
the slot at the bottom of the liftgate
inside the luggage compartment.
NOTICE
i
The liftgate swings upward.
Make sure no objects or people
are near the rear of the vehicle
when opening the liftgate.
WARNING
Do not hold on to or try to pull
on the liftgate strut. Be aware
that the deformation of the lift-
gate strut may cause vehicle
damage and risk of injury.
WARNING
OJS048023
OBU048021N
OBU048022N
Page 106 of 446

3-28
Convenient features of your vehicle
2. Slide the key or screwdriver to the
right to engage the safety release
lever.
3. Push the liftgate outward and
upward.
Fuel Filler Door
Opening the fuel filler door
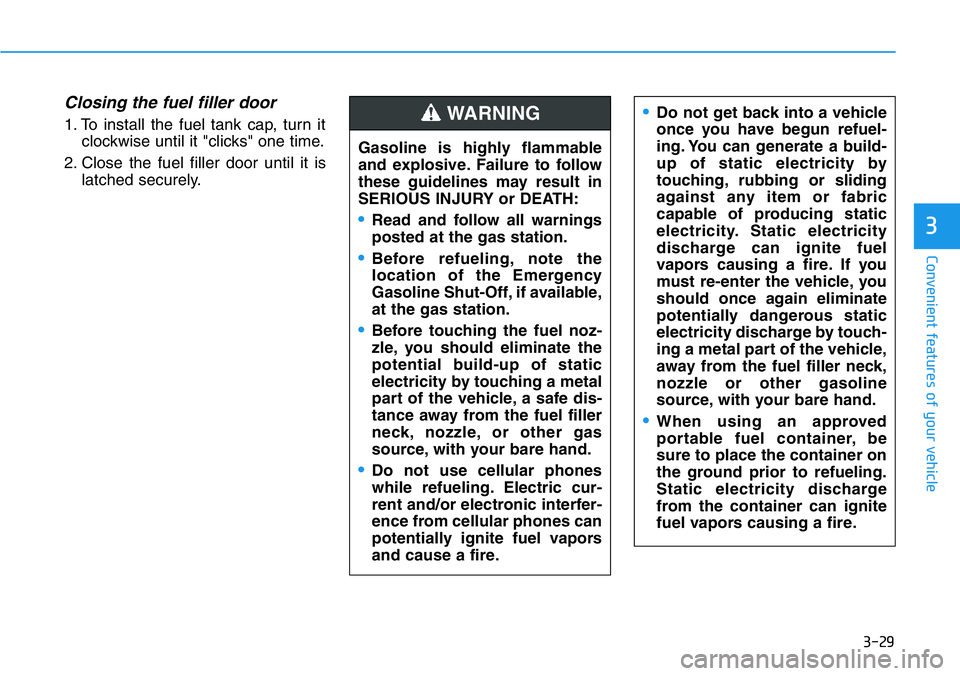
The fuel filler door is opened from
inside the vehicle using the fuel filler
door release lever.
1. Turn the engine off. Locate the fuel
filler door release lever on the floor
on the left side of the driver seat.
2. Pull up on the release lever.3. Pull the fuel filler door (1) outward
to access the fuel tank cap.
4. To remove the fuel tank cap (2),
turn it counterclockwise. You may
hear a hissing noise as the pres-
sure inside the tank equalizes.
5. Place the cap on the fuel filler door.
Information
If the fuel filler door does not open
because ice has formed around it, tap
lightly or push on the door to break
the ice and release the door. Do not
pry on the door. If necessary, spray
around the door with an approved de-
icer fluid (do not use radiator anti-
freeze) or move the vehicle to a warm
place and allow the ice to melt.
i
•Be aware of the location of the
emergency liftgate safety
release lever in your vehicle
and know how to open the lift-
gate using the safety release
lever.
•No one should be allowed to
occupy the luggage compart-
ment of the vehicle at any time.
The luggage compartment is a
very dangerous location in the
event of a crash.
•Use the release lever for emer-
gencies only. Use extreme cau-
tion, especially while the vehi-
cle is in motion.
WARNING
OJS048024
OJS048025
Page 107 of 446

3-29
Convenient features of your vehicle
3
Closing the fuel filler door
1. To install the fuel tank cap, turn it
clockwise until it "clicks" one time.
2. Close the fuel filler door until it is
latched securely.•Do not get back into a vehicle
once you have begun refuel-
ing. You can generate a build-
up of static electricity by
touching, rubbing or sliding
against any item or fabric
capable of producing static
electricity. Static electricity
discharge can ignite fuel
vapors causing a fire. If you
must re-enter the vehicle, you
should once again eliminate
potentially dangerous static
electricity discharge by touch-
ing a metal part of the vehicle,
away from the fuel filler neck,
nozzle or other gasoline
source, with your bare hand.
•When using an approved
portable fuel container, be
sure to place the container on
the ground prior to refueling.
Static electricity discharge
from the container can ignite
fuel vapors causing a fire.
Gasoline is highly flammable
and explosive. Failure to follow
these guidelines may result in
SERIOUS INJURY or DEATH:
•Read and follow all warnings
posted at the gas station.
•Before refueling, note the
location of the Emergency
Gasoline Shut-Off, if available,
at the gas station.
•Before touching the fuel noz-
zle, you should eliminate the
potential build-up of static
electricity by touching a metal
part of the vehicle, a safe dis-
tance away from the fuel filler
neck, nozzle, or other gas
source, with your bare hand.
•Do not use cellular phones
while refueling. Electric cur-
rent and/or electronic interfer-
ence from cellular phones can
potentially ignite fuel vapors
and cause a fire.
WARNING
Page 109 of 446
3-31
Convenient features of your vehicle
3
INSTRUMENT CLUSTER
1. Tachometer
2. Speedometer
3. Engine coolant temperature gauge
4. Fuel gauge
5. Warning and indicator lights
6. LCD display (including Trip computer)
The actual cluster in the vehicle may dif-
fer from the illustration.
For more details, refer to the "Gauges
and Meters" in this chapter.
OBU048106N
Page 110 of 446
3-32
Convenient features of your vehicle
Instrument Cluster Control
Adjusting instrument cluster
illumination
When the vehicle's position lights or
headlights are on, press the illumina-
tion control button to adjust the
brightness of the instrument panel
illumination.
When pressing the illumination con-
trol button, the interior switch illumi-
nation intensity is also adjusted.• The brightness of the instrument
panel illumination is displayed.
• If the brightness reaches the maxi-
mum or minimum level, a chime
will sound.
For information regarding the illu-
mination setting on your audio dis-
play, refer to the "Setup" section of
your Audio or Navigation manual. Never adjust the instrument
cluster while driving. Doing so
could lead to driver distraction
which may cause an accident
and lead to vehicle damage,
serious injury, or death.
WARNING
OJS048110L
OJSN048026
Page 111 of 446
3-33
Convenient features of your vehicle
3
Gauges and Meters
Speedometer
The speedometer indicates the
speed of the vehicle and is calibrated
in miles per hour (MPH) and/or kilo-
meters per hour (km/h).
Variable LED tachometer
The tachometer indicates the
approximate number of engine revo-
lutions per minute (rpm).
Use the tachometer to select the cor-
rect shift points and to prevent lug-
ging and/or over-revving the engine.The yellow and red LEDs show the
range of recommended engine oper-
ation speed. As the engine oil tem-
perature warms up, the recommend-
ed engine speed range also extends.
Avoid driving with engine speeds in
the yellow and red warning fields. In
particular, do not drive with the
engine speed in the red warning
field.
Doing so may damage the engine.OPDEN047109
OBU048146N
OBU048147N