2022 HYUNDAI TUCSON lug nut
[x] Cancel search: lug nutPage 103 of 638

04
4-5
Instrument cluster control
Instrument panel illumination
When the vehicle’s parking lights or
headlamps are on, press the illumination
control switch to adjust the brightness of
the instrument panel illumination.
When pressing the illumination control
switch, the interior switch illumination
intensity also adjusted.
You can adjust the brightness of the
instrument panel illumination from the
User Settings Mode on the LCD display
when the ignition switch is on (‘Lights →
Illumination’). When the vehicle’s parking
lights or headlamps are on, interior
switch illumination intensity and mood
lamps are also adjusted.
If your vehicle is equipped with
additional navigation, please refer
to the infotainment system manual
separately supplied.
WARNING
Never adjust the instrument cluster
while driving. This could result in loss
of control and lead to an accident that
may cause vehicle damage, or lead to
serious injury or death.
• The brightness of the instrument
panel illumination is displayed.
• When the brightness setting reaches
either the minimum or maximum
level, a chime will sound.
Gauges and meters
Speedometer
„„4.2-inch„„10.25-inch
ONX4E040018OBC3040005
The speedometer indicates the speed of
the vehicle and is calibrated in miles per
hour (MPH) and/or kilometers per hour
(km/h).
Tachometer
„„4.2-inch„„10.25-inch
ONX4040004OCN7040007The tachometer indicates the
approximate number of engine
revolutions per minute (RPM).
Use the tachometer to select the correct
shift points and to prevent lugging and/
or over-revving the engine.
NOTICE
Do not operate the engine within the
tachometer's RED ZONE. This may
cause severe engine damage.
Page 204 of 638
Convenient features
5-60
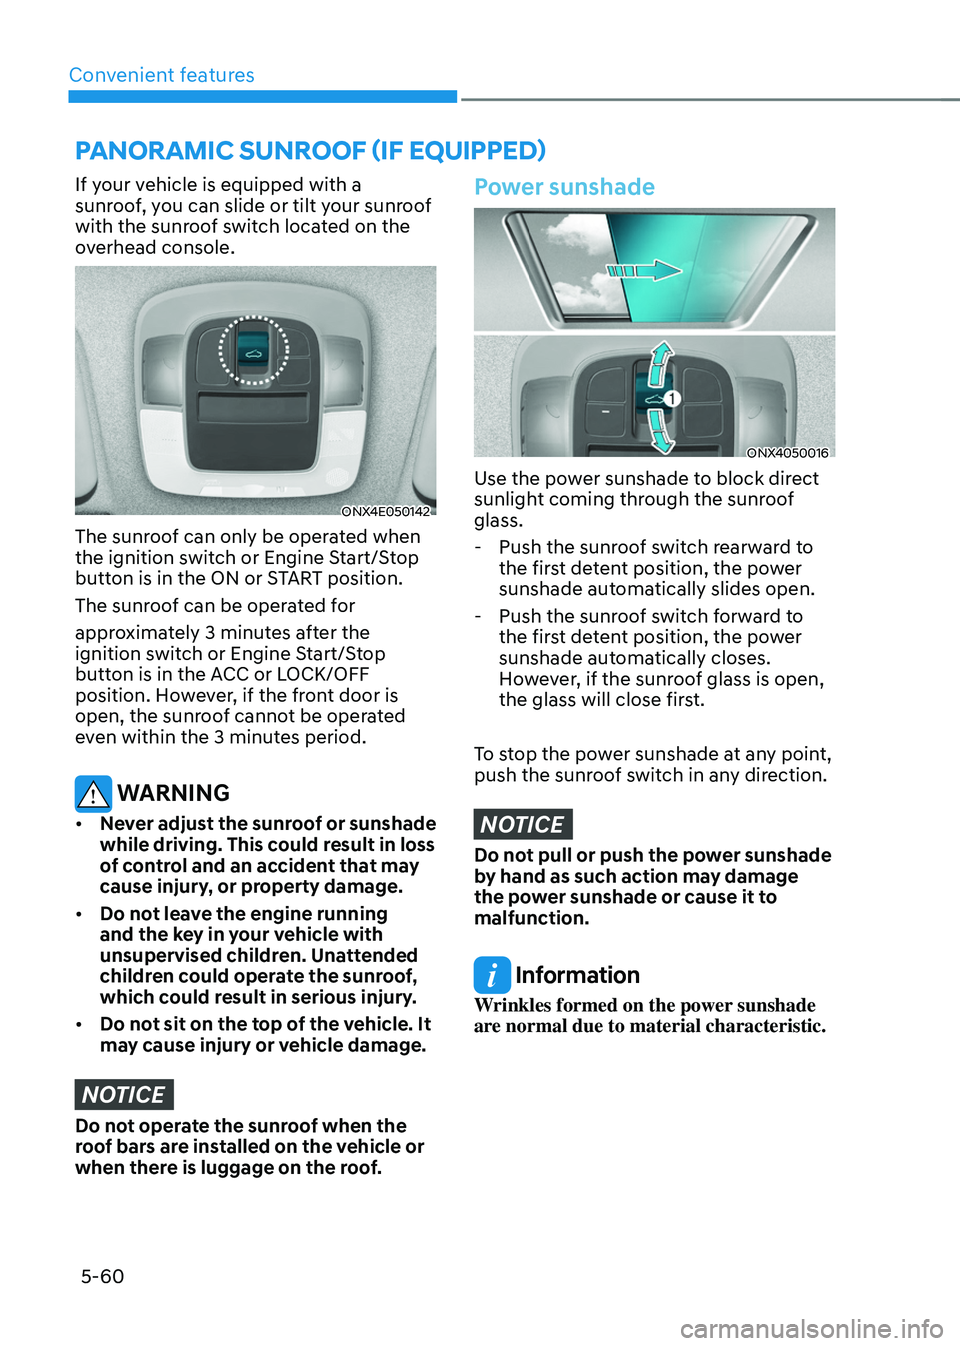
If your vehicle is equipped with a
sunroof, you can slide or tilt your sunroof
with the sunroof switch located on the
overhead console.
ONX4E050142
The sunroof can only be operated when
the ignition switch or Engine Start/Stop
button is in the ON or START position.
The sunroof can be operated for
approximately 3 minutes after the
ignition switch or Engine Start/Stop
button is in the ACC or LOCK/OFF
position. However, if the front door is
open, the sunroof cannot be operated
even within the 3 minutes period.
WARNING
• Never adjust the sunroof or sunshade
while driving. This could result in loss
of control and an accident that may
cause injury, or property damage.
• Do not leave the engine running
and the key in your vehicle with
unsupervised children. Unattended
children could operate the sunroof,
which could result in serious injury.
• Do not sit on the top of the vehicle. It
may cause injury or vehicle damage.
NOTICE
Do not operate the sunroof when the
roof bars are installed on the vehicle or
when there is luggage on the roof.
Power sunshade
ONX4050016
Use the power sunshade to block direct
sunlight coming through the sunroof
glass.
-Push the sunroof switch rearward to
the first detent position, the power
sunshade automatically slides open.
-Push the sunroof switch forward to
the first detent position, the power
sunshade automatically closes.
However, if the sunroof glass is open,
the glass will close first.
To stop the power sunshade at any point,
push the sunroof switch in any direction.
NOTICE
Do not pull or push the power sunshade
by hand as such action may damage
the power sunshade or cause it to
malfunction.
Information
Wrinkles formed on the power sunshade
are normal due to material characteristic.
PANORAMIC SUNROOF (IF EQUIPPED)
Page 540 of 638
Emergency situations
8-14
IF YOU HAVE A FLAT TIRE
WARNING
Changing a tire can be dangerous.
Follow the instructions in this section
when changing a tire to reduce the risk
of serious injury or death.
CAUTION
Be careful as you use the jack handle to
stay clear of the flat end. The flat end
has sharp edges that could cause cuts.
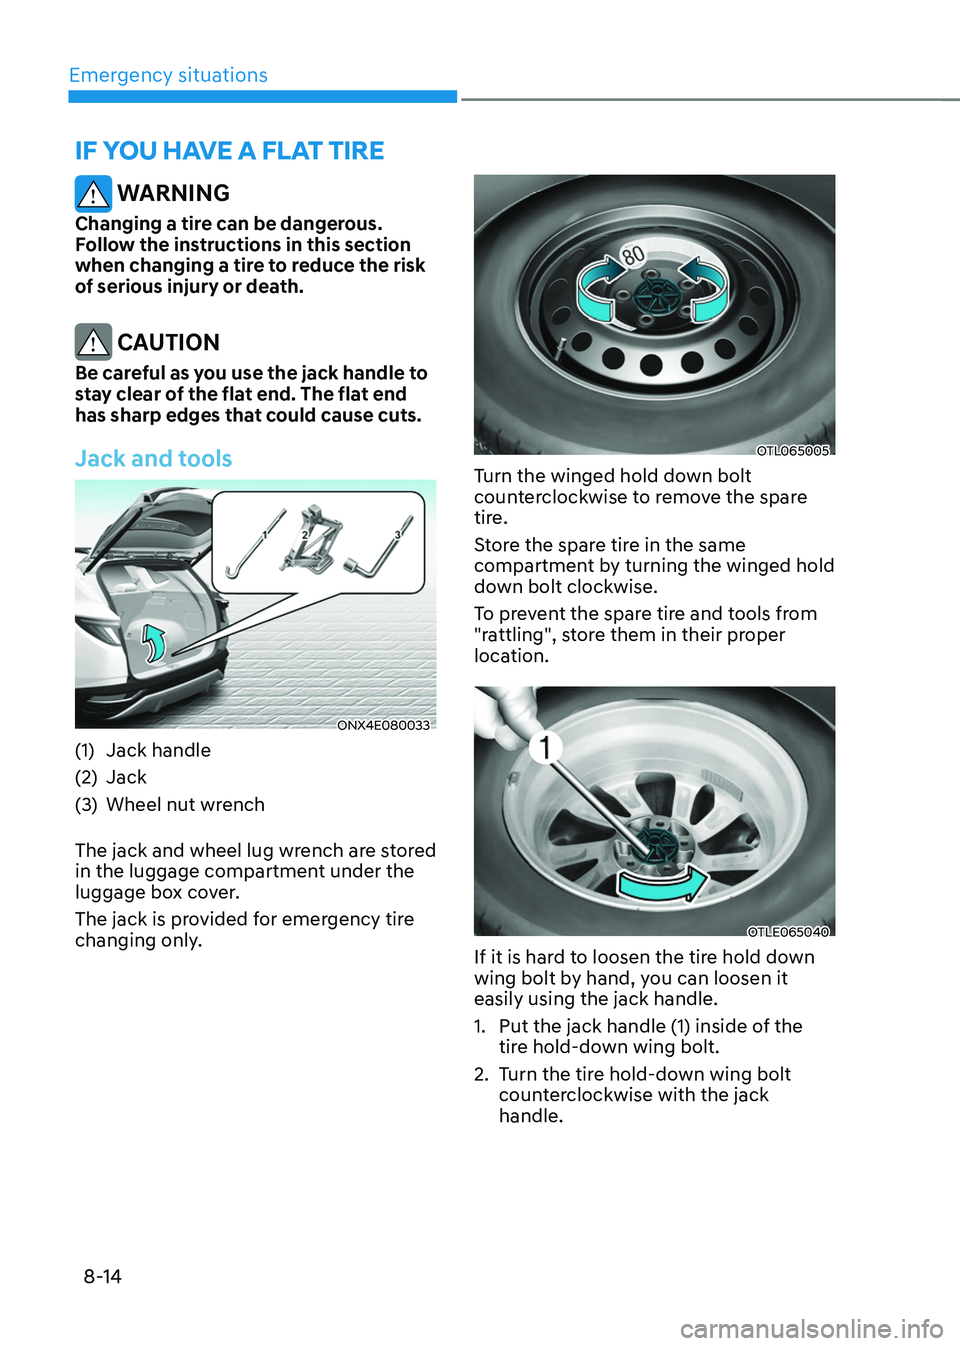
Jack and tools
ONX4E080033
(1) Jack handle
(2) Jack
(3) Wheel nut wrench
The jack and wheel lug wrench are stored
in the luggage compartment under the
luggage box cover.
The jack is provided for emergency tire
changing only.
OTL065005
Turn the winged hold down bolt
counterclockwise to remove the spare
tire.
Store the spare tire in the same
compartment by turning the winged hold
down bolt clockwise.
To prevent the spare tire and tools from
"rattling", store them in their proper
location.
OTLE065040
If it is hard to loosen the tire hold down
wing bolt by hand, you can loosen it
easily using the jack handle.
1. Put the jack handle (1) inside of the
tire hold-down wing bolt.
2. Turn the tire hold-down wing bolt
counterclockwise with the jack
handle.
Page 542 of 638
Emergency situations
8-16
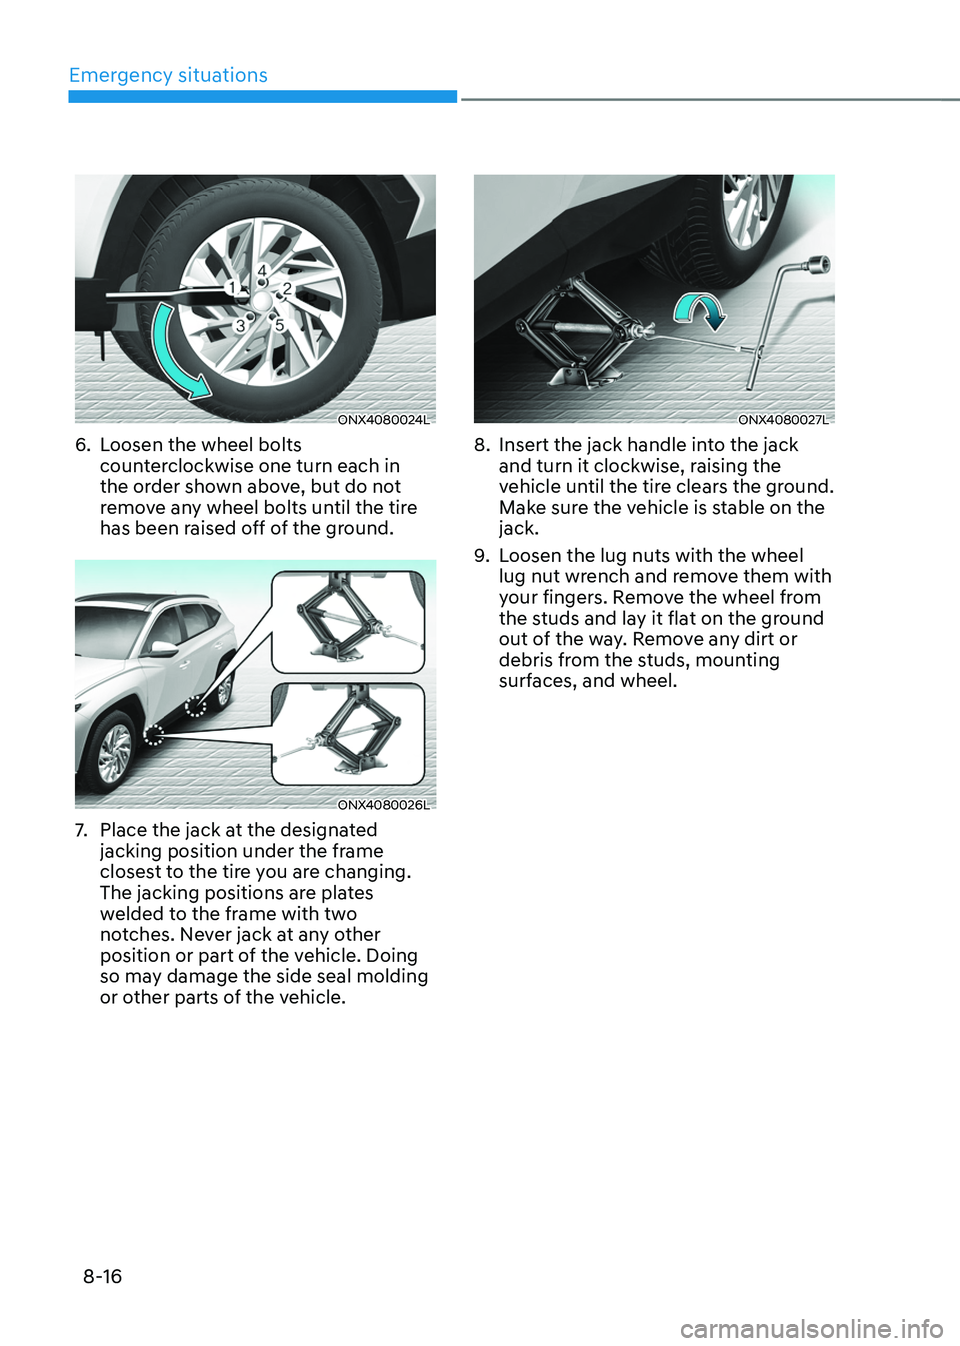
ONX4080024L
6. Loosen the wheel bolts
counterclockwise one turn each in
the order shown above, but do not
remove any wheel bolts until the tire
has been raised off of the ground.
ONX4080026L
7. Place the jack at the designated
jacking position under the frame
closest to the tire you are changing.
The jacking positions are plates
welded to the frame with two
notches. Never jack at any other
position or part of the vehicle. Doing
so may damage the side seal molding
or other parts of the vehicle.
ONX4080027L
8. Insert the jack handle into the jack
and turn it clockwise, raising the
vehicle until the tire clears the ground.
Make sure the vehicle is stable on the
jack.
9. Loosen the lug nuts with the wheel
lug nut wrench and remove them with
your fingers. Remove the wheel from
the studs and lay it flat on the ground
out of the way. Remove any dirt or
debris from the studs, mounting
surfaces, and wheel.
Page 543 of 638
08
8-17
WARNING
Wheels may have sharp edges. Handle
them carefully to avoid possible severe
injury. Before putting the wheel into
place, be sure that there is nothing on
the hub or wheel (such as mud, tar,
gravel, etc.) that interferes with the
wheel from fitting solidly against the
hub.
If there is, remove it. If there is not
good contact on the mounting surface
between the wheel and hub, the wheel
nuts could come loose and cause the
loss of a wheel. Loss of a wheel may
result in loss of control of the vehicle.
This may cause serious injury or death.
10. Install the spare tire onto the studs of
the hub.
11. Tighten the lug nuts with your fingers
onto the studs with the smaller end of
the lug nuts closest to the wheel.
12. Lower the vehicle to the ground
by turning the jack handle
counterclockwise.
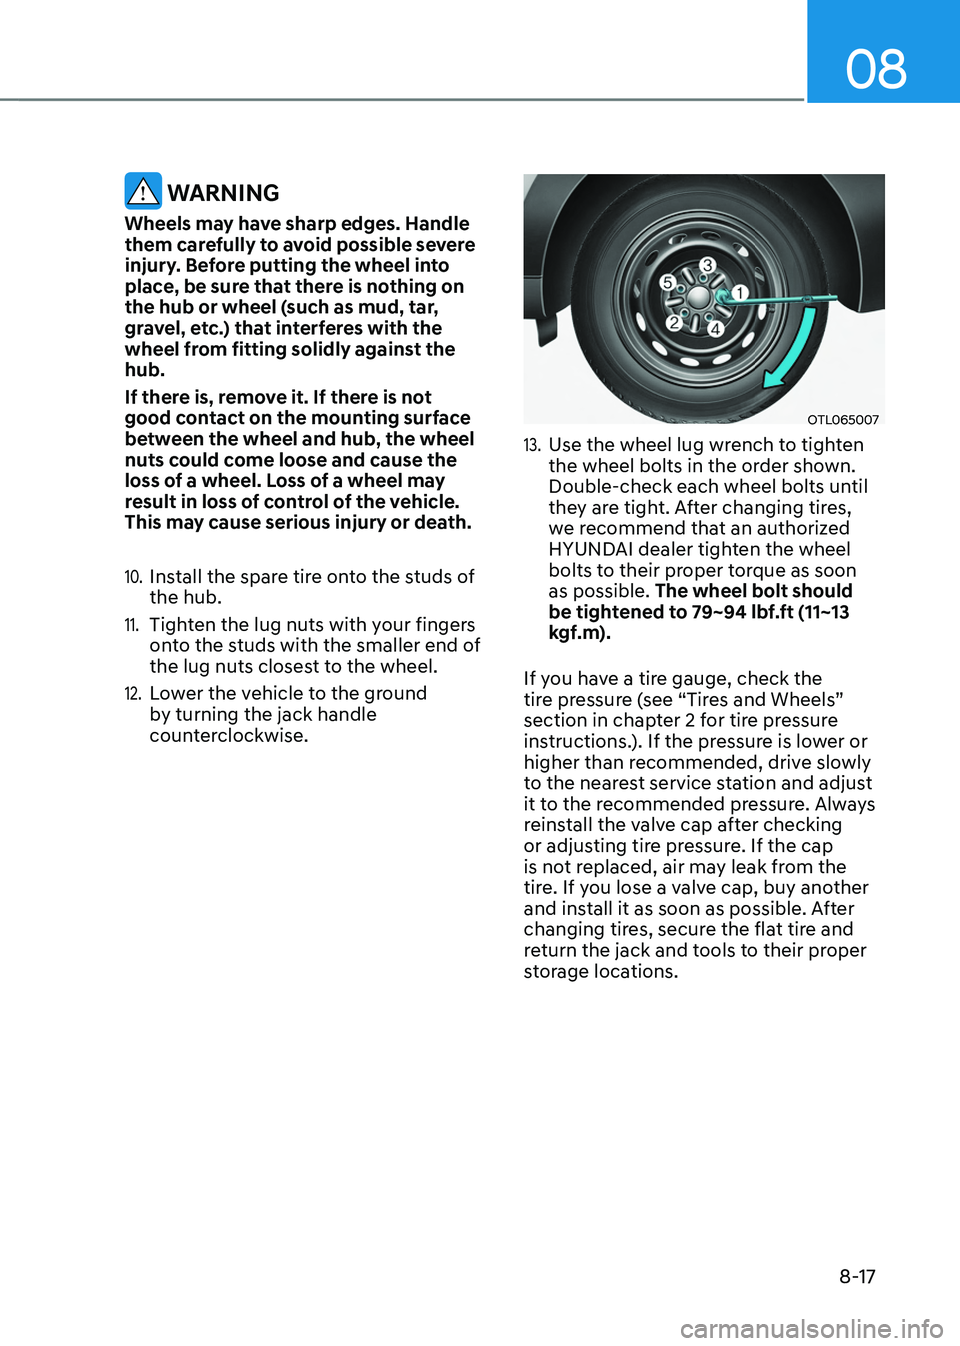
OTL065007
13. Use the wheel lug wrench to tighten
the wheel bolts in the order shown.
Double-check each wheel bolts until
they are tight. After changing tires,
we recommend that an authorized
HYUNDAI dealer tighten the wheel
bolts to their proper torque as soon
as possible. The wheel bolt should
be tightened to 79~94 lbf.ft (11~13
kgf.m).
If you have a tire gauge, check the
tire pressure (see “Tires and Wheels”
section in chapter 2 for tire pressure
instructions.). If the pressure is lower or
higher than recommended, drive slowly
to the nearest service station and adjust
it to the recommended pressure. Always
reinstall the valve cap after checking
or adjusting tire pressure. If the cap
is not replaced, air may leak from the
tire. If you lose a valve cap, buy another
and install it as soon as possible. After
changing tires, secure the flat tire and
return the jack and tools to their proper
storage locations.
Page 556 of 638
Maintenance
9-6
Owner maintenance schedule
When you stop for fuel:
• Check the coolant level in the engine
coolant reservoir.
• Check the windshield washer fluid
level.
• Check for low or under-inflated tires.
WARNING
Be careful when checking your coolant
level when the engine is hot. This may
result in coolant being blown out of the
opening and cause serious burns and
other injuries.
While operating your vehicle:
• Note any changes in the sound of the
exhaust or any smell of exhaust fumes
in the vehicle.
• Check for vibrations in the steering
wheel. Notice if there is any increased
steering effort or looseness in the
steering wheel, or change in its
straight-ahead position.
• Notice if your vehicle constantly turns
slightly or “pulls” to one side when
traveling on smooth, level road.
• When stopping, listen and check for
unusual sounds, pulling to one side,
increased brake pedal travel or “hard-
to-push” brake pedal.
• If any slipping or changes in the
operation of your transmission occurs,
check the transmission fluid level.
• Check the automatic transmission P
(Park) function.
• Check the parking brake.
• Check for fluid leaks under your
vehicle (water dripping from the air
conditioning system during or after
use is normal).
At least monthly:
• Check coolant level in the engine
coolant reservoir.
• Check the operation of all exterior
lights, including the stoplights, turn
signals and hazard warning flashers.
• Check the inflation pressures of all
tires including the spare for tires that
are worn, show uneven wear, or are
damaged.
• Check for loose wheel lug nuts.
At least twice a year:
• Check radiator, heater and air
conditioning hoses for leaks or
damage.
• Check windshield washer spray and
wiper operation. Clean wiper blades
with a clean cloth dampened with
washer fluid.
• Check headlamp alignment.
• Check muffler, exhaust pipes, shields
and clamps.
• Check the seat belts for wear and
function.
At least once a year:
• Clean body and door drain holes.
• Lubricate door hinges and hood
hinges.
• Lubricate door and hood locks and
latches.
• Lubricate door rubber weather strips.
• Check the air conditioning system.
• Inspect and lubricate automatic
transmission linkage and controls.
• Clean the battery and terminals.
• Check the brake fluid level.