Page 542 of 638
Emergency situations
8-16
ONX4080024L
6. Loosen the wheel bolts
counterclockwise one turn each in
the order shown above, but do not
remove any wheel bolts until the tire
has been raised off of the ground.
ONX4080026L
7. Place the jack at the designated
jacking position under the frame
closest to the tire you are changing.
The jacking positions are plates
welded to the frame with two
notches. Never jack at any other
position or part of the vehicle. Doing
so may damage the side seal molding
or other parts of the vehicle.
ONX4080027L
8. Insert the jack handle into the jack
and turn it clockwise, raising the
vehicle until the tire clears the ground.
Make sure the vehicle is stable on the
jack.
9. Loosen the lug nuts with the wheel
lug nut wrench and remove them with
your fingers. Remove the wheel from
the studs and lay it flat on the ground
out of the way. Remove any dirt or
debris from the studs, mounting
surfaces, and wheel.
Page 543 of 638

08
8-17
WARNING
Wheels may have sharp edges. Handle
them carefully to avoid possible severe
injury. Before putting the wheel into
place, be sure that there is nothing on
the hub or wheel (such as mud, tar,
gravel, etc.) that interferes with the
wheel from fitting solidly against the
hub.
If there is, remove it. If there is not
good contact on the mounting surface
between the wheel and hub, the wheel
nuts could come loose and cause the
loss of a wheel. Loss of a wheel may
result in loss of control of the vehicle.
This may cause serious injury or death.
10. Install the spare tire onto the studs of
the hub.
11. Tighten the lug nuts with your fingers
onto the studs with the smaller end of
the lug nuts closest to the wheel.
12. Lower the vehicle to the ground
by turning the jack handle
counterclockwise.
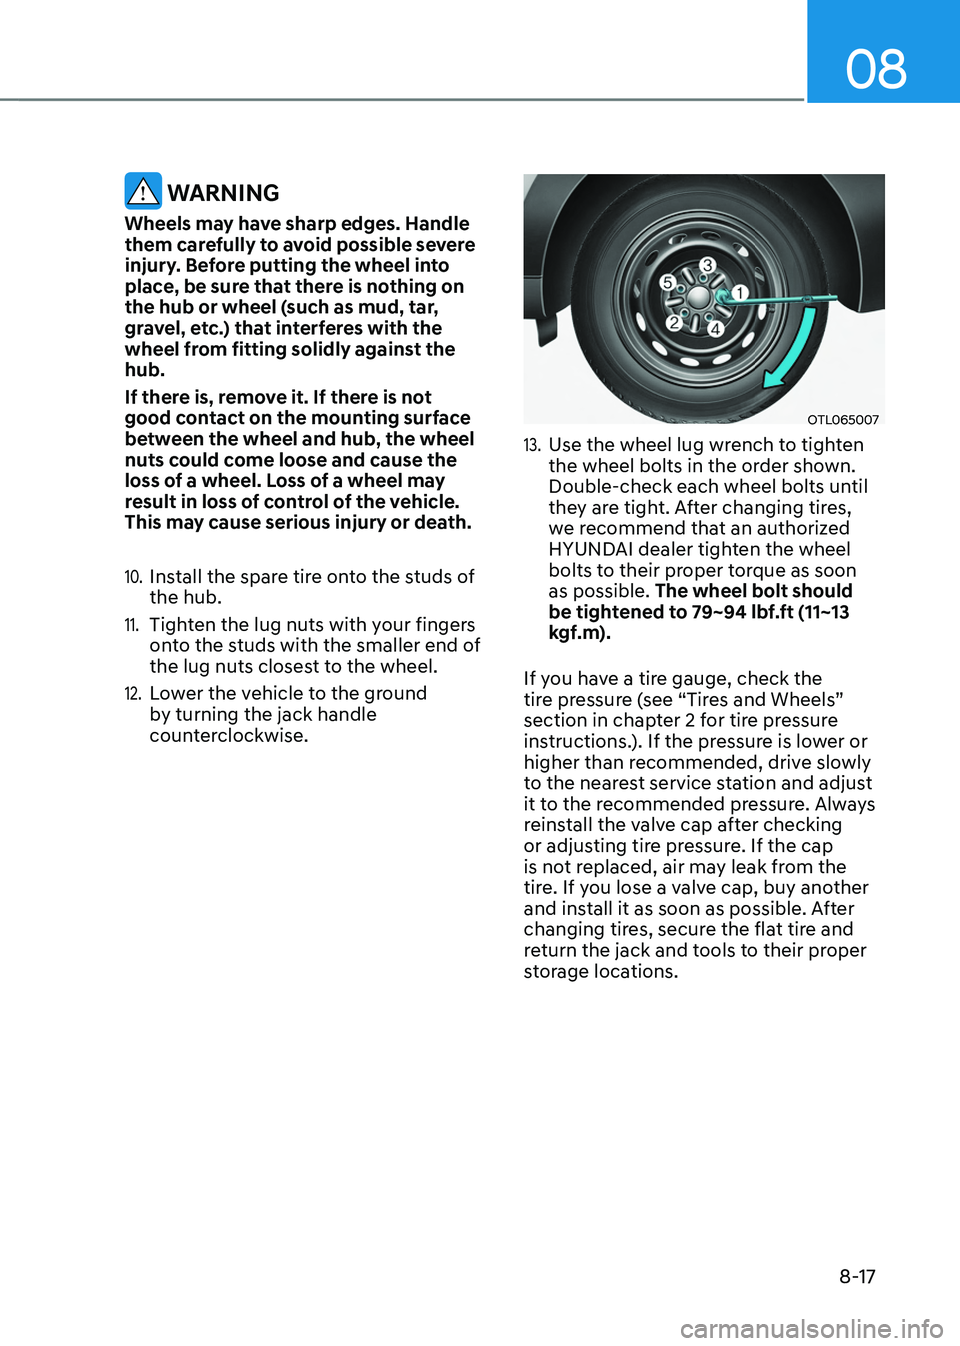
OTL065007
13. Use the wheel lug wrench to tighten
the wheel bolts in the order shown.
Double-check each wheel bolts until
they are tight. After changing tires,
we recommend that an authorized
HYUNDAI dealer tighten the wheel
bolts to their proper torque as soon
as possible. The wheel bolt should
be tightened to 79~94 lbf.ft (11~13
kgf.m).
If you have a tire gauge, check the
tire pressure (see “Tires and Wheels”
section in chapter 2 for tire pressure
instructions.). If the pressure is lower or
higher than recommended, drive slowly
to the nearest service station and adjust
it to the recommended pressure. Always
reinstall the valve cap after checking
or adjusting tire pressure. If the cap
is not replaced, air may leak from the
tire. If you lose a valve cap, buy another
and install it as soon as possible. After
changing tires, secure the flat tire and
return the jack and tools to their proper
storage locations.
Page 561 of 638

09
9-11
Normal maintenance schedule
MAINTENANCE
INTERVALS
MAINTENANCE
ITEM Number of months or driving distance, whichever comes first
Months 1224 3648 60 7284 96108 120 132144 156
Miles×1,000 816 24 3240 48 5664 7280 8896104
Km×1,000 1326 39 5265 78 91104 117130 143156169
Engine coolant At first, replace at 120,000 miles (200,000 km) or 120 months.
After that, replace every 24,000 miles (40,000 km) or 24 months
Battery condition IIIIIIIIIIIII
Brake lines, hoses and connections IIIIIIIIIIIII
Brake pedal IIIIII
Parking brake (if equipped) IIIIII
Brake fluid Inspect every 8,000 miles (13,000 km) or 12 months,
Replace every 48,000 miles (78,000 km) or 48 monthsI : Inspect and if necessary, adjust, correct, clean or replace.
R : Replace or change.Normal maintenance schedule
MAINTENANCE
INTERVALS
MAINTENANCE
ITEM Number of months or driving distance, whichever comes first
Months 1224 3648 60 7284 96108 120 132144 156
Miles×1,000 816 24 3240 48 5664 7280 8896104
Km×1,000 1326 39 5265 78 91104 117130 143156169
Disc brakes and pads IIIIIIIIIIIII
Steering gear rack, linkage and boots III
Tire (pressure & tread wear) IIIIIIIIIIIII
Suspension mounting bolts IIIIIIIIIIIII
Air conditioner refrigerant IIIIIIIIIIIII
Air conditioner compressor IIIIIIIIIIIII
Cabin air filter Replace every 16,000 miles (25,000 km) or 12 months
Automatic transmission fluid No check, No service required
Exhaust pipe and muffler IIIIIIII
IIIII
Rear differential oil *
6
I II
Transfer case oil (AWD) No check, No service required
Drive shaft IIIIIIIIIIIII
I : Inspect and if necessary, adjust, correct, clean or replace.
R : Replace or change.*5 : Rear differential oil should be changed anytime, front/rear differential have been submerged in water.
Page 566 of 638

Maintenance
9-16
Brake hoses and lines
Visually check for proper installation,
chafing, cracks, deterioration and any
leakage. Replace any deteriorated or
damaged parts immediately.
Brake fluid
Check the brake fluid level in the brake
fluid reservoir. The level should be
between the MIN and the MAX marks
on the side of the reservoir. Use only
hydraulic brake fluid conforming to DOT
4 specification.
Parking brake
Inspect the parking brake system
including the parking brake lever and
cables.
Brake discs, pads, calipers and
rotors
Check the pads, the disc, and the rotor
for any excessive wear-out. Inspect
calipers for any fluid leakage.
For more information on checking the
pads or lining wear limit, refer to the
HYUNDAI web site.
(http://service.hyundai-motor.com)
Drive Shaft and Related
Check the drive shaft, boots, clamps,
rubber couplings and center-bearing
rubber for cracks, deterioration, or
damage. Replace any damaged parts
and if necessary, repack the grease.
Suspension mounting bolts
Check the suspension connections for
looseness or damage. Retighten to the
specified torque.
Steering gear box, linkage &
boots/lower arm ball joint
With the vehicle stopped and the engine
off, check for excessive free-play in the
steering wheel. Check the linkage for
bends or damage. Check the dust boots
and ball joints for deterioration, cracks,
or damage.
Replace any damaged parts.
Air conditioning refrigerant
Check the air conditioning lines and
connections for leakage and damage.