2022 HYUNDAI TUCSON HYBRID service
[x] Cancel search: servicePage 558 of 630

09
9-11
Maintenance under severe usage conditions
The following items must be serviced more frequently on cars mainly used under severe
driving conditions. Refer to the chart below for the appropriate maintenance intervals.
R : Replace
I : Inspect and if necessary, adjust, correct, clean or replace
Maintenance itemMaintenance
operation Maintenance Intervals Driving
condition
Engine oil and engine oil filter R Every 5,000 miles
(8,000 km) or 6 months A, B, C, D, E, F,
G, H, I, J, K, L
Air cleaner filter RReplace more
frequently depending on the condition C, E
Spark plugs RReplace more
frequently depending on the condition A, B, H, I, K
HSG (Hybrid Starter &
Generator) belt R
Every 32,000 miles
(48,000km) or 48 months C, D, E, F, G,
I, J, K
I Every 8,000 miles
(13,000km) or 12 months
Automatic transmission fluid R Every 60,000 miles
(96,000km) A, C, D, E, F, G,
H, I, K
Steering gear rack, linkage and
boots IInspect more frequently
depending on the condition C, D, E, F, G,
H, I
Front suspension ball joints IInspect more frequently
depending on the condition C, D, E, F, G
Disc brakes and pads, calipers
and rotors IInspect more frequently
depending on the condition C, D, G, H, J, K
Parking brake IInspect more frequently
depending on the condition C, D, G, H
Page 561 of 630
Maintenance
9-14
Brake hoses and lines
Visually check for proper installation,
chafing, cracks, deterioration and any
leakage. Replace any deteriorated or
damaged parts immediately.
Brake fluid
Check the brake fluid level in the brake
fluid reservoir. The level should be
between the MIN and the MAX marks
on the side of the reservoir. Use only
hydraulic brake fluid conforming to DOT
4 specification.
Parking brake
Inspect the parking brake system.
Brake discs, pads, calipers and
rotors
Check the pads, the disc, and the rotor
for any excessive wear-out. Inspect
calipers for any fluid leakage
For more information on checking the
pads or lining wear limit, refer to the
HYUNDAI web site.
(http://service.hyundai-motor.com)
Exhaust pipe and muffler
Visually inspect the exhaust pipes,
muffler and hangers for cracks,
deterioration, or damage. Start
the engine and listen carefully for
any exhaust gas leakage. Tighten
connections or replace parts as
necessary.
Suspension mounting bolts
Check the suspension connections for
looseness or damage. Retighten to the
specified torque.
Steering gear box, linkage &
boots/lower arm ball joint
With the vehicle stopped and the hybrid
system off, check for excessive free-play
in the steering wheel. Check the linkage
for bends or damage. Check the dust
boots and ball joints for deterioration,
cracks, or damage.
Replace any damaged parts.
Air conditioning refrigerant
Check the air conditioning lines and
connections for leakage and damage.
Drive Shaft and Related
Check the drive shaft, boots, clamps,
rubber couplings and center-bearing
rubber for cracks, deterioration, or
damage. Replace any damaged parts
and if necessary, repack the grease.
Page 572 of 630
09
9-25
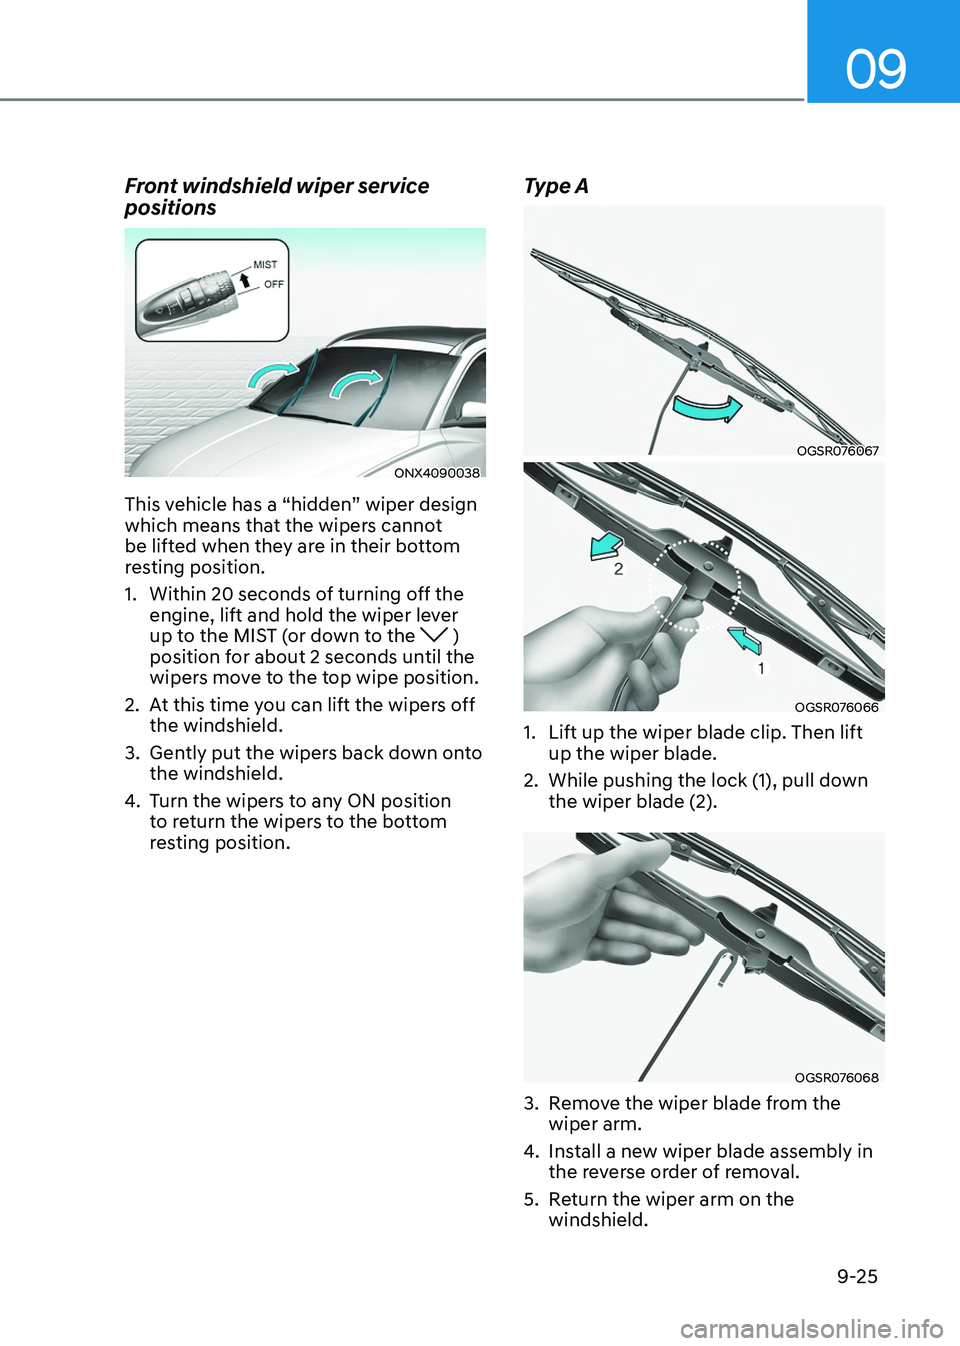
Front windshield wiper service
positions
ONX4090038
This vehicle has a “hidden” wiper design
which means that the wipers cannot
be lifted when they are in their bottom
resting position.
1.
Within 20 seconds of turning o
ff the
engine, lift and hold the wiper lever
up to the MIST (or down to the
)
position for about 2 seconds until the
wipers move to the top wipe position.
2.
At this time y
ou can lift the wipers off
the windshield.
3.
Gently put the wiper
s back down onto
the windshield.
4.
Turn the wiper
s to any ON position
to return the wipers to the bottom
resting position.
Type A
OGSR076067
OGSR076066
1. Lift up the wiper blade clip. Then lift
up the wiper blade.
2.
While pushing the lock (1), pull down
the wiper blade (2).
OGSR076068
3. Remove the wiper blade from the
wiper arm.
4.
Install a ne
w wiper blade assembly in
the reverse order of removal.
5.
Re
turn the wiper arm on the
windshield.
Page 577 of 630
Maintenance
9-30
• The negative battery cable must
be removed first and installed last
when the battery is disconnected.
Disconnect the battery charger in the
following order:
1.
Turn o
ff the battery charger main
switch.
2.
Unhook the nega
tive clamp from
the negative battery terminal.
3.
Unhook the positiv
e clamp from
the positive battery terminal.
• We recommend that you use
batteries for replacement from an
authorized HYUNDAI dealer.
NOTICE
AGM battery (if equipped)
• Absorbent Glass Matt (AGM)
batteries are maintenance-free
and we recommend that the AGM
battery be serviced by an authorized
HYUNDAI dealer. For charging
your AGM battery, use only fully
automatic battery chargers that
are specially developed for AGM
batteries.
• When replacing the AGM battery,
we recommend that you use parts
for replacement from an authorized
HYUNDAI dealer.
• Do not open or remove the cap on
top of the battery. This may cause
leaks of internal electrolyte that
could result in severe injury.
By jump starting
After a jump start from a good battery,
drive the vehicle for 20-30 minutes
before it is shutoff. The vehicle may
not restart if you shut it off before the
battery had a chance to adequately
recharge. See “Jump Starting” in chapter
9 for more information on jump starting
procedures.
Information
An inappropriately disposed
battery can be harmful to the
environment and human health.
Dispose of the battery according
to your local law(s) or regulation.
Reset items
The following items may need to be reset
after the battery has been discharged or
the battery has been disconnected.
• Auto up/down window (see chapter 5)
• Sunroof (see chapter 5)
• Trip computer (see chapter 5)
• Climate control system (see chapter 5)
• Driver position memory system (see
chapter 5)
• Clock (see chapter 5)
• Infotainment system (see
infotainment system manual)
Page 581 of 630
Maintenance
9-34
Wheel alignment and tire
balance
The wheels on your vehicle were
aligned and balanced carefully at the
factory to give you the longest tire
life and best overall performance.
In most cases, you will not need to
have your wheels aligned again.
However, if you notice unusual tire
wear or your vehicle pulling one way
or the other, the alignment may need
to be reset.
If you notice your vehicle vibrating
when driving on a smooth road, your
wheels may need to be rebalanced.
NOTICE
Incorrect wheel weights can
damage your vehicle’s aluminum
wheels. Use only approved wheel
weights.
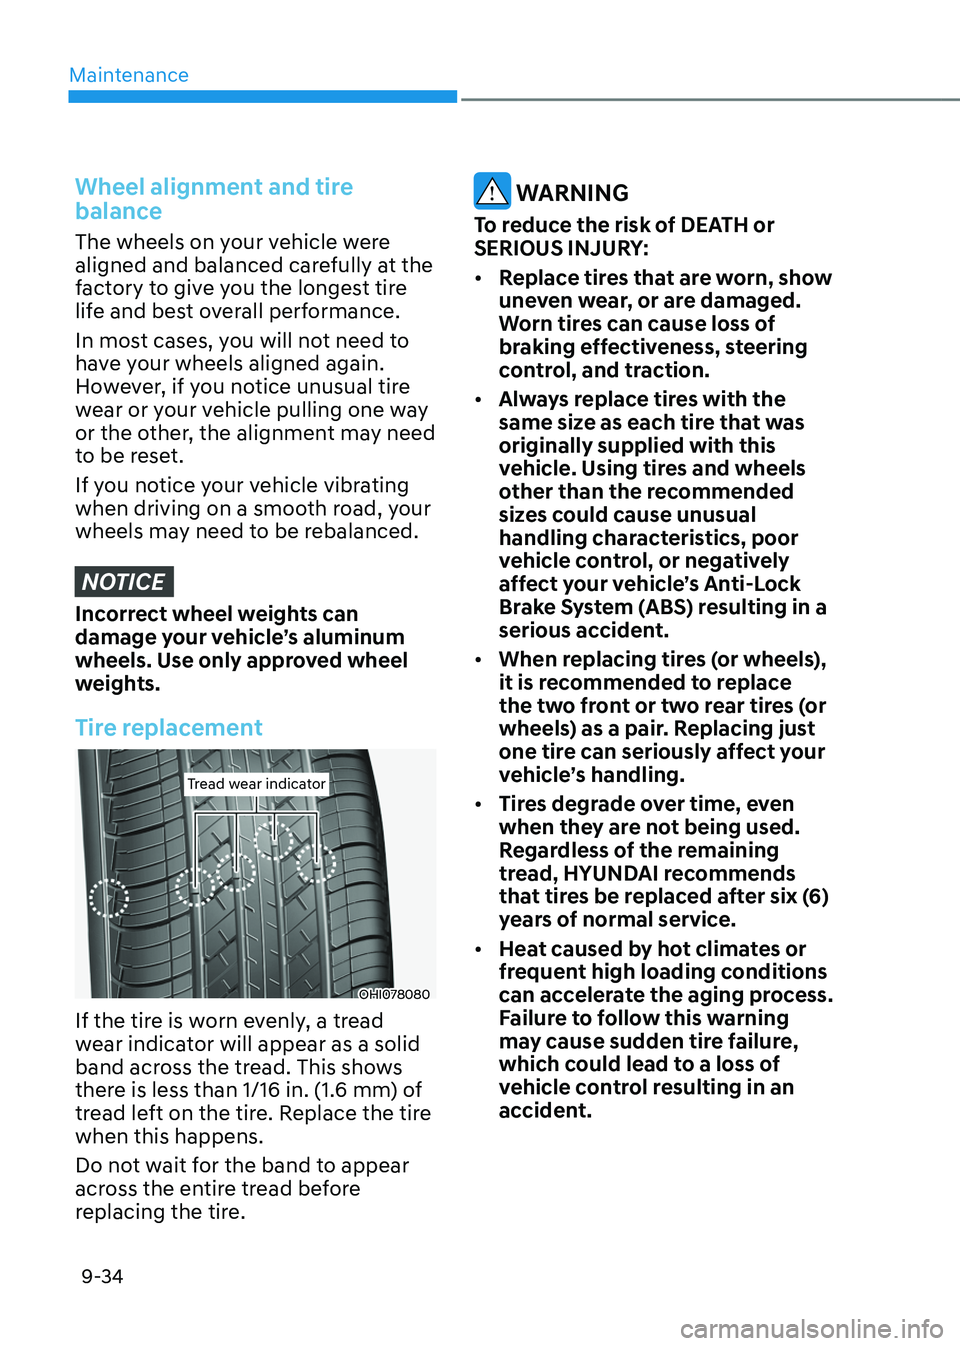
Tire replacement
Tread wear indicatorTread wear indicator
OHI078080
If the tire is worn evenly, a tread
wear indicator will appear as a solid
band across the tread. This shows
there is less than 1/16 in. (1.6 mm) of
tread left on the tire. Replace the tire
when this happens.
Do not wait for the band to appear
across the entire tread before
replacing the tire.
WARNING
To reduce the risk of DEATH or
SERIOUS INJURY:
• Replace tires that are worn, show
uneven wear, or are damaged.
Worn tires can cause loss of
braking effectiveness, steering
control, and traction.
• Always replace tires with the
same size as each tire that was
originally supplied with this
vehicle. Using tires and wheels
other than the recommended
sizes could cause unusual
handling characteristics, poor
vehicle control, or negatively
affect your vehicle’s Anti-Lock
Brake System (ABS) resulting in a
serious accident.
• When replacing tires (or wheels),
it is recommended to replace
the two front or two rear tires (or
wheels) as a pair. Replacing just
one tire can seriously affect your
vehicle’s handling.
• Tires degrade over time, even
when they are not being used.
Regardless of the remaining
tread, HYUNDAI recommends
that tires be replaced after six (6)
years of normal service.
• Heat caused by hot climates or
frequent high loading conditions
can accelerate the aging process.
Failure to follow this warning
may cause sudden tire failure,
which could lead to a loss of
vehicle control resulting in an
accident.
Page 585 of 630
Maintenance
9-38
Tread wear
The tread wear grade is a
comparative rating based on the
wear rate of the tire when tested
under controlled conditions on a
specified government test course.
For example, a tire graded 150 would
wear one-and-a-half times (1½) as
well on the government course as a
tire graded 100.
The relative performance of tires
depends upon the actual conditions
of their use, however, and may
depart significantly from the norm
due to variations in driving habits,
service practices and differences in
road characteristics and climate.
These grades are molded on the
sidewalls of passenger vehicle tires.
The tires available as standard or
optional equipment on your vehicle
may vary with respect to grade.
Traction - AA, A, B & C
The traction grades, from highest
to lowest, are AA, A, B and C. Those
grades represent the tire’s ability to
stop on wet pavement as measured
under controlled conditions on
specified government test surfaces
of asphalt and concrete. A tire
marked C may have poor traction
performance.
WARNING
The traction grade assigned to
this tire is based on straightahead
braking traction tests, and does not
include acceleration, cornering,
hydroplaning, or peak traction
characteristics.
Temperature - A, B & C
The temperature grades are A (the
highest), B and C representing the
tire’s resistance to the generation
of heat and its ability to dissipate
heat when tested under controlled
conditions on a specified indoor
laboratory test wheel.
Sustained high temperature can
cause the material of the tire to
degenerate and reduce tire life,
and excessive temperature can
lead to sudden tire failure. Grades
B and A represent higher levels of
performance on the laboratory test
wheel than the minimum required
by law.
WARNING
The temperature grade for this
tire is established for a tire that
is properly inflated and not
overloaded. Excessive speed,
under-inflation, over-inflation, or
excessive loading, either separately
or in combination, can cause heat
build-up and possible sudden
tire failure. This may cause loss
of vehicle control resulting in an
accident.
Page 601 of 630
Maintenance
9-54
ONX4090027
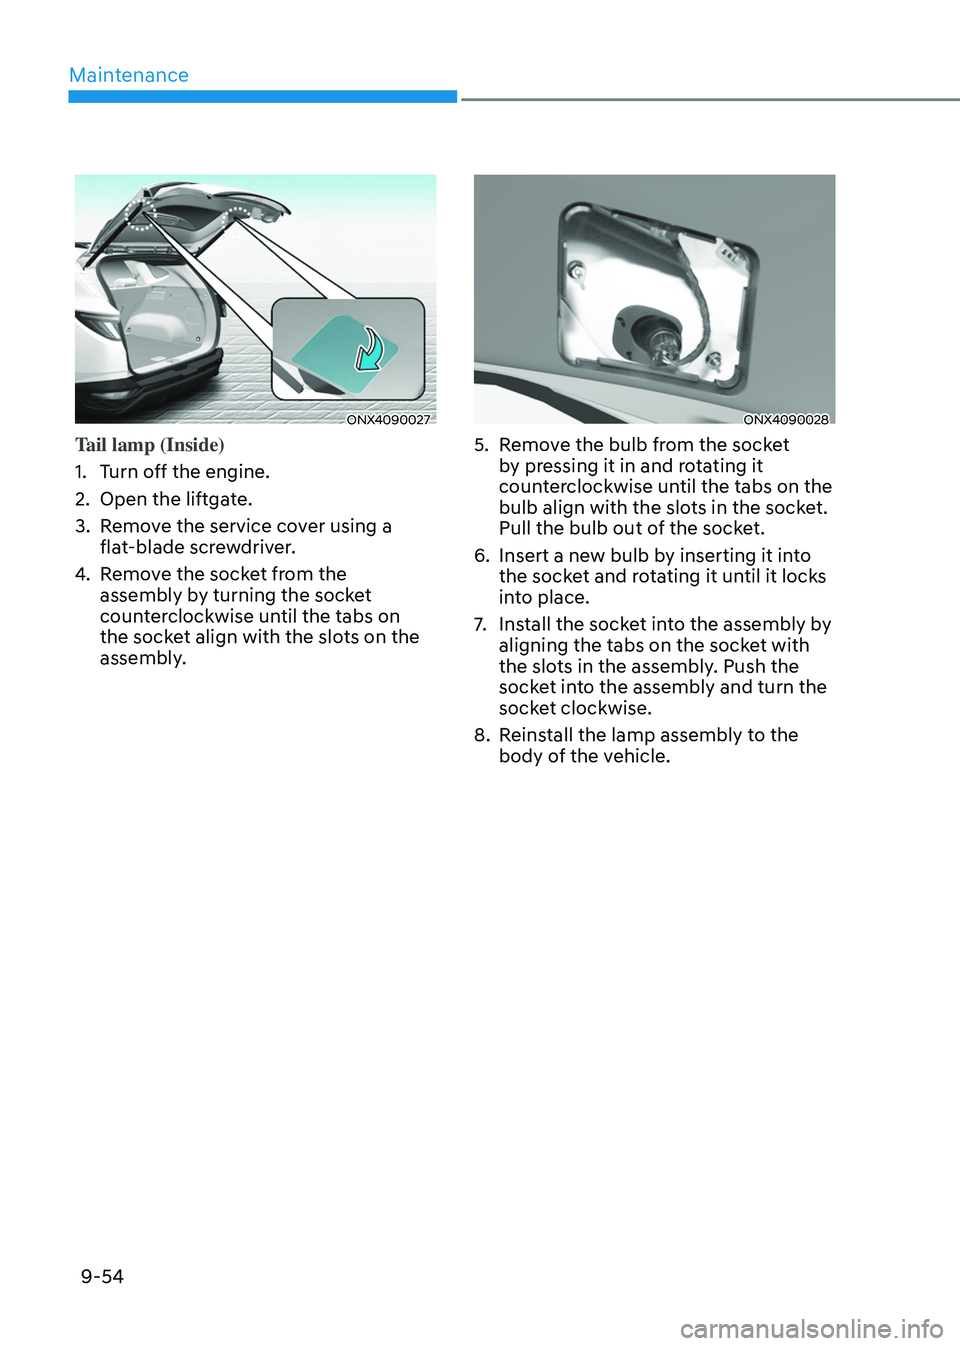
Tail lamp (Inside)
1.
Turn o
ff the engine.
2.
Open the liftga
te.
3.
Remo
ve the service cover using a
flat-blade screwdriver.
4.
Remo
ve the socket from the
assembly by turning the socket
counterclockwise until the tabs on
the socket align with the slots on the
assembly.
ONX4090028
5. Remove the bulb from the socket
b y pressing it in and rotating it
counterclockwise until the tabs on the
bulb align with the slots in the socket.
Pull the bulb out of the socket.
6.
Insert a new bulb b
y inserting it into
the socket and rotating it until it locks
into place.
7.
Install the sock
et into the assembly by
aligning the tabs on the socket with
the slots in the assembly. Push the
socket into the assembly and turn the
socket clockwise.
8.
Reins
tall the lamp assembly to the
body of the vehicle.
Page 613 of 630

Maintenance
9-66
Emission control systEm
The emission control system of your
vehicle is covered by a written limited
warranty. Please see the warranty
information contained in the Service
Passport in your vehicle.
Your vehicle is equipped with an
emission control system to meet all
applicable emission regulations. There
are three emission control systems, as
follows.
(1)
Crank
case emission control system
(2)
Ev
aporative emission control system
(3)
Exhaust emission con
trol system
In order to ensure the proper function
of the emission control systems, it
is recommended that you have your
vehicle inspected and maintained
by an authorized HYUNDAI dealer in
accordance with the maintenance
schedule in this manual.
NOTICE
For the Inspection and Maintenance
Test (with Electronic Stability Control
(ESC) system)
• To prevent the vehicle from misfiring
during dynamometer testing, turn
the Electronic Stability Control
(ESC) system off by pressing the ESC
switch (ESC OFF light illuminated).
• After dynamometer testing is
completed, turn the ESC system back
on by pressing the ESC switch again.
1. Crankcase emission control
sy
stem
The positive crankcase ventilation system
is employed to prevent air pollution
caused by blow-by gases being emitted
from the crankcase. This system supplies
fresh filtered air to the crankcase through
the air intake hose. Inside the crankcase,
the fresh air mixes with blow-by gases,
which then pass through the PCV valve
into the induction system.
2. Evaporative emission control
system
The Evaporative Emission Control System
is designed to prevent fuel vapors from
escaping into the atmosphere.
Canister
Fuel vapors generated inside the fuel
tank are absorbed and stored in the
onboard canister. When the engine is
running, the fuel vapors absorbed in the
canister are drawn into the surge tank
through the purge control solenoid valve.
Purge Control Solenoid Valve (PCSV)
The purge control solenoid valve
is controlled by the Engine Control
Module (ECM); when the engine coolant
temperature is low during idling, the
PCSV closes so that evaporated fuel
is not taken into the engine. After the
engine warms-up during ordinary
driving, the PCSV opens to introduce
evaporated fuel to the engine.