2022 HYUNDAI TUCSON HYBRID service
[x] Cancel search: servicePage 455 of 630
Driver assistance system
7-96
Limitations of Navigation-based
Smart Cruise Control
Navigation-based Smart Cruise Control
may not operate normally under the
following circumstances:
• The navigation is not working properly
• Speed limit and road information in
the navigation is not updated
• Map information is not transmitted
due to infotainment system's
abnormal operation
• The map information and the actual
road is different because of real-time
GPS data or map information error
• The navigation searches for a route
while driving
• GPS signals are blocked in areas such
as a tunnel
• A road that divides into two or more
roads and joins again
• The driver goes off course the route
set in the navigation
• The route to the destination is
changed or canceled by resetting the
navigation •
The vehicle enters a service station or
rest area
• Android Auto or Car Play is operating
• The navigation cannot detect the
current vehicle position (ex: elevated
roads including overpass adjacent to
general roads or nearby roads exist in
a parallel way)
• The navigation is being updated while
driving
• The navigation is being restarted while
driving
• The speed limit of some sections
changes according to the road
situations
• Driving on a road under construction
• Driving on a road that is controlled
• There is bad weather, such as heavy
rain, heavy snow, etc.
• Driving on a road that is sharply
curved
Page 468 of 630
07
7-109
• Highway Driving Assist may
inadvertently operate or turn off
depending on road conditions
(navigation information) and
surroundings.
• Lane Following Assist function may
be temporarily disabled when the
front view camera cannot detect
lanes properly or the hands-off
warning is on.
• You may not hear the warning sound
of Highway Driving Assist if the
surrounding is noisy.
• If the vehicle is driven at high speed
above a certain speed at a curve,
your vehicle may drive to one side or
may depart from the driving lane.
• When you are towing a trailer or
another vehicle, we recommend that
Highway Driving Assist is turned off
due to safety reasons.
• The hands–off warning message
may appear early or late depending
on how the steering wheel is held or
road conditions. Always have your
hands on the steering wheel while
driving.
• For your safety, please read the
owner's manual before using the
Highway Driving Assist.
• Highway Driving Assist will not
operate when the engine is started,
or when the detecting sensors or
navigation is being initialized.Limitations of Highway Driving
Assist
Highway Driving Assist may not operate
normally, or may not operate under the
following circumstances:
• The map information and the
actual road is different because the
navigation is not updated
• The map information and the actual
road is different because of real-time
GPS data or map information error
• The infotainment system is overloaded
by simultaneously performing
functions such as route search, video
playback, voice recognition, etc.
• GPS signals are blocked in areas such
as a tunnel
• The driver goes off course or the
route to the destination is changed or
canceled by resetting the navigation
• The vehicle enters a service station or
rest area
• Android Auto or Car Play is operating
• The navigation cannot detect the
current vehicle position (ex: elevated
roads including overpass adjacent to
general roads or nearby roads exist in
a parallel way)
Information
For more details on the limitations of
the front view camera, front radar, front
corner radar and rear corner radar, refer
to “Forward Collision-Avoidance Assist
(FCA)” section in chapter 7.
Page 521 of 630
8. Emergency situations
Hazard warning flasher........................................................................\
.............8-2
In case of an emergency while driving
............................................................ 8
-3
If the engine stalls while driving ........................................................................\
.........8-3
If the engine s talls at a crossroad or crossing ............................................................ 8
-3
If you have a flat tire while driving
........................................................................\
...... 8
-3
If the engine will not start ........................................................................\
........8-4
If the 12 Volt Ba ttery Is Discharged
.................................................................. 8-5
Before Jump Starting ........................................................................\
........................... 8-5
Jump Starting ........................................................................\
...................................... 8-6
If the Engine Overheats ........................................................................\
............8-8
Tire Pr essure Monitoring System (TPMS)
....................................................... 8-
10
Check tire pressure ........................................................................\
............................8-10
Tir e pressure monitoring system ........................................................................\
........ 8-11
L
ow tire pressure warning light
........................................................................\
......... 8-
12
Low tire pressure position and tire pressure indicator
............................................ 8-
12
TPMS (Tire Pressure Monitoring System) malfunction indicator
............................ 8-
13
Changing a tire with TPMS
........................................................................\
................ 8-
13
If you have a flat tire (with Tire Mobility Kit) ..................................................8-15Introduction ........................................................................\
........................................ 8-15
N otes on the safe use of the Tire Mobility Kit .......................................................... 8-
16
Components of the Tire Mobility Kit
........................................................................\
.. 8-
17
Using the Tire Mobility Kit
........................................................................\
................. 8-
18
Checking the tire inflation pressure
........................................................................\
.. 8-
21
Towing ........................................................................\
.....................................8-23Towing service ........................................................................\
....................................8-23
R emovable towing hook ........................................................................\
.................... 8
-24
Emergency towing
........................................................................\
............................. 8-
25
Emergency / Roadside assistance accessories ............................................8-27Fire extinguisher ........................................................................\
................................. 8-27
Fir st aid kit ........................................................................\
..................................... .....8-27
Triangle reflector
........................................................................\
................................ 8-
27
Tire pressure gauge
........................................................................\
........................... 8-
27
Emergency situations
8
Page 526 of 630
Emergency situations
8-6
NOTICE
External power source using 12V battery
The use of external power accessories
may reduce performance and function
of the vehicle. Especially, the use of
dash cameras may shut off the power of
the vehicle prior to the dash camera’s
automatic shut-down.
If the power of the vehicle is shut off,
start the vehicle as explained. (refer to
“Using the 12V Battery Reset Switch”)
Jump Starting
In the event vehicle still does not have a
functional 12V battery (check if interior
lights will not turn on) then you can try
a jump start to the engine compartment
jumper terminals using a 12V booster
pack or jumper cables from another
vehicle’s 12V battery according to the
following instructions.
CAUTION
Jump starting can be dangerous if
done incorrectly. Follow the jump
starting procedure in this section to
avoid serious injury or damage to
your vehicle. If in doubt about how to
properly jump start your vehicle, we
strongly recommend that you have a
service technician or towing service do
it for you.
1.
Position the v
ehicles close enough
that the jumper cables will reach, but
do not allow the vehicles to touch.
Avoid fans or any moving parts in the
engine compartment at all times, even
when the vehicles are turned off.
2.
Turn o
ff all electrical devices such as
radios, lights, air conditioning, etc.
Put the vehicles in P (Park) and set the
parking brake. Turn both vehicles OFF.
ONX4080003
3. Connect the jumper cables in
the ex act sequence shown in the
illustration. First connect one jumper
cable to the red, positive (+) jumper
terminal of your vehicle (1).
4.
Connect the other end o
f the jumper
cable to the red, positive (+) battery/
jumper terminal of the assisting
vehicle (2).
5.
Connect the second jumper cable to
the black, nega
tive (-) battery/chassis
ground of the assisting vehicle (3).
6.
Connect the other end o
f the second
jumper cable to the black, negative (-)
chassis ground of your vehicle (4).
Do not allow the jumper cables to
contact anything except the correct
battery or jumper terminals or the
correct ground. Do not lean over the
battery when making connections.
Page 532 of 630
Emergency situations
8-12
Low tire pressure
warning light
Low tire pressure position and
tire pressure telltale
ONX4E040019
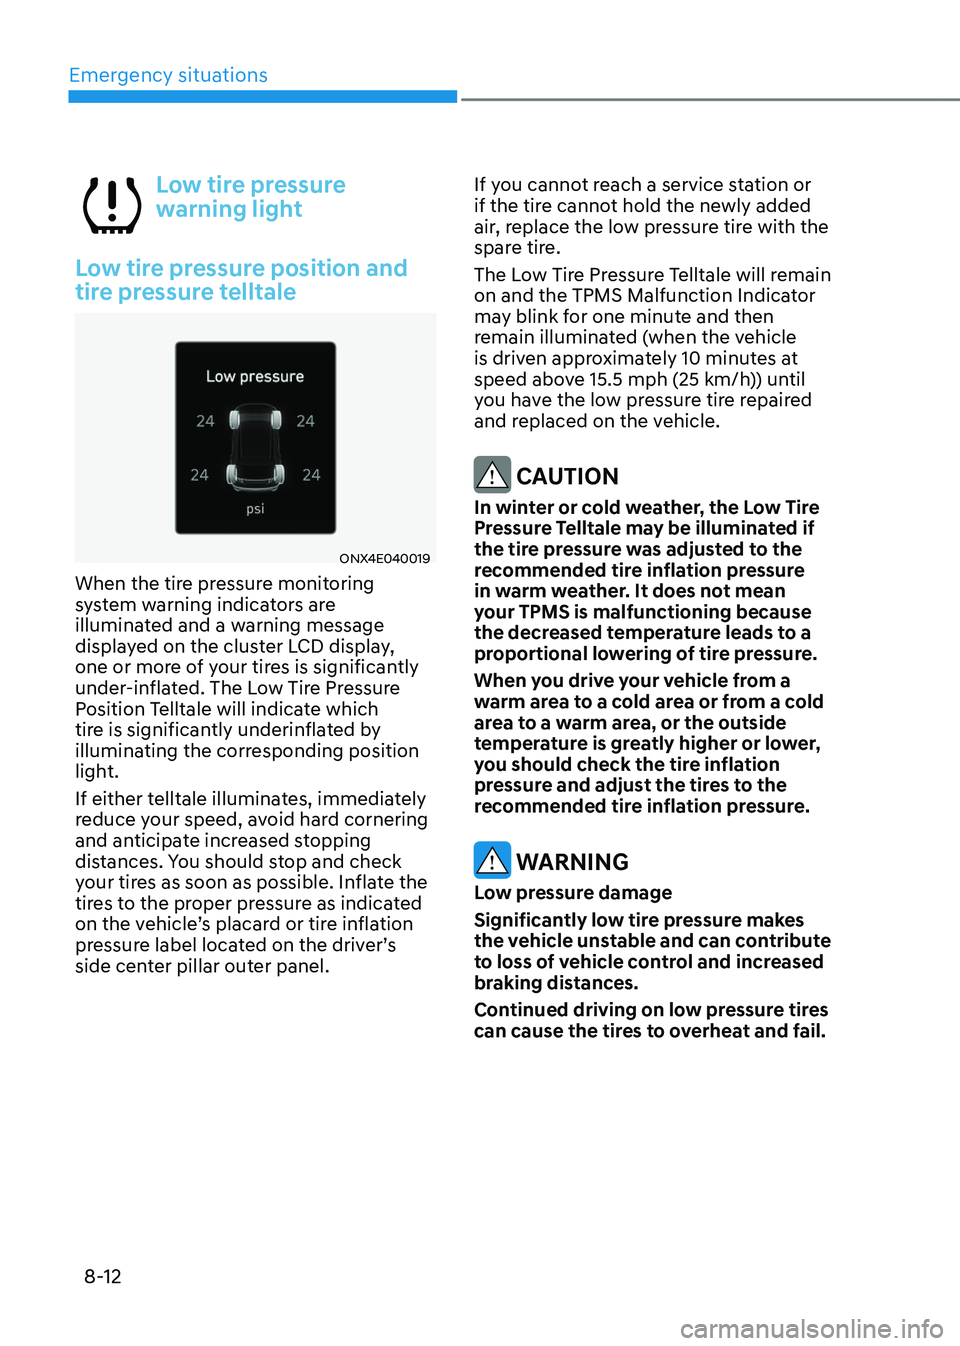
When the tire pressure monitoring
system warning indicators are
illuminated and a warning message
displayed on the cluster LCD display,
one or more of your tires is significantly
under-inflated. The Low Tire Pressure
Position Telltale will indicate which
tire is significantly underinflated by
illuminating the corresponding position
light.
If either telltale illuminates, immediately
reduce your speed, avoid hard cornering
and anticipate increased stopping
distances. You should stop and check
your tires as soon as possible. Inflate the
tires to the proper pressure as indicated
on the vehicle’s placard or tire inflation
pressure label located on the driver’s
side center pillar outer panel. If you cannot reach a service station or
if the tire cannot hold the newly added
air, replace the low pressure tire with the
spare tire.
The Low Tire Pressure Telltale will remain
on and the TPMS Malfunction Indicator
may blink for one minute and then
remain illuminated (when the vehicle
is driven approximately 10 minutes at
speed above 15.5 mph (25 km/h)) until
you have the low pressure tire repaired
and replaced on the vehicle.
CAUTION
In winter or cold weather, the Low Tire
Pressure Telltale may be illuminated if
the tire pressure was adjusted to the
recommended tire inflation pressure
in warm weather. It does not mean
your TPMS is malfunctioning because
the decreased temperature leads to a
proportional lowering of tire pressure.
When you drive your vehicle from a
warm area to a cold area or from a cold
area to a warm area, or the outside
temperature is greatly higher or lower,
you should check the tire inflation
pressure and adjust the tires to the
recommended tire inflation pressure.
WARNING
Low pressure damage
Significantly low tire pressure makes
the vehicle unstable and can contribute
to loss of vehicle control and increased
braking distances.
Continued driving on low pressure tires
can cause the tires to overheat and fail.
Page 533 of 630
08
8-13
TPMS (Tire Pressure
Monitoring System)
malfunction indicator
The TPMS Malfunction Indicator
will illuminate after it blinks for
approximately one minute when there
is a problem with the Tire Pressure
Monitoring System.
We recommend that you have the
system checked by an authorized
HYUNDAI dealer as soon as possible.
NOTICE
If there is a malfunction with the TPMS,
the Low Tire Pressure Position Indicator
will not be displayed even though the
vehicle has an under-inflated tire.
NOTICE
The TPMS Malfunction Indicator may
illuminate after blinking for one minute
if the vehicle is near electric power
supply cables or radio transmitters
such as police stations, government
and public offices, broadcasting
stations, military installations, airports,
transmitting towers, etc.
Additionally, the TPMS Malfunction
Indicator may illuminate if snow chains
are used or electronic devices such as
computers, chargers, remote starters,
navigation, etc. This may interfere with
normal operation of the TPMS.
Changing a tire with TPMS
If you have a flat tire, the Low Tire
Pressure and Position indicators will
come on. We recommend that you have
the flat tire repaired by an authorized
HYUNDAI dealer as soon as possible or
replace the flat tire with the spare tire.
NOTICE
It is recommended that you do not
use a puncture-repairing agent not
approved by HYUNDAI dealer or the
equivalent specified for your vehicle to
repair and/or inflate a low pressure tire.
Tire sealant not approved by HYUNDAI
dealer or the equivalent specified for
your vehicle may damage the tire
pressure sensor.
The spare tire (if equipped) does not
come with a tire pressure monitoring
sensor. When the low pressure tire or
the flat tire is replaced with the spare
tire, the Low Tire Pressure Indicator will
remain on. Also, the TPMS Malfunction
Indicator will illuminate after blinking
for one minute if the vehicle is driven
at speed above 15.5 mph (25 km/h) for
approximately 10 minutes.
Once the original tire equipped with
a tire pressure monitoring sensor is
reinflated to the recommended pressure
and reinstalled on the vehicle, the
Low Tire Pressure Indicator and TPMS
Malfunction Indicator will go off within a
few minutes of driving.
If the indicators do not extinguish after
a few minutes, we recommend that you
contact an authorized HYUNDAI dealer.
Each wheel is equipped with a tire
pressure sensor mounted inside the tire
behind the valve stem (except for the
spare tire). You must use TPMS specific
wheels. It is recommended that you
always have your tires serviced by an
authorized HYUNDAI dealer.
Page 535 of 630
08
8-15
if you have a flaT Tire (wiTh Tire MobiliTy KiT,
if e qui
PPed)
ONX4E080039
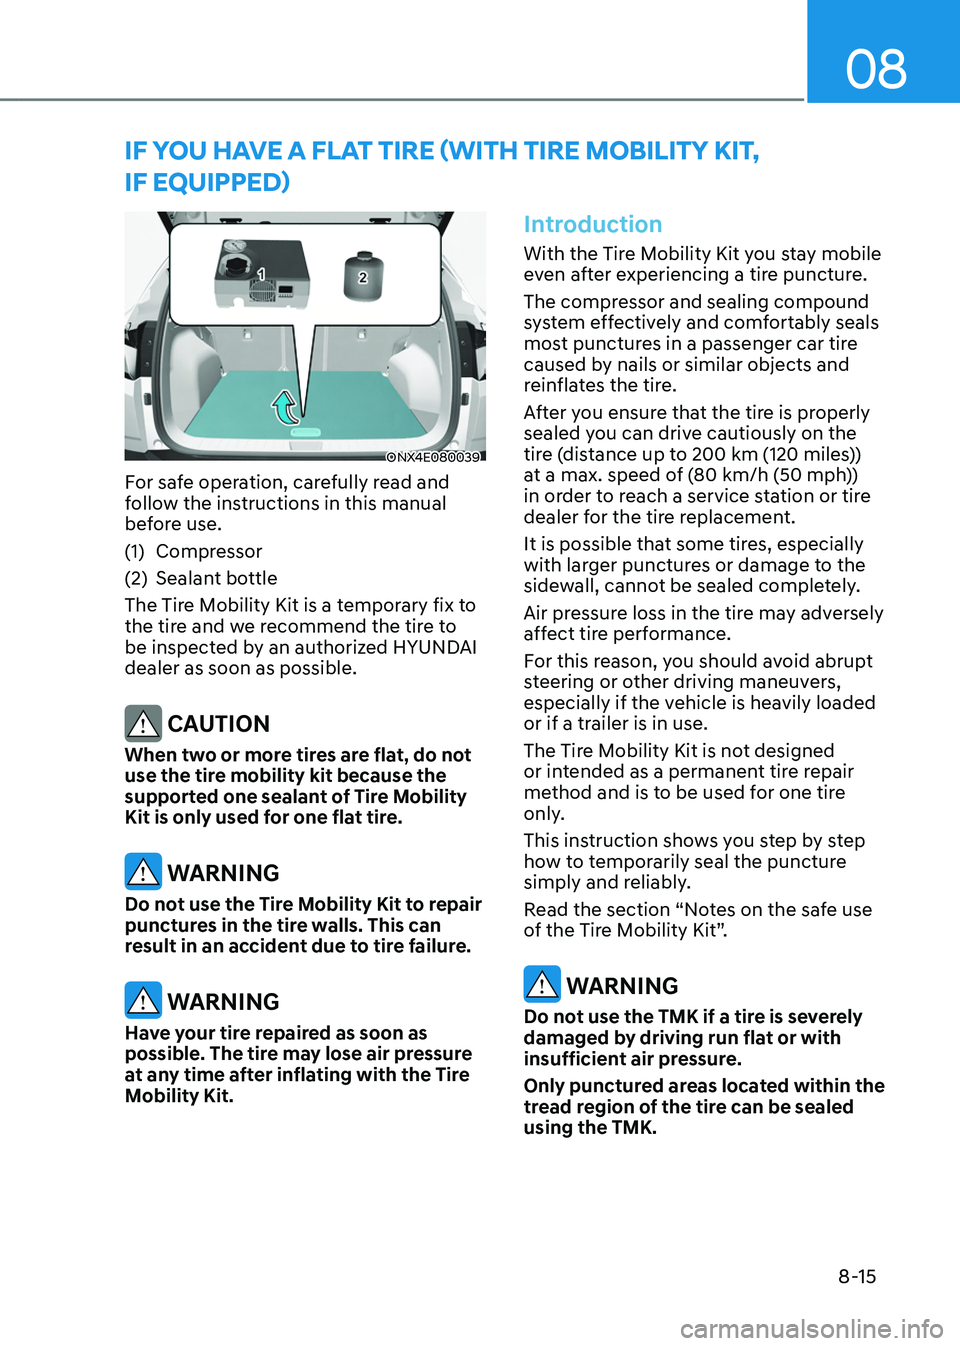
For safe operation, carefully read and
follow the instructions in this manual
before use.
(1)
Compressor
(2)
Sealant bo
ttle
The Tire Mobility Kit is a temporary fix to
the tire and we recommend the tire to
be inspected by an authorized HYUNDAI
dealer as soon as possible.
CAUTION
When two or more tires are flat, do not
use the tire mobility kit because the
supported one sealant of Tire Mobility
Kit is only used for one flat tire.
WARNING
Do not use the Tire Mobility Kit to repair
punctures in the tire walls. This can
result in an accident due to tire failure.
WARNING
Have your tire repaired as soon as
possible. The tire may lose air pressure
at any time after inflating with the Tire
Mobility Kit.
Introduction
With the Tire Mobility Kit you stay mobile
even after experiencing a tire puncture.
The compressor and sealing compound
system effectively and comfortably seals
most punctures in a passenger car tire
caused by nails or similar objects and
reinflates the tire.
After you ensure that the tire is properly
sealed you can drive cautiously on the
tire (distance up to 200 km (120 miles))
at a max. speed of (80 km/h (50 mph))
in order to reach a service station or tire
dealer for the tire replacement.
It is possible that some tires, especially
with larger punctures or damage to the
sidewall, cannot be sealed completely.
Air pressure loss in the tire may adversely
affect tire performance.
For this reason, you should avoid abrupt
steering or other driving maneuvers,
especially if the vehicle is heavily loaded
or if a trailer is in use.
The Tire Mobility Kit is not designed
or intended as a permanent tire repair
method and is to be used for one tire
only.
This instruction shows you step by step
how to temporarily seal the puncture
simply and reliably.
Read the section “Notes on the safe use
of the Tire Mobility Kit”.
WARNING
Do not use the TMK if a tire is severely
damaged by driving run flat or with
insufficient air pressure.
Only punctured areas located within the
tread region of the tire can be sealed
using the TMK.
Page 540 of 630
Emergency situations
8-20
9. With the vehicle ON
( indicator ON), switch on
the compressor and let it run for
approximately 5~7 minutes to fill
the sealant up to proper pressure.
(Refer to “Tire and Wheels” section
in chapter2). The inflation pressure of
the tire after filling is unimportant and
will be checked/corrected later.
Be careful not to overinflate the tire
and stay away from the tire when
filling it.
CAUTION
Do not attempt to drive your vehicle if
the tire pressure is below 200 kpa (29
psi). This could result in an accident due
to sudden tire failure.
10.
Swit
ch off the compressor.
11.
Detach the hoses fr
om the sealant
bottle connector and from the tire
valve.
Return the Tire Mobility Kit to its storage
location in the vehicle.
WARNING
Do not leave your vehicle running in
a poorly ventilated area for extended
periods of time. Carbon monoxide
poisoning and suffocation can occur.
Distributing the sealant
OOSH079022L
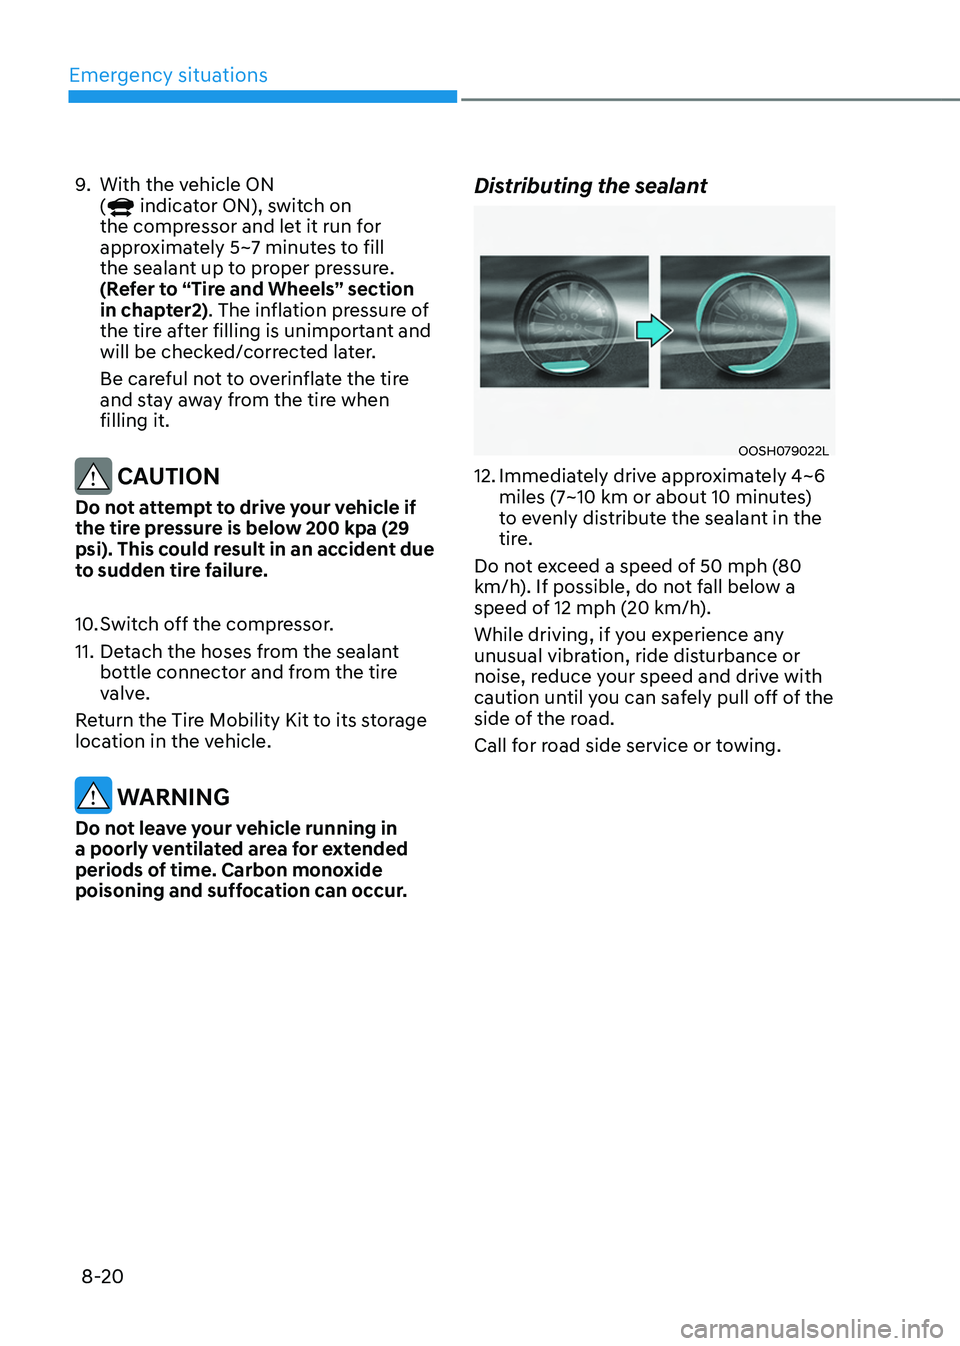
12. Immediat ely drive approximately 4~6
miles (7~10 km or about 10 minutes)
to evenly distribute the sealant in the
tire.
Do not exceed a speed of 50 mph (80
km/h). If possible, do not fall below a
speed of 12 mph (20 km/h).
While driving, if you experience any
unusual vibration, ride disturbance or
noise, reduce your speed and drive with
caution until you can safely pull off of the
side of the road.
Call for road side service or towing.