2022 HYUNDAI SONATA HYBRID air condition
[x] Cancel search: air conditionPage 455 of 527

Maintenance
8-6
While operating your vehicle:
• Note any changes in the sound of the
exhaust or any smell of exhaust fumes
in the vehicle.
• Check for vibrations in the steering
wheel. Notice if there is any increased
steering effort or looseness in the
steering wheel, or change in its
straight-ahead position.
• Notice if your vehicle constantly turns
slightly or “pulls” to one side when
traveling on smooth, level road.
• When stopping, listen and check for
unusual sounds, pulling to one side,
increased brake pedal travel or “hard-
to-push” brake pedal.
• If any slipping or changes in the
operation of your transmission occurs,
check the transmission fluid level.
• Check the automatic transmission P
(Park) function.
• Check the parking brake.
• Check for fluid leaks under your
vehicle (water dripping from the air
conditioning system during or after
use is normal).
At least monthly:
• Check coolant level in the engine
coolant reservoir.
• Check the operation of all exterior
lights, including the stoplights, turn
signals and hazard warning flashers.
• Check the inflation pressures of all
tires including the spare for tires that
are worn, show uneven wear, or are
damaged.
• Check for loose wheel lug nuts.
At least twice a year: (i.e., every
Spring and Autumn)
• Check radiator, heater and air
conditioning hoses for leaks or
damage.
• Check windshield washer spray and
wiper operation. Clean wiper blades
with a clean cloth dampened with
washer fluid.
• Check headlamp alignment.
• Check muffler, exhaust pipes, shields
and clamps.
• Check the seat belts for wear and
function.
At least once a year:
• Clean body and door drain holes.
• Lubricate door hinges and hood
hinges.
• Lubricate door and hood locks and
latches.
• Lubricate door rubber weather strips.
• Check the air conditioning system.
• Inspect and lubricate automatic
transmission linkage and controls.
• Clean the battery and terminals.
• Check the brake fluid level.
Page 458 of 527

08
8-9
Normal Maintenance Schedule (CONT.)
MAINTENANCE
INTERVALS
MAINTENANCE
ITEM Number of months or driving distance, whichever comes first
Months 1224 3648 60 7284 96108 120 132144 156168 180
Miles 7. 51522.5 3037.5 4552.5 6067.5 7583 90 98105 113
Km 1224 3648 60 7284 96108 120 132144 156168 180
Battery condition IIIIIIIIIIIIIII
Brake lines, hoses and connections IIIIIIIIIIIIIII
Brake hoses and lines IIIIIIIIIIIIIII
Disc brakes and pads IIIIIIIIIIIIIII
Steering gear rack, linkage and boots IIIIIIIIIIIIIIIDriveshaft and boots IIIIIIIIIIIIIII
Suspension mounting bolts IIIIIIIIIIIIIII
Air conditioner refrigerant IIIIIIIIIIIIIII
Air conditioner compressor IIIIIIIIIIIIIII
Exhaust pipe and muffler IIIIIII
Automatic transmission fluid No check, No service required
Vapor hose, fuel filler cap and fuel tank IIII : Inspect and if necessary, adjust, correct, clean or replace.
R : Replace or change.
Page 460 of 527

08
8-11
Maintenance Under Severe Usage Conditions
The following items must be serviced more frequently on cars normally used under severe
driving conditions. Refer to the chart below for the appropriate maintenance intervals.
R : Replace
I : Inspect and, after inspection, clean, adjust, repair or replace if necessary
Maintenance ItemMaintenance
operation Maintenance Intervals Driving
condition
HSG (Hybrid Starter &
Generator) belt R
Every 30,000 miles (48,000 km)
or 24 months C, D, E, I
I Every 3,750 miles (6,000 km) or
6 months
Engine oil and filter REvery 3,750 miles (6,000 km) or
6 months A, B, C, D, E,
F, G, H, I, K
Air cleaner filter RMore frequently C, E
Spark plugs RMore frequently B, H
Climate control air filter
(for evaporator and
blower unit) R
More frequently C, E
Front brake disc/pads,
calipers I
More frequently C, D, G, H
Page 462 of 527

08
8-13
Engine Oil and Filter
The engine oil and filter should be
changed at the intervals specified in the
maintenance schedule. If the vehicle
is being driven in severe conditions,
more frequent oil and filter changes are
required.
HSG (Hybrid Starter & Generator)
Belt
The HSG belt should be changed at the
intervals specified in the maintenance
schedule.
Fuel Lines, Fuel Hoses and
Connections
Check the fuel lines, fuel hoses and
connections for leakage and damage.
Have an authorized HYUNDAI dealer
replace any damaged or leaking parts
immediately.
Fuel Filter
A clogged filter can limit the speed
at which the vehicle may be driven,
damage the emission system and cause
multiple issues such as hard starting. If
an excessive amount of foreign matter
accumulates in the fuel tank, the
filter may require replacement more
frequently. After installing a new filter,
run the engine for several minutes,
and check for leaks at the connections.
Fuel filters should be installed by an
authorized HYUNDAI dealer.
Vapor Hose and Fuel Filler Cap
The vapor hose and fuel filler cap should
be inspected at those intervals specified
in the maintenance schedule. Make sure
a new vapor hose or fuel filler cap is
correctly replaced.
Air Cleaner Filter
A genuine HYUNDAI air cleaner filter
is recommended when the filter is
replaced.
Spark Plugs
Make sure to install new spark plugs of
the correct heat range.
Cooling System
Check cooling system components, such
as radiator, coolant reservoir, hoses and
connections for leakage and damage.
Replace any damaged parts.
Engine Coolant/Inverter Coolant
The coolant should be changed at the
intervals specified in the maintenance
schedule.
Automatic Transmission Fluid
Automatic transmission fluid should
not be checked under normal usage
conditions. But in severe conditions, the
fluid should be changed at an authorized
HYUNDAI dealer in accordance to the
scheduled maintenance at the beginning
of this chapter.
EXPLANATION OF SCHEDULED MAINTENANCE ITEMS
Page 463 of 527

Maintenance
8-14
Information
Automatic transmission fluid color is red
when new.
As the vehicle is driven, the automatic
transmission fluid will begin to look
darker. This is a normal condition and you
should not judge the need to replace the
fluid based upon the changed color.
NOTICE
The use of a non-specified fluid could
result in transmission malfunction
and failure. Use only the specified
automatic transmission fluid (refer
to “Recommended Lubricants and
Capacities” in chapter 2).
Engine Clutch Actuator Fluid
The engine clutch actuator fluid level
should be inspected or replaced to the
intervals specified in the maintenance
schedule.
Brake Hoses and Lines
Visually check for proper installation,
chafing, cracks, deterioration and any
leakage. Replace any deteriorated or
damaged parts immediately.
Brake Fluid
Check the brake fluid level in the brake
fluid reservoir. The level should be
between the MIN and the MAX marks
on the side of the reservoir. Use only
hydraulic brake fluid conforming to DOT
4 specification.
Parking Brake
Inspect the parking brake system.
Brake Discs, Pads, Calipers and
Rotors
Check the pads, the disc, and the rotor
for any excessive wear-out. Inspect
calipers for any fluid leakage
Exhaust Pipe and Muffler
Visually inspect the exhaust pipes,
muffler and hangers for cracks,
deterioration, or damage. Start
the engine and listen carefully for
any exhaust gas leakage. Tighten
connections or replace parts as
necessary.
Suspension Mounting Bolts
Check the suspension connections for
looseness or damage. Retighten to the
specified torque.
Steering Gear Box, Linkage &
Boots/Lower Arm Ball Joint
With the vehicle stopped and the hybrid
system off, check for excessive free-play
in the steering wheel. Check the linkage
for bends or damage. Check the dust
boots and ball joints for deterioration,
cracks, or damage.
Replace any damaged parts.
Drive Shafts and Boots
Check the drive shafts, boots and clamps
for cracks, deterioration, or damage.
Replace any damaged parts and, if
necessary, repack the grease.
Air Conditioning Refrigerant
Check the air conditioning lines and
connections for leakage and damage.
Page 471 of 527

Maintenance
8-22
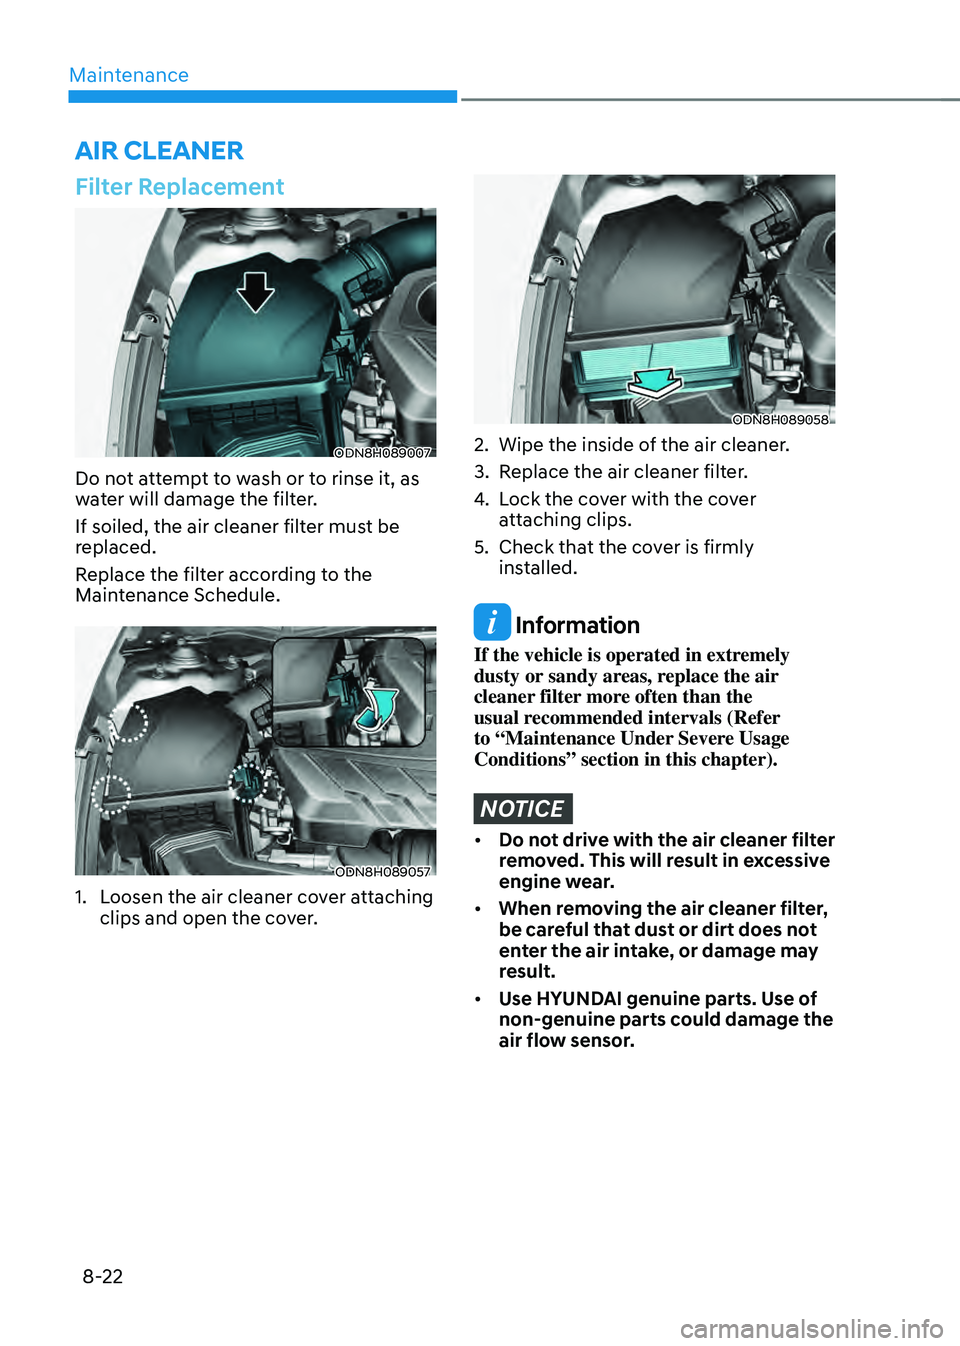
Filter Replacement
ODN8H089007
Do not attempt to wash or to rinse it, as
water will damage the filter.
If soiled, the air cleaner filter must be
replaced.
Replace the filter according to the
Maintenance Schedule.
ODN8H089057
1. Loosen the air cleaner cover attaching
clips and open the cover.
ODN8H089058
2. Wipe the inside of the air cleaner.
3. Replace the air cleaner filter.
4. Lock the cover with the cover
attaching clips.
5. Check that the cover is firmly
installed.
Information
If the vehicle is operated in extremely
dusty or sandy areas, replace the air
cleaner filter more often than the
usual recommended intervals (Refer
to “Maintenance Under Severe Usage
Conditions” section in this chapter).
NOTICE
• Do not drive with the air cleaner filter
removed. This will result in excessive
engine wear.
• When removing the air cleaner filter,
be careful that dust or dirt does not
enter the air intake, or damage may
result.
• Use HYUNDAI genuine parts. Use of
non-genuine parts could damage the
air flow sensor.
AIR CLEANER
Page 476 of 527

08
8-27
Check Tire Inflation Pressure
Check your tires, including the spare
tire, once a month or more.
How to check
Use a good quality tire pressure
gauge to check tire pressure. You
can not tell if your tires are properly
inflated simply by looking at them.
Radial tires may look properly
inflated when they are under-
inflated.
Remove the valve cap from the tire
valve stem. Press the tire gauge
firmly onto the valve to get a
pressure measurement. If the cold
tire inflation pressure matches the
recommended pressure on the tire
and loading information label, no
further adjustment is necessary. If
the pressure is low, add air until you
reach the recommended pressure.
Make sure to put the valve caps
back on the valve stems. Without
the valve cap, dirt or moisture could
get into the valve core and cause
air leakage. If a valve cap is missing,
install a new one as soon as possible.
If you overfill the tire, release air by
pushing on the metal stem in the
center of the tire valve. Recheck the
tire pressure with the tire gauge. Be
sure to put the valve caps back on
the valve stems. Without the valve
cap, dirt or moisture could get into
the valve core and cause air leakage.
If a valve cap is missing, install a new
one as soon as possible.
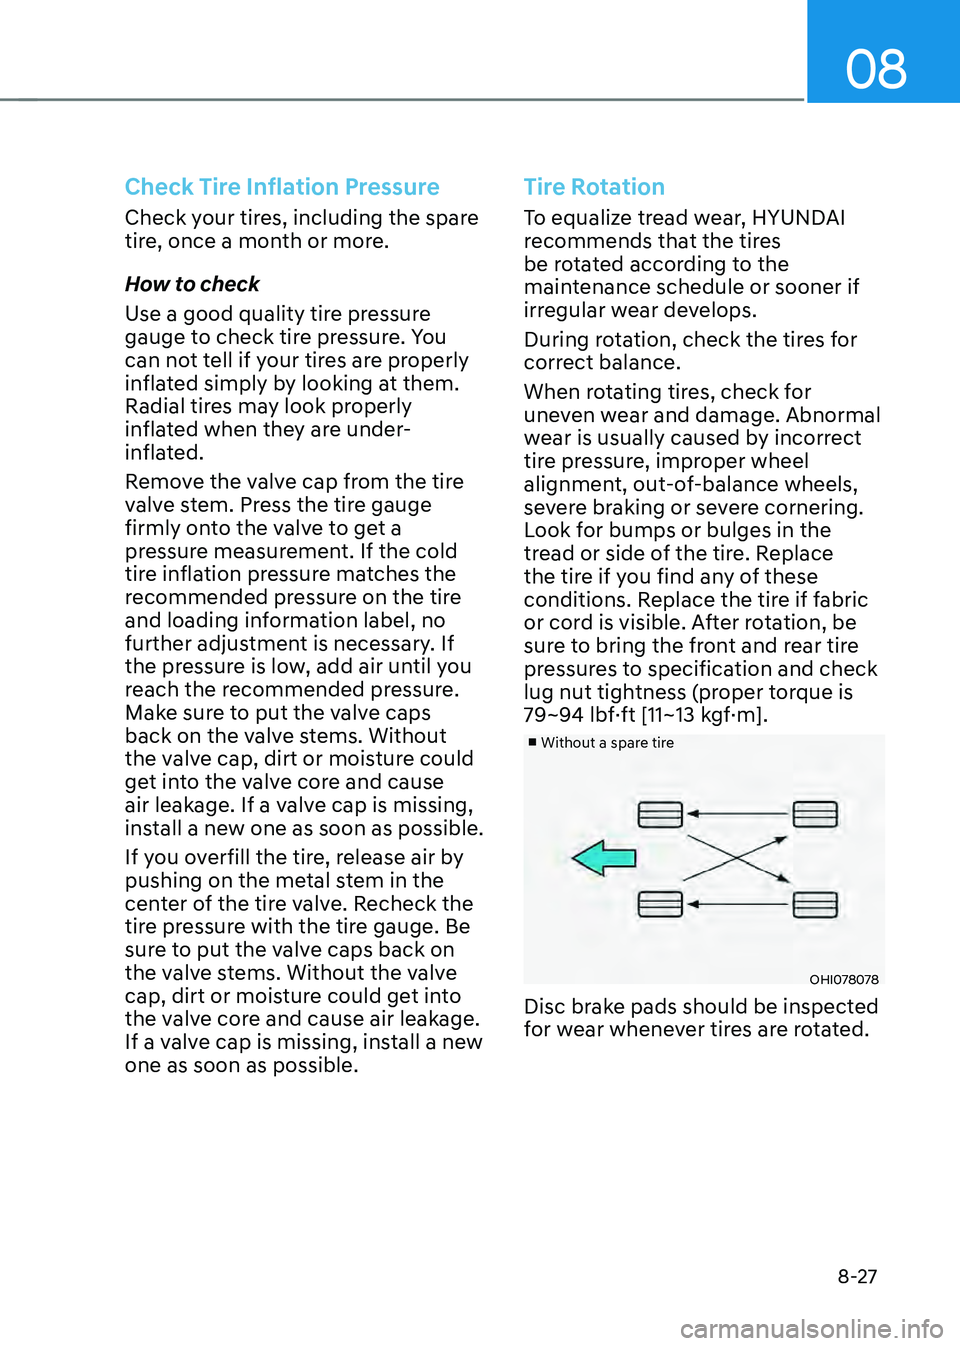
Tire Rotation
To equalize tread wear, HYUNDAI
recommends that the tires
be rotated according to the
maintenance schedule or sooner if
irregular wear develops.
During rotation, check the tires for
correct balance.
When rotating tires, check for
uneven wear and damage. Abnormal
wear is usually caused by incorrect
tire pressure, improper wheel
alignment, out-of-balance wheels,
severe braking or severe cornering.
Look for bumps or bulges in the
tread or side of the tire. Replace
the tire if you find any of these
conditions. Replace the tire if fabric
or cord is visible. After rotation, be
sure to bring the front and rear tire
pressures to specification and check
lug nut tightness (proper torque is
79~94 lbf·ft [11~13 kgf·m].
■ Without a spare tire
OHI078078
Disc brake pads should be inspected
for wear whenever tires are rotated.
Page 478 of 527

08
8-29
WARNING
To reduce the risk of DEATH or
SERIOUS INJURY:
• Replace tires that are worn, show
uneven wear, or are damaged.
Worn tires can cause loss of
braking effectiveness, steering
control, and traction.
• Always replace tires with the
same size as each tire that was
originally supplied with this
vehicle. Using tires and wheels
other than the recommended
sizes could cause unusual
handling characteristics, poor
vehicle control, or negatively
affect your vehicle’s Anti-Lock
Brake System (ABS) resulting in a
serious accident.
• When replacing tires (or wheels),
it is recommended to replace
the two front or two rear tires (or
wheels) as a pair. Replacing just
one tire can seriously affect your
vehicle’s handling.
• Tires degrade over time, even
when they are not being used.
Regardless of the remaining
tread, HYUNDAI recommends
that tires be replaced after six (6)
years of normal service.
• Heat caused by hot climates or
frequent high loading conditions
can accelerate the aging process.
Failure to follow this warning
may cause sudden tire failure,
which could lead to a loss of
vehicle control resulting in an
accident. Compact spare tire replacement
(if equipped)
A compact spare tire has a shorter
tread life than a regular size tire.
Replace it when you can see the
tread wear indicator bars on the tire.
The replacement compact spare tire
should be the same size and design
tire as the one provided with your
new vehicle and should be mounted
on the same compact spare tire
wheel. The compact spare tire is
not designed to be mounted on a
regular size wheel, and the compact
spare tire wheel is not designed for
mounting a regular size tire.
WARNING
The original tire should be repaired
or replaced as soon as possible to
avoid failure of the spare and loss
of vehicle control resulting in an
accident.The compact spare tire
is for emergency use only. Do not
operate your vehicle over 50 mph
(80 km/h) when using the compact
spare tire.