2022 HYUNDAI SONATA HYBRID tow
[x] Cancel search: towPage 99 of 527
3-53
03
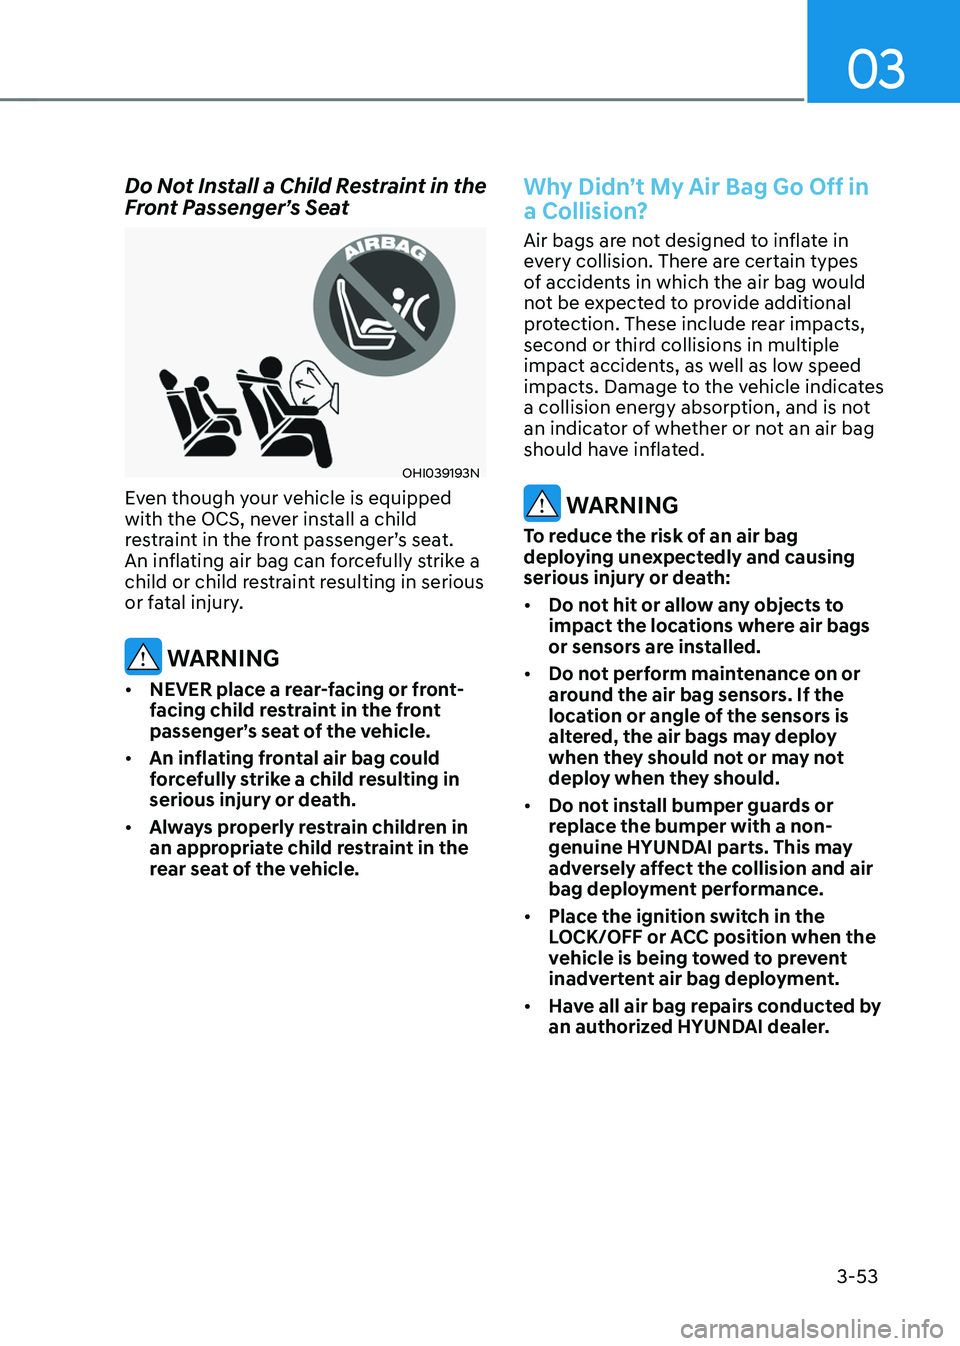
Do Not Install a Child Restraint in the Front Passenger’s Seat
OHI039193N
Even though your vehicle is equipped
with the OCS, never install a child
restraint in the front passenger’s seat.
An inflating air bag can forcefully strike a
child or child restraint resulting in serious
or fatal injury.
WARNING
• NEVER place a rear-facing or front-
facing child restraint in the front
passenger’s seat of the vehicle.
• An inflating frontal air bag could
forcefully strike a child resulting in
serious injury or death.
• Always properly restrain children in
an appropriate child restraint in the
rear seat of the vehicle.
Why Didn’t My Air Bag Go Off in
a Collision?
Air bags are not designed to inflate in
every collision. There are certain types
of accidents in which the air bag would
not be expected to provide additional
protection. These include rear impacts,
second or third collisions in multiple
impact accidents, as well as low speed
impacts. Damage to the vehicle indicates
a collision energy absorption, and is not
an indicator of whether or not an air bag
should have inflated.
WARNING
To reduce the risk of an air bag
deploying unexpectedly and causing
serious injury or death:
• Do not hit or allow any objects to
impact the locations where air bags
or sensors are installed.
• Do not perform maintenance on or
around the air bag sensors. If the
location or angle of the sensors is
altered, the air bags may deploy
when they should not or may not
deploy when they should.
• Do not install bumper guards or
replace the bumper with a non-
genuine HYUNDAI parts. This may
adversely affect the collision and air
bag deployment performance.
• Place the ignition switch in the
LOCK/OFF or ACC position when the
vehicle is being towed to prevent
inadvertent air bag deployment.
• Have all air bag repairs conducted by
an authorized HYUNDAI dealer.
Page 126 of 527
Instrument Cluster
4-22
Check exhaust system (if equipped)
This message is displayed if there is a
problem with the GPF system. At this
time, the GPF warning light will also
blink. If this occurs, we recommend that
you have the GPF system checked by an
authorized HYUNDAI dealer.
GPF : Gasoline Particulate Filter
Check headlight (if equipped)
This message is displayed if the
headlights are not operating properly. A
headlight bulb may need to be replaced.
Make sure to replace the burned out
bulb with a new one of the same wattage
rating.
Check turn signal (if equipped)
This message is displayed if the turn
signal lamps are not operating properly.
A lamp may need to be replaced.
Make sure to replace the burned out
bulb with a new one of the same wattage
rating.
Check brake light (if equipped)
This message is displayed if the stop
lamps are not operating properly. A lamp
may need to be replaced.
Make sure to replace the burned out
bulb with a new one of the same wattage
rating.
Check headlamp LED (if equipped)
This message is displayed if there is a
problem with the LED headlamp. We
recommend that you have the vehicle
inspected by an authorized HYUNDAI
dealer.
Check Active Air Flap system
This message is displayed in the
following situations:
-There is a malfunction with the flap
-There is a malfunction with the
controller or sensor
When all of the above conditions are
fixed, the warning will disappear.
Ready to start driving
This message is displayed when the
vehicle is ready to be driven.
Check regenerative brakes
This message is displayed when the brake
performance is low or the regenerative
brake does not work properly due to a
problem in the brake system.
If this occurs, it may take longer for the
brake pedal to operate and the braking
distance may become longer.
Stop vehicle and check brakes
This message is displayed when there is
a problem in the brake system.
If this occurs, park the vehicle in a
safe location and we recommend that
you tow your vehicle to the nearest
authorized HYUNDAI dealer and have the
vehicle inspected.
Page 127 of 527
04
4-23
Check Hybrid system
This message is displayed when there
is a problem with the hybrid system.
Refrain from driving when the warning
message is displayed.
If this occurs, we recommend that
you have the vehicle inspected by an
authorized HYUNDAI dealer.
Stop safely and check Hybrid system
This message is displayed when there is
a problem with the hybrid system. The
“
” indicator will blink and a warning
chime will sound until the problem is
solved. Refrain from driving when the
warning message is displayed.
If this occurs, we recommend that
you have the vehicle inspected by an
authorized HYUNDAI dealer.
Check Hybrid system. Do not start
engine
This message is displayed when the
hybrid battery power (SOC) level is low.
A warning chime will sound until the
problem is solved. Refrain from driving
when the warning message is displayed.
If this occurs, we recommend that
you have the vehicle inspected by an
authorized HYUNDAI dealer.
Stop safely and check power supply
This message is displayed when there is
a problem in the power supply system.
If this occurs, park the vehicle in a safe
location and tow your vehicle to the
nearest authorized HYUNDAI dealer and
have the vehicle inspected.
Check virtual engine sound system
This message is displayed when there is
a problem with the Virtual Engine Sound
System (VESS).
If this occurs, we recommend that
you have the vehicle inspected by an
authorized HYUNDAI dealer.
Refuel to prevent Hybrid battery
damage
This message is displayed when the fuel
tank is nearly empty.
You should refill the fuel tank to prevent
hybrid battery damage.
Refill inverter coolant
This message is displayed when the
inverter coolant is nearly empty.
You should refill the inverter coolant.
Park with engine On to charge
battery
This message is displayed when the
hybrid battery power (SOC) level is low.
If this occurs, park the vehicle in a safe
location and wait until the hybrid battery
is charged.
Start engine to avoid battery
discharge
This message is displayed to inform the
driver the 12V battery may be discharged
if the ignition switch is in ON position
(without the
indicator ON).
Set the vehicle to the ready () mode
to prevent the 12V battery from being
discharged.
Page 142 of 527
Instrument Cluster
4-38
Information
The vehicle must be driven for a minimum
of 0.19 miles (300 meters) since the last
ignition key cycle before the average fuel
economy will be recalculated.
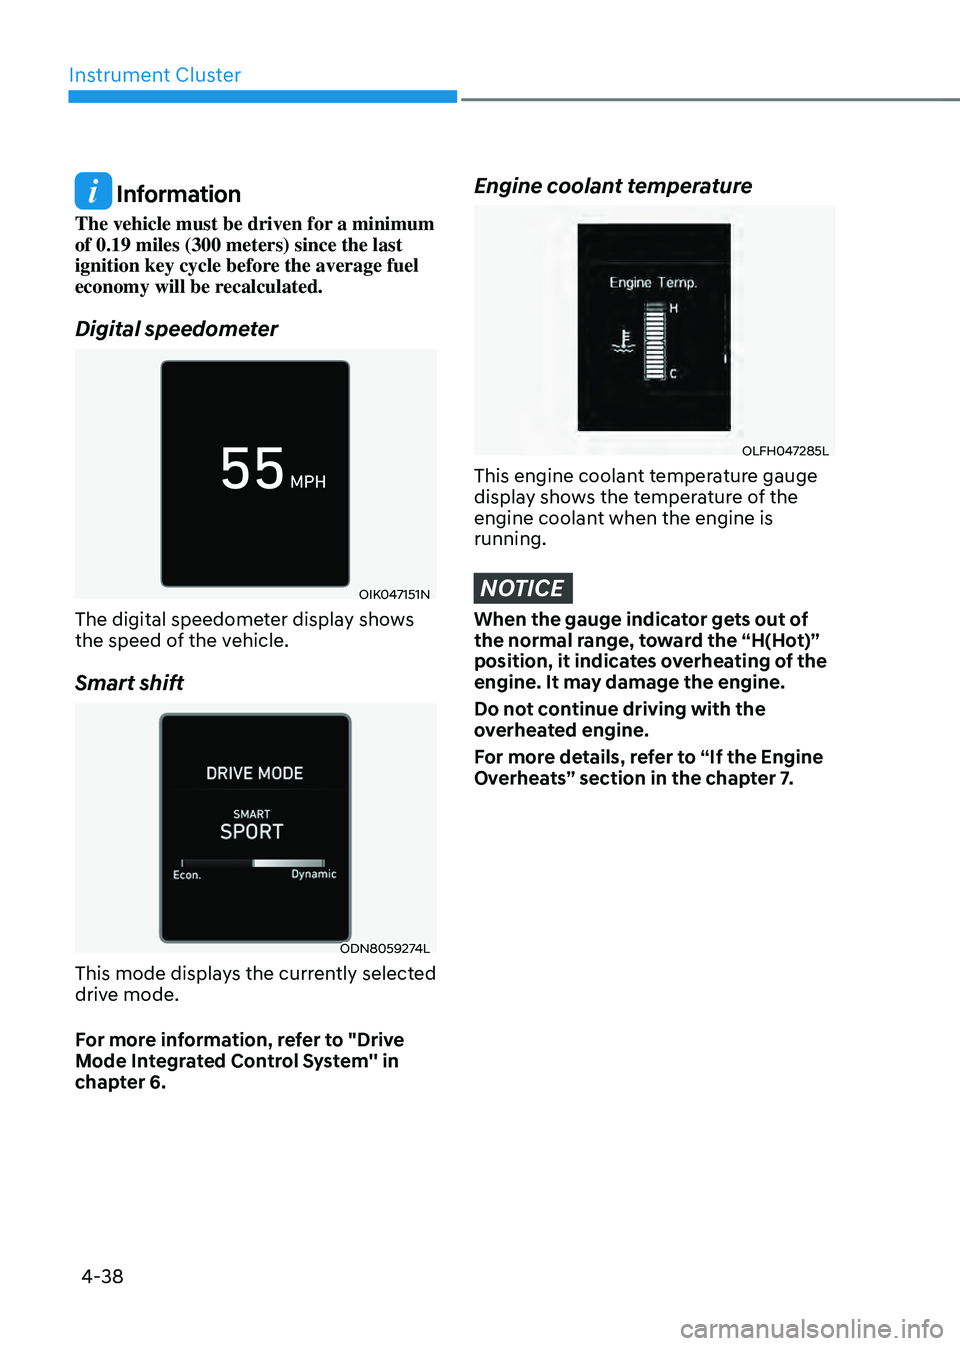
Digital speedometer
OIK047151N
The digital speedometer display shows
the speed of the vehicle.
Smart shift
ODN8059274L
This mode displays the currently selected
drive mode.
For more information, refer to "Drive
Mode Integrated Control System'' in
chapter 6.
Engine coolant temperature
OLFH047285L
This engine coolant temperature gauge
display shows the temperature of the
engine coolant when the engine is
running.
NOTICE
When the gauge indicator gets out of
the normal range, toward the “H(Hot)”
position, it indicates overheating of the
engine. It may damage the engine.
Do not continue driving with the
overheated engine.
For more details, refer to “If the Engine
Overheats” section in the chapter 7.
Page 157 of 527

05
5-9
Start-up
You can start the vehicle without
inserting the key.
For information, refer to the “Engine
Start/Stop Button” section in chapter 6.
NOTICE
To prevent damaging the smart key:
• Keep the smart key in a cool,
dry place to avoid damage or
malfunction. Exposure to moisture
or high temperature may cause
the internal circuit of the smart key
to malfunction which may not be
covered under warranty.
• Avoid dropping or throwing the
smart key.
• Protect the smart key from extreme
temperatures.
Remote start
You can start the vehicle using the
Remote Start button (5) of the smart key.
To start the vehicle remotely:
• Lock the doors by pressing the door
lock button within 32 feet (10 m)
distance from the vehicle.
• Press the remote start button for over
2 seconds within 4 seconds after
locking the doors and the hazard
warning will blink.
To turn off the remote start function,
press the remote start button once.
In case of the manual operation,
the climate control system will be
maintained even when the engine is
turned OFF. However, the automatic
operation is set to 72°F (22°C).
Mechanical key
If the Smart Key does not operate
normally, you can lock or unlock the
driver’s door by using the mechanical
key.
OFE048007
To remove the mechanical key from the
smart key FOB, slide the release lever in
the direction of the arrow (1) and then
pull the mechanical key (2) outward.
To unlock the vehicle using the
mechanical key. insert the mechanical
key into the key hole in the driver door.
To reinstall the mechanical key into the
FOB, insert the key in the top of the key
FOB and push inward until a click sound
is heard.
Loss of a smart key
A maximum of two Smart Keys can be
registered to a single vehicle. If you
happen to lose your smart key, you
should immediately take the vehicle
and remaining keys to your authorized
HYUNDAI dealer or tow the vehicle, if
necessary.
Page 187 of 527
05
5-39
Tilt Steering / Telescope Steering
When adjusting the steering wheel to a
comfortable position, adjust the steering
wheel so that it points toward your chest,
not toward your face. Make sure you can
see the instrument cluster warning lights
and gauges. After locking the lever, push
the steering wheel both up and down to
be certain it is locked in position. Always
adjust the position of the steering wheel
before driving.
WARNING
NEVER adjust the steering wheel while
driving. This may cause loss of vehicle
control resulting in an accident.
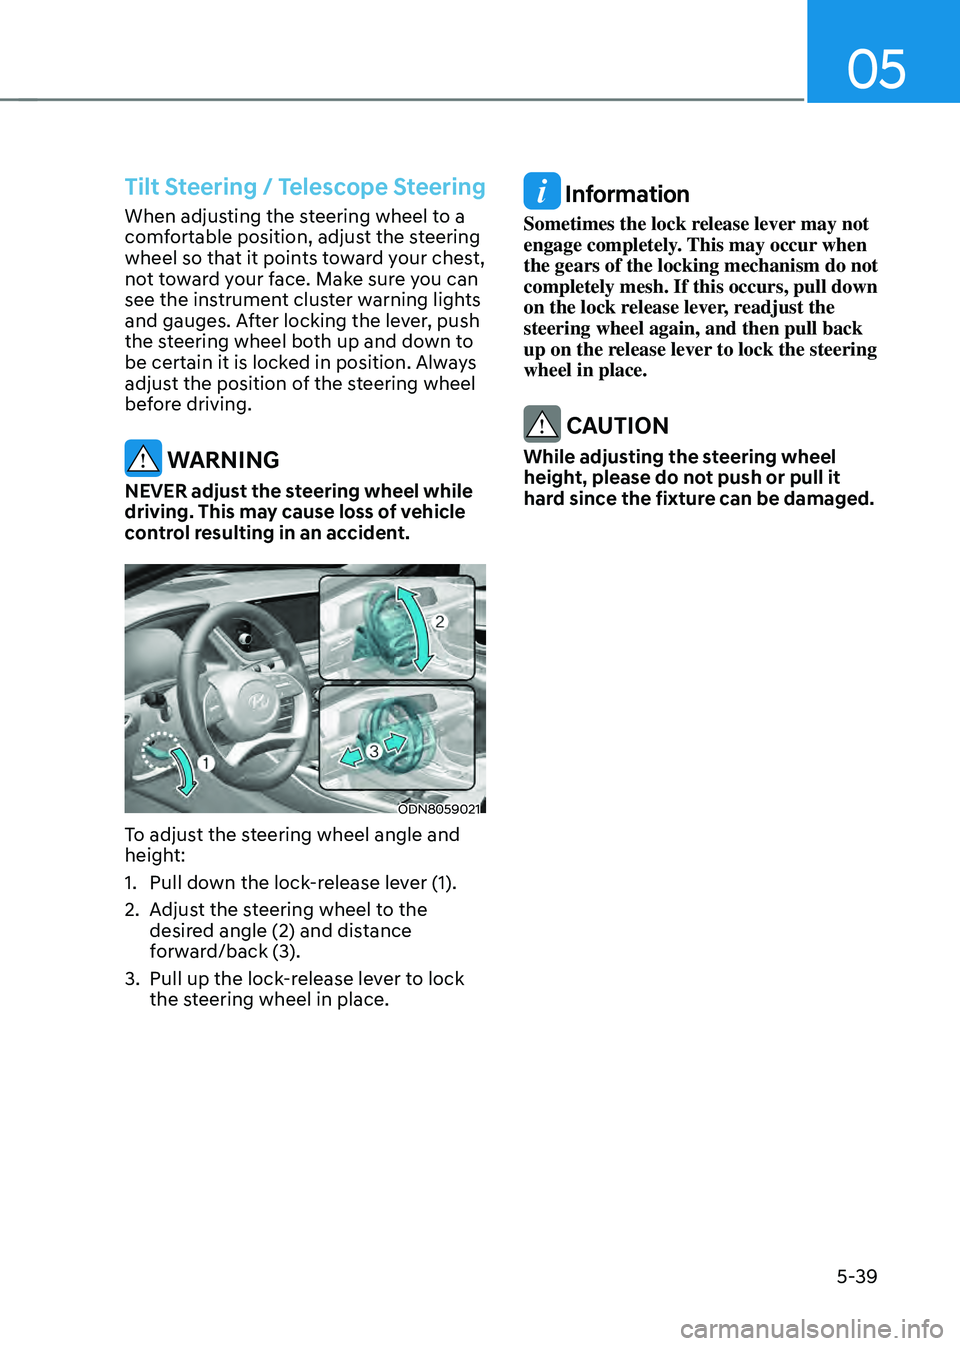
ODN8059021
To adjust the steering wheel angle and
height:
1. Pull down the lock-release lever (1).
2. Adjust the steering wheel to the
desired angle (2) and distance
forward/back (3).
3. Pull up the lock-release lever to lock
the steering wheel in place.
Information
Sometimes the lock release lever may not
engage completely. This may occur when
the gears of the locking mechanism do not
completely mesh. If this occurs, pull down
on the lock release lever, readjust the
steering wheel again, and then pull back
up on the release lever to lock the steering
wheel in place.
CAUTION
While adjusting the steering wheel
height, please do not push or pull it
hard since the fixture can be damaged.
Page 190 of 527
Convenient Features
5-42
MIRRORS
Inside Rearview Mirror
Before driving your vehicle, check to
see that your inside rearview mirror is
properly positioned. Adjust the rearview
mirror so that the view through the rear
window is properly centered.
WARNING
Make sure your line of sight is not
obstructed. Do not place objects in the
rear seat, cargo area, or behind the rear
head restraints which could interfere
with your vision through the rear
window.
WARNING
To prevent serious injury during an
accident or deployment of the air bag,
do not modify the rearview mirror and
do not install a wide mirror.
WARNING
NEVER adjust the mirror while driving.
This may cause loss of vehicle control
resulting in an accident.
NOTICE
When cleaning the mirror, use a paper
towel or similar material dampened
with glass cleaner. Do not spray glass
cleaner directly on the mirror as this
may cause the liquid cleaner to enter
the mirror housing.
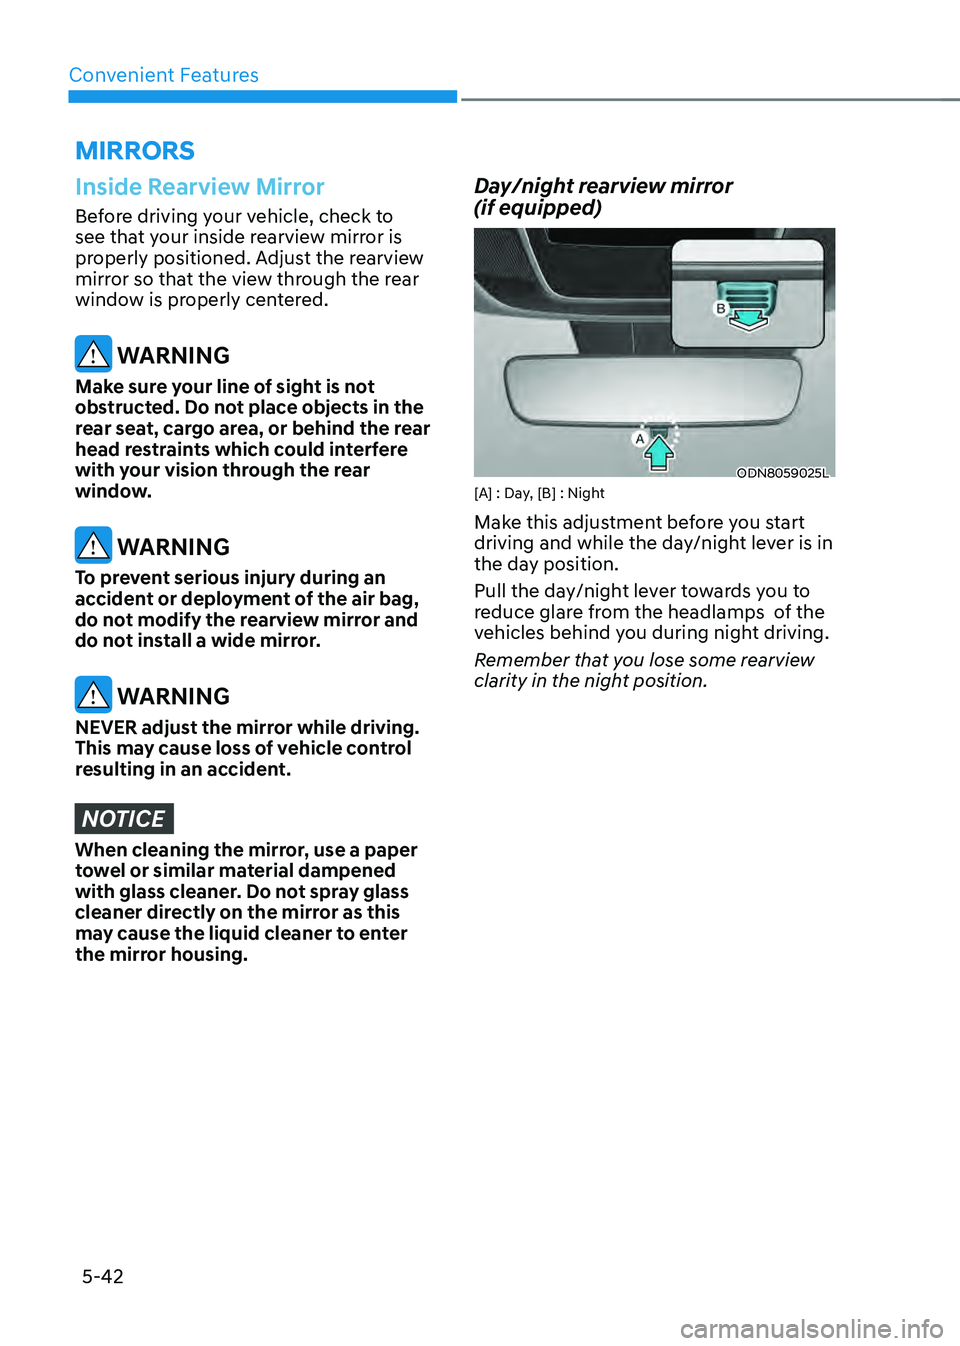
Day/night rearview mirror
(if equipped)
ODN8059025L[A] : Day, [B] : Night
Make this adjustment before you start
driving and while the day/night lever is in
the day position.
Pull the day/night lever towards you to
reduce glare from the headlamps of the
vehicles behind you during night driving.
Remember that you lose some rearview
clarity in the night position.
Page 204 of 527
Convenient Features
5-56
Sunshade
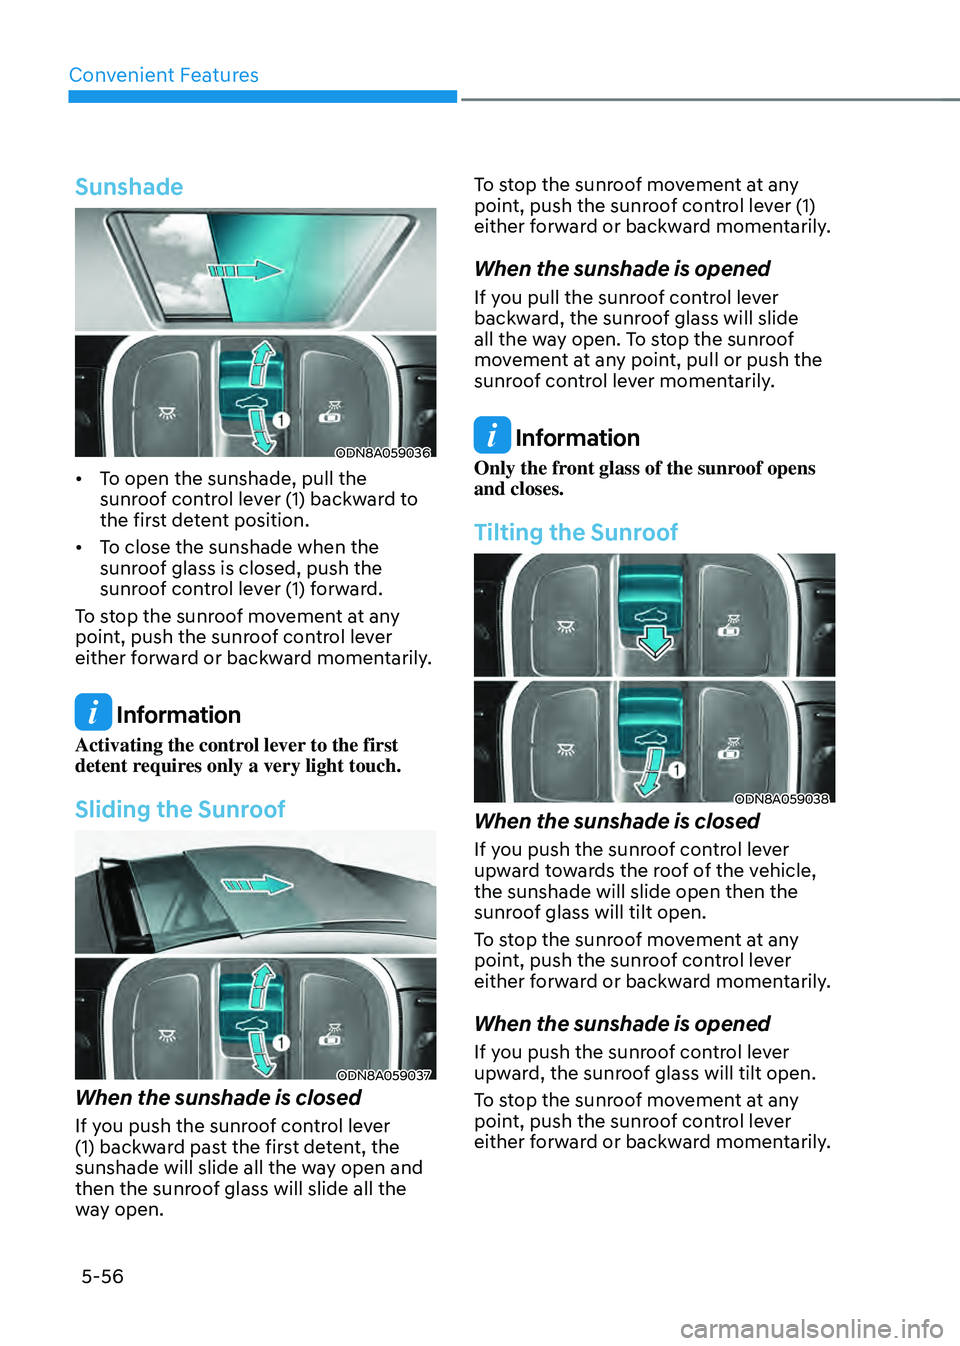
ODN8A059036
• To open the sunshade, pull the
sunroof control lever (1) backward to
the first detent position.
• To close the sunshade when the
sunroof glass is closed, push the
sunroof control lever (1) forward.
To stop the sunroof movement at any
point, push the sunroof control lever
either forward or backward momentarily.
Information
Activating the control lever to the first
detent requires only a very light touch.
Sliding the Sunroof
ODN8A059037
When the sunshade is closed
If you push the sunroof control lever
(1) backward past the first detent, the
sunshade will slide all the way open and
then the sunroof glass will slide all the
way open. To stop the sunroof movement at any
point, push the sunroof control lever (1)
either forward or backward momentarily.
When the sunshade is opened
If you pull the sunroof control lever
backward, the sunroof glass will slide
all the way open. To stop the sunroof
movement at any point, pull or push the
sunroof control lever momentarily.
Information
Only the front glass of the sunroof opens
and closes.
Tilting the Sunroof
ODN8A059038
When the sunshade is closed
If you push the sunroof control lever
upward towards the roof of the vehicle,
the sunshade will slide open then the
sunroof glass will tilt open.
To stop the sunroof movement at any
point, push the sunroof control lever
either forward or backward momentarily.
When the sunshade is opened
If you push the sunroof control lever
upward, the sunroof glass will tilt open.
To stop the sunroof movement at any
point, push the sunroof control lever
either forward or backward momentarily.