Page 177 of 579

05
5-43
OOS040476N
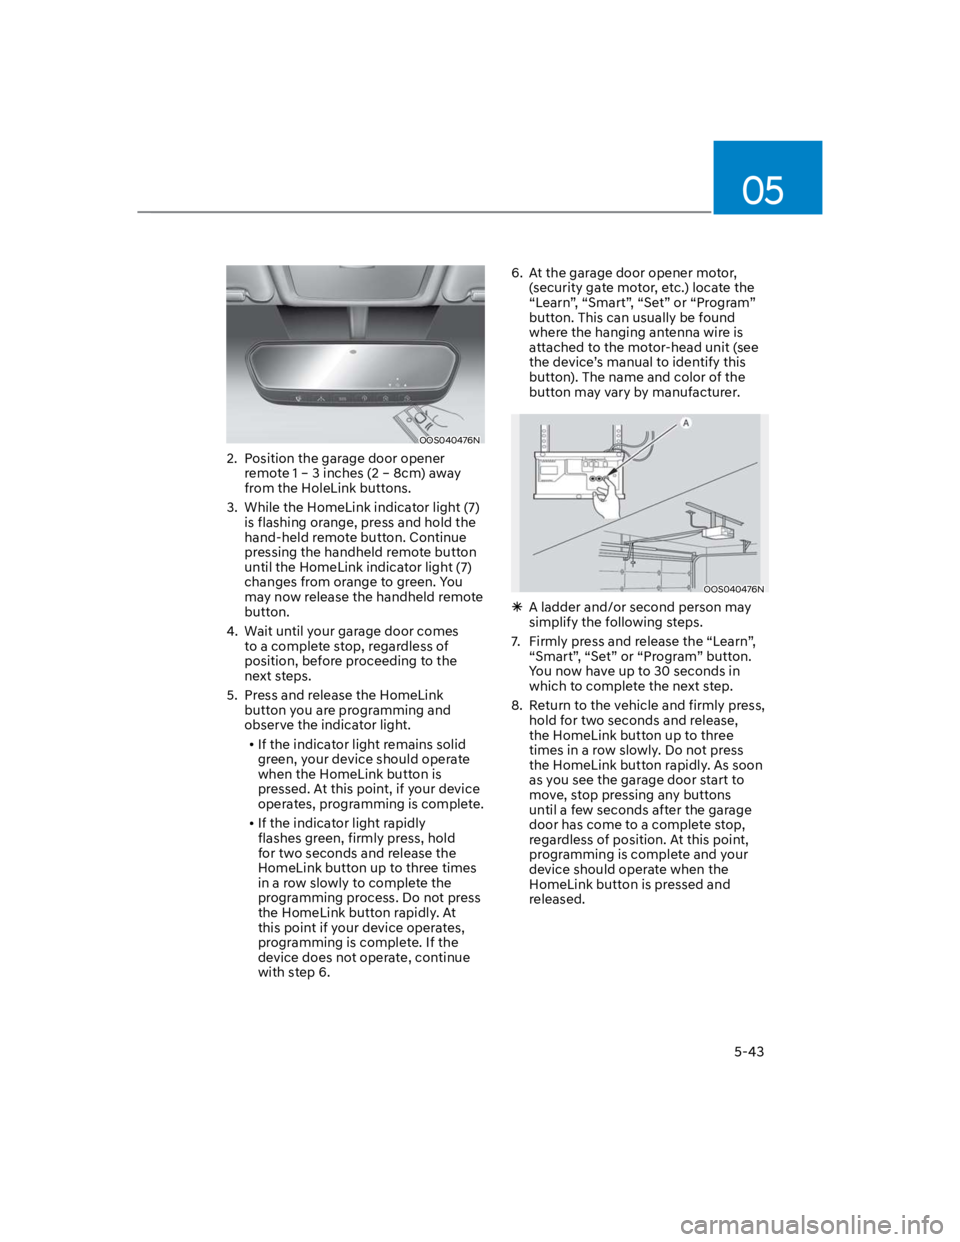
2. Position the garage door opener
remote 1 – 3 inches (2 – 8cm) away
from the HoleLink buttons.
3. While the HomeLink indicator light (7)
is flashing orange, press and hold the
hand-held remote button. Continue
pressing the handheld remote button
until the HomeLink indicator light (7)
changes from orange to green. You
may now release the handheld remote
button.
4. Wait until your garage door comes
to a complete stop, regardless of
position, before proceeding to the
next steps.
5. Press and release the HomeLink
button you are programming and
observe the indicator light.
If the indicator light remains solid
green, your device should operate
when the HomeLink button is
pressed. At this point, if your device
operates, programming is complete.
If the indicator light rapidly
flashes green, firmly press, hold
for two seconds and release the
HomeLink button up to three times
in a row slowly to complete the
programming process. Do not press
the HomeLink button rapidly. At
this point if your device operates,
programming is complete. If the
device does not operate, continue
with step 6.
6. At the garage door opener motor,
(security gate motor, etc.) locate the
“Learn”, “Smart”, “Set” or “Program”
button. This can usually be found
where the hanging antenna wire is
attached to the motor-head unit (see
the device’s manual to identify this
button). The name and color of the
button may vary by manufacturer.
OOS040476N
A ladder and/or second person may
simplify the following steps.
7. Firmly press and release the “Learn”,
“Smart”, “Set” or “Program” button.
You now have up to 30 seconds in
which to complete the next step.
8. Return to the vehicle and firmly press,
hold for two seconds and release,
the HomeLink button up to three
times in a row slowly. Do not press
the HomeLink button rapidly. As soon
as you see the garage door start to
move, stop pressing any buttons
until a few seconds after the garage
door has come to a complete stop,
regardless of position. At this point,
programming is complete and your
device should operate when the
HomeLink button is pressed and
released.
Page 210 of 579

Convenient features
5-76
When it is affected by an external
condition
When there is a similar shaped lamp
with the vehicle front vehicle’s
lamps.
When the headlamp is not repaired
or replaced at an authorized dealer.
When headlamp aiming is not
properly adjusted.
When driving on a narrow winding
road or rough road.
When driving downhill or uphill.
When only part of the vehicle in
front is visible on a crossroad or on a
corner.
When there is a traffic light,
reflecting sign, flashing sign or
mirror.
When the road conditions are bad
such as being wet or covered with
snow.
When a vehicle suddenly appears
from around a corner.
When the vehicle is tilted from a flat
tire or being towed.
When the front visibility is poor
When the light from the on-coming
or vehicle in front is not detected
because of exhaust fume, smoke,
fog, snow, Heavy rain, dust, etc.
When the front window is covered
with foreign matter.
WARNING
Do not disassemble a front view
camera temporarily for tinted
window or attaching any types
of coatings and accessories. If
you disassemble the camera and
assemble it again, take your vehicle
to an authorized HYUNDAI dealer
and have the function checked to
need a calibration.
When you replace or reinstall the
windshield glass, front view camera,
we recommend that you take your
vehicle to an authorized HYUNDAI
dealer and have the function
checked.
Be careful that water doesn’t get into
High Beam Assist unit and do not
remove or damage related parts of
High Beam Assist.
Do not place objects on the crash
pad that reflect light such as mirrors,
white paper, etc. The function may
malfunction if sunlight is reflected.
At times, High Beam Assist may
not work properly. The function is
for your convenience only. It is the
responsibility of the driver for safe
driving practices and always check
the road conditions for your safety.
When the function does not operate
normally, change the lamp position
manually between the high beam
and low beam.
Page 536 of 579

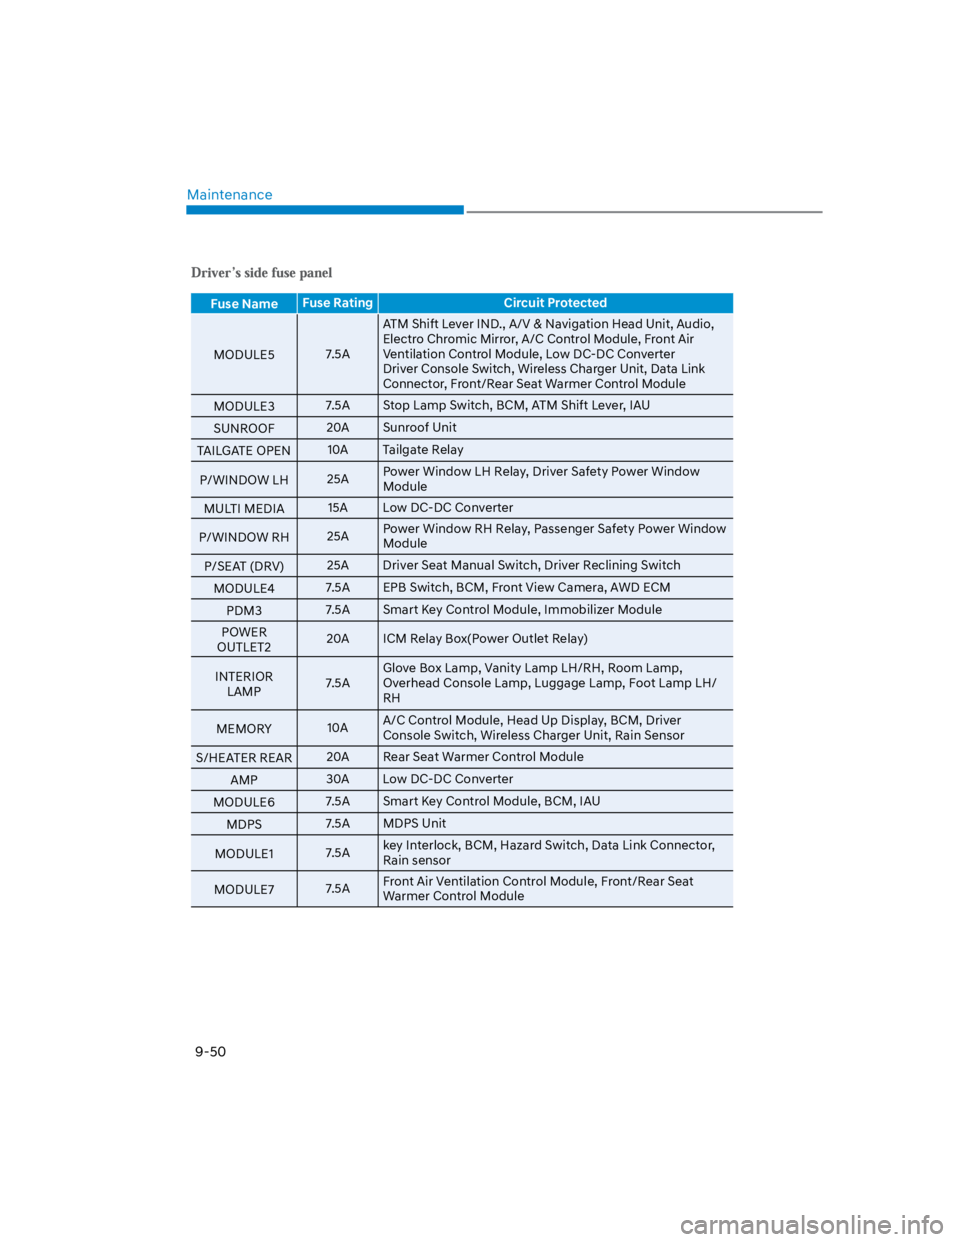
Maintenance
9-50
Fuse NameFuse Rating Circuit Protected
MODULE57.5A
ATM Shift Lever IND., A/V & Navigation Head Unit, Audio,
Electro Chromic Mirror, A/C Control Module, Front Air
Ventilation Control Module, Low DC-DC Converter
Driver Console Switch, Wireless Charger Unit, Data Link
Connector, Front/Rear Seat Warmer Control Module
MODULE37.5A Stop Lamp Switch, BCM, ATM Shift Lever, IAU
SUNROOF20A Sunroof Unit
TAILGATE OPEN10A Tailgate Relay
P/WINDOW LH25APower Window LH Relay, Driver Safety Power Window
Module
MULTI MEDIA15A Low DC-DC Converter
P/WINDOW RH25APower Window RH Relay, Passenger Safety Power Window
Module
P/SEAT (DRV)25A Driver Seat Manual Switch, Driver Reclining Switch
MODULE47.5A EPB Switch, BCM, Front View Camera, AWD ECM
PDM37.5A Smart Key Control Module, Immobilizer Module
POWER
OUTLET220A ICM Relay Box(Power Outlet Relay)
INTERIOR
LAMP7.5A
Glove Box Lamp, Vanity Lamp LH/RH, Room Lamp,
Overhead Console Lamp, Luggage Lamp, Foot Lamp LH/
RH
MEMORY10AA/C Control Module, Head Up Display, BCM, Driver
Console Switch, Wireless Charger Unit, Rain Sensor
S/HEATER REAR20A Rear Seat Warmer Control Module
AMP30A Low DC-DC Converter
MODULE67.5A Smart Key Control Module, BCM, IAU
MDPS7.5A MDPS Unit
MODULE17.5Akey Interlock, BCM, Hazard Switch, Data Link Connector,
Rain sensor
MODULE77.5AFront Air Ventilation Control Module, Front/Rear Seat
Warmer Control Module
Page 537 of 579

09
9-51
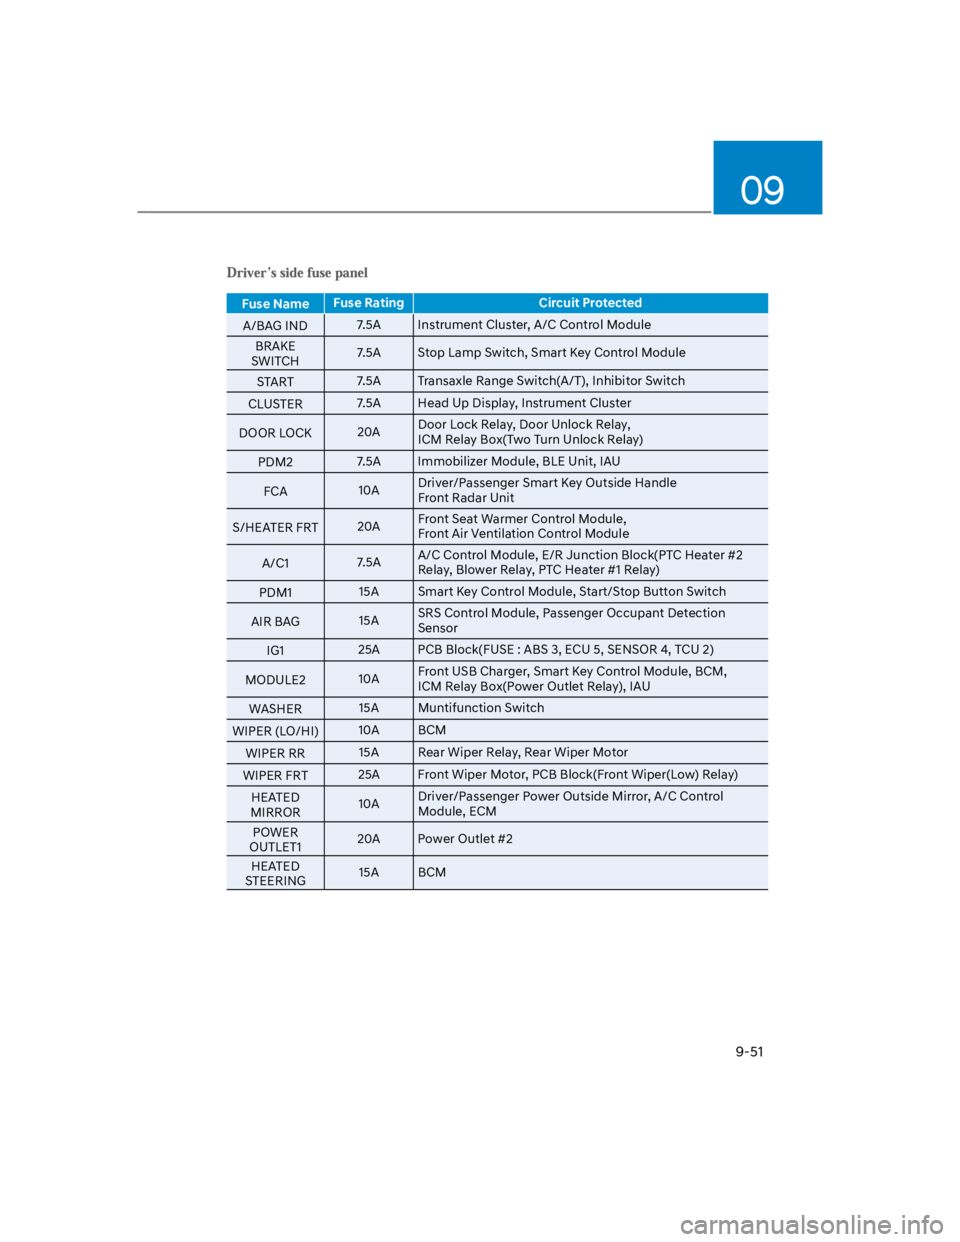
Fuse NameFuse Rating Circuit Protected
A/BAG IND7.5A Instrument Cluster, A/C Control Module
BRAKE
SWITCH7.5A Stop Lamp Switch, Smart Key Control Module
START7.5A Transaxle Range Switch(A/T), Inhibitor Switch
CLUSTER7.5A Head Up Display, Instrument Cluster
DOOR LOCK20ADoor Lock Relay, Door Unlock Relay,
ICM Relay Box(Two Turn Unlock Relay)
PDM27.5A Immobilizer Module, BLE Unit, IAU
FCA10ADriver/Passenger Smart Key Outside Handle
Front Radar Unit
S/HEATER FRT20AFront Seat Warmer Control Module,
Front Air Ventilation Control Module
A/C17.5AA/C Control Module, E/R Junction Block(PTC Heater #2
Relay, Blower Relay, PTC Heater #1 Relay)
PDM115A Smart Key Control Module, Start/Stop Button Switch
AIR BAG15ASRS Control Module, Passenger Occupant Detection
Sensor
IG125A PCB Block(FUSE : ABS 3, ECU 5, SENSOR 4, TCU 2)
MODULE210AFront USB Charger, Smart Key Control Module, BCM,
ICM Relay Box(Power Outlet Relay), IAU
WASHER15A Muntifunction Switch
WIPER (LO/HI)10A BCM
WIPER RR15A Rear Wiper Relay, Rear Wiper Motor
WIPER FRT25A Front Wiper Motor, PCB Block(Front Wiper(Low) Relay)
HEATED
MIRROR10ADriver/Passenger Power Outside Mirror, A/C Control
Module, ECM
POWER
OUTLET120A Power Outlet #2
HEATED
STEERING15A BCM