Page 176 of 579
Convenient features
5-42
The following steps show how to
program HomeLink. If you have any
questions or are having difficulty
programming your HomeLink buttons,
refer to the HomeLink website or call
the HomeLink customer support tollfree
number. Do this, before going back to
the dealer who sold you the car.
Visit the HomeLink website at: www.
homelink.com. Then at the top of the
page, choose your vehicle make. Then
watch the You Tube video, and/or
access additional website information.
If you choose to access the website
via your cell phone, scan the QR code.
Or, call HomeLink customer support
at 1-800-355-3515 (Please have the
vehicle make/model AND the opener
device make/model readily available.)
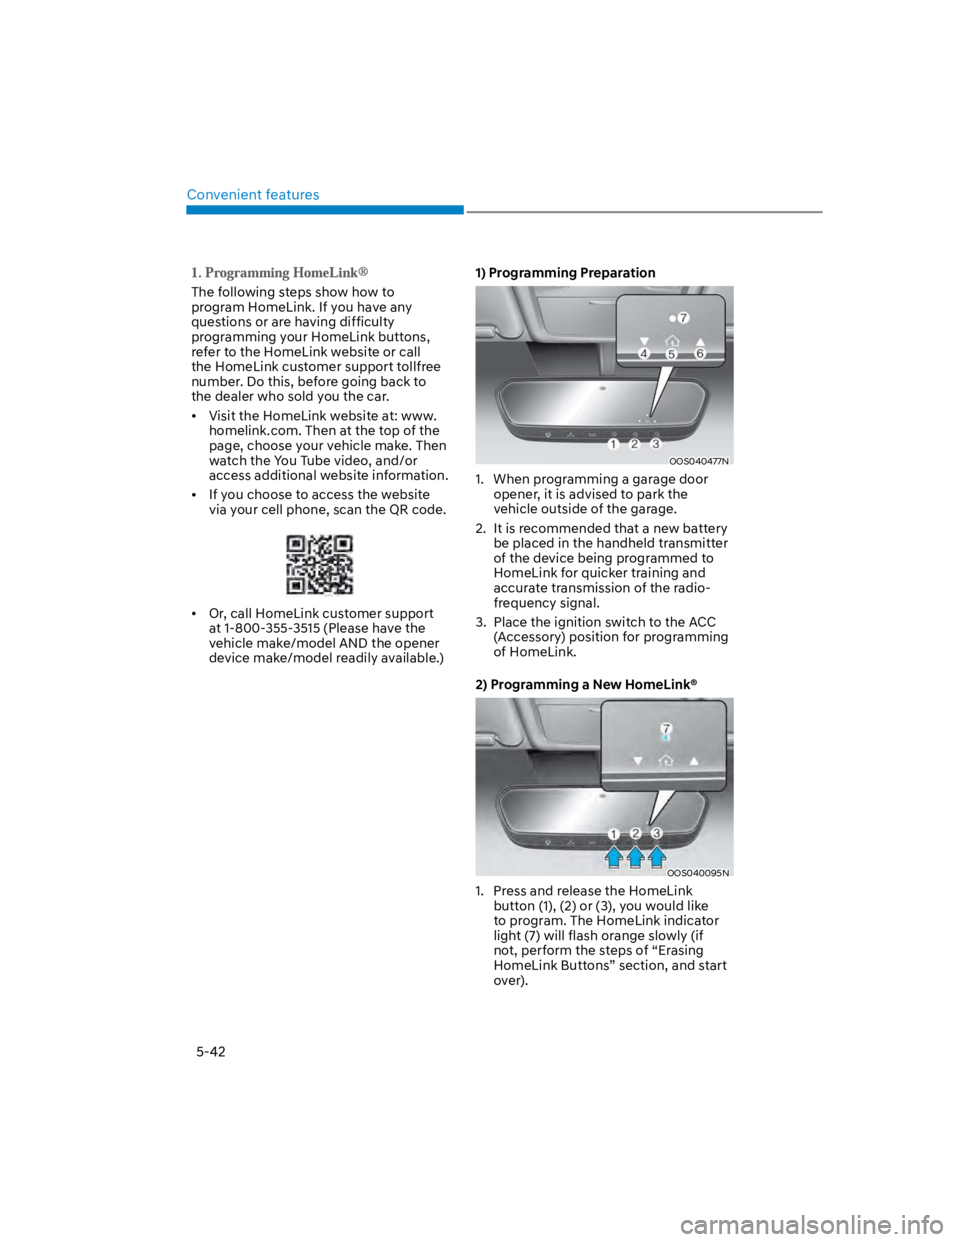
1) Programming Preparation
OOS040477N
1. When programming a garage door
opener, it is advised to park the
vehicle outside of the garage.
2. It is recommended that a new battery
be placed in the handheld transmitter
of the device being programmed to
HomeLink for quicker training and
accurate transmission of the radio-
frequency signal.
3. Place the ignition switch to the ACC
(Accessory) position for programming
of HomeLink.
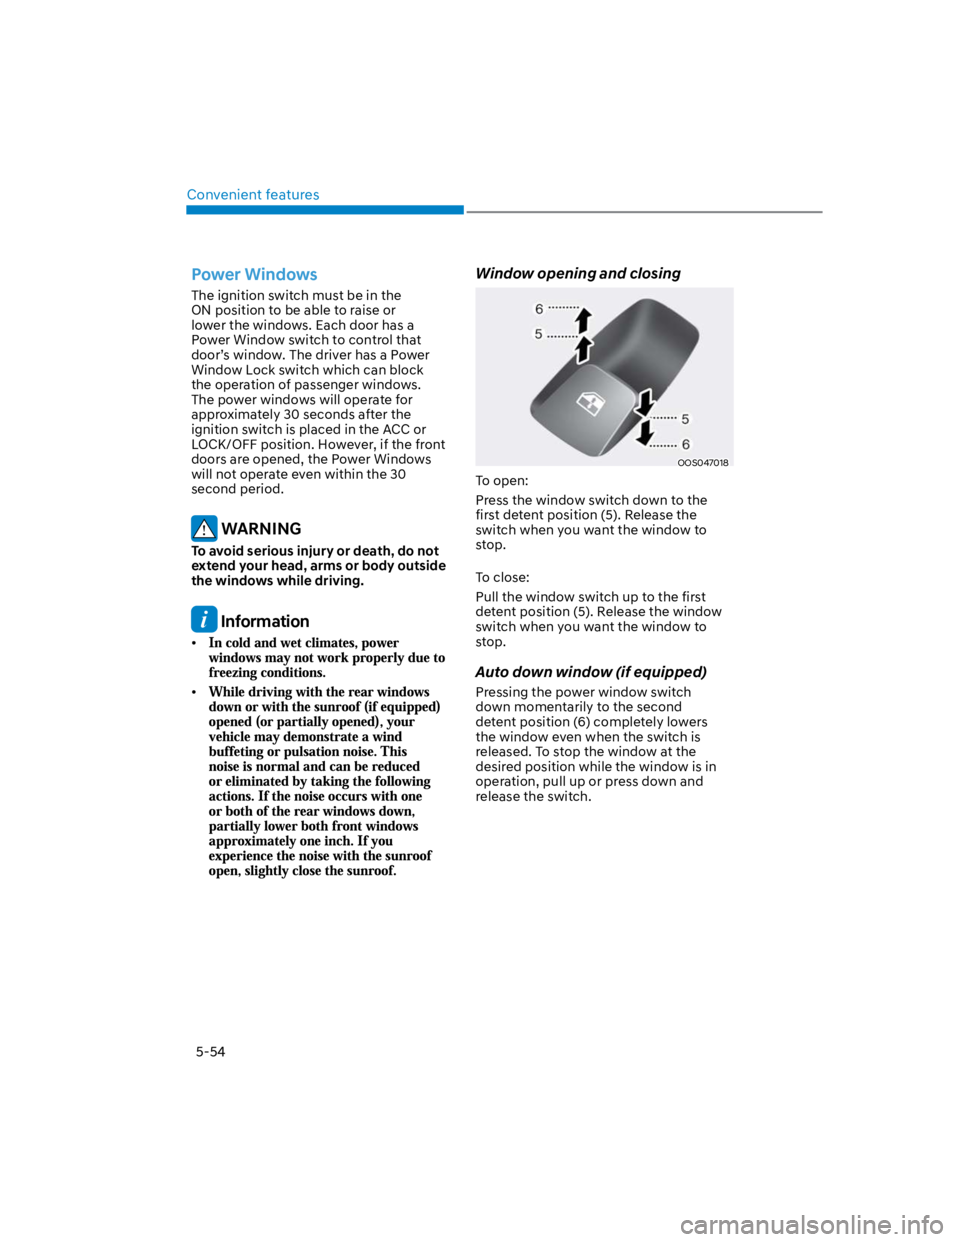
2) Programming a New HomeLink®
OOS040095N
1. Press and release the HomeLink
button (1), (2) or (3), you would like
to program. The HomeLink indicator
light (7) will flash orange slowly (if
not, perform the steps of “Erasing
HomeLink Buttons” section, and start
over).
Page 188 of 579
Convenient features
5-54
Power Windows
The ignition switch must be in the
ON position to be able to raise or
lower the windows. Each door has a
Power Window switch to control that
door’s window. The driver has a Power
Window Lock switch which can block
the operation of passenger windows.
The power windows will operate for
approximately 30 seconds after the
ignition switch is placed in the ACC or
LOCK/OFF position. However, if the front
doors are opened, the Power Windows
will not operate even within the 30
second period.
WARNING
To avoid serious injury or death, do not
extend your head, arms or body outside
the windows while driving.
Information
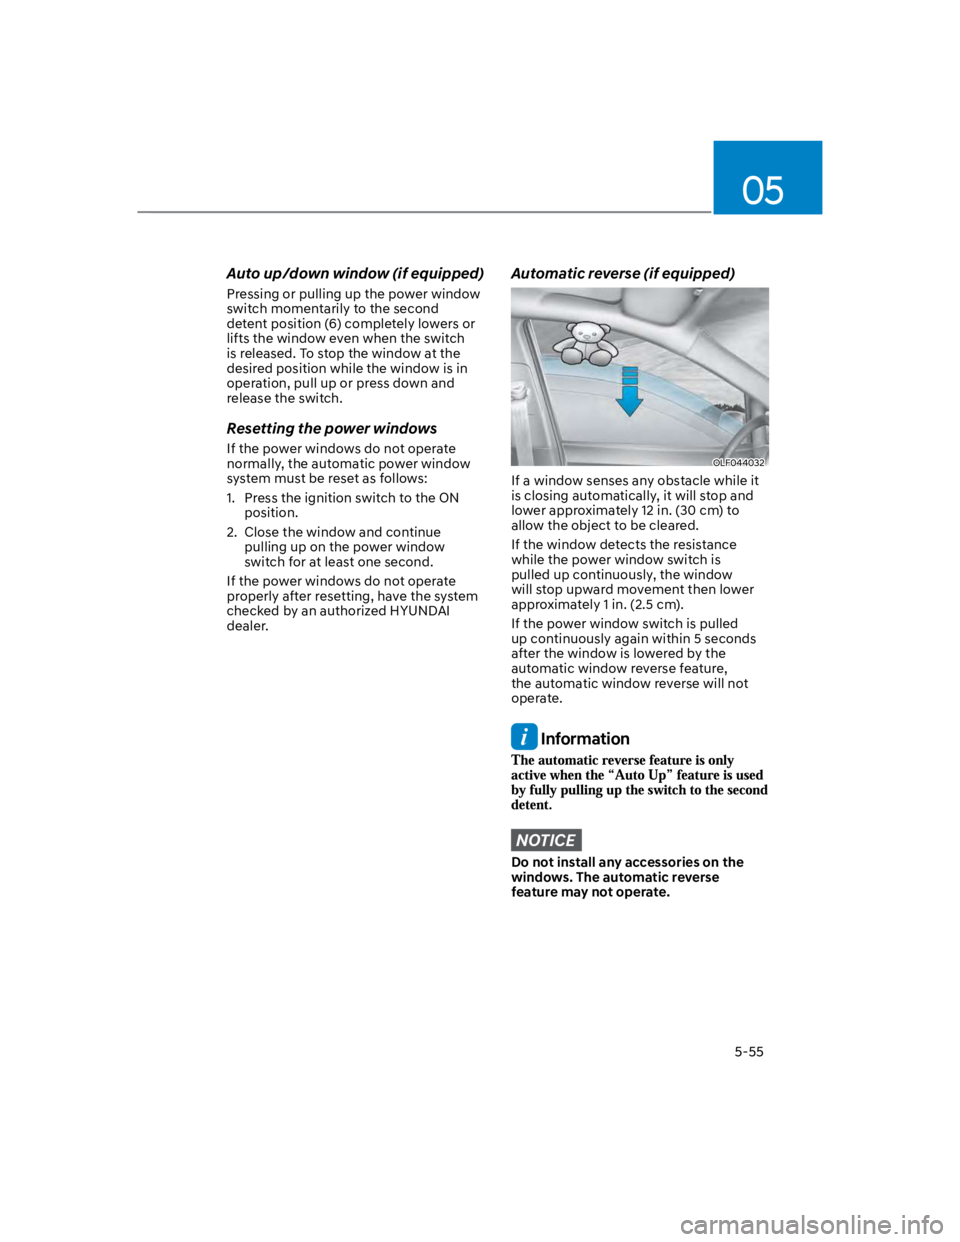
Window opening and closing
OOS047018
To open:
Press the window switch down to the
first detent position (5). Release the
switch when you want the window to
stop.
To close:
Pull the window switch up to the first
detent position (5). Release the window
switch when you want the window to
stop.
Auto down window (if equipped)
Pressing the power window switch
down momentarily to the second
detent position (6) completely lowers
the window even when the switch is
released. To stop the window at the
desired position while the window is in
operation, pull up or press down and
release the switch.
Page 189 of 579
05
5-55
Auto up/down window (if equipped)
Pressing or pulling up the power window
switch momentarily to the second
detent position (6) completely lowers or
lifts the window even when the switch
is released. To stop the window at the
desired position while the window is in
operation, pull up or press down and
release the switch.
Resetting the power windows
If the power windows do not operate
normally, the automatic power window
system must be reset as follows:
1. Press the ignition switch to the ON
position.
2. Close the window and continue
pulling up on the power window
switch for at least one second.
If the power windows do not operate
properly after resetting, have the system
checked by an authorized HYUNDAI
dealer.
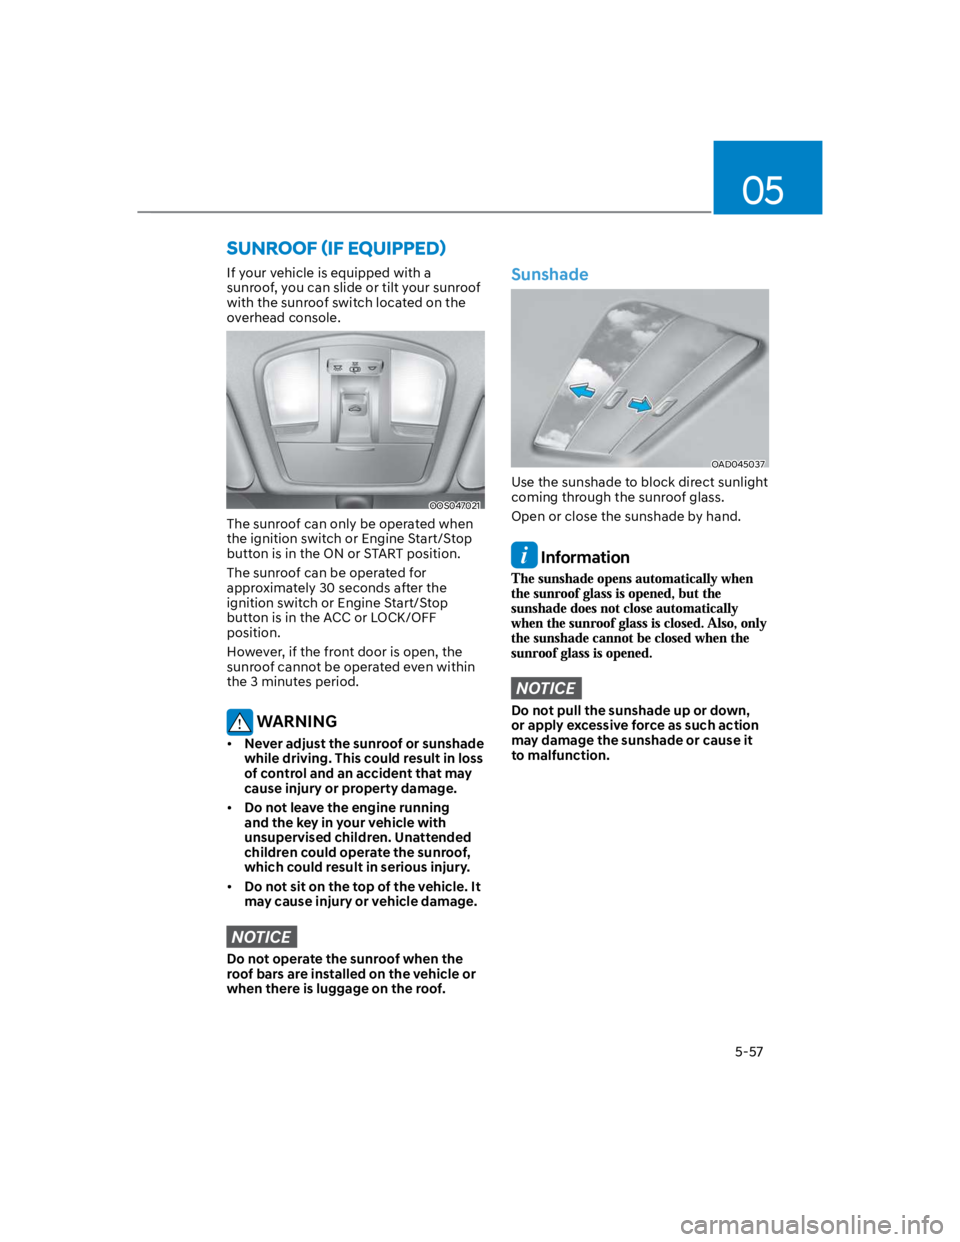
Automatic reverse (if equipped)
OLF044032
If a window senses any obstacle while it
is closing automatically, it will stop and
lower approximately 12 in. (30 cm) to
allow the object to be cleared.
If the window detects the resistance
while the power window switch is
pulled up continuously, the window
will stop upward movement then lower
approximately 1 in. (2.5 cm).
If the power window switch is pulled
up continuously again within 5 seconds
after the window is lowered by the
automatic window reverse feature,
the automatic window reverse will not
operate.
Information
NOTICE
Do not install any accessories on the
windows. The automatic reverse
feature may not operate.
Page 191 of 579
05
5-57
If your vehicle is equipped with a
sunroof, you can slide or tilt your sunroof
with the sunroof switch located on the
overhead console.
OOS047021
The sunroof can only be operated when
the ignition switch or Engine Start/Stop
button is in the ON or START position.
The sunroof can be operated for
approximately 30 seconds after the
ignition switch or Engine Start/Stop
button is in the ACC or LOCK/OFF
position.
However, if the front door is open, the
sunroof cannot be operated even within
the 3 minutes period.
WARNING
Never adjust the sunroof or sunshade
while driving. This could result in loss
of control and an accident that may
cause injury or property damage.
Do not leave the engine running
and the key in your vehicle with
unsupervised children. Unattended
children could operate the sunroof,
which could result in serious injury.
Do not sit on the top of the vehicle. It
may cause injury or vehicle damage.
NOTICE
Do not operate the sunroof when the
roof bars are installed on the vehicle or
when there is luggage on the roof.
Sunshade
OAD045037
Use the sunshade to block direct sunlight
coming through the sunroof glass.
Open or close the sunshade by hand.
Information
NOTICE
Do not pull the sunshade up or down,
or apply excessive force as such action
may damage the sunshade or cause it
to malfunction.
Page 204 of 579

Convenient features
5-70
Battery saver function
The purpose of this feature is to prevent
the battery from being discharged.
The system automatically turns off the
position lamp when the driver turns the
vehicle off and opens the driver-side
door.
With this feature, the position lamps will
turn off automatically if the driver parks
on the side of road at night.
If necessary, to keep the lamps on when
the vehicle is turned off, perform the
following:
(1) Open the driver-side door.
(2) Turn the position lamps OFF and ON
again using the headlamp switch on
the steering column.
Headlamp delay function
(if equipped)
If the key is removed from the ignition
switch or placed in the ACC position
or the LOCK/OFF position with the
headlamps ON, the headlamps (and/
or parking lamps) remain on for about
5 minutes. However, if the driver’s door
is opened and closed, the headlights
are turned off after 15 seconds. Also,
with the engine off if the driver’s door is
opened and closed, the headlamps (and/
or parking lamps) are turned off after 15
seconds.
The headlamps (and/or parking lamps)
can be turned off by pressing the lock
button on the remote key or smart key
twice or turning the headlamp switch to
the OFF or AUTO position.
You can activate or deactivate the
Headlamp Delay function from the User
Settings Mode in the LCD display.
For more information, refer to the “LCD
Display” section in this chapter.
NOTICE
If the driver exits the vehicle through
another door besides the driver
door, the battery saver function
does not operate and the headlamp
delay function does not turn OFF
automatically.
This may cause the battery to
discharge. To avoid battery discharge,
turn OFF the headlamps manually from
the headlamp switch before exiting the
vehicle.
Page 205 of 579
05
5-71
Interior lights
WARNING
Do not use the interior lights when
driving in the dark. The interior lights
may obscure your view and cause an
accident.
NOTICE
Do not use the interior lights for
extended periods when the vehicle is
turned off or the battery will discharge.
Interior lamp AUTO cut
The interior lamps will automatically go
off approximately 20 minutes after the
vehicle is turned off and the doors are
closed. If a door is opened, the lamp
will go off 40 minutes after the vehicle
is turned off. If the doors are locked by
the smart key and the vehicle enters the
armed stage of the theft alarm system,
the lamps will go off five seconds later.
Front lamps
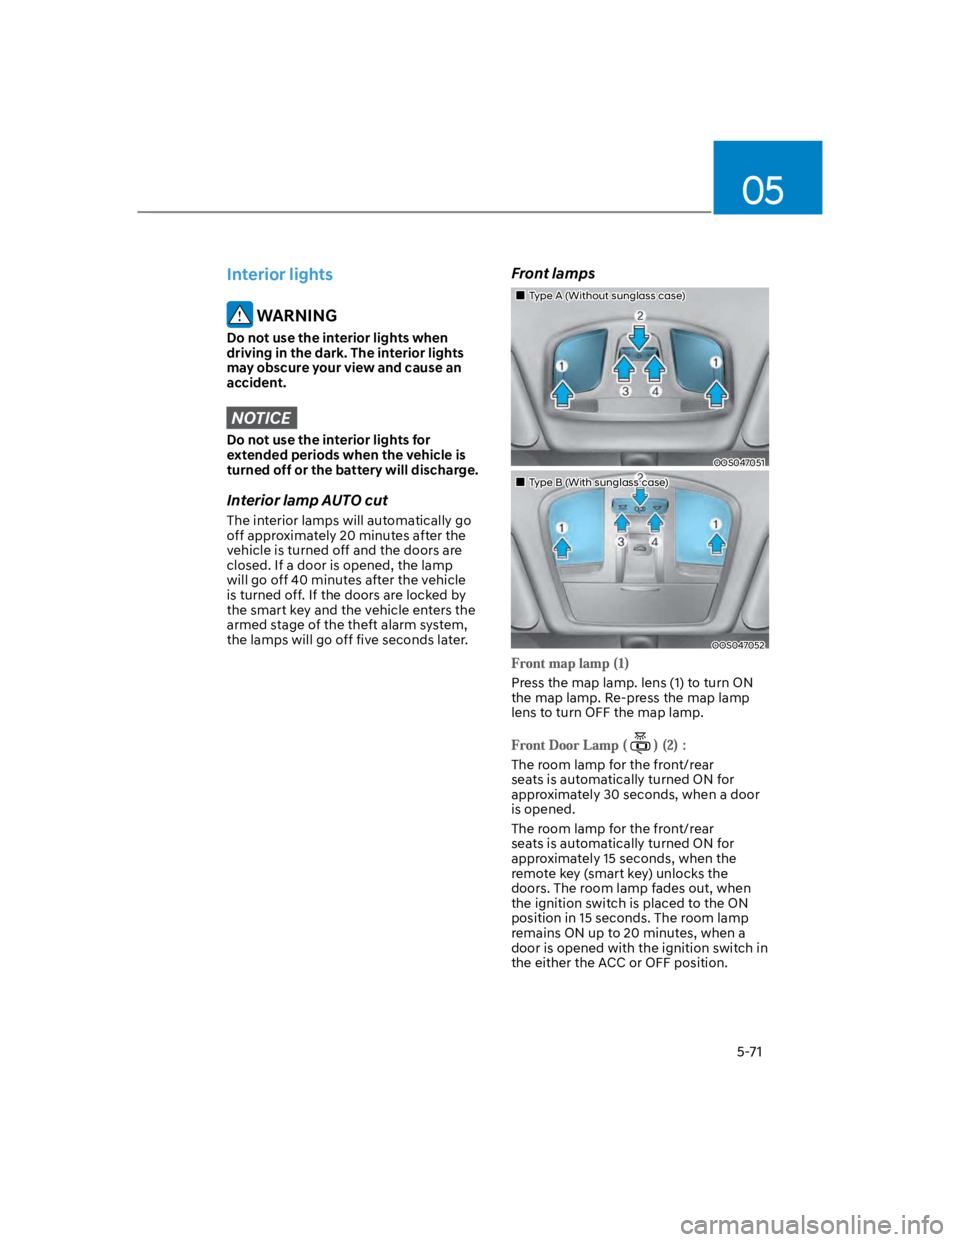
Type A (Without sunglass case)
OOS047051
Type B (With sunglass case)
OOS047052
Press the map lamp. lens (1) to turn ON
the map lamp. Re-press the map lamp
lens to turn OFF the map lamp.
The room lamp for the front/rear
seats is automatically turned ON for
approximately 30 seconds, when a door
is opened.
The room lamp for the front/rear
seats is automatically turned ON for
approximately 15 seconds, when the
remote key (smart key) unlocks the
doors. The room lamp fades out, when
the ignition switch is placed to the ON
position in 15 seconds. The room lamp
remains ON up to 20 minutes, when a
door is opened with the ignition switch in
the either the ACC or OFF position.
Page 208 of 579
Convenient features
5-74
OOS047409N
High Beam Assist will automatically
adjust the headlamp range (switches
between high beam and low beam)
depending on the brightness of detected
vehicles and certain road conditions.
Detecting sensor (Front view
camera)
OOS070001N
[1] : Front view camera
The front view camera is used as a
detecting sensor to detect ambient light
and brightness while driving.
Refer to the picture above for the
detailed location of the detecting sensor.
For more details on the precautions
of the front view camera, refer to
“Forward Collision-Avoidance Assist
(FCA)” section in chapter 7.
High Beam Assist setting
The driver can activate HBA by placing
the ignition switch to the ON position
this setting, HBA will not work.
The setting of HBA will be maintained, as
selected, when the engine is re-started.
Page 211 of 579
05
5-77
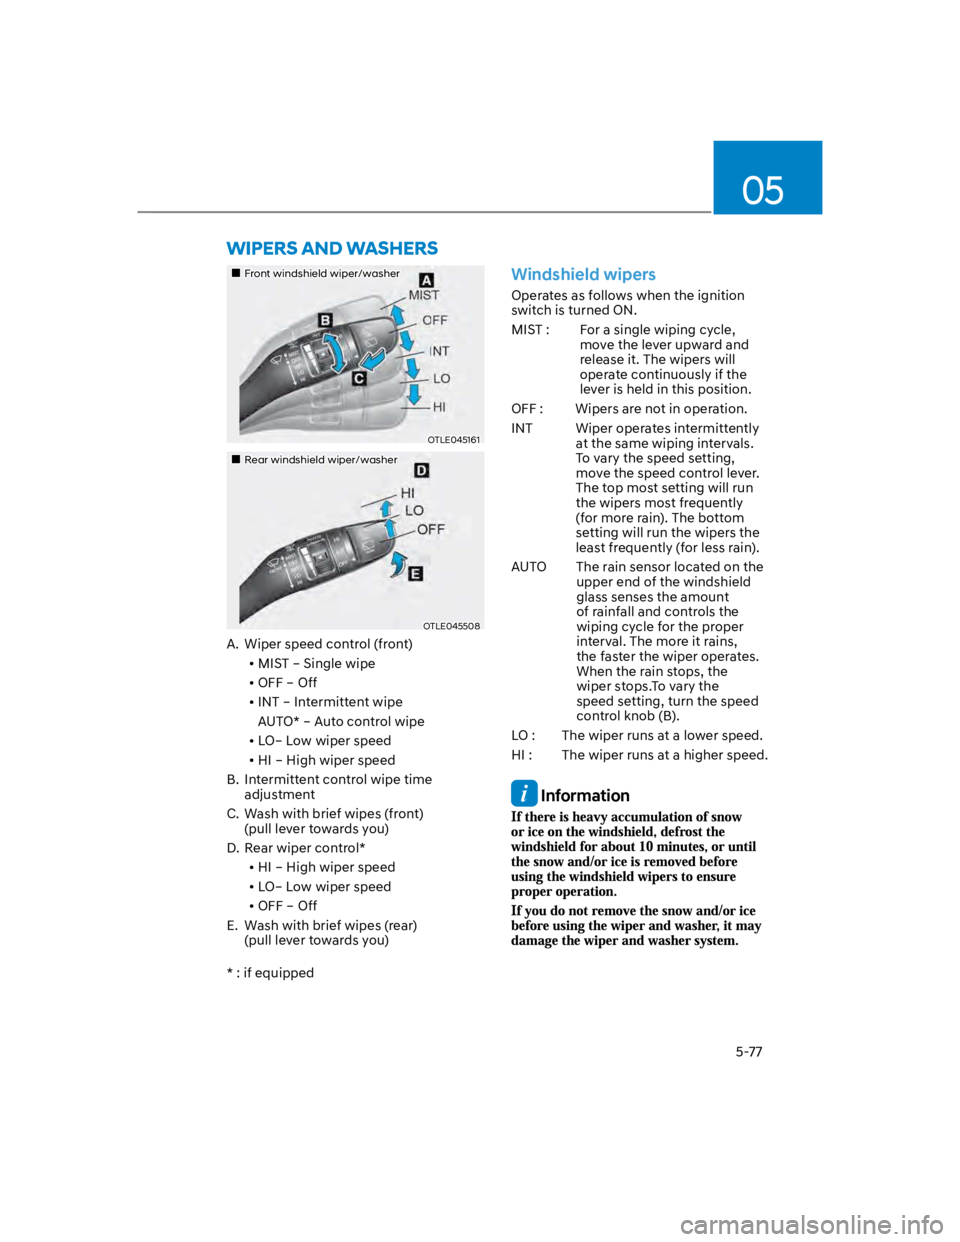
Front windshield wiper/washer
OTLE045161
Rear windshield wiper/washer
OTLE045508
A. Wiper speed control (front)
MIST – Single wipe
OFF – Off
INT – Intermittent wipe
AUTO* – Auto control wipe
LO– Low wiper speed
HI – High wiper speed
B. Intermittent control wipe time
adjustment
C. Wash with brief wipes (front)
(pull lever towards you)
D. Rear wiper control*
HI – High wiper speed
LO– Low wiper speed
OFF – Off
E. Wash with brief wipes (rear)
(pull lever towards you)
* : if equipped
Windshield wipers
Operates as follows when the ignition
switch is turned ON.
MIST : For a single wiping cycle,
move the lever upward and
release it. The wipers will
operate continuously if the
lever is held in this position.
OFF : Wipers are not in operation.
INT Wiper operates intermittently
at the same wiping intervals.
To vary the speed setting,
move the speed control lever.
The top most setting will run
the wipers most frequently
(for more rain). The bottom
setting will run the wipers the
least frequently (for less rain).
AUTO The rain sensor located on the
upper end of the windshield
glass senses the amount
of rainfall and controls the
wiping cycle for the proper
interval. The more it rains,
the faster the wiper operates.
When the rain stops, the
wiper stops.To vary the
speed setting, turn the speed
control knob (B).
LO : The wiper runs at a lower speed.
HI : The wiper runs at a higher speed.
Information