Page 132 of 579
04
4-39
OTMA040004
Trip distance (1), average fuel economy
(2), and instant fuel economy (3) are
displayed.
The information is combined for each
ignition cycle. However, when the engine
has been OFF for 3 minutes or longer the
Drive Info screen will reset.
To reset manually, press the OK switch
on the steering wheel for more than 1
second when ‘Drive Info’ is displayed.
OTMA040009
Accumulated trip distance (1), average
fuel economy (2), and instant fuel
economy (3) are displayed.
The information is accumulated starting
from the last reset.
To reset manually, press the OK switch
on the steering wheel for more than
1 second when ‘Accumulated Info’ is
displayed.
OJX1069044
AUTO STOP display shows the elapsed
time of engine stop by Idle Stop and Go
system.
For more details, refer to “Idle Stop and
Go (ISG)” section in chapter 6.
OIK047151N
Digital speedometer display shows the
speed of the vehicle.
Page 133 of 579
Instrument cluster
4-40
Trip computer (Type B)
The trip computer is a microcomputer-
controlled driver information system that
displays information related to driving.
Information
Trip modes
Drive Info
Since refueling
Accumulated Info
Auto Stop (if equipped)
Digital speedometer
OOSH049025L
To change the trip mode, toggle the
", " switch on the steering wheel
OTMA040012
Trip distance (1), average fuel economy
(2), and total driving time (3) are
displayed.
The information is combined for each
ignition cycle. However, when the engine
has been OFF for 3 minutes or longer the
Drive Info screen will reset.
To reset manually, press the OK switch
on the steering wheel for more than 1
second when ‘Drive Info’ is displayed.
Page 138 of 579

Convenient features
5-4
Remote key (if equipped)
OOS050035N
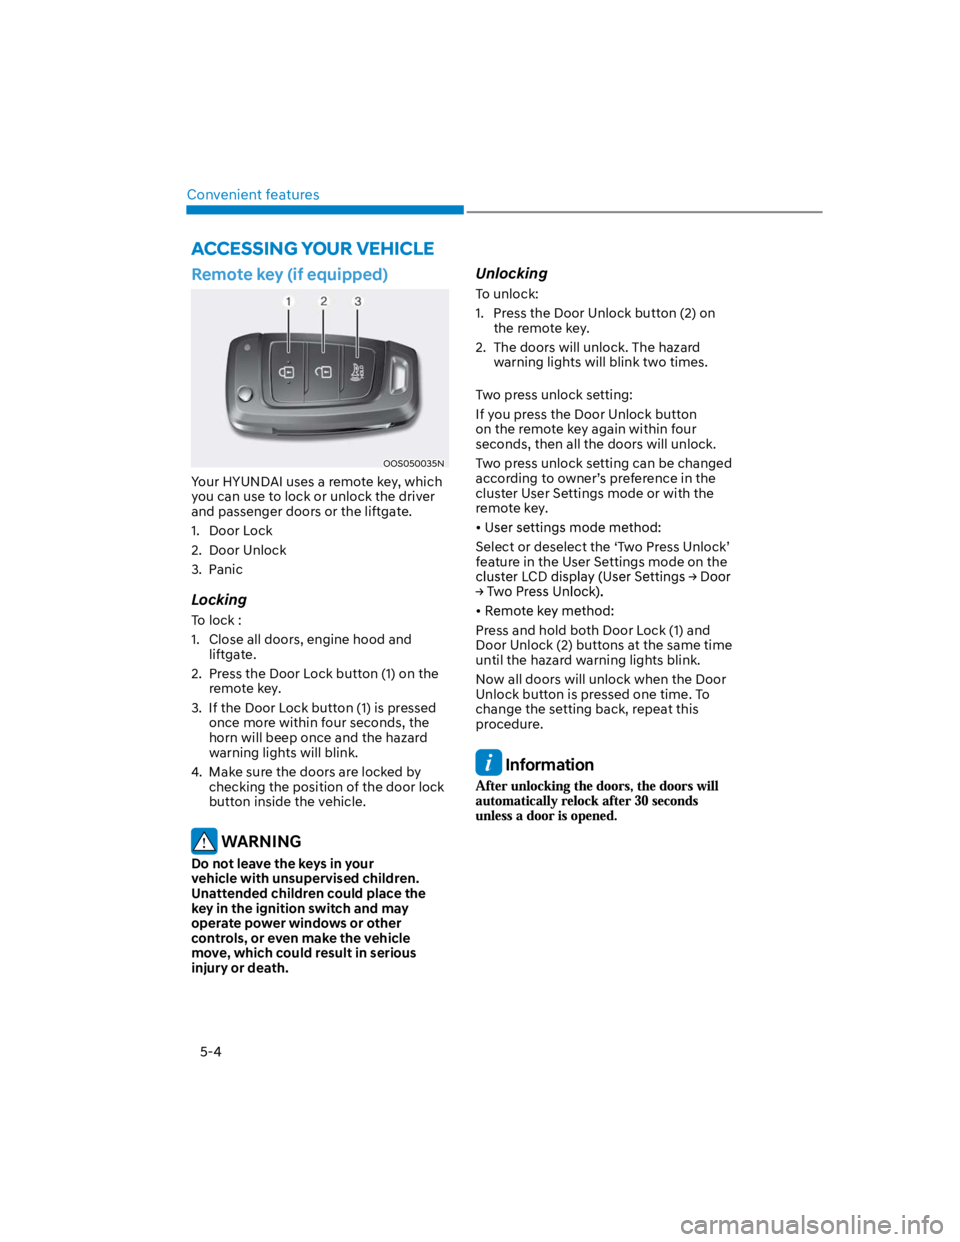
Your HYUNDAI uses a remote key, which
you can use to lock or unlock the driver
and passenger doors or the liftgate.
1. Door Lock
2. Door Unlock
3. Panic
Locking
To lock :
1. Close all doors, engine hood and
liftgate.
2. Press the Door Lock button (1) on the
remote key.
3. If the Door Lock button (1) is pressed
once more within four seconds, the
horn will beep once and the hazard
warning lights will blink.
4. Make sure the doors are locked by
checking the position of the door lock
button inside the vehicle.
WARNING
Do not leave the keys in your
vehicle with unsupervised children.
Unattended children could place the
key in the ignition switch and may
operate power windows or other
controls, or even make the vehicle
move, which could result in serious
injury or death.
Unlocking
To unlock:
1. Press the Door Unlock button (2) on
the remote key.
2. The doors will unlock. The hazard
warning lights will blink two times.
Two press unlock setting:
If you press the Door Unlock button
on the remote key again within four
seconds, then all the doors will unlock.
Two press unlock setting can be changed
according to owner’s preference in the
cluster User Settings mode or with the
remote key.
Select or deselect the ‘Two Press Unlock’
feature in the User Settings mode on the
Press and hold both Door Lock (1) and
Door Unlock (2) buttons at the same time
until the hazard warning lights blink.
Now all doors will unlock when the Door
Unlock button is pressed one time. To
change the setting back, repeat this
procedure.
Information
ACCESSING YOUR VEHICLE
Page 139 of 579

05
5-5
Panic button (if equipped)
Press and hold the Panic button (3) for
more than one second. The horn sounds
and hazard warning lights flash for about
30 seconds.
To cancel the panic mode, press any
button on the remote key.
Information
Start-up
For detailed information refer to “Key
Ignition Switch” in chapter 6.
NOTICE
To prevent damaging the remote key:
Keep the remote key away from
water or any liquid and fire. If
the inside of the remote key gets
damp (due to drinks or moisture),
or is heated, internal circuit may
malfunction, excluding the car from
the warranty.
Avoid dropping or throwing the
remote key.
Protect the remote key from extreme
temperatures.
Mechanical key
OOS050036N
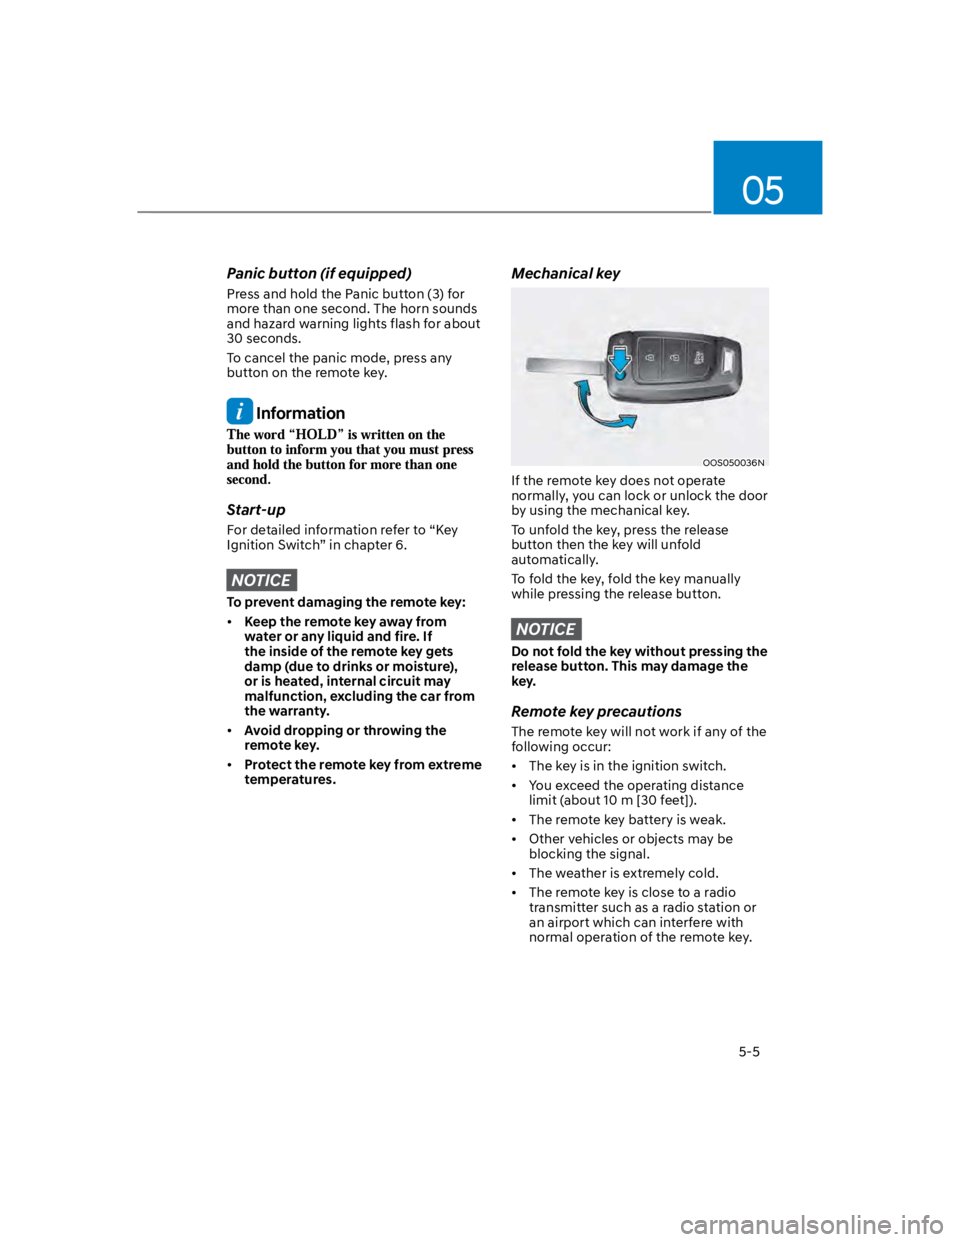
If the remote key does not operate
normally, you can lock or unlock the door
by using the mechanical key.
To unfold the key, press the release
button then the key will unfold
automatically.
To fold the key, fold the key manually
while pressing the release button.
NOTICE
Do not fold the key without pressing the
release button. This may damage the
key.
Remote key precautions
The remote key will not work if any of the
following occur:
The key is in the ignition switch.
You exceed the operating distance
limit (about 10 m [30 feet]).
The remote key battery is weak.
Other vehicles or objects may be
blocking the signal.
The weather is extremely cold.
The remote key is close to a radio
transmitter such as a radio station or
an airport which can interfere with
normal operation of the remote key.
Page 148 of 579

Convenient features
5-14
Immobilizer system (if equipped)
The immobilizer system helps protect
your vehicle from theft. If an improperly
coded key (or other device) is used, the
engine’s fuel system is disabled.
When the ignition switch is placed in
the ON position, the immobilizer system
indicator should come on briefly, then
go off. If the indicator starts to blink, the
system does not recognize the coding of
the key.
Place the ignition switch to the LOCK/
OFF position, then place the ignition
switch to the ON position again.
The system may not recognize your
key’s coding if another immobilizer key
or other metal object (i.e., key chain) is
near the key. The engine may not start
because the metal may interrupt the
transponder signal from transmitting
normally.
If the system repeatedly does not
recognize the coding of the key, it is
recommended that you contact your
HYUNDAI dealer.
Do not attempt to alter this system
or add other devices to it. Electrical
problems could result that may make
your vehicle inoperable.
WARNING
In order to prevent theft of your
vehicle, do not leave spare keys
anywhere in your vehicle. Your
immobilizer password is a customer
unique password and should be kept
confidential.
NOTICE
The transponder in your key is an
important part of the immobilizer
system. It is designed to give years
of trouble-free service, however you
should avoid exposure to moisture,
static electricity and rough handling.
Immobilizer system malfunction could
occur.
Information
1.
2.
3.
Page 165 of 579

05
5-31
Smart key
OOS047001
To lock the doors, press the button on
the outside door handle while carrying
the smart key with you or press the door
lock button on the smart key.
To unlock the doors, press the button on
the outside door handle while carrying
the smart key with you or press the door
unlock button on the smart key.
Once the doors are unlocked, they may
be opened by pulling the door handle.
When closing the door, push the door by
hand. Make sure that doors are closed
securely.
Information
Operating door locks from inside
the vehicle
With the door lock button
OOS047003
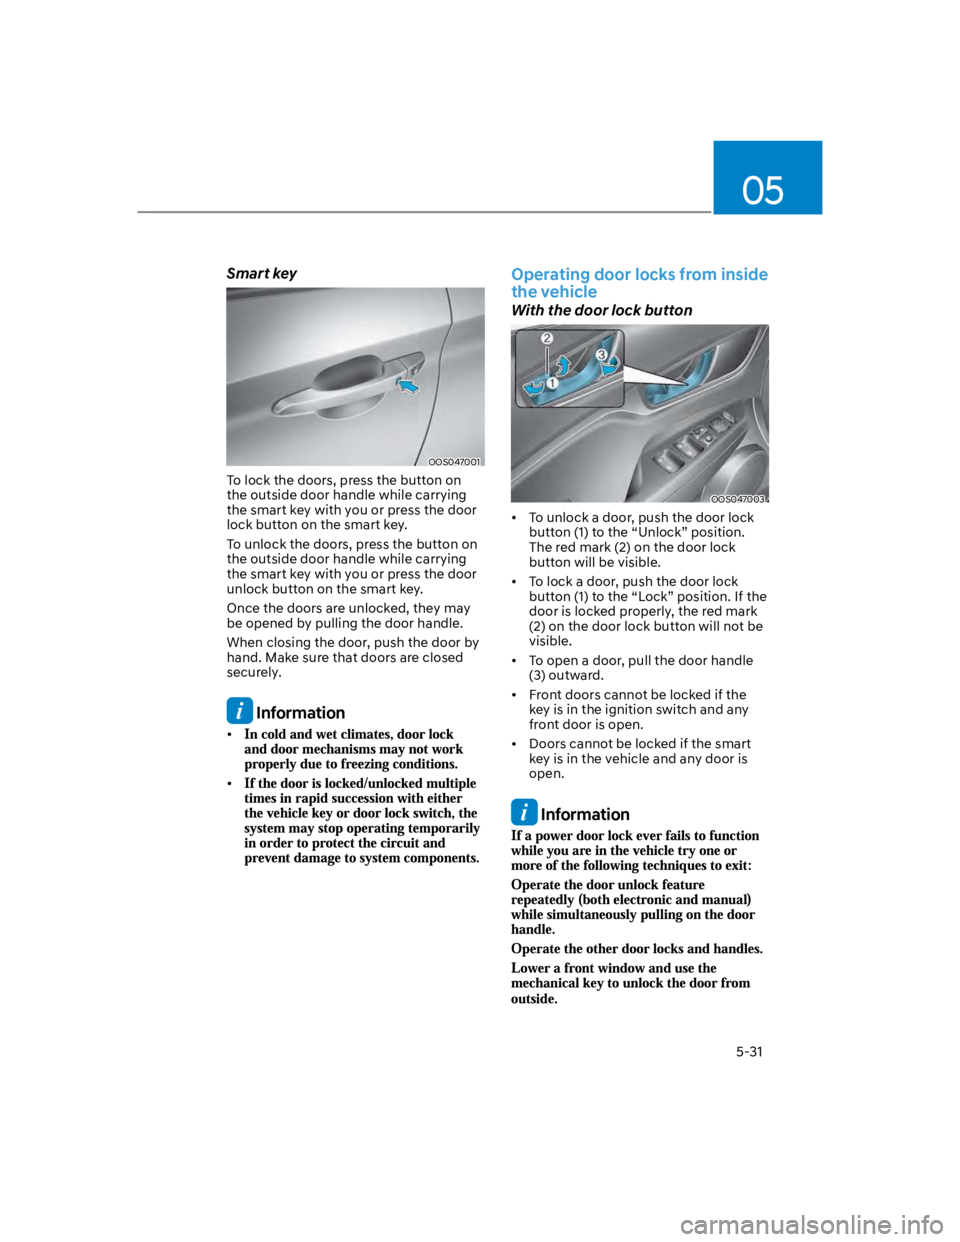
To unlock a door, push the door lock
button (1) to the “Unlock” position.
The red mark (2) on the door lock
button will be visible.
To lock a door, push the door lock
button (1) to the “Lock” position. If the
door is locked properly, the red mark
(2) on the door lock button will not be
visible.
To open a door, pull the door handle
(3) outward.
Front doors cannot be locked if the
key is in the ignition switch and any
front door is open.
Doors cannot be locked if the smart
key is in the vehicle and any door is
open.
Information
Page 172 of 579
Convenient features
5-38
Heated steering wheel
(if equipped)
OOS050003K
When the ignition switch is in the ON
position or when the engine is running,
press the heated steering wheel button
to warm the steering wheel.
The indicator on the button will
illuminate.
To turn the heated steering wheel off,
press the button again. The indicator on
the button will turn off.
Information
NOTICE
Do not install any cover or accessory
on the steering wheel. This cover or
accessory could cause damage to the
heated steering wheel system.
Horn
OOS047008
To sound the horn, press the area
indicated by the horn symbol on your
steering wheel (see illustration). The
horn will operate only when this area is
pressed.
NOTICE
Do not strike the horn severely to
operate it, or hit it with your fist. Do not
press on the horn with a sharp-pointed
object.
Page 175 of 579

05
5-41
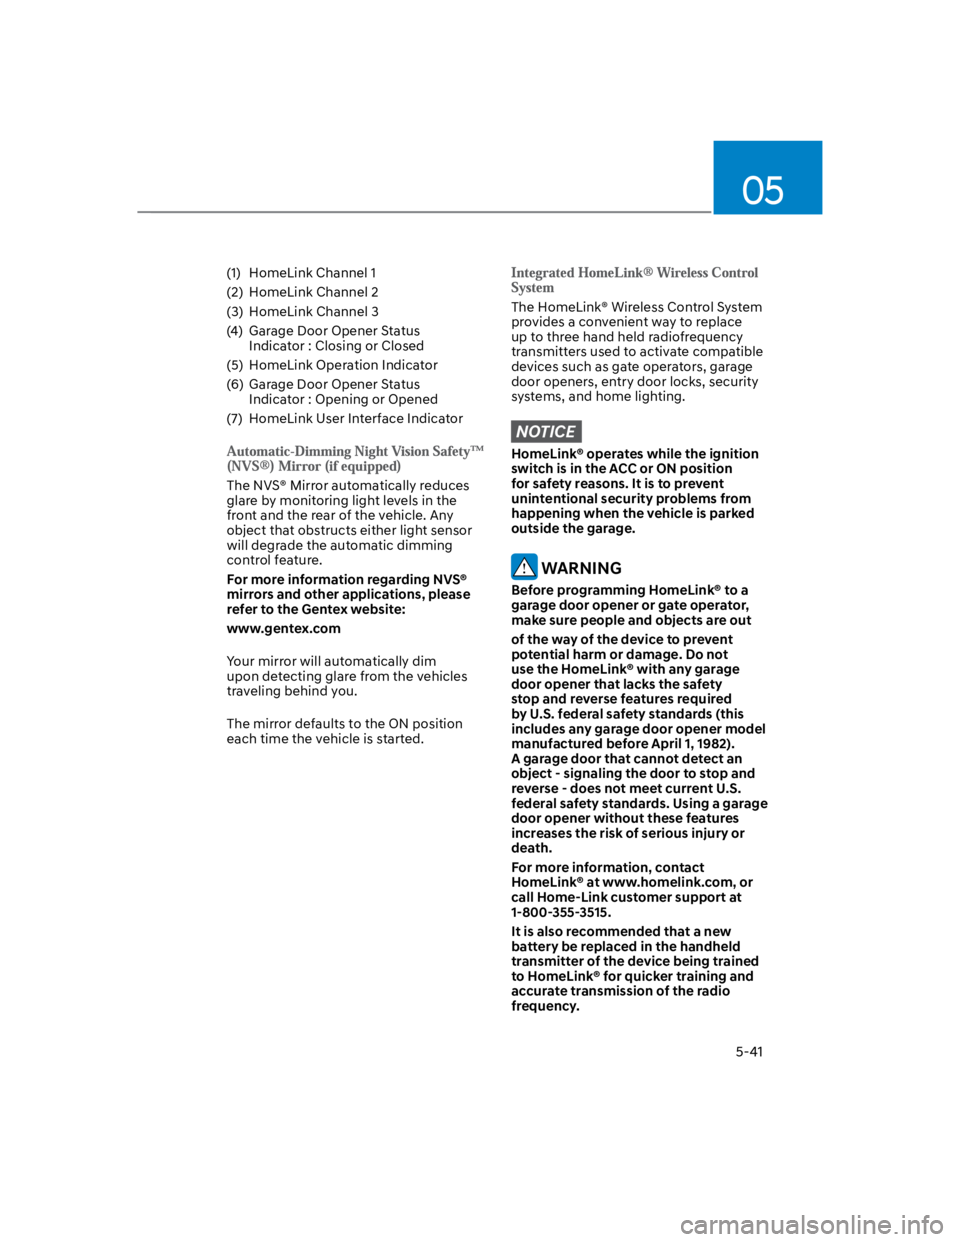
(1) HomeLink Channel 1
(2) HomeLink Channel 2
(3) HomeLink Channel 3
(4) Garage Door Opener Status
Indicator : Closing or Closed
(5) HomeLink Operation Indicator
(6) Garage Door Opener Status
Indicator : Opening or Opened
(7) HomeLink User Interface Indicator
The NVS® Mirror automatically reduces
glare by monitoring light levels in the
front and the rear of the vehicle. Any
object that obstructs either light sensor
will degrade the automatic dimming
control feature.
For more information regarding NVS®
mirrors and other applications, please
refer to the Gentex website:
www.gentex.com
Your mirror will automatically dim
upon detecting glare from the vehicles
traveling behind you.
The mirror defaults to the ON position
each time the vehicle is started.
The HomeLink® Wireless Control System
provides a convenient way to replace
up to three hand held radiofrequency
transmitters used to activate compatible
devices such as gate operators, garage
door openers, entry door locks, security
systems, and home lighting.
NOTICE
HomeLink® operates while the ignition
switch is in the ACC or ON position
for safety reasons. It is to prevent
unintentional security problems from
happening when the vehicle is parked
outside the garage.
WARNING
Before programming HomeLink® to a
garage door opener or gate operator,
make sure people and objects are out
of the way of the device to prevent
potential harm or damage. Do not
use the HomeLink® with any garage
door opener that lacks the safety
stop and reverse features required
by U.S. federal safety standards (this
includes any garage door opener model
manufactured before April 1, 1982).
A garage door that cannot detect an
object - signaling the door to stop and
reverse - does not meet current U.S.
federal safety standards. Using a garage
door opener without these features
increases the risk of serious injury or
death.
For more information, contact
HomeLink® at www.homelink.com, or
call Home-Link customer support at
1-800-355-3515.
It is also recommended that a new
battery be replaced in the handheld
transmitter of the device being trained
to HomeLink® for quicker training and
accurate transmission of the radio
frequency.