2022 HYUNDAI KONA ABS
[x] Cancel search: ABSPage 551 of 579
09
9-65
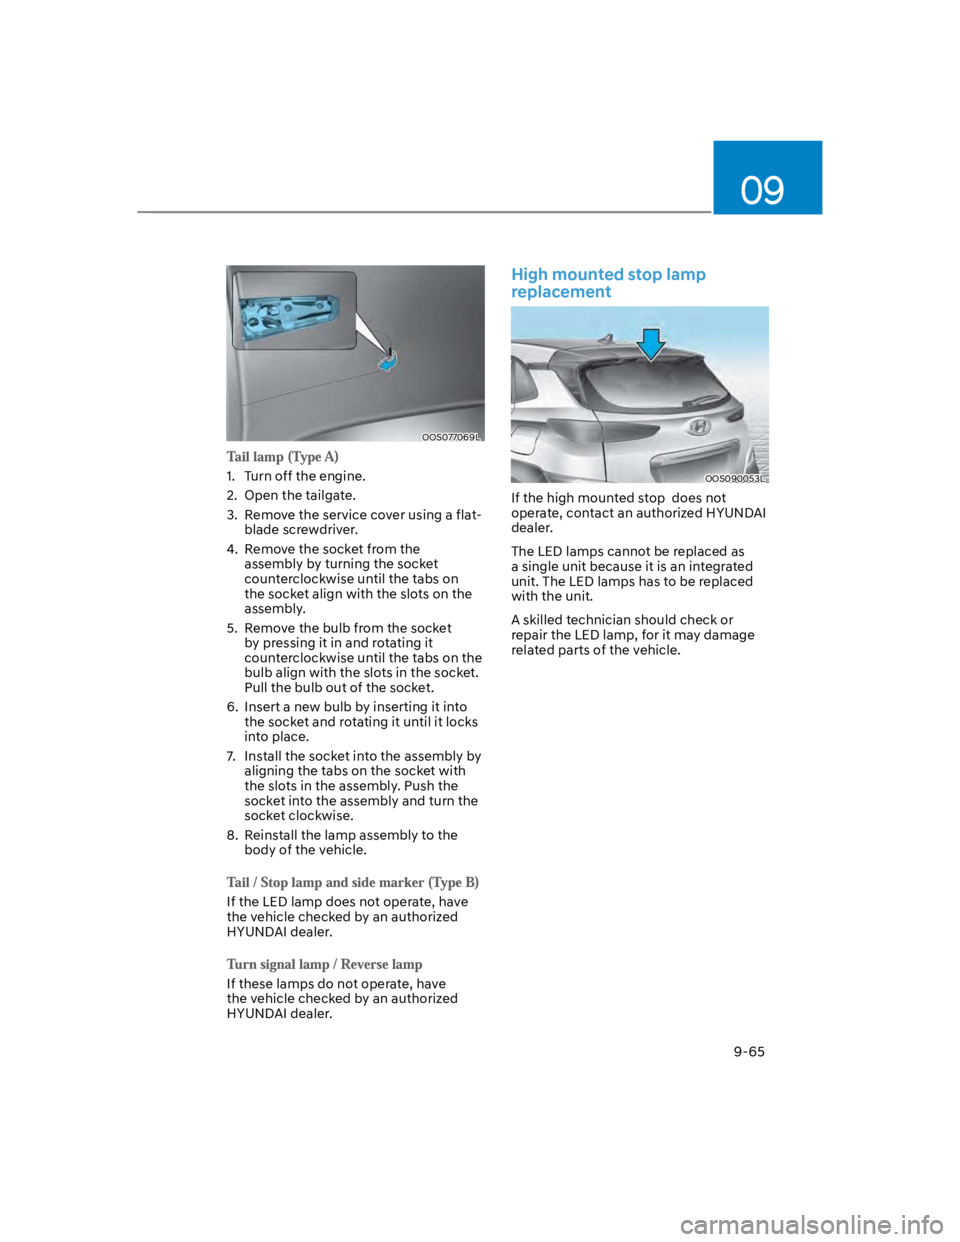
OOS077069L
1. Turn off the engine.
2. Open the tailgate.
3. Remove the service cover using a flat-
blade screwdriver.
4. Remove the socket from the
assembly by turning the socket
counterclockwise until the tabs on
the socket align with the slots on the
assembly.
5. Remove the bulb from the socket
by pressing it in and rotating it
counterclockwise until the tabs on the
bulb align with the slots in the socket.
Pull the bulb out of the socket.
6. Insert a new bulb by inserting it into
the socket and rotating it until it locks
into place.
7. Install the socket into the assembly by
aligning the tabs on the socket with
the slots in the assembly. Push the
socket into the assembly and turn the
socket clockwise.
8. Reinstall the lamp assembly to the
body of the vehicle.
If the LED lamp does not operate, have
the vehicle checked by an authorized
HYUNDAI dealer.
If these lamps do not operate, have
the vehicle checked by an authorized
HYUNDAI dealer.
High mounted stop lamp
replacement
OOS090053L
If the high mounted stop does not
operate, contact an authorized HYUNDAI
dealer.
The LED lamps cannot be replaced as
a single unit because it is an integrated
unit. The LED lamps has to be replaced
with the unit.
A skilled technician should check or
repair the LED lamp, for it may damage
related parts of the vehicle.
Page 553 of 579

09
9-67
Room lamp (Type A)
OOS077054
Room lamp (Type B)
OOS077045
Vanity mirror lamp
OOS077046
Luggage compartment lamp
OOS077048
Glove box lamp
OOS077047
1. Using a flat-blade screwdriver, gently
pry the lens from the interior lamp
housing.
2. Remove the bulb by pulling it straight
out.
WARNING
Prior to working on the Interior Lights,
ensure that the “OFF” button is
depressed to avoid burning your fingers
or receiving an electric shock.
3. Install a new bulb in the socket.
4. Align the lens tabs with the interior
lamp housing notches and snap the
lens into place.
NOTICE
Use care not to dirty or damage lens,
lens tab, and plastic housings.
Page 562 of 579

Maintenance
9-76
- Oil
Remove oil instantly with
absorbable cloth and wipe with
stain remover used only for natural
leather.
- Chewing gum
Harden the gum with ice and
remove gradually.
Handling prime napa leather (if
equipped)
Try to avoid excessive sunlight and
heat exposure. Excessive sunlight
and heat exposure naturally fades
and dries out napa leather, causing
wrinkles and discoloration. If the napa
leather is wet with liquid, immediately
clean it with lint-free cloth to minimize
damage. Do not scratch the napa
leather surface with a sharp object.
If your napa leather seat is bright
colored, it may be contaminated or
stained from dyed materials such as
jeans.
Interior wooden trim
Use a wooden furniture protector (e.g.
wax, coating compound) to clean the
interior wooden trim.
Often wipe the interior wooden
trim with a lint-free, clean cloth to
maintain the unique wooden textures
for a longer period of time.
If you spill beverage (e.g. water,
coffee) over the interior wooden trim,
immediately wipe it with clean, dry
cloth.
Sharp objects (e.g. driver, knife),
adhesive materials, or tapes may
damage the interior wooden trim.
Any strong impacts may damage the
interior wooden trim.
If the coating finish over the interior
wooden trim is removed, moisture
may damage or change wood traits.
If the interior wooden trim is
damaged, you may get a splinter
from the wood surface. Therefore,
you should immediately have the
damaged interior wooden trim
replaced by an authorized HYUNDAI
dealer.
Cleaning the seat belt webbing
Clean the belt webbing with any
mild soap solution recommended for
cleaning upholstery or carpet. Follow
the instructions provided with the soap.
Do not bleach or re-dye the webbing
because this may weaken the seat belt.
Cleaning the interior window glass
If the interior glass surfaces of the
vehicle become fogged (that is, covered
with an oily, greasy or waxy film), they
should be cleaned with glass cleaner.
Follow the directions on the glass cleaner
container.
NOTICE
Do not scrape or scratch the inside of
the rear window. This may result in
damage to the rear window defroster
grid.
Page 563 of 579
09
9-77
The emission control system of your
vehicle is covered by a written limited
warranty. Please see the warranty
information contained in the Service
Passport in your vehicle.
Your vehicle is equipped with an
emission control system to meet all
applicable emission regulations. There
are three emission control systems, as
follows.
(1) Crankcase emission control system
(2) Evaporative emission control system
(3) Exhaust emission control system
In order to ensure the proper function
of the emission control systems, it
is recommended that you have your
vehicle inspected and maintained
by an authorized HYUNDAI dealer in
accordance with the maintenance
schedule in this manual.
NOTICE
For the Inspection and Maintenance
Test (with Electronic Stability Control
(ESC) system)
To prevent the vehicle from misfiring
during dynamometer testing, turn
the Electronic Stability Control
(ESC) system off by pressing the ESC
switch (ESC OFF light illuminated).
After dynamometer testing is
completed, turn the ESC system back
on by pressing the ESC switch again.
1. Crankcase emission control
system
The positive crankcase ventilation system
is employed to prevent air pollution
caused by blow-by gases being emitted
from the crankcase. This system supplies
fresh filtered air to the crankcase through
the air intake hose. Inside the crankcase,
the fresh air mixes with blow-by gases,
which then pass through the PCV valve
into the induction system.
2. Evaporative emission control
system
The Evaporative Emission Control System
is designed to prevent fuel vapors from
escaping into the atmosphere.
Canister
Fuel vapors generated inside the fuel
tank are absorbed and stored in the
onboard canister. When the engine is
running, the fuel vapors absorbed in the
canister are drawn into the surge tank
through the purge control solenoid valve.
Purge Control Solenoid Valve (PCSV)
The purge control solenoid valve
is controlled by the Engine Control
Module (ECM); when the engine coolant
temperature is low during idling, the
PCSV closes so that evaporated fuel
is not taken into the engine. After the
engine warms-up during ordinary
driving, the PCSV opens to introduce
evaporated fuel to the engine.
EMISSION CONTROL SYSTEM
Page 569 of 579

I
I-3
Brake fluid ........................................................................................................... 9-21
Checking the brake fluid level ......................................................................... 9-21
Braking system .................................................................................................... 6-26
Anti-lock Brake System (ABS) ........................................................................ 6-36
Auto Hold ......................................................................................................... 6-33
Disc brakes wear indicator ............................................................................... 6-26
Downhill Brake Control (DBC) ...................................................................... 6-42
Electronic Parking Brake (EPB) ..................................................................... 6-28
Electronic Stability Control (ESC)................................................................... 6-38
Good braking practices..................................................................................... 6-45
Hill-Start Assist Control (HAC) ...................................................................... 6-41
Parking Brake ................................................................................................... 6-27
Power-assist brakes .......................................................................................... 6-26
Vehicle Stability Management (VSM) ............................................................ 6-40
Bulb wattage ........................................................................................................ 2-10
C
California perchlorate notice ............................................................................... 9-80
Child Restraint System (CRS) ............................................................................. 3-30
Children Always in the Rear ............................................................................ 3-30
Installing a Child Restraint System (CRS)....................................................... 3-33
Selecting a Child Restraint System (CRS) ....................................................... 3-31
Climate control additional features.................................................................... 5-103
Automatic Ventilation..................................................................................... 5-103
Inside air circulation while operating the washer fluid ................................. 5-103
Sunroof Inside Air Recirculation.................................................................... 5-103
Climate control air filter ...................................................................................... 9-24
Filter Inspection................................................................................................ 9-24
Consumer information ......................................................................................... 2-17
Cruise Control (CC) ............................................................................................ 7-60
Function operation ........................................................................................... 7-60