Page 531 of 579
![HYUNDAI KONA 2022 Owners Manual 09
9-45
FUSES
OLF074075
A
Blade type
Cartridge type
Multi fuse
A
A
B
B
B
B
A
[A] : Normal, [B] : Blown
A vehicle’s electrical system is protected
from electrical overload damage by
fuses.
This veh HYUNDAI KONA 2022 Owners Manual 09
9-45
FUSES
OLF074075
A
Blade type
Cartridge type
Multi fuse
A
A
B
B
B
B
A
[A] : Normal, [B] : Blown
A vehicle’s electrical system is protected
from electrical overload damage by
fuses.
This veh](/manual-img/35/41169/w960_41169-530.png)
09
9-45
FUSES
OLF074075
A
Blade type
Cartridge type
Multi fuse
A
A
B
B
B
B
A
[A] : Normal, [B] : Blown
A vehicle’s electrical system is protected
from electrical overload damage by
fuses.
This vehicle has 5 fuse panels, one
located in the driver’s side panel bolster,
the other in the engine compartment.
If any of your vehicle’s lights,
accessories, or controls do not work,
check the appropriate circuit fuse. If a
fuse has blown, the element inside the
fuse will be melted or broken.
If the electrical system does not work,
first check the driver’s side fuse panel.
Before replacing a blown fuse, turn the
engine and all switches off, and then
disconnect the negative battery cable.
Always replace a blown fuse with one of
the same rating.
If the replacement fuse blows, this
indicates an electrical problem.
Avoid using the system involved. We
recommend that you immediately
consult an authorized HYUNDAI dealer.
WARNING
NEVER replace a fuse with anything but
another fuse of the same rating.
A higher capacity fuse could cause
damage and possibly cause a fire.
Do not install a wire or aluminum
foil instead of the proper fuse -
even as a temporary repair. It may
cause extensive wiring damage and
possibly a fire.
NOTICE
Do not use a screwdriver or any other
metal object to remove fuses because
it may cause a short circuit and damage
the system.
Page 532 of 579

Maintenance
9-46
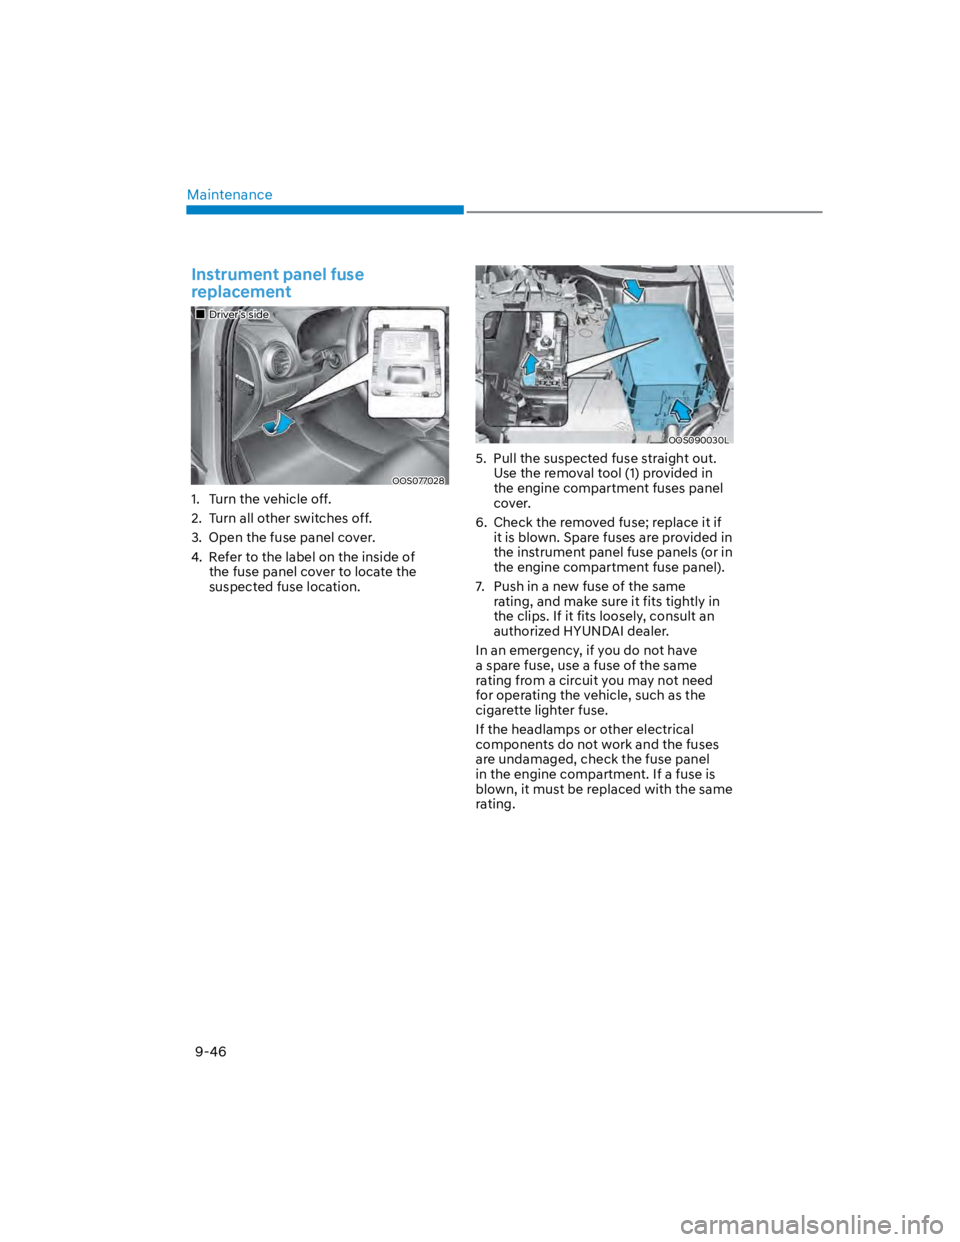
Instrument panel fuse
replacement
Driver’s side
OOS077028
1. Turn the vehicle off.
2. Turn all other switches off.
3. Open the fuse panel cover.
4. Refer to the label on the inside of
the fuse panel cover to locate the
suspected fuse location.
OOS090030L
5. Pull the suspected fuse straight out.
Use the removal tool (1) provided in
the engine compartment fuses panel
cover.
6. Check the removed fuse; replace it if
it is blown. Spare fuses are provided in
the instrument panel fuse panels (or in
the engine compartment fuse panel).
7. Push in a new fuse of the same
rating, and make sure it fits tightly in
the clips. If it fits loosely, consult an
authorized HYUNDAI dealer.
In an emergency, if you do not have
a spare fuse, use a fuse of the same
rating from a circuit you may not need
for operating the vehicle, such as the
cigarette lighter fuse.
If the headlamps or other electrical
components do not work and the fuses
are undamaged, check the fuse panel
in the engine compartment. If a fuse is
blown, it must be replaced with the same
rating.
Page 544 of 579

Maintenance
9-58
We recommend that you consult an
authorized HYUNDAI dealer to replace
most vehicle light bulbs. It is difficult
to replace vehicle light bulbs because
other parts of the vehicle must be
removed before you can get to the bulb.
This is especially true for removing the
headlamp assembly to get to the bulb(s).
Removing/installing the headlamp
assembly can result in damage to the
vehicle.
WARNING
Prior to working on a light, depress
the foot brake, shift to P (Park), apply
the parking brake, press the Engine
Start/Stop button to the OFF position
and take the key with you when
leaving the vehicle to avoid sudden
movement of the vehicle and to
prevent possible electric shock.
Be aware the bulbs may be hot and
may burn your fingers.
NOTICE
Be sure to replace the burned-out bulb
with one of the same wattage rating.
Otherwise, it may cause damage to the
fuse or electrical wiring system.
NOTICE
To prevent damage, do not clean the
headlamp lens with chemical solvents
or strong detergents.
Information
LIGHT BULBS
Page 545 of 579
09
9-59
Information
Information
Headlamp, position lamp, turn
signal lamp, Daytime Running
Light (DRL) replacement
Type A
OOS090017N
(1) Turn signal lamp
(2) Headlamp (High/Low)
(3) Daytime running light (if equipped) /
Position lamp (LED)
(4) Front fog lamp (if equipped)
(5) Side marker
(6) Side reflex reflector
Page 547 of 579
09
9-61
OOS090054L
1. Open the hood.
2. Disconnect the negative battery
cable.
3. Remove the bulb cover (2) by turning
it counterclockwise.
4. Disconnect the bulb socket-
connector.
5. Remove the bulb from the assembly.
6. Install a new bulb.
7. Connect the bulb socket-connector.
8. Install the bulb cover by turning it
clockwise.
If the LED lamp does not operate, have
the vehicle checked by an authorized
HYUNDAI dealer.
Type B
OOS090017N
(1) Headlamp (High) (LED)
(2) Headlamp (Low) (LED)
(3) Daytime running light /
Position lamp/
Turn signal lamp (LED) (if equipped)
(4) Front fog lamp (if equipped)
(5) Side marker
(6) Side reflex reflector
Page 549 of 579
09
9-63
Side repeater lamp replacement
OOS077039
If the light bulb does not operate, have
the vehicle checked by an authorized
HYUNDAI dealer.
Rear combination lamp bulb
replacement
Type A (Standard)
OOS090018N
Type B (LED)
OOS090018N
(1) Stop/Tail lamp
(2) Tail lamp(Type A),
Stop/Tail lamp (Type B)
(3) Turn signal lamp (Bulb) (Type A)
Turn signal lamp (LED) (Type B)
(4) Reverse lamp
(5) Side marker
Page 552 of 579
Maintenance
9-66
License Plate Light Bulb
Replacement
OOS077043
1. Using a flat-blade screwdriver, gently
pry the lens cover from the lamp
housing.
2. Remove the bulb by pulling it straight
out.
3. Install a new bulb.
4. Reinstall in the reverse order.
Interior Light Bulb Replacement
Map lamp, Room lamp, Vanity mirror
lamp, Luggage compartment lamp
and Glove box lamp
Map lamp (Type A)
OOS077053
Map lamp (Type B)
OOS077044
Page 553 of 579
09
9-67
Room lamp (Type A)
OOS077054
Room lamp (Type B)
OOS077045
Vanity mirror lamp
OOS077046
Luggage compartment lamp
OOS077048
Glove box lamp
OOS077047
1. Using a flat-blade screwdriver, gently
pry the lens from the interior lamp
housing.
2. Remove the bulb by pulling it straight
out.
WARNING
Prior to working on the Interior Lights,
ensure that the “OFF” button is
depressed to avoid burning your fingers
or receiving an electric shock.
3. Install a new bulb in the socket.
4. Align the lens tabs with the interior
lamp housing notches and snap the
lens into place.
NOTICE
Use care not to dirty or damage lens,
lens tab, and plastic housings.