2022 HYUNDAI IONIQ ELECTRIC oil
[x] Cancel search: oilPage 492 of 546
7-33
7
Maintenance
Bead
The tire bead contains steel wires
wrapped by steel cords that hold the
tire onto the rim.
Bias Ply Tire
A pneumatic tire in which the plies
are laid at alternate angles less than
90 degrees to the centerline of thetread.
Cold Tire Pressure
The amount of air pressure in a tire,measured in pounds per square inch
(psi) or kilopascals (kPa) before a tire
has built up heat from driving.
Curb Weight
This means the weight of a motor
vehicle with standard and optional
equipment including the maximum
capacity of fuel, oil and coolant, but
without passengers and cargo.
DOT Markings
The DOT code includes the TireIdentification Number (TIN), an
alphanumeric designator which can
also identify the tire manufacturer,
production plant, brand and date ofproduction.
GVWR
Gross Vehicle Weight Rating
GAWR FRT
Gross Axle Weight Rating for the
Front Axle.
GAWR RR
Gross Axle Weight Rating for the
Rear axle.
Intended Outboard Sidewall
The side of an asymmetrical tire, that
must always face outward when
mounted on a vehicle.
Kilopascal (kPa)
The metric unit for air pressure.
Light truck(LT) tire
A tire designated by its manufacturer
as primarily intended for use on light-
weight trucks or multipurpose pas-
senger vehicles.
Load ratings
The maximum load that a tire is rated
to carry for a given inflation pressure.
Load Index
An assigned number ranging from 1to 279 that corresponds to the load
carrying capacity of a tire.
Maximum Inflation Pressure
The maximum air pressure to which
a cold tire may be inflated. The max-
imum air pressure is molded onto the
sidewall.
Page 498 of 546
7-39
7
Maintenance
FFUU SSEE SS
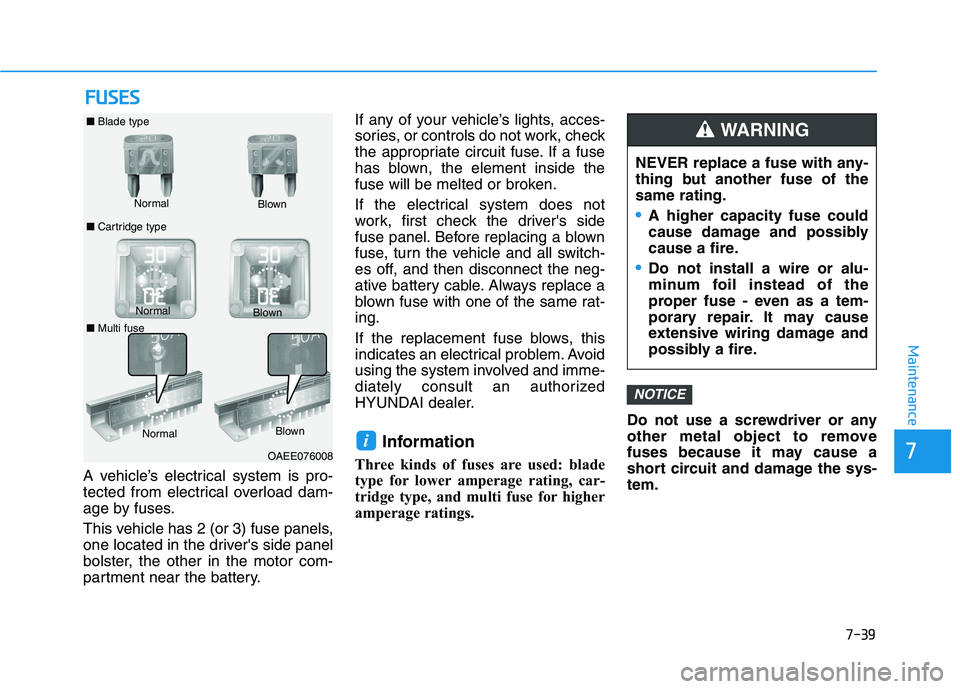
A vehicle’s electrical system is pro-
tected from electrical overload dam-
age by fuses.
This vehicle has 2 (or 3) fuse panels,
one located in the driver's side panel
bolster, the other in the motor com-
partment near the battery. If any of your vehicle’s lights, acces-
sories, or controls do not work, check
the appropriate circuit fuse. If a fuse
has blown, the element inside the
fuse will be melted or broken.
If the electrical system does not
work, first check the driver's side
fuse panel. Before replacing a blown
fuse, turn the vehicle and all switch-
es off, and then disconnect the neg-
ative battery cable. Always replace a
blown fuse with one of the same rat-ing.
If the replacement fuse blows, this
indicates an electrical problem. Avoid
using the system involved and imme-
diately consult an authorized
HYUNDAI dealer.
Information
Three kinds of fuses are used: blade
type for lower amperage rating, car-
tridge type, and multi fuse for higher
amperage ratings. Do not use a screwdriver or any
other metal object to remove
fuses because it may cause a
short circuit and damage the sys-tem.
NOTICE
i
NEVER replace a fuse with any-
thing but another fuse of thesame rating.
A higher capacity fuse could
cause damage and possibly
cause a fire.
Do not install a wire or alu-
minum foil instead of the
proper fuse - even as a tem-
porary repair. It may cause
extensive wiring damage and
possibly a fire.
WARNING
Normal
■
Blade type
■ Cartridge type Blown
Normal Blown
OAEE076008
Normal
Blown
■ Multi fuse
Page 512 of 546
7-53
7
Maintenance
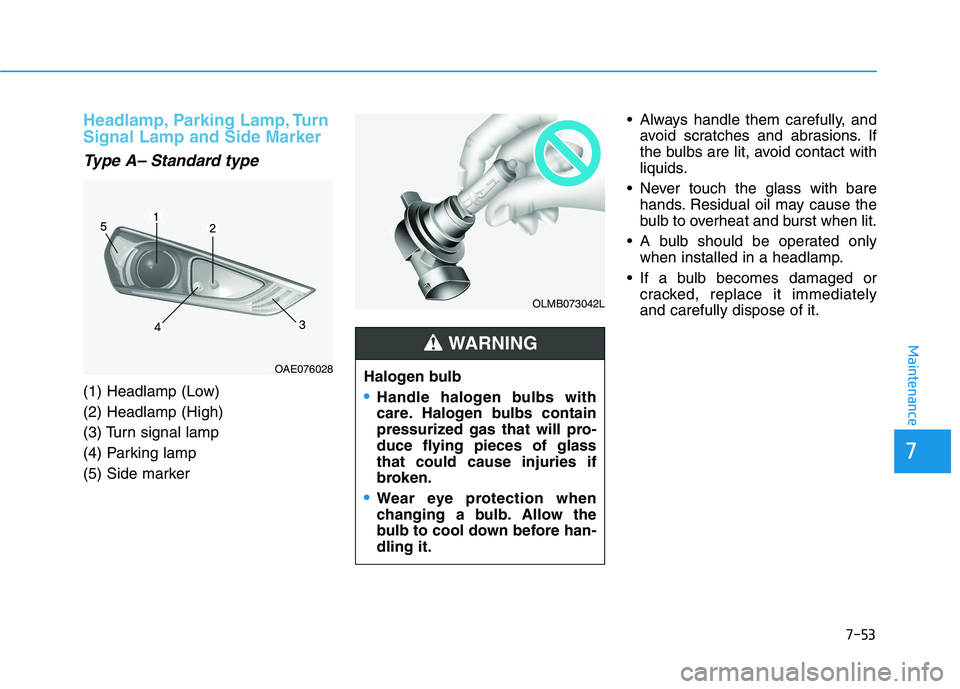
Headlamp, Parking Lamp, Turn Signal Lamp and Side Marker
Type A– Standard type
(1) Headlamp (Low) (2) Headlamp (High)
(3) Turn signal lamp
(4) Parking lamp
(5) Side marker Always handle them carefully, and
avoid scratches and abrasions. If
the bulbs are lit, avoid contact with
liquids.
Never touch the glass with bare hands. Residual oil may cause the
bulb to overheat and burst when lit.
A bulb should be operated only when installed in a headlamp.
If a bulb becomes damaged or cracked, replace it immediatelyand carefully dispose of it.
OLMB073042L
Halogen bulb
Handle halogen bulbs with
care. Halogen bulbs contain
pressurized gas that will pro-
duce flying pieces of glassthat could cause injuries if
broken.
Wear eye protection when
changing a bulb. Allow the
bulb to cool down before han-dling it.
WARNING
OAE076028
Page 519 of 546
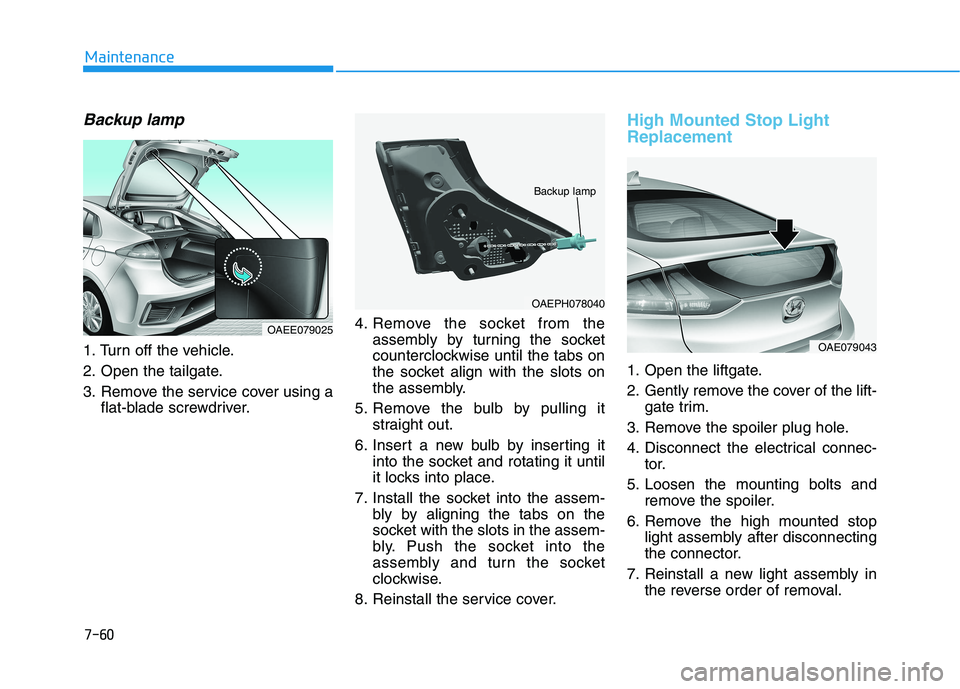
Backup lamp
1. Turn off the vehicle.
2. Open the tailgate.
3. Remove the service cover using aflat-blade screwdriver. 4. Remove the socket from the
assembly by turning the socket
counterclockwise until the tabs on
the socket align with the slots on
the assembly.
5. Remove the bulb by pulling it straight out.
6. Insert a new bulb by inserting it into the socket and rotating it until
it locks into place.
7. Install the socket into the assem- bly by aligning the tabs on the
socket with the slots in the assem-
bly. Push the socket into the
assembly and turn the socket
clockwise.
8. Reinstall the service cover.
High Mounted Stop Light Replacement
1. Open the liftgate.
2. Gently remove the cover of the lift- gate trim.
3. Remove the spoiler plug hole.
4. Disconnect the electrical connec- tor.
5. Loosen the mounting bolts and remove the spoiler.
6. Remove the high mounted stop light assembly after disconnecting
the connector.
7. Reinstall a new light assembly in the reverse order of removal.
7-60
Maintenance
OAEPH078040
Backup lamp
OAE079043
OAEE079025
Page 524 of 546
7-65
7
Maintenance
Matte paint finish vehicle (if equipped)
Automatic car wash which uses
rotating brushes should not be
used as this can damage the sur-
face of your vehicle. A steam
cleaner which washes the vehicle
surface at high temperature may
result the oil to adhere and leave
stains that is difficult to remove.
Use a soft cloth (e.g. microfiber
towel or sponge) when washing
your vehicle and dry with a
microfiber towel. When you hand
wash your vehicle, you should not
use a cleaner that finishes with
wax. If the vehicle surface is too
dirty (sand, dirt, dust, contami-
nant, etc.), clean the surface with
water before washing the vehicle.
Waxing
A good coat of wax provides a barri-
er between your paint and environ-mental contamination.
Keeping a good coat of wax on your
vehicle will help protect it.
Wax the vehicle when water will no longer bead on the paint.
Always wash and dry the vehicle
before waxing. Use a good quality
liquid or paste wax, and follow the
manufacturer’s instructions. Wax all
metal trim to protect it and to main-
tain its luster.
Removing oil, tar, and similar materi-
als with a spot remover will usually
strip the wax from the finish. Be sure
to re-wax these areas even if the rest
of the vehicle does not yet need wax-ing. Wiping dust or dirt off the body
with a dry cloth will scratch thefinish.
Do not use steel wool, abrasive cleaners, or strong detergents
containing highly alkaline or
caustic agents on chrome-plat-
ed or anodized aluminum parts.
This may result in damage to the
protective coating and causediscoloration or paint deteriora-tion.
Matte paint finish vehicle (if equipped)
Do not use any polish protector
such as a detergent, an abrasive
and a polish. In case wax is
applied, remove the wax immedi-
ately using a silicon remover and
if any tar or tar contaminant is on
the surface use a tar remover to
clean. However, be careful not to
apply too much pressure on thepainted area.
NOTICE
NOTICENOTICE
Page 528 of 546
7-69
7
Maintenance
Interior Care
Interior general precautions
Prevent caustic solutions such as perfume and cosmetic oil, from con-
tacting the interior parts because
they may cause damage or discol-
oration. If they do contact the interior
parts, wipe them off immediately.
See the instructions for the proper
way to clean vinyl.
Never allow water or other liq-uids to come in contact with
electrical/electronic compo-
nents inside the vehicle as this
may damage them.
When cleaning leather products (steering wheel, seats etc.), use
neutral detergents or low alco-
hol content solutions. If you usehigh alcohol content solutions
or acid/alkaline detergents, the
color of the leather may fade or
the surface may get stripped off.
Cleaning the upholstery and
interior trim
Vinyl (if equipped)
Remove dust and loose dirt from
vinyl with a whisk broom or vacuum
cleaner. Clean vinyl surfaces with a
vinyl cleaner.
Fabric (if equipped)
Remove dust and loose dirt from fab-
ric with a whisk broom or vacuum
cleaner. Clean with a mild soap solu-
tion recommended for upholstery or
carpets. Remove fresh spots imme-
diately with a fabric spot cleaner. If
fresh spots do not receive immediate
attention, the fabric can be stained
and its color can be affected. Also, its
fire-resistant properties can be
reduced if the material is not proper-ly maintained.
Using anything but recommended
cleaners and procedures may
affect the fabric's appearance and
fire-resistant properties.
Leather (if equipped)
Feature of Seat Leather
- Leather is made from the outerskin of an animal, which goes through a special process to be
available for use. Since it is a nat-
ural object, each part differs in
thickness or density.
Wrinkles may appear as a natural result of stretching and shrinking
depending on the temperature
and humidity.
- The seat is made of stretchable fabric to improve comfort.
- The parts contacting the body are curved and the side supporting
area is high which provides driv-
ing comfort and stability.
- Wrinkles may appear naturally from usage. It is not a fault of the
products.
NOTICE
NOTICE
Page 529 of 546
7-70
Maintenance
Caring for the leather seats- Vacuum the seat periodically toremove dust and sand on the
seat. It will prevent abrasion ordamage of the leather and main-
tain its quality.
- Wipe the natural leather seat cover often with dry or soft cloth.
- Use of proper leather protective may prevent abrasion of the
cover and helps maintain the
color. Be sure to read the instruc-tions and consult a specialistwhen using leather coating or
protective agent.
- Light colored (beige, cream beige) leather is easily contami-
nated and the stain is noticeable.
Clean the seats frequently.
- Avoid wiping with wet cloth. It may cause the surface to crack. Cleaning the leather seats
- Remove all contaminationsinstantly. Refer to instructions
below for removal of each con-taminant.
- Cosmetic products (sunscreen, foundation, etc.)
Apply cleansing cream on a clothand wipe the contaminate spot.
Wipe off the cream with a wet
cloth and remove water with a drycloth.
- Beverages (coffee, soft drink, etc.)
Apply a small amount of neutraldetergent and wipe until contami-
nations do not smear.
- Oil Remove oil instantly with
absorbable cloth and wipe with
stain remover used only for natu-
ral leather.
- Chewing gum
Harden the gum with ice and
remove gradually.
Wrinkles or abrasions which
appear naturally from usage
are not covered by warranty.
Belts with metallic acces-
sories, zippers or keys inside
the back pocket may damagethe seat fabric.
Make sure not to wet the seat.
It may change the nature of
natural leather.
Jeans or clothes which could
bleach may contaminate the
surface of the seat coveringfabric.
CAUTION
Page 530 of 546
Cleaning the seat belt webbing
Clean the belt webbing with any mild
soap solution recommended for
cleaning upholstery or carpet. Follow
the instructions provided with the
soap. Do not bleach or re-dye the
webbing because this may weakenthe seat belt.
Cleaning the interior windowglass
If the interior glass surfaces of the
vehicle become fogged (that is, cov-
ered with an oily, greasy or waxy
film), they should be cleaned with
glass cleaner. Follow the directions
on the glass cleaner container.
Do not scrape or scratch the
inside of the rear window. This
may result in damage to the rear
window defroster grid.
NOTICE
7-71
7
Maintenance