2022 HYUNDAI IONIQ ELECTRIC brake
[x] Cancel search: brakePage 457 of 546
6-22
What to do in an emergency
When towing your vehicle in an emergency without wheel dollies:
1. While depressing the brake pedalshift to the N (Neutral) position
and turn the vehicle off. The
POWER button will be in the ACCposition.
2. Release the parking brake.
Failure to shift to N (Neutral) may
cause internal damage to the vehi-
cle.
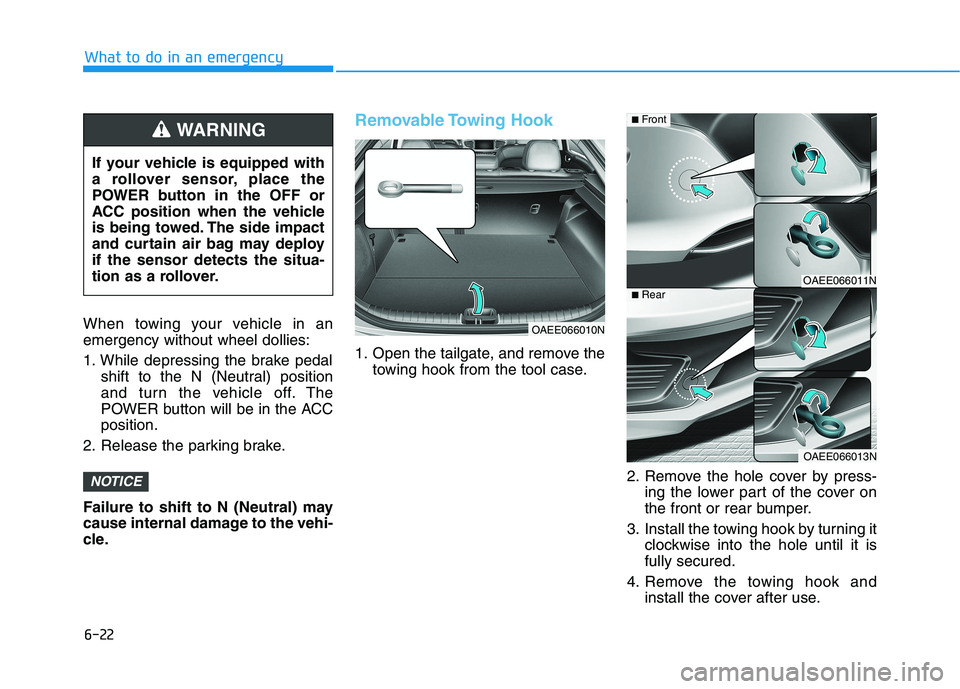
Removable Towing Hook
1. Open the tailgate, and remove the towing hook from the tool case.
2. Remove the hole cover by press-ing the lower part of the cover on
the front or rear bumper.
3. Install the towing hook by turning it clockwise into the hole until it isfully secured.
4. Remove the towing hook and install the cover after use.
NOTICE
If your vehicle is equipped with
a rollover sensor, place the
POWER button in the OFF or
ACC position when the vehicle
is being towed. The side impact
and curtain air bag may deployif the sensor detects the situa-
tion as a rollover.
WARNING
OAEE066010N
OAEE066011N
OAEE066013N
■Front
■Rear
Page 458 of 546
6-23
What to do in an emergency
6
Emergency Towing
If towing is necessary, we recom-
mend you have it done by an author-
ized HYUNDAI dealer or a commer-
cial tow truck service.
If towing service is not available in an
emergency, your vehicle may be
temporarily towed using a cable or
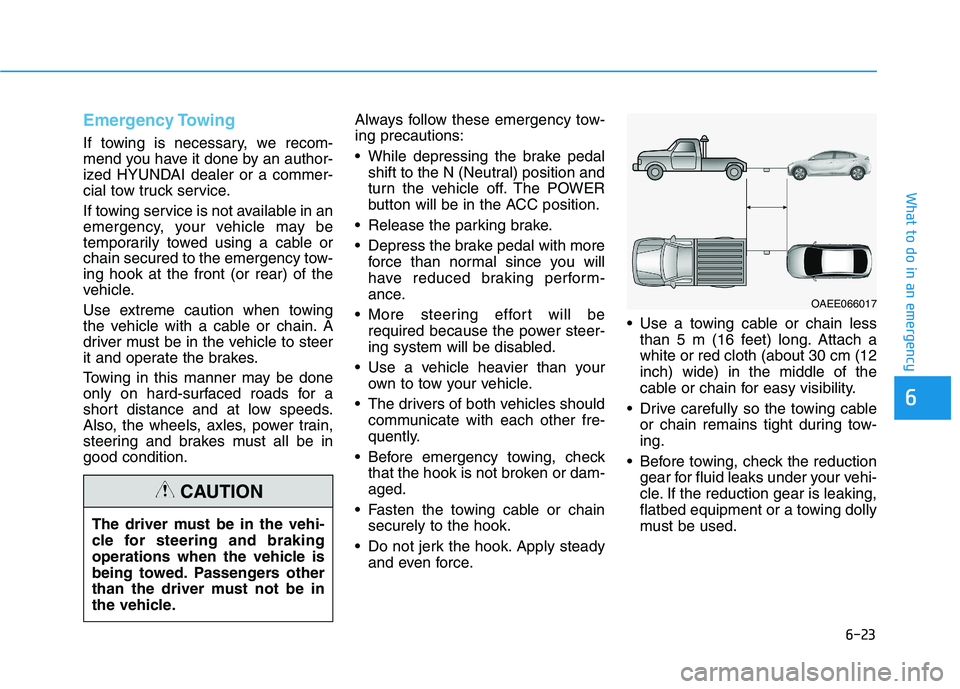
chain secured to the emergency tow-ing hook at the front (or rear) of the
vehicle.
Use extreme caution when towing
the vehicle with a cable or chain. A
driver must be in the vehicle to steer
it and operate the brakes.
Towing in this manner may be done
only on hard-surfaced roads for a
short distance and at low speeds.
Also, the wheels, axles, power train,
steering and brakes must all be ingood condition.Always follow these emergency tow- ing precautions:
While depressing the brake pedal
shift to the N (Neutral) position and
turn the vehicle off. The POWER
button will be in the ACC position.
Release the parking brake.
Depress the brake pedal with more force than normal since you will
have reduced braking perform-
ance.
More steering effort will be required because the power steer-
ing system will be disabled.
Use a vehicle heavier than your own to tow your vehicle.
The drivers of both vehicles should communicate with each other fre-
quently.
Before emergency towing, check that the hook is not broken or dam-aged.
Fasten the towing cable or chain securely to the hook.
Do not jerk the hook. Apply steady and even force. Use a towing cable or chain less
than 5 m (16 feet) long. Attach awhite or red cloth (about 30 cm (12inch) wide) in the middle of the
cable or chain for easy visibility.
Drive carefully so the towing cable or chain remains tight during tow-ing.
Before towing, check the reduction gear for fluid leaks under your vehi-
cle. If the reduction gear is leaking,
flatbed equipment or a towing dolly
must be used.
The driver must be in the vehi-
cle for steering and braking
operations when the vehicle is
being towed. Passengers other
than the driver must not be in
the vehicle.
CAUTION
OAEE066017
Page 460 of 546
7
Maintenance
7
Maintenance
Motor compartment .............................................7-3
Maintenance services ...........................................7-4Owner's Responsibility .....................................................7-4
Owner Maintenance Precautions..................................7-4
Owner maintenance ...............................................7-5 Owner Maintenance Schedule .......................................7-6
Scheduled maintenance services.........................7-7
Explanation of scheduled maintenance items .7-11Coolant...................................................................7-12
Brake fluid ............................................................7-13 Checking the Brake Fluid Level ...................................7-13
Washer fluid .........................................................7-14 Checking the Washer Fluid Level................................7-14
Climate control air filter .....................................7-15 Filter Inspection ...............................................................7-15
Wiper blades .........................................................7-17 Blade Inspection ..............................................................7-17
Blade Replacement .........................................................7-17
12V Battery ...........................................................7-20 For Best Battery Service .............................................7-21
Battery Recharging ........................................................7-21
Reset Features.................................................................7-22 Tires and wheels ..................................................7-23
Tire Care ............................................................................7-23
Recommended Cold Tire Inflation Pressures ...........7-24
Check Tire Inflation Pressure ......................................7-25
Tire Rotation ...................................................................7-26
Wheel Alignment and Tire Balance ............................7-27
Tire Replacement ............................................................7-27
Wheel Replacement ........................................................7-28
Tire Traction ....................................................................7-28
Tire Maintenance ............................................................7-28
Tire Sidewall Labeling ....................................................7-28
Tire Terminology and Definitions ..............................7-32
All Season Tires ...............................................................7-36
Summer Tires ...................................................................7-36
Snow Tires ........................................................................7-36
Radial-Ply Tires ...............................................................7-36
Low Aspect Ratio Tires ................................................7-37
Fuses ......................................................................7-39 Instrument Panel Fuse Replacement .......................7-40
Motor Compartment Panel Fuse Replacement ........7-41
Fuse/Relay Panel Description ......................................7-43
7
Page 462 of 546
7-3
7
Maintenance
MMOOTTOO RR CC OO MM PPAA RRTTMM EENN TT
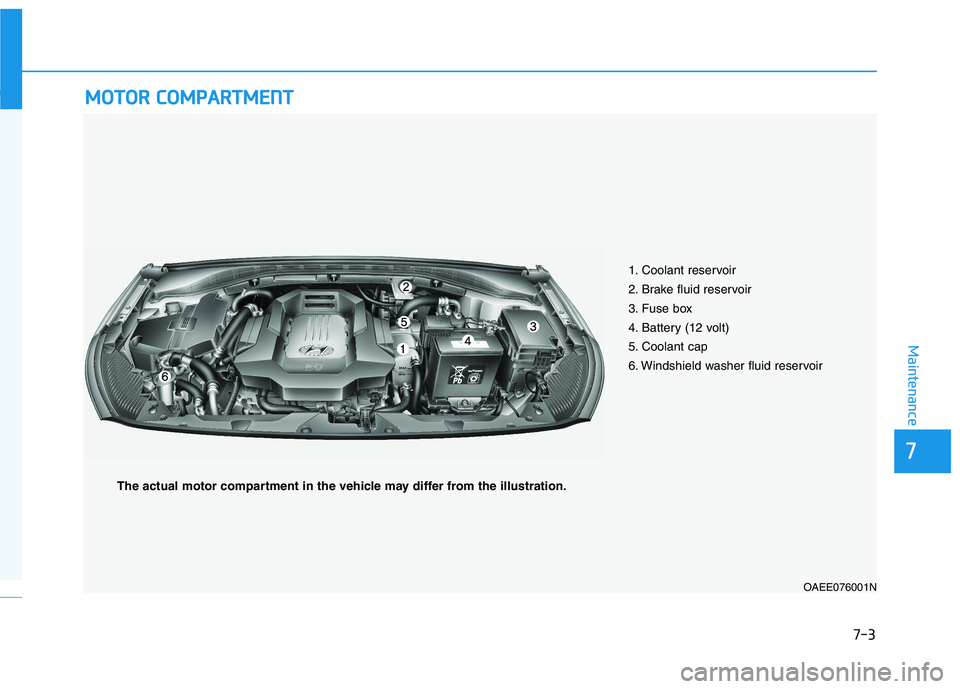
1. Coolant reservoir
2. Brake fluid reservoir
3. Fuse box
4. Battery (12 volt)
5. Coolant cap
6. Windshield washer fluid reservoir
OAEE076001N
The actual motor compartment in the vehicle may differ from the illustration.
Page 464 of 546
7-5
7
Maintenance
OOWW NNEERR MM AAIINN TTEENN AANN CCEE
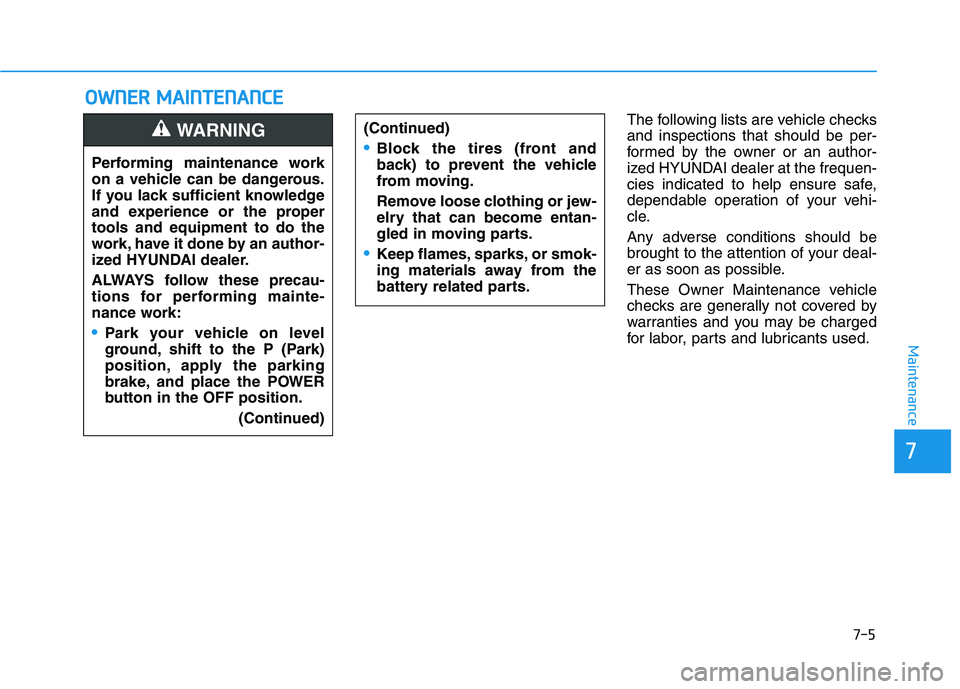
The following lists are vehicle checks and inspections that should be per-
formed by the owner or an author-
ized HYUNDAI dealer at the frequen-
cies indicated to help ensure safe,
dependable operation of your vehi-
cle.
Any adverse conditions should be
brought to the attention of your deal-
er as soon as possible.
These Owner Maintenance vehicle
checks are generally not covered by
warranties and you may be charged
for labor, parts and lubricants used.
Performing maintenance work
on a vehicle can be dangerous.
If you lack sufficient knowledge
and experience or the propertools and equipment to do the
work, have it done by an author-
ized HYUNDAI dealer.
ALWAYS follow these precau-
tions for performing mainte-
nance work:
•Park your vehicle on level
ground, shift to the P (Park)
position, apply the parking
brake, and place the POWER
button in the OFF position.
(Continued)
WARNING (Continued)
Block the tires (front and
back) to prevent the vehicle
from moving.
Remove loose clothing or jew-
elry that can become entan-
gled in moving parts.
Keep flames, sparks, or smok-
ing materials away from the
battery related parts.
Page 465 of 546
7-6
Maintenance
Owner Maintenance Schedule
When you stop for fuel:
• Check coolant level in the coolantreservoir.
Check the windshield washer fluid level.
Check for low or under-inflated tires.
While operating your vehicle:
Check for vibrations in the steeringwheel. Notice if there is any
increased steering effort or loose-
ness in the steering wheel, or
change in its straight-ahead posi-tion.
Notice if your vehicle constantly turns slightly or "pulls" to one side
when traveling on smooth, levelroad.
When stopping, listen and check for unusual sounds, pulling to one
side, increased brake pedal travel
or "hard-to-push" brake pedal.
If any slipping or changes in the operation of your reduction gear
occurs, check the reduction gear
fluid level.
Check the reduction gear P (Park) function.
Check the parking brake.
Check for fluid leaks under your vehicle (water dripping from the air
conditioning system during or after
use is normal).
At least monthly:
Check coolant level in the coolantreservoir.
Check the operation of all exterior lights, including the brake lights,
turn signals and hazard warning
flashers.
Check the inflation pressures of all tires including the spare for tires
that are worn, show uneven wear,or are damaged.
Check for loose wheel lug nuts.
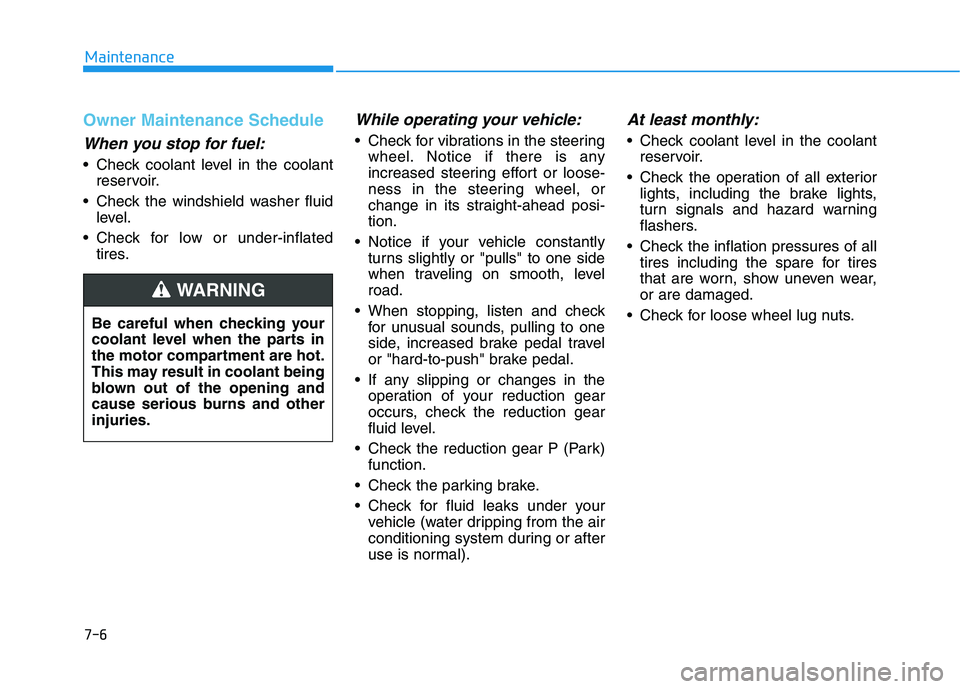
Be careful when checking your
coolant level when the parts in
the motor compartment are hot.
This may result in coolant being
blown out of the opening and
cause serious burns and otherinjuries.
WARNING
Page 466 of 546
7-7
7
Maintenance
At least twice a year:(i.e., every Spring and Fall)
Check radiator, heater and air con- ditioning hoses for leaks or dam-
age.
Check windshield washer spray and wiper operation. Clean wiper
blades with clean cloth dampened
with washer fluid.
Check headlamp alignment.
Check the seat belts for wear and function.
At least once a year:
Clean body and door drain holes.
Lubricate door hinges and hoodhinges.
Lubricate door and hood locks and latches.
Lubricate door rubber weather strips.
Lubricate door checker.
Check the air conditioning system.
Inspect and lubricate reduction gear linkage and controls.
Clean the battery and terminals.
Check the brake fluid level. Follow Normal Maintenance
Schedule if the vehicle is usually
operated where none of the following
conditions apply. If any of the follow-
ing conditions apply, you must follow
the Maintenance Under Severe
Usage Conditions.
Repeated short distance driving.
Driving in dusty conditions or
sandy areas.
Extensive use of brakes.
Driving in areas where salt or other corrosive materials are used.
Driving on rough or muddy roads.
Driving in mountainous areas.
Extended periods of low speed operation.
Driving for a prolonged period in cold temperatures and/or extreme-
ly humid climates.
More than 50% driving in heavy city traffic during hot weather
above 32°C (90°F).
For additional information or assis-
tance see your authorized HYUNDAI
dealer.
SS CC HH EEDD UU LLEE DD MM AAIINN TTEENN AANN CCEE
S
S EE RR VV IICC EE SS
Page 467 of 546
7-8
Maintenance
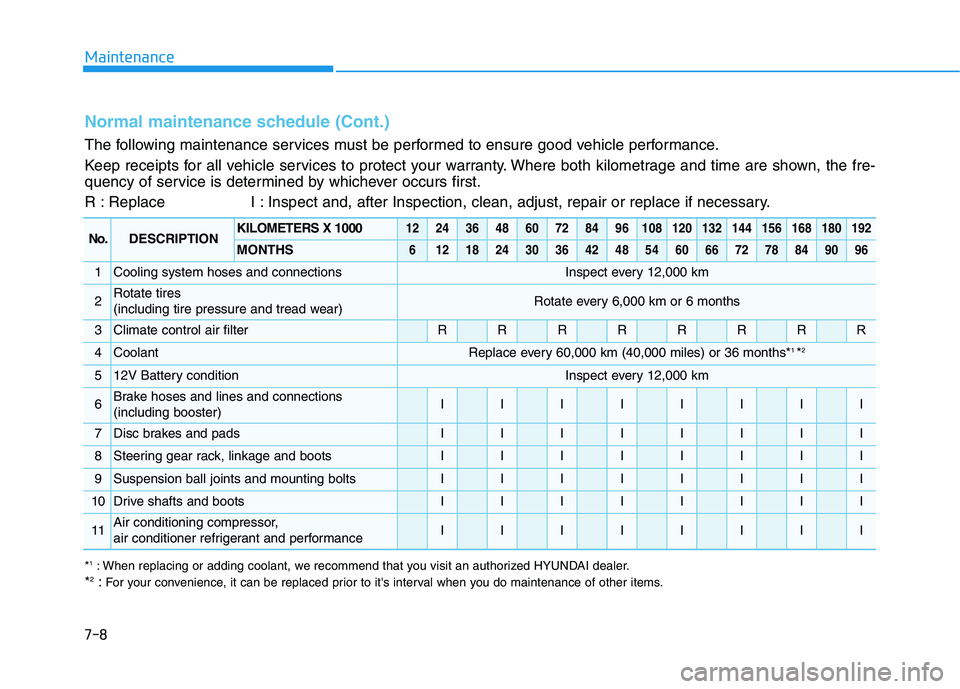
Normal maintenance schedule (Cont.)
The following maintenance services must be performed to ensure good vehicle performance.
Keep receipts for all vehicle services to protect your warranty. Where both kilometrage and time are shown, the fre-
quency of service is determined by whichever occurs first.
R : Replace I : Inspect and, after Inspection, clean, adjust, repair or replace if necessary.
No.DESCRIPTIONKILOMETERS X 10001224364860728496108120132144156168180192
MONTHS6121824303642485460667278849096
1Cooling system hoses and connectionsInspect every 12,000 km
2Rotate tires
(including tire pressure and tread wear)Rotate every 6,000 km or 6 months
3Climate control air filterRRRRRRRR
4CoolantReplace every 60,000 km (40,000 miles) or 36 months*1
*2
512V Battery conditionInspect every 12,000 km
6Brake hoses and lines and connections (including booster)IIIIIIII
7Disc brakes and padsIIIIIIII
8Steering gear rack, linkage and bootsIIIIIIII
9Suspension ball joints and mounting boltsIIIIIIII
10Drive shafts and bootsIIIIIIII
11Air conditioning compressor,
air conditioner refrigerant and performanceIIIIIIII
*
1
: When replacing or adding coolant, we recommend that you visit an authorized HYUNDAI dealer.
* 2
:For your convenience, it can be replaced prior to it's interval when you do maintenance of other items.