Page 468 of 546
7-9
7
Maintenance
Normal maintenance schedule
R : Replace I : Inspect and, after Inspection, clean, adjust, repair or replace if necessary.
No.DESCRIPTIONKILOMETERS X 10001224364860728496108120132144156168180192
MONTHS6121824303642485460667278849096
12Reduction gear oilIII
13Brake pedal free playInspect every 12,000 km
14Brake fluidIIIIIIII
After 192,000 km or 96 months continue to follow the prescribed maintenance intervals.
NOTICE
Page 469 of 546
7-10
Maintenance
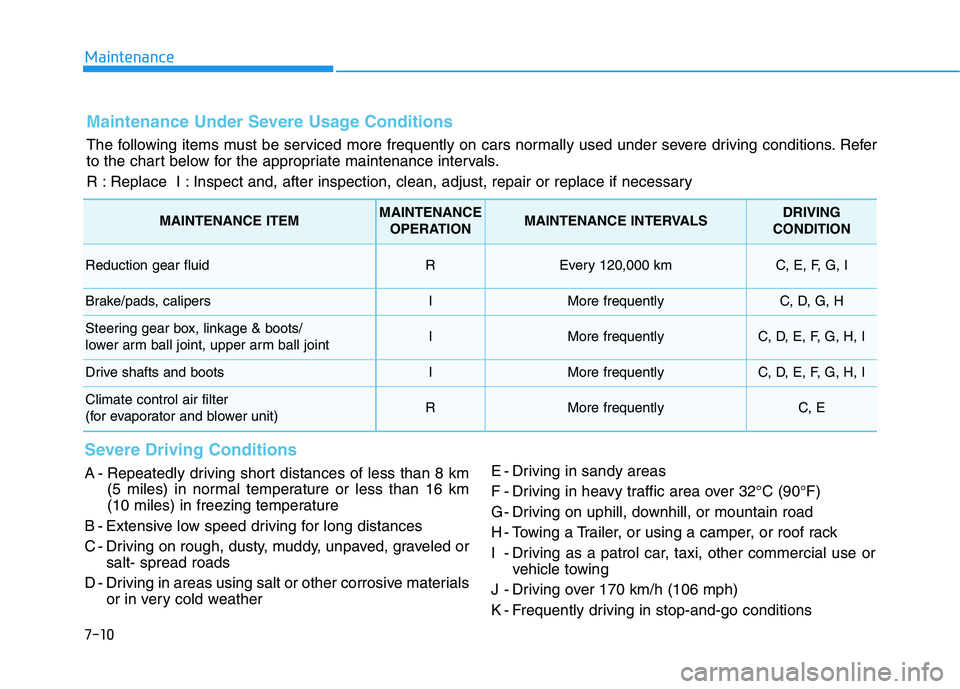
Maintenance Under Severe Usage Conditions
The following items must be serviced more frequently on cars normally used under severe driving conditions. Refer
to the chart below for the appropriate maintenance intervals.
R : Replace I : Inspect and, after inspection, clean, adjust, repair or replace if necessary
Severe Driving Conditions
A - Repeatedly driving short distances of less than 8 km(5 miles) in normal temperature or less than 16 km
(10 miles) in freezing temperature
B - Extensive low speed driving for long distances
C - Driving on rough, dusty, muddy, unpaved, graveled or salt- spread roads
D - Driving in areas using salt or other corrosive materials or in very cold weather E - Driving in sandy areas
F - Driving in heavy traffic area over 32°C (90°F)
G - Driving on uphill, downhill, or mountain road
H - Towing a Trailer, or using a camper, or roof rack
I - Driving as a patrol car, taxi, other commercial use or
vehicle towing
J - Driving over 170 km/h (106 mph)
K - Frequently driving in stop-and-go conditions
MAINTENANCE ITEMMAINTENANCE OPERATIONMAINTENANCE INTERVALSDRIVING
CONDITION
Reduction gear fluid REvery 120,000 kmC, E, F, G, I
Brake/pads, calipersIMore frequentlyC, D, G, H
Steering gear box, linkage & boots/
lower arm ball joint, upper arm ball jointIMore frequentlyC, D, E, F, G, H, I
Drive shafts and bootsIMore frequentlyC, D, E, F, G, H, I
Climate control air filter
(for evaporator and blower unit)RMore frequentlyC, E
Page 470 of 546
7-11
7
Maintenance
EEXX PPLLAA NN AATTIIOO NN OO FF SS CC HH EEDD UU LLEE DD MM AAIINN TTEENN AANN CCEE IITT EEMM SS
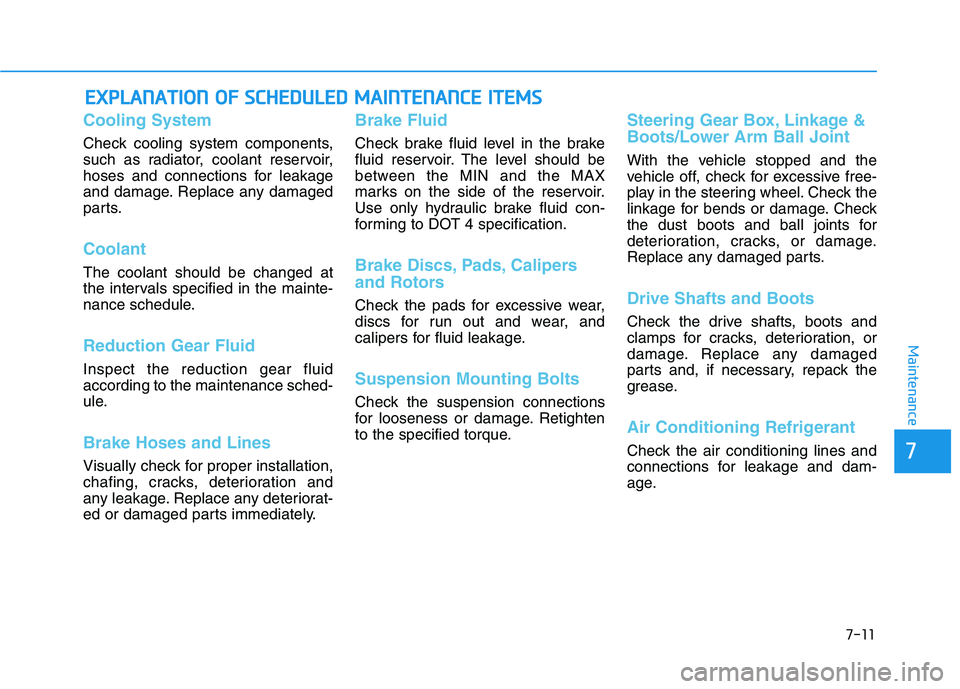
Cooling System
Check cooling system components,
such as radiator, coolant reservoir,
hoses and connections for leakage
and damage. Replace any damaged
parts.
Coolant
The coolant should be changed at
the intervals specified in the mainte-
nance schedule.
Reduction Gear Fluid
Inspect the reduction gear fluid according to the maintenance sched-
ule.
Brake Hoses and Lines
Visually check for proper installation,
chafing, cracks, deterioration and
any leakage. Replace any deteriorat-
ed or damaged parts immediately.
Brake Fluid
Check brake fluid level in the brake
fluid reservoir. The level should be
between the MIN and the MAX
marks on the side of the reservoir.
Use only hydraulic brake fluid con-
forming to DOT 4 specification.
Brake Discs, Pads, Calipers
and Rotors
Check the pads for excessive wear,
discs for run out and wear, and
calipers for fluid leakage.
Suspension Mounting Bolts
Check the suspension connections
for looseness or damage. Retighten
to the specified torque.
Steering Gear Box, Linkage &
Boots/Lower Arm Ball Joint
With the vehicle stopped and the
vehicle off, check for excessive free-
play in the steering wheel. Check the
linkage for bends or damage. Check
the dust boots and ball joints for
deterioration, cracks, or damage.
Replace any damaged parts.
Drive Shafts and Boots
Check the drive shafts, boots and
clamps for cracks, deterioration, or
damage. Replace any damaged
parts and, if necessary, repack the
grease.
Air Conditioning Refrigerant
Check the air conditioning lines and
connections for leakage and dam-
age.
Page 472 of 546
7-13
7
Maintenance
BBRRAA KKEE FF LLUU IIDD
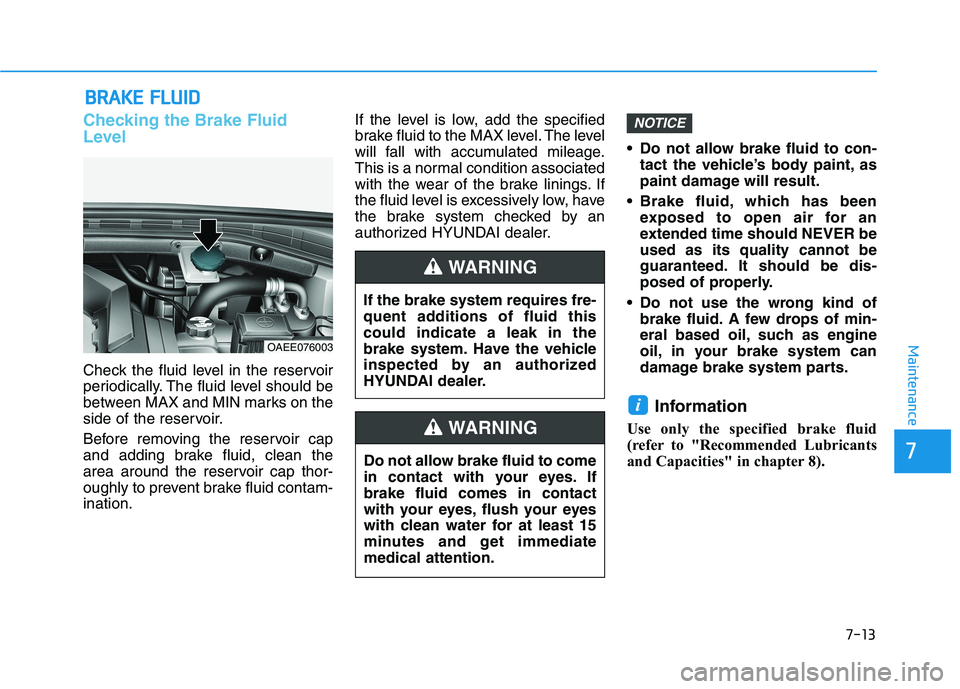
Checking the Brake Fluid
Level
Check the fluid level in the reservoir
periodically. The fluid level should be
between MAX and MIN marks on the
side of the reservoir.
Before removing the reservoir cap
and adding brake fluid, clean the
area around the reservoir cap thor-
oughly to prevent brake fluid contam-ination. If the level is low, add the specified
brake fluid to the MAX level. The level
will fall with accumulated mileage.
This is a normal condition associated
with the wear of the brake linings. If
the fluid level is excessively low, have
the brake system checked by an
authorized HYUNDAI dealer.
Do not allow brake fluid to con-
tact the vehicle’s body paint, as
paint damage will result.
Brake fluid, which has been exposed to open air for an
extended time should NEVER beused as its quality cannot be
guaranteed. It should be dis-
posed of properly.
Do not use the wrong kind of brake fluid. A few drops of min-
eral based oil, such as engine
oil, in your brake system can
damage brake system parts.
Information
Use only the specified brake fluid
(refer to "Recommended Lubricants
and Capacities" in chapter 8).
i
NOTICE
If the brake system requires fre-
quent additions of fluid thiscould indicate a leak in the
brake system. Have the vehicle
inspected by an authorized
HYUNDAI dealer.
WARNING
Do not allow brake fluid to come
in contact with your eyes. Ifbrake fluid comes in contact
with your eyes, flush your eyes
with clean water for at least 15
minutes and get immediatemedical attention.
WARNING
OAEE076003
Page 482 of 546
7-23
7
Maintenance
TTIIRR EESS AA NN DD WW HHEEEELLSS
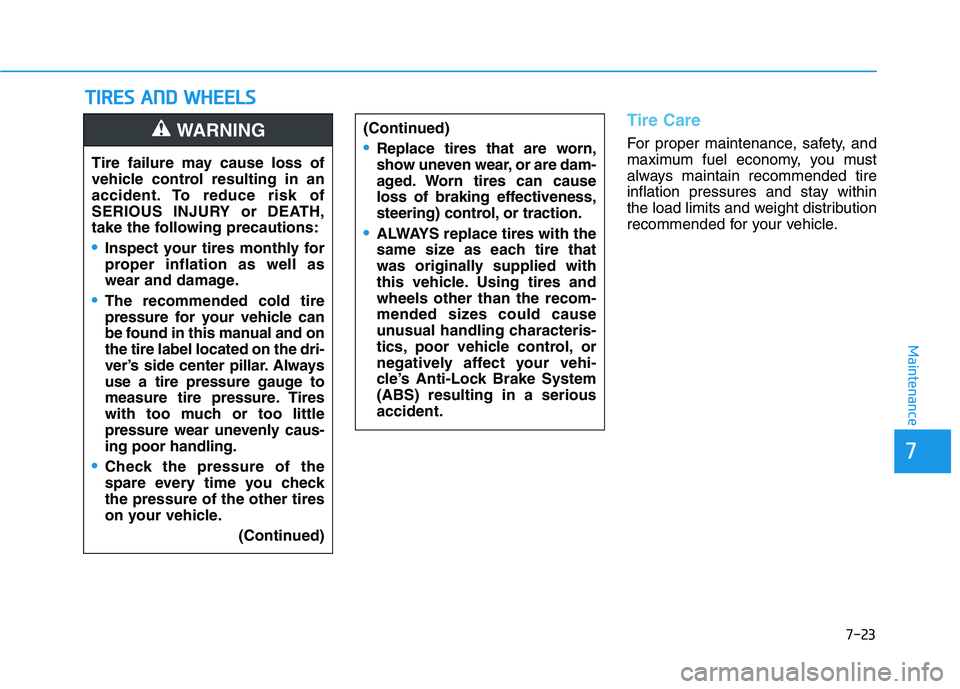
Tire Care
For proper maintenance, safety, and
maximum fuel economy, you must
always maintain recommended tire
inflation pressures and stay within
the load limits and weight distribution
recommended for your vehicle.
(Continued)Replace tires that are worn,
show uneven wear, or are dam-
aged. Worn tires can cause
loss of braking effectiveness,
steering) control, or traction.
ALWAYS replace tires with the
same size as each tire that
was originally supplied with
this vehicle. Using tires andwheels other than the recom-
mended sizes could cause
unusual handling characteris-
tics, poor vehicle control, or
negatively affect your vehi-
cle’s Anti-Lock Brake System(ABS) resulting in a seriousaccident.
Tire failure may cause loss of
vehicle control resulting in an
accident. To reduce risk of
SERIOUS INJURY or DEATH,
take the following precautions:
Inspect your tires monthly for
proper inflation as well as
wear and damage.
The recommended cold tire
pressure for your vehicle can
be found in this manual and onthe tire label located on the dri-
ver’s side center pillar. Always
use a tire pressure gauge to
measure tire pressure. Tires
with too much or too little
pressure wear unevenly caus-ing poor handling.
Check the pressure of the
spare every time you checkthe pressure of the other tires
on your vehicle.
(Continued)
WARNING
Page 485 of 546
7-26
Maintenance
Tire Rotation
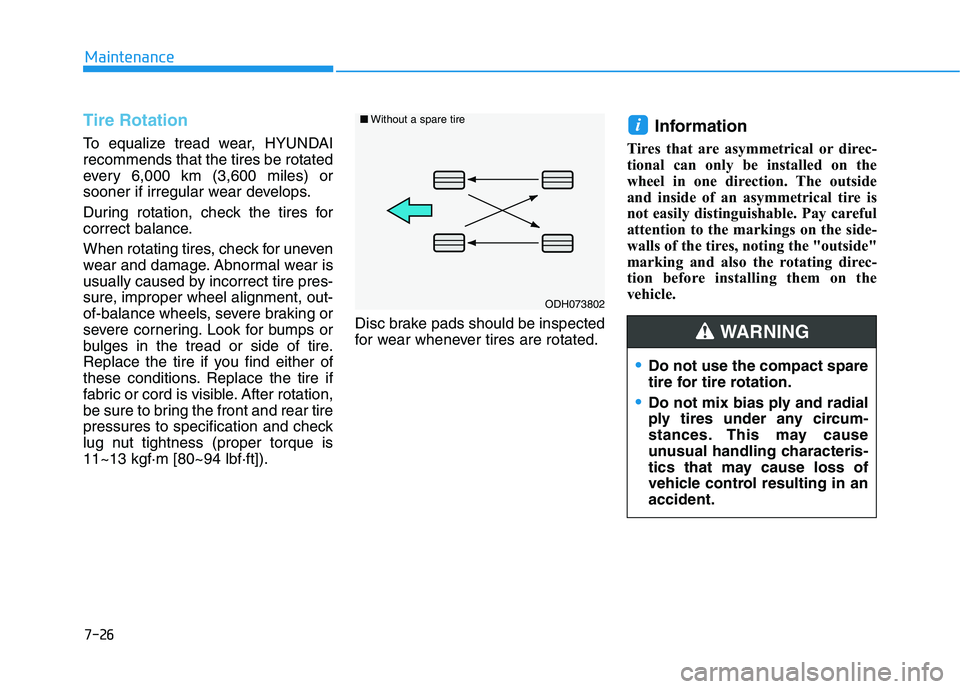
To equalize tread wear, HYUNDAI recommends that the tires be rotated
every 6,000 km (3,600 miles) or
sooner if irregular wear develops.
During rotation, check the tires for
correct balance.
When rotating tires, check for uneven
wear and damage. Abnormal wear is
usually caused by incorrect tire pres-
sure, improper wheel alignment, out-
of-balance wheels, severe braking or
severe cornering. Look for bumps or
bulges in the tread or side of tire.
Replace the tire if you find either of
these conditions. Replace the tire if
fabric or cord is visible. After rotation,
be sure to bring the front and rear tire
pressures to specification and check
lug nut tightness (proper torque is11~13 kgf·m [80~94 lbf·ft]).Disc brake pads should be inspected
for wear whenever tires are rotated. Information
Tires that are asymmetrical or direc-
tional can only be installed on the
wheel in one direction. The outside
and inside of an asymmetrical tire is
not easily distinguishable. Pay careful
attention to the markings on the side-
walls of the tires, noting the "outside"
marking and also the rotating direc-
tion before installing them on the
vehicle.
i
Do not use the compact spare
tire for tire rotation.
Do not mix bias ply and radial
ply tires under any circum-
stances. This may cause
unusual handling characteris-
tics that may cause loss of
vehicle control resulting in anaccident.
WARNING
ODH073802
■ Without a spare tire
Page 486 of 546
7-27
7
Maintenance
Wheel Alignment and Tire Balance
The wheels on your vehicle were aligned and balanced carefully at the
factory to give you the longest tire life
and best overall performance.
In most cases, you will not need to
have your wheels aligned again.
However, if you notice unusual tire
wear or your vehicle pulling one way
or the other, the alignment may needto be reset.
If you notice your vehicle vibrating
when driving on a smooth road, your
wheels may need to be rebalanced.
Improper wheel weights can dam-
age your vehicle’s aluminum
wheels. Use only approved wheelweights.
Tire Replacement
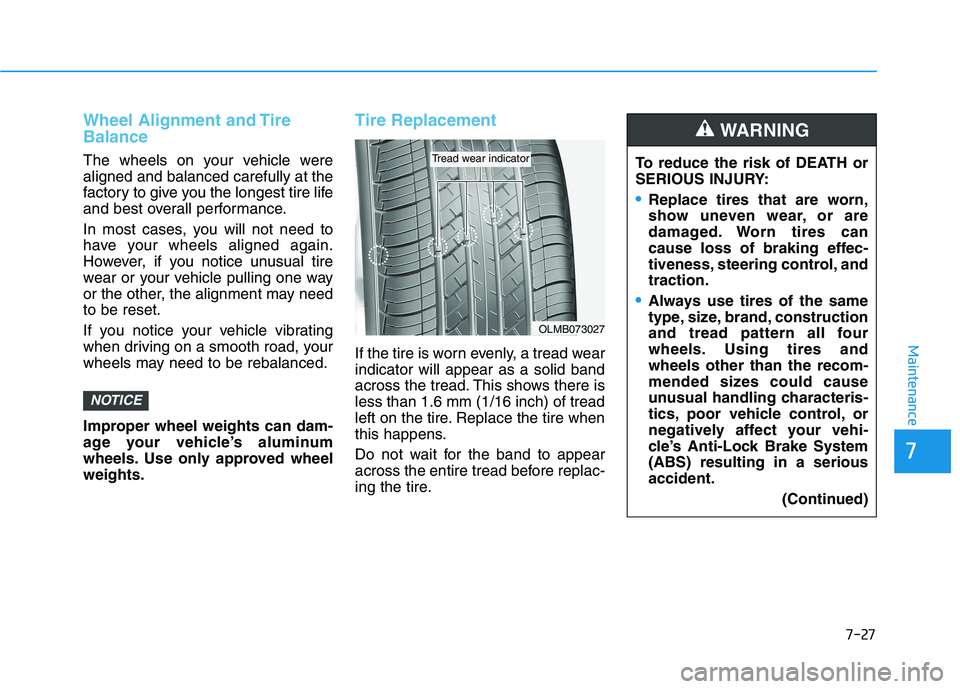
If the tire is worn evenly, a tread wear indicator will appear as a solid band
across the tread. This shows there isless than 1.6 mm (1/16 inch) of tread
left on the tire. Replace the tire when
this happens.
Do not wait for the band to appear
across the entire tread before replac-
ing the tire.
NOTICE
OLMB073027
Tread wear indicatorTo reduce the risk of DEATH or
SERIOUS INJURY:
Replace tires that are worn,
show uneven wear, or are
damaged. Worn tires can
cause loss of braking effec-
tiveness, steering control, andtraction.
Always use tires of the same
type, size, brand, construction
and tread pattern all four
wheels. Using tires andwheels other than the recom-
mended sizes could cause
unusual handling characteris-
tics, poor vehicle control, or
negatively affect your vehi-
cle’s Anti-Lock Brake System(ABS) resulting in a seriousaccident.
(Continued)
WARNING
Page 503 of 546
7-44
Maintenance
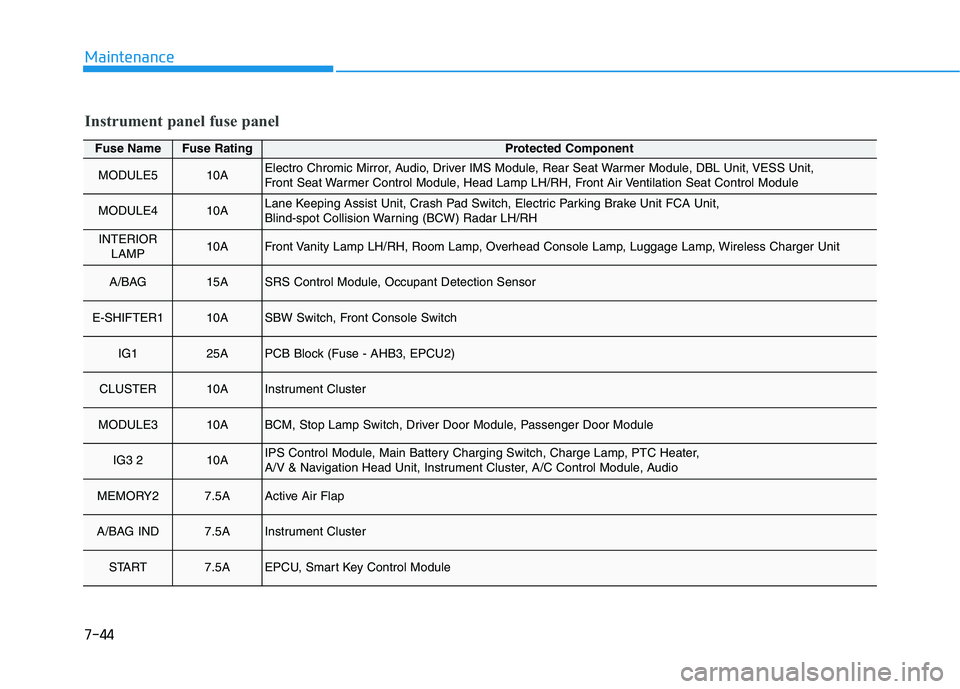
Fuse NameFuse RatingProtected Component
MODULE510AElectro Chromic Mirror, Audio, Driver IMS Module, Rear Seat Warmer Module, DBL Unit, VESS Unit,
Front Seat Warmer Control Module, Head Lamp LH/RH, Front Air Ventilation Seat Control Module
MODULE410ALane Keeping Assist Unit, Crash Pad Switch, Electric Parking Brake Unit FCA Unit,
Blind-spot Collision Warning (BCW) Radar LH/RH
INTERIORLAMP10AFront Vanity Lamp LH/RH, Room Lamp, Overhead Console Lamp, Luggage Lamp, Wireless Charger Unit
A/BAG 15ASRS Control Module, Occupant Detection Sensor
E-SHIFTER110ASBW Switch, Front Console Switch
IG125APCB Block (Fuse - AHB3, EPCU2)
CLUSTER10AInstrument Cluster
MODULE310ABCM, Stop Lamp Switch, Driver Door Module, Passenger Door Module
IG3 210AIPS Control Module, Main Battery Charging Switch, Charge Lamp, PTC Heater,
A/V & Navigation Head Unit, Instrument Cluster, A/C Control Module, Audio
MEMORY27.5AActive Air Flap
A/BAG IND7.5AInstrument Cluster
START7.5AEPCU, Smart Key Control Module
Instrument panel fuse panel