Page 437 of 529
Emergency Situations
8-16
if you Have a flaT Tire (WiTH sPare Tire)
WARNING
Changing a tire can be dangerous.
Follow the instructions in this section
when changing a tire to reduce the risk
of serious injury or death.
CAUTION
Be careful as you use the jack handle to
stay clear of the flat end. The flat end
has sharp edges that could cause cuts.
Jack and Tools
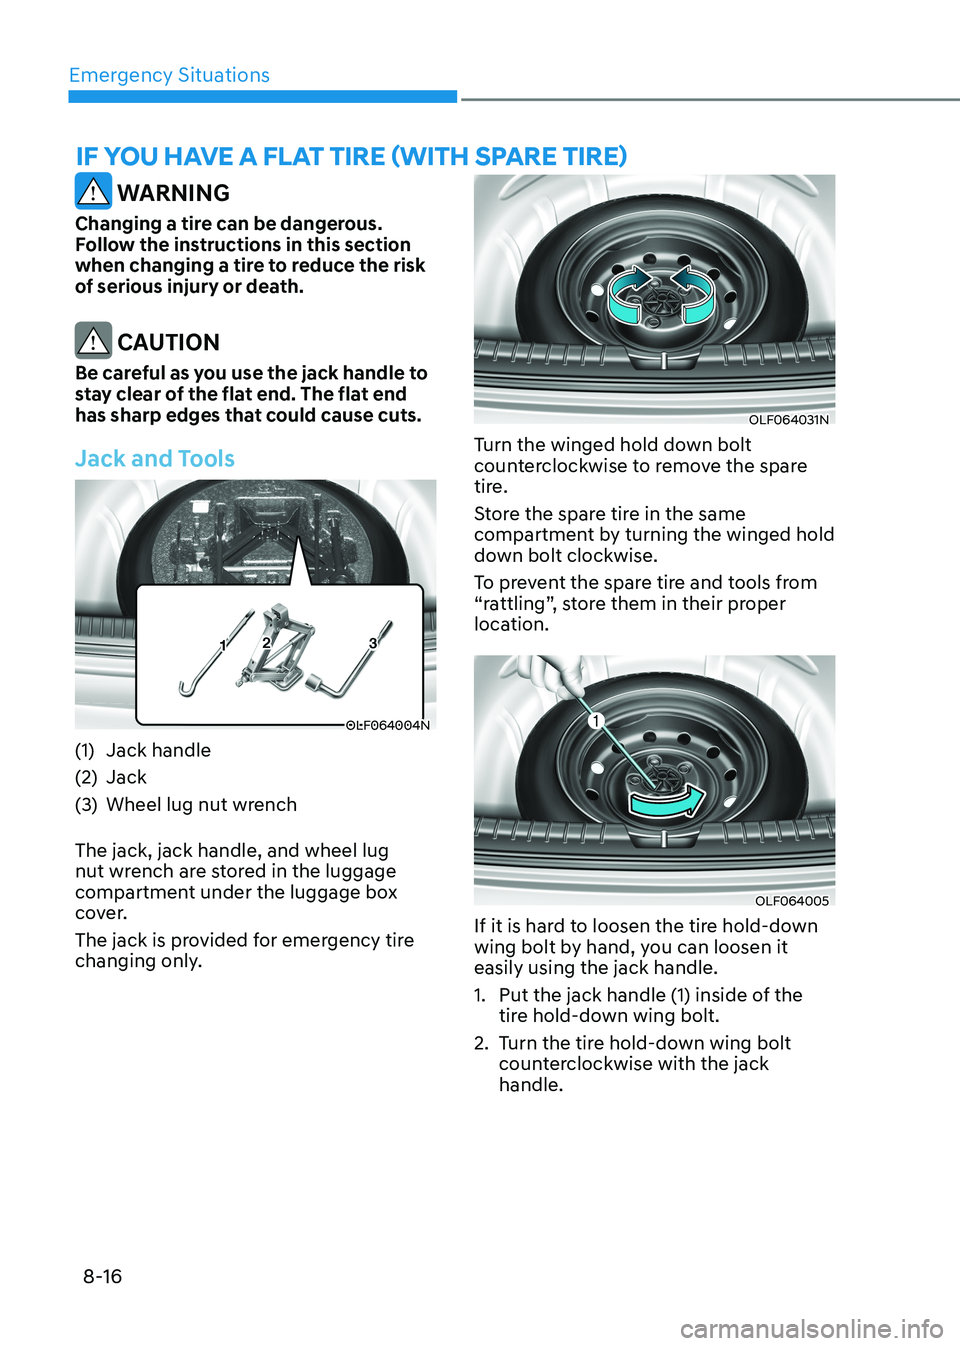
OLF064004N
(1) Jack handle
(2) Jack
(3) Wheel lug nut wrench The jack, jack handle, and wheel lug
nut wrench are stored in the luggage
compartment under the luggage box
cover.
The jack is provided for emergency tire
changing only.
OLF064031N
Turn the winged hold down bolt
counterclockwise to remove the spare
tire.
Store the spare tire in the same
compartment by turning the winged hold
down bolt clockwise.
To prevent the spare tire and tools from
“rattling”, store them in their proper
location.
OLF064005
If it is hard to loosen the tire hold-down
wing bolt by hand, you can loosen it easily using the jack handle.
1. Put the jack handle (1) inside of the tire hold-down wing bolt.
2. Turn the tire hold-down wing bolt counterclockwise with the jack handle.
Page 438 of 529
08
8-17
Changing Tires
WARNING
A vehicle can slip or roll off of a jack
causing serious injury or death to you or
those nearby. Take the following safety
precautions: • Never place any portion of your body
under a vehicle that is supported by a jack.
• NEVER attempt to change a tire in
the lane of traffic. ALWAYS move the
vehicle completely off the road on
level, firm ground away from traffic
before trying to change a tire. If you
cannot find a level, firm place off
the road, call a towing service for
assistance.
• Be sure to use the jack provided with
the vehicle.
• ALWAYS place the jack on the
designated jacking positions on the
vehicle and NEVER on the bumpers
or any other part of the vehicle for jacking support.
• Do not start or run the engine while
the vehicle is on the jack.
• Do not allow anyone to remain in the
vehicle while it is on the jack.
• Keep children away from the road
and the vehicle. Follow these steps to change your
vehicle’s tire:
1. Park on a level, firm surface.
2. Shift the shift button into P (Park).
3. Press the hazard warning flasher
button.
4. Remove the wheel lug nut wrench,
jack, jack handle, and spare tire from
the vehicle.
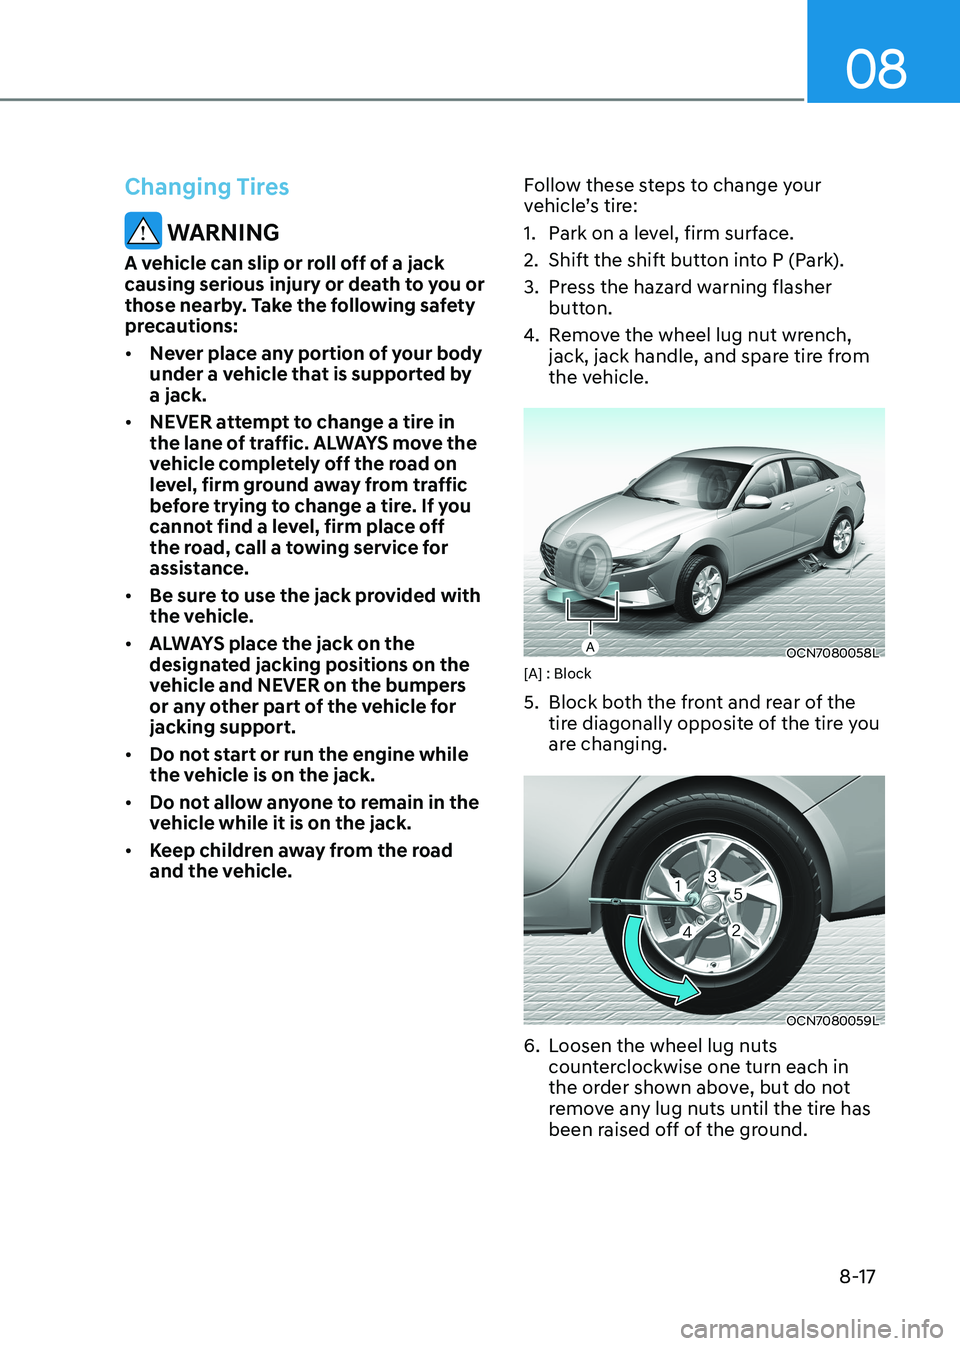
OCN7080058L
[A] : Block
5. Block both the front and rear of the
tire diagonally opposite of the tire you
are changing.
OCN7080059L
6. Loosen the wheel lug nuts counterclockwise one turn each in
the order shown above, but do not
remove any lug nuts until the tire has
been raised off of the ground.
Page 439 of 529
Emergency Situations
8-18
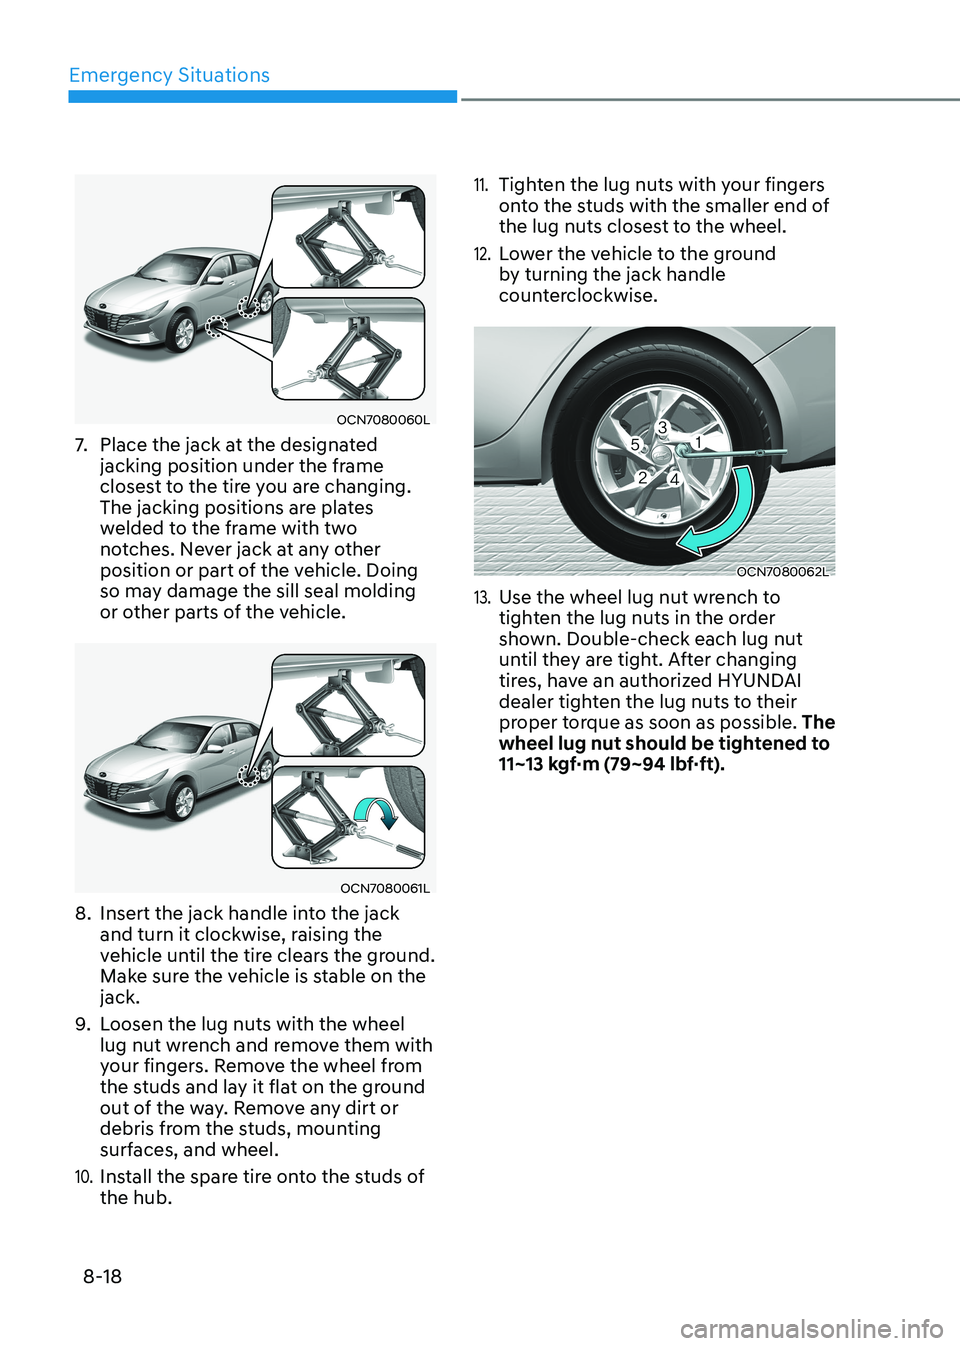
OCN7080060L
7. Place the jack at the designated
jacking position under the frame
closest to the tire you are changing.
The jacking positions are plates
welded to the frame with two
notches. Never jack at any other
position or part of the vehicle. Doing
so may damage the sill seal molding
or other parts of the vehicle.
OCN7080061L
8. Insert the jack handle into the jack and turn it clockwise, raising the
vehicle until the tire clears the ground.
Make sure the vehicle is stable on the jack.
9. Loosen the lug nuts with the wheel
lug nut wrench and remove them with
your fingers. Remove the wheel from
the studs and lay it flat on the ground
out of the way. Remove any dirt or
debris from the studs, mounting
surfaces, and wheel.
10. Install the spare tire onto the studs of the hub.
11. Tighten the lug nuts with your fingers
onto the studs with the smaller end of
the lug nuts closest to the wheel.
12. Lower the vehicle to the ground
by turning the jack handle
counterclockwise.
OCN7080062L
13. Use the wheel lug nut wrench to
tighten the lug nuts in the order
shown. Double-check each lug nut
until they are tight. After changing
tires, have an authorized HYUNDAI
dealer tighten the lug nuts to their
proper torque as soon as possible. The
wheel lug nut should be tightened to
11~13 kgf·m (79~94 lbf·ft).
Page 445 of 529
Emergency Situations
8-24
Removable Towing Hook
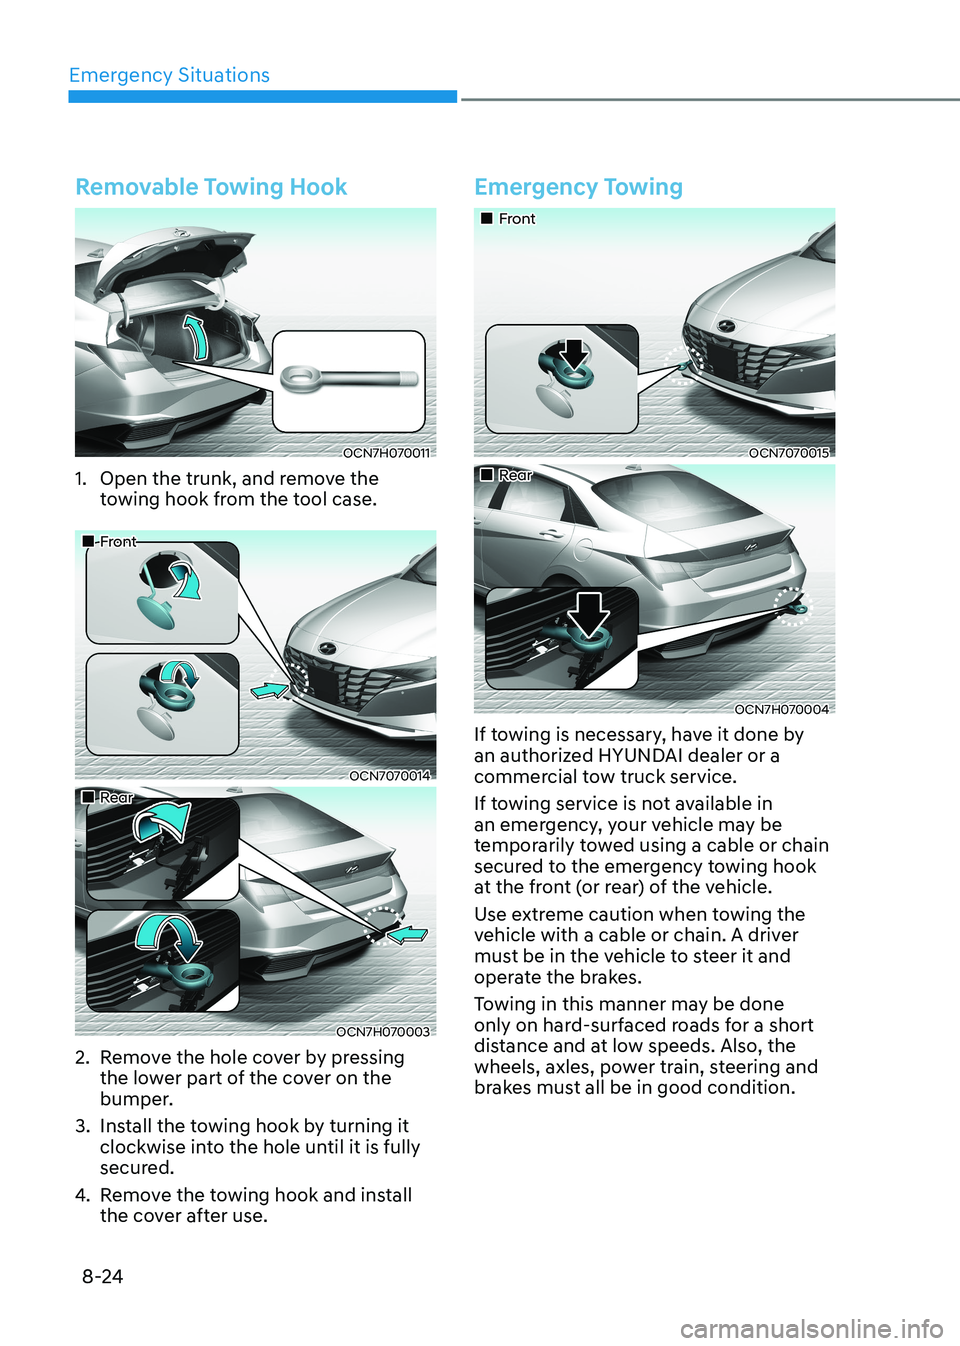
OCN7H070011
1. Open the trunk, and remove the towing hook from the tool case.
„„Front
OCN7070014
„„Rear
OCN7H070003
2. Remove the hole cover by pressing the lower part of the cover on the
bumper.
3. Install the towing hook by turning it clockwise into the hole until it is fully
secured.
4. Remove the towing hook and install
the cover after use.
Emergency Towing
„„Front
OCN7070015
„„Rear
OCN7H070004
If towing is necessary, have it done by
an authorized HYUNDAI dealer or a
commercial tow truck service.
If towing service is not available in
an emergency, your vehicle may be
temporarily towed using a cable or chain
secured to the emergency towing hook
at the front (or rear) of the vehicle.
Use extreme caution when towing the
vehicle with a cable or chain. A driver
must be in the vehicle to steer it and
operate the brakes.
Towing in this manner may be done
only on hard-surfaced roads for a short
distance and at low speeds. Also, the
wheels, axles, power train, steering and
brakes must all be in good condition.
Page 465 of 529
Maintenance
9-16
WARNING
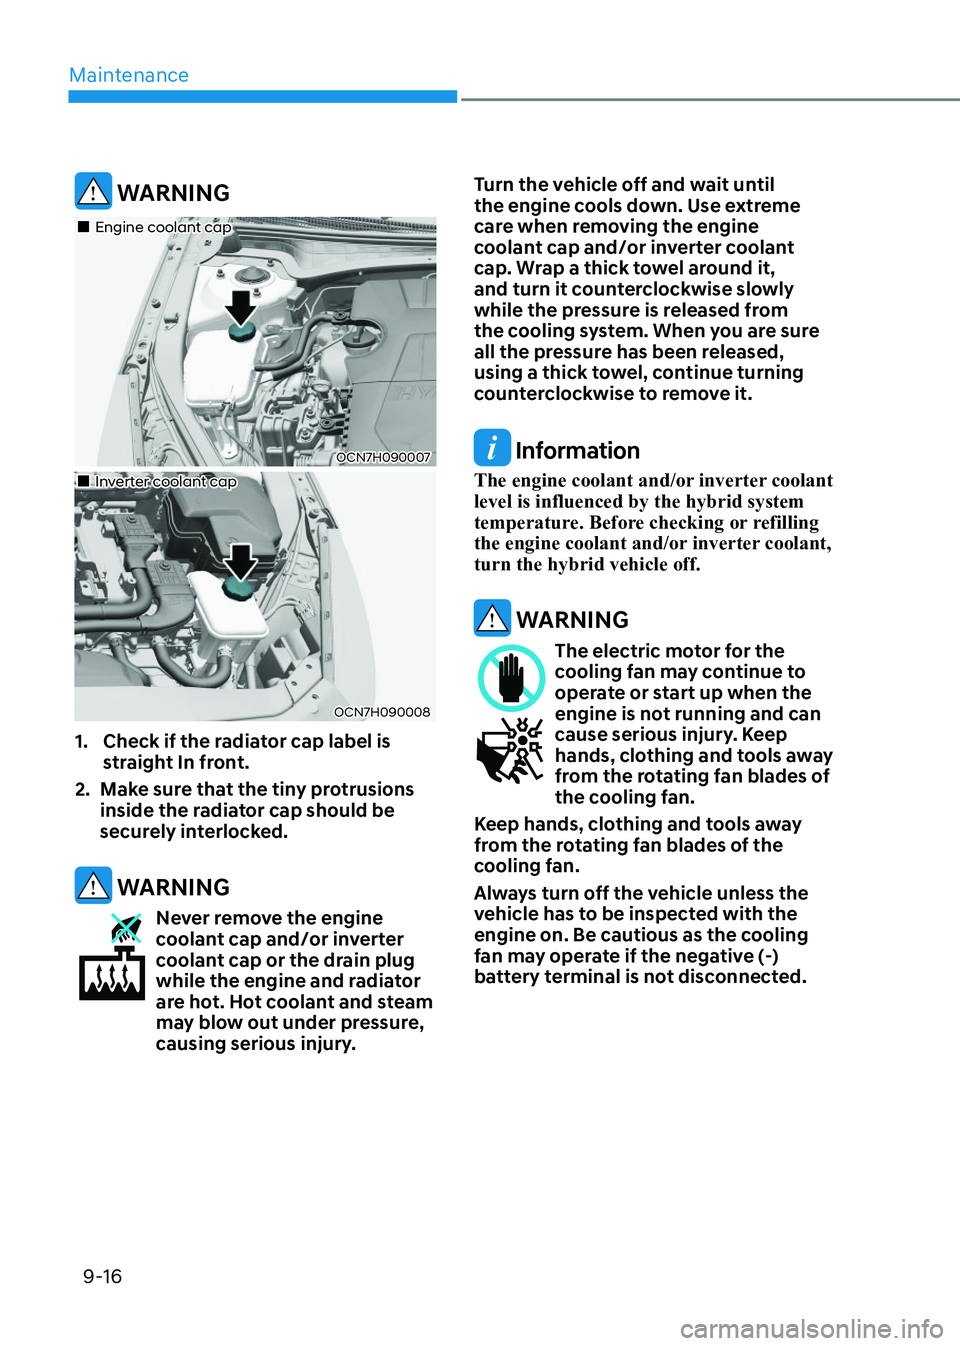
OCN7H090007OCN7H090007
Engine coolant capEngine coolant cap
OCN7H090008OCN7H090008
Inverter coolant capInverter coolant cap
1. Check if the radiator cap label is straight In front.
2. Make sure that the tiny protrusions inside the radiator cap should be
securely interlocked.
WARNING
Never remove the engine
coolant cap and/or inverter
coolant cap or the drain plug
while the engine and radiator
are hot. Hot coolant and steam
may blow out under pressure,
causing serious injury. Turn the vehicle off and wait until
the engine cools down. Use extreme
care when removing the engine
coolant cap and/or inverter coolant
cap. Wrap a thick towel around it,
and turn it counterclockwise slowly
while the pressure is released from
the cooling system. When you are sure
all the pressure has been released,
using a thick towel, continue turning
counterclockwise to remove it.
Information
The engine coolant and/or inverter coolant level is influenced by the hybrid system
temperature. Before checking or refilling
the engine coolant and/or inverter coolant, turn the hybrid vehicle off.
WARNING
The electric motor for the
cooling fan may continue to
operate or start up when the
engine is not running and can
cause serious injury. Keep
hands, clothing and tools away
from the rotating fan blades of
the cooling fan.
Keep hands, clothing and tools away
from the rotating fan blades of the
cooling fan.
Always turn off the vehicle unless the
vehicle has to be inspected with the engine on. Be cautious as the cooling
fan may operate if the negative (-)
battery terminal is not disconnected.
Page 502 of 529
09
9-53
Headlamp/Daytime running light (DRL) / Parking lamp (LED type)
If the lamp (LED) does not operate, have
the system checked by an authorized
HYUNDAI dealer.
The LED lamps cannot be replaced as
a single unit because it is an integrated
unit. The LED lamps have to be replaced with the unit.
A skilled technician should check or
repair the LED lamp, for it may damage
related parts of the vehicle.
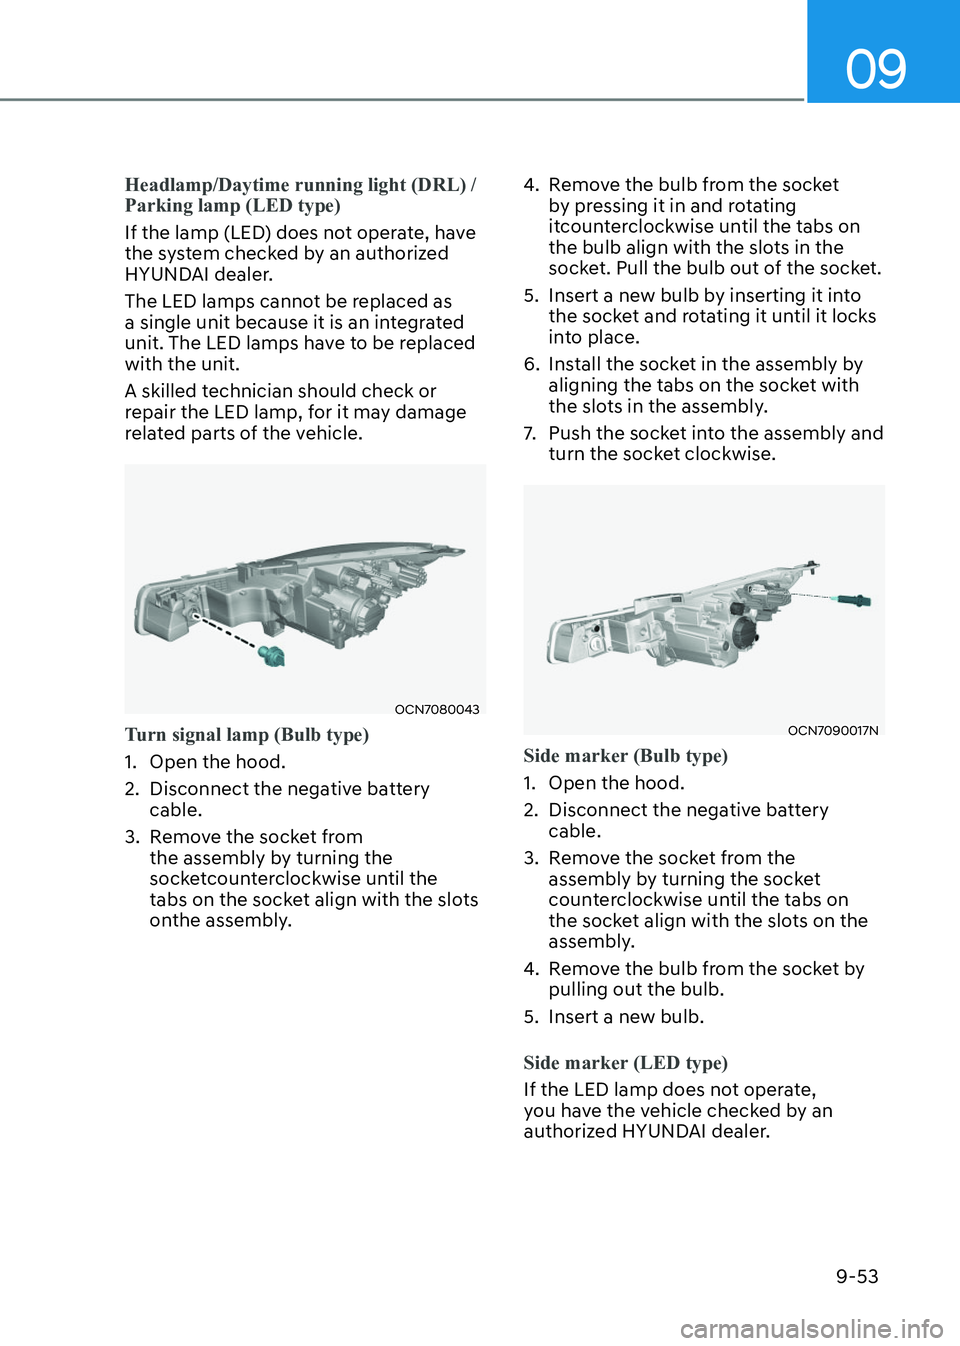
OCN7080043OCN7080043
Turn signal lamp (Bulb type)
1. Open the hood.
2. Disconnect the negative battery cable.
3. Remove the socket from the assembly by turning the
socketcounterclockwise until the
tabs on the socket align with the slots
onthe assembly. 4. Remove the bulb from the socket
by pressing it in and rotating
itcounterclockwise until the tabs on
the bulb align with the slots in the
socket. Pull the bulb out of the socket.
5. Insert a new bulb by inserting it into the socket and rotating it until it locks
into place.
6. Install the socket in the assembly by aligning the tabs on the socket with
the slots in the assembly.
7. Push the socket into the assembly and turn the socket clockwise.
OCN7090017NOCN7090017N
Side marker (Bulb type)
1. Open the hood.
2. Disconnect the negative battery cable.
3. Remove the socket from the assembly by turning the socket
counterclockwise until the tabs on
the socket align with the slots on the
assembly.
4. Remove the bulb from the socket by pulling out the bulb.
5. Insert a new bulb.
Side marker (LED type)
If the LED lamp does not operate,
you have the vehicle checked by an
authorized HYUNDAI dealer.
Page 504 of 529
09
9-55
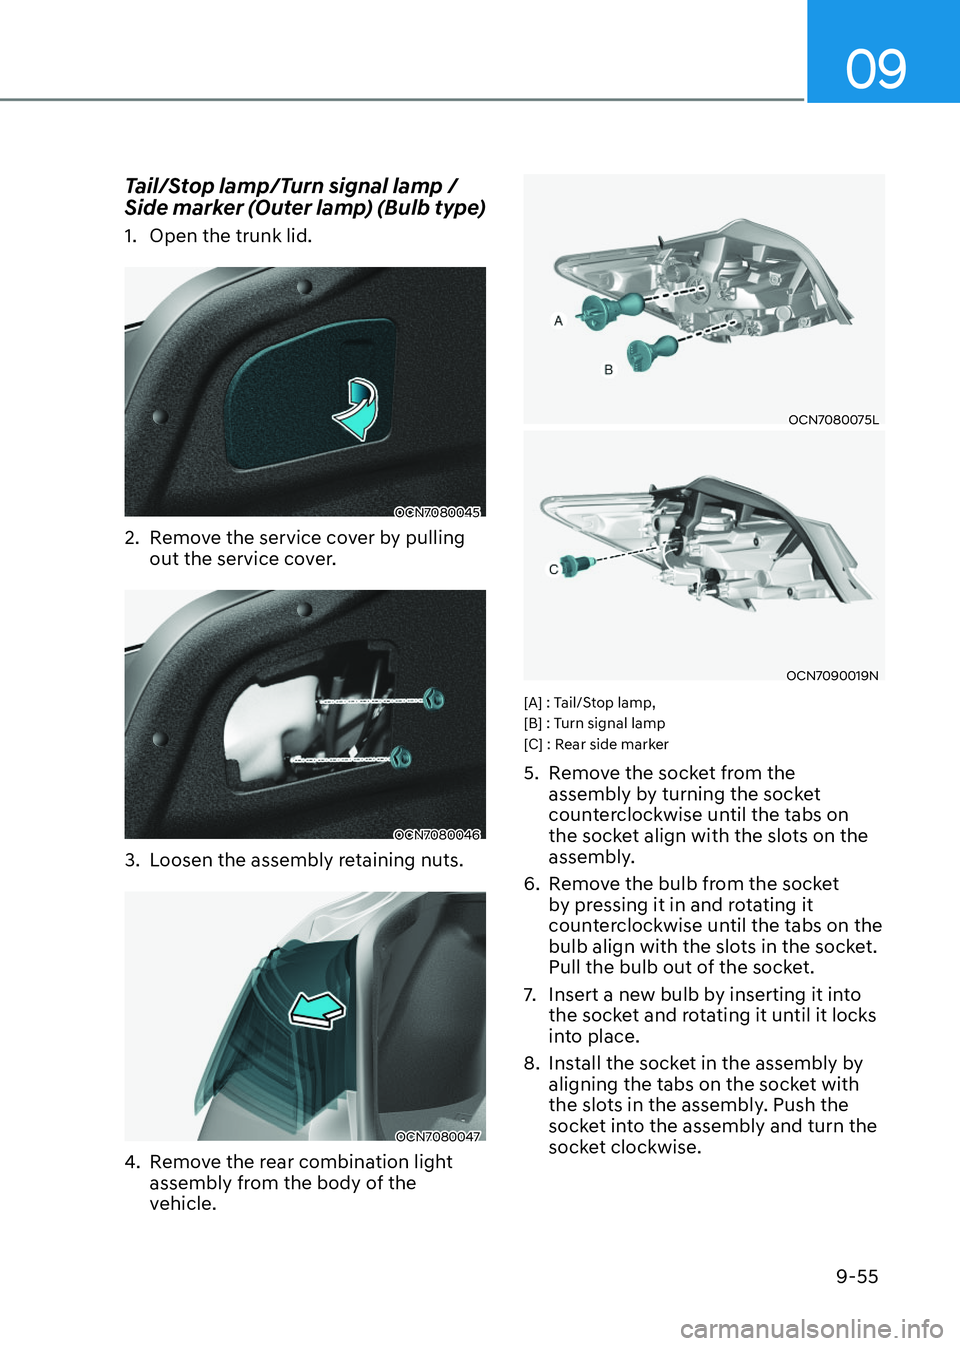
Tail/Stop lamp/Turn signal lamp /
Side marker (Outer lamp) (Bulb type)
1. Open the trunk lid.
OCN7080045OCN7080045
2. Remove the service cover by pulling out the service cover.
OCN7080046OCN7080046
3. Loosen the assembly retaining nuts.
OCN7080047OCN7080047
4. Remove the rear combination light assembly from the body of the
vehicle.
OCN7080075LOCN7080075L
OCN7090019NOCN7090019N
[A] : Tail/Stop lamp,
[B] : Turn signal lamp
[C] : Rear side marker
5. Remove the socket from the assembly by turning the socket
counterclockwise until the tabs on
the socket align with the slots on the
assembly.
6. Remove the bulb from the socket by pressing it in and rotating it
counterclockwise until the tabs on the
bulb align with the slots in the socket.
Pull the bulb out of the socket.
7. Insert a new bulb by inserting it into the socket and rotating it until it locks
into place.
8. Install the socket in the assembly by aligning the tabs on the socket with
the slots in the assembly. Push the
socket into the assembly and turn the
socket clockwise.
Page 505 of 529
Maintenance
9-56
Reverse lamp (Inner lamp)
(Bulb type)
1. Disconnect the connector and then
remove the nuts by turning the nuts
counter clockwise.
2. Take the light assembly out.
OCN7080053OCN7080053
3. Remove the socket from the assembly by turning the socket
counterclockwise until the tabs on
the socket align with the slots on the
assembly.
4. Remove the bulb by pulling it out.
5. Insert a new bulb by inserting it into the socket.
6. Install the light assembly to the trunk.
7. Reinstall the trunk lid cover by pushing in the screw.
Stop/Tail lamp and rear side marker (LED type)
If the LED lamp does not operate, we
recommend that you have the vehicle
checked by an authorized HYUNDAI
dealer.
The LED lamps cannot be replaced as
a single unit because it is an integrated
unit. The LED lamps has to be replaced with the unit.
A skilled technician should check or
repair the LED lamp, for it may damage
related parts of the vehicle.