Page 18 of 657
16
Quick Reference Guide
Turn Signals (P 194)
Lights (P 195)
Turn Signal Control Lever
Right
Left
Light Control Switches
Low Beam High Beam
Flashing
Wipers and Washers
(P 202)
*1:Models with automatic intermittent wipers
*2:Models with manual intermittent wipers
Wiper/Washer Control Lever
Adjustment Ring
(-: Low Sensitivity*1
(- : Lower speed, fewer sweeps*2
(+: High Sensitivity*1
(+ : Higher speed, more sweeps*2
MIST
OFF
AUTO
*1: Wiper speed varies automatically
INT*2: Low speed with intermittent
LO : Low speed wipe
HI : High speed wipe Pull toward
you to spray
washer fluid.
AUTO
should always be turned OFF before
the following situations in order to prevent
severe damage to the wiper system:
●Cleaning the windshield●Driving through a car wash●No rain present
Steering Wheel (P 209)
●To adjust, push the adjustment lever
down, adjust to the desired position, then
lock the lever back in place.
Models with automatic intermittent wipers
To lock
To adjust
Page 30 of 657
28
Quick Reference Guide
Maintenance (P 537)
Under the Hood (P 548)
●Check engine oil, engine coolant, and windshield washer
fluid. Add when necessary.
●Check brake fluid.●Check the battery condition monthly.
aPull the hood release handle under the corner of the
dashboard.
bLocate the hood latch lever, push it to the side, and then
raise the hood. Once you have raised the hood slightly, you
can release the lever.
cWhen finished, close the hood and make sure it is firmly
locked in place.
Lights (P 564)
●Inspect all lights regularly.
Wiper Blades (P 572)
●Replace blades if they leave streaks
across the windshield or become noisy.
Tires (P 575)
●Inspect tires and wheels regularly.●Check tire pressures regularly.●Install snow tires for winter
driving.
Page 113 of 657
111
uuIndicators uDriver Information Interface Wa rning and Information Messages
Continued
Instrument Panel
MessageConditionExplanation
•Appears if there is a problem with the shutter grille,
and the radiator coolant temperature is too high.
•Power output will be reduced , so you may not be able
to accelerate or maintain yo ur current speed. Have your
vehicle checked by a dealer.
●Appears when the washer fluid is low.
●Refill the washer fluid.
2 Refilling Window Washer Fluid P. 563
●Appears when the scheduled maintenance is due
soon.
●Consequently, Maintenance Due Now and
Maintenance Past Due follow.2Maintenance Minder Messages on the Driver
Information Interface P. 543
●Appears when there is a problem with the battery
charging system.●Have your vehicle checked by a dealer.
Models with shutter grille
Canadian models
Page 204 of 657

202
uuOperating the Switches Around the Steering Wheel uWipers and Washers
Controls
Wipers and Washers
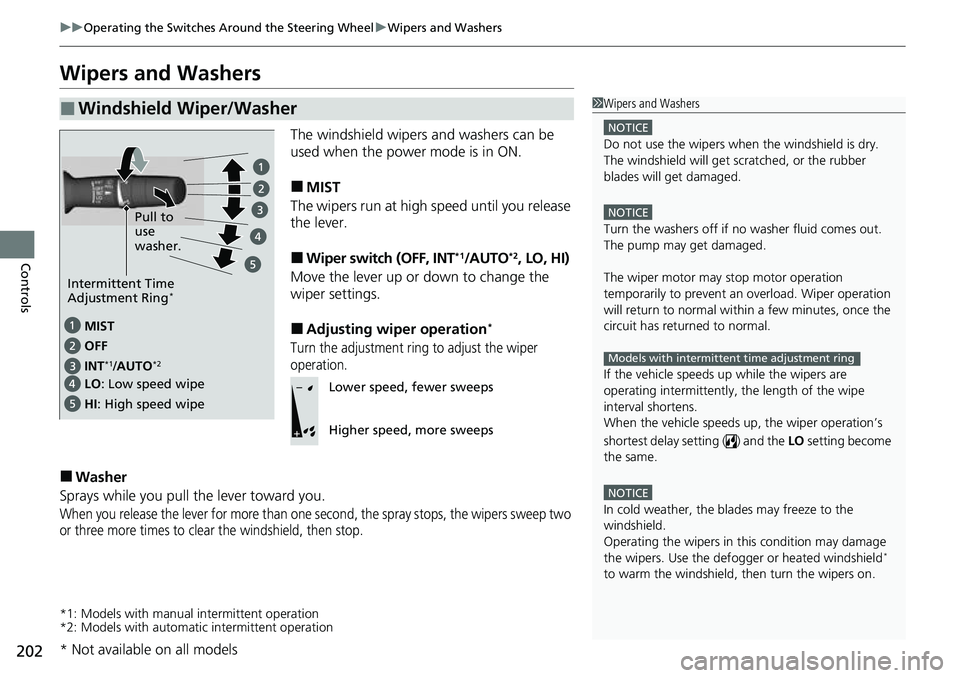
The windshield wipers and washers can be
used when the power mode is in ON.
■MIST
The wipers run at high speed until you release
the lever.
■Wiper switch (OFF, INT*1/AUTO*2, LO, HI)
Move the lever up or down to change the
wiper settings.
■Adjusting wiper operation*
Turn the adjustment ring to adjust the wiper
operation.
■Washer
Sprays while you pull the lever toward you.
When you release the lever for more than one second, the spray stops, the wipers sweep two
or three more times to clear the windshield, then stop.
*1: Models with manual intermittent operation
*2: Models with automati c intermittent operation
■Windshield Wiper/Washer1Wipers and Washers
NOTICE
Do not use the wipers when the windshield is dry.
The windshield will get sc ratched, or the rubber
blades will get damaged.
NOTICE
Turn the washers off if no washer fluid comes out.
The pump may get damaged.
The wiper motor may stop motor operation
temporarily to prevent an overload. Wiper operation
will return to normal within a few minutes, once the
circuit has returned to normal.
If the vehicle speeds up while the wipers are
operating intermittently, the length of the wipe
interval shortens.
When the vehicle speeds up, the wiper operation’s
shortest delay se tting ( ) and the LO setting become
the same.
NOTICE
In cold weather, the blades may freeze to the
windshield.
Operating the wipers in th is condition may damage
the wipers. Use the defogge r or heated windshield
*
to warm the windshield, then turn the wipers on.
Models with intermittent time adjustment ring
MIST
INT
*1/AUTO*2OFF
LO: Low speed wipe
HI : High speed wipe Pull to
use
washer.
Intermittent Time
Adjustment Ring*
Lower speed, fewer sweeps
Higher speed, more sweeps
* Not available on all models
Page 550 of 657
548
Maintenance
Maintenance Under the Hood
Maintenance Items Under the Hood
1.5 L engine models
Brake Fluid
(Black Cap)
Engine Coolant
Reserve Tank
Radiator Cap
Washer Fluid
(Blue Cap) Engine Oil Dipstick
(Orange) Engine Oil Fill Cap
Battery
Page 551 of 657
549
uuMaintenance Under the Hood uMaintenance Items Under the Hood
Maintenance
2.0 L engine models
Engine Oil Dipstick
(Orange)
Washer Fluid
(Blue Cap) Engine Coolant
Reserve Tank
Radiator Cap Brake Fluid
(Black Cap)
Engine Oil Fill Cap
Battery
Page 565 of 657
563
uuMaintenance Under the Hood uRefilling Window Washer Fluid
Maintenance
Refilling Window Washer Fluid
Check the amount of window washer fluid.
If the level is low, fill the washer reservoir.
If the washer fluid is low, a message appears
on the driver information interface.
Pour the washer fluid carefully. Do not overflow the reservoir.1Refilling Window Washer Fluid
NOTICE
Do not use engine antifreeze or a vinegar/water
solution in the windshield washer reservoir.
Antifreeze can damage y our vehicle’s paint. A
vinegar/water solution ca n damage the windshield
washer pump.
Use only commercially avai lable windshield washer
fluid.
Avoid prolonged use of hard water to prevent lime
scale buildup.Canadian models
All models
Page 567 of 657

565
uuReplacing Light Bulbs uHeadlight Bulbs
Maintenance
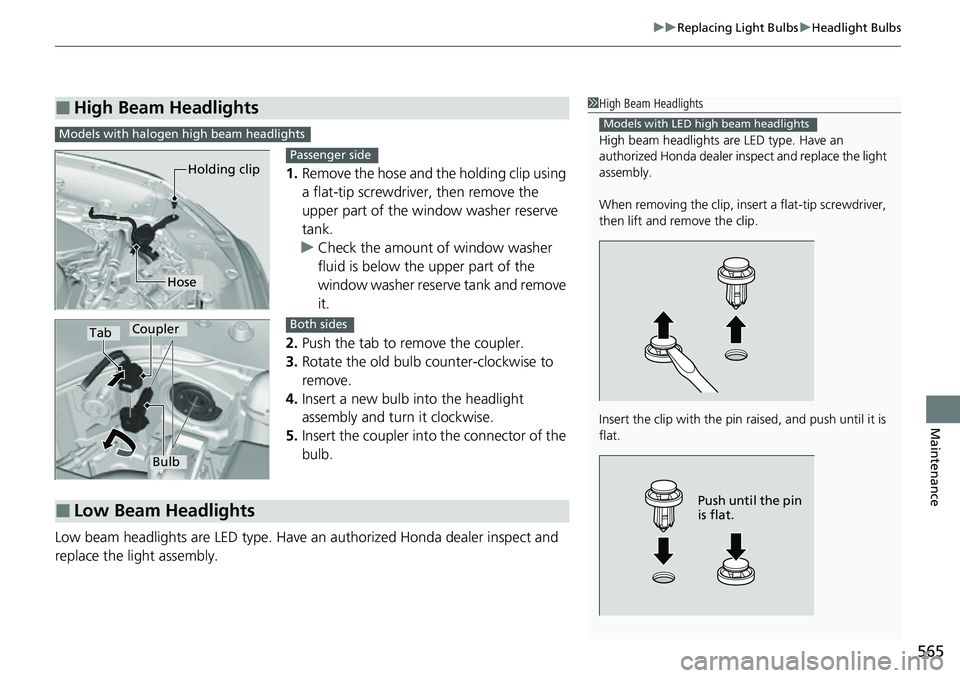
1. Remove the hose and the holding clip using
a flat-tip screwdriver, then remove the
upper part of the window washer reserve
tank.
u Check the amount of window washer
fluid is below the upper part of the
window washer reserve tank and remove
it.
2. Push the tab to remove the coupler.
3. Rotate the old bulb counter-clockwise to
remove.
4. Insert a new bulb into the headlight
assembly and turn it clockwise.
5. Insert the coupler into the connector of the
bulb.
Low beam headlights are LED type. Have an authorized Honda dealer inspect and
replace the light assembly.
■High Beam Headlights1 High Beam Headlights
High beam headlights ar e LED type. Have an
authorized Honda d ealer inspect and replace the light
assembly.
When removing the clip, insert a flat-tip screwdriver,
then lift and remove the clip.
Insert the clip with the pin raised, and push until it is
flat.
Models with LED high beam headlights
Push until the pin
is flat.
Models with halogen high beam headlights
Holding clip
Hose
Passenger side
TabCoupler
Bulb
Both sides
■Low Beam Headlights