2022 FORD MAVERICK auto button
[x] Cancel search: auto buttonPage 206 of 533
WHAT IS HILL DESCENT
CONTROL
Hill descent control allows the driver to set
and maintain vehicle speed while
descending steep slopes in various surface
conditions.
HOW DOES HILL DESCENT
CONTROL WORK
Hill descent control can maintain vehicle
speeds on downhill slopes between
2
– 20 mph (3– 32 km/h). Above 20 mph
(32 km/h), the system remains on but the
descent speed cannot be set or
maintained.
Note: The system does not function below
2 mph (3 km/h)
.
The system requires a cool down interval
after a period of sustained use. Hill descent
control provides a warning in the message
center and a tone sounds when the system
is about to disengage for cooling. At this
time, manually apply the brakes as needed
to maintain descent speed.
Note: The amount of time that the system
can remain active before cooling varies with
conditions.
HILL DESCENT CONTROL
PRECAUTIONS WARNING:
The system does not
control speed in low traction conditions
or extremely steep slopes. The system
is designed to be an aid and does not
relieve you of your responsibility to drive
with due care and attention. Failure to
follow this instruction could result in
personal injury. WARNING:
Hill descent control
cannot control descent in all surface
conditions and circumstances, such as
ice or extremely steep grades. Hill
descent control is a driver assist system
and cannot substitute for good judgment
by the driver. Failure to do so may result
in loss of vehicle control, crash or serious
injury. WARNING:
The system does not
replace the parking brake. When you
leave your vehicle, always apply the
parking brake and shift the transmission
into park (P) for automatic transmission
or first gear for manual transmission.
SWITCHING HILL DESCENT
CONTROL ON AND OFF Press the button on the center
console. A light illuminates and
a tone sounds when the system
is active.
SETTING THE HILL DESCENT
SPEED
To increase or decrease the descent speed,
press the accelerator or brake pedal, or use
the SET
+ and SET - buttons on the
steering wheel. Once you reach the
preferred speed remove your feet from the
pedals.
HILL DESCENT CONTROL
INDICATOR Illuminates when you switch hill
descent control on.
203
2022 Maverick (CFE) Canada/United States of America, enUSA, Edition date: 202106, First-Printing Hill Descent Control
(If Equipped)E163171 E163171
Page 221 of 533
Optimal system performance requires a
clear view of the road by the
windshield-mounted camera.
Optimal performance may not occur if:
•
The camera is blocked.
• There is poor visibility or lighting
conditions.
• There are bad weather conditions.
SWITCHING ADAPTIVE
CRUISE CONTROL ON AND OFF
The cruise controls are on the steering
wheel. See What Is Cruise Control
(page 213).
Switching Adaptive Cruise Control
On Press the button to set the
system in standby mode.
The indicator, current gap setting and set
speed appear in the information display.
Switching Adaptive Cruise Control
Off Press the button when the
system is in standby mode, or
switch the ignition off.
Note: You erase the set speed when you
switch the system off.
ADAPTIVE CRUISE CONTROL
AUTOMATIC CANCELLATION
The system may cancel if:
• The tires lose traction.
• You apply the parking brake. The system may cancel and set the parking
brake if:
•
You unbuckle the seatbelt and open
the driver door after you stop your
vehicle.
• Your vehicle is at a stop continuously
for more than three minutes.
The system may deactivate or prevent
activating when requested if:
• The vehicle has a blocked sensor.
• The brake temperature is too high.
• There is a failure in the system or a
related system.
SETTING THE ADAPTIVE
CRUISE CONTROL SPEED
Drive to the speed you prefer. Press the toggle button upward
or downward to set the current
speed.
Take your foot off the accelerator pedal.
The indicator, current gap setting and set
speed appear in the instrument cluster
display. A vehicle image illuminates if there is a
vehicle detected in front of you.
218
2022 Maverick (CFE) Canada/United States of America, enUSA, Edition date: 202106, First-Printing Adaptive Cruise Control
(If Equipped)E144529 E144529 E356418
Page 226 of 533
You can override the system at any time
by steering your vehicle.
Note:
The correct requirements must be
met before you can switch the system on.
See Lane Centering Requirements (page
222).
LANE CENTERING ALERTS
You must keep your hands on the steering
wheel at all times.
When the system is active and detects no
steering activity for a period of time, the
system alerts you to put your hands on the
steering wheel. If you do not react to the
warnings the system cancels and slows
your vehicle down to idle speeds while
maintaining steering control.
The system also alerts you if your vehicle
crosses lane markings without detected
steering activity.
Note: The system may detect a light grip
or touch on the steering wheel as hands-off
driving.
LANE CENTERING AUTOMATIC
CANCELLATION
When an external condition cancels the
system, for example, no lane markings
available, a tone sounds and a message
appears in the instrument cluster display. If your vehicle starts to slow
down, you must provide steering
input to the wheel and press and
release the button to regain full system
performance. Automatic cancellation can also occur if:
•
The lane becomes too wide or too
narrow.
• The system cannot detect valid lane
markings.
• Lane markings cross over one another.
Note: The system disables until the next
key cycle if your vehicle slows down due to
driver inactivity twice within a key cycle.
LANE CENTERING INDICATORS Illuminates when you switch
lane centering on. The color of
the indicator changes to indicate
the system status.
Gray indicates the system is on but
inactive.
Green indicates the system is active and
applying steering torque assistance input
to keep your vehicle in the center of the
lane.
Amber with an audible tone and then gray
indicates a system automatic cancellation.
ADAPTIVE CRUISE CONTROL
– TROUBLESHOOTING
ADAPTIVE CRUISE CONTROL –
INFORMATION MESSAGES -
VEHICLES WITH: ADAPTIVE
CRUISE CONTROL WITH LANE
CENTERING
Note: Depending on your vehicle options
and instrument cluster type, not all
messages display or are available.
Note: The system could abbreviate or
shorten certain messages depending upon
which cluster type you have.
223
2022 Maverick (CFE) Canada/United States of America, enUSA, Edition date: 202106, First-Printing Adaptive Cruise Control
(If Equipped) E297977
Page 283 of 533
1. Exit the vehicle immediately.
2. Advise emergency assistance that an
electric or hybrid-electric vehicle is
involved.
3. As with any vehicle fire, do not inhale smoke, vapors or gas from the vehicle,
as they may be hazardous.
Post-Incident
1. Do not store a severely damaged vehicle with a lithium-ion battery inside
a structure or within 49 ft (15 m) of any
structure or vehicle.
2. Make sure that passenger and luggage
compartments remain ventilated.
3. Call emergency assistance if you observe leaking fluids, sparks, smoke
or flames, or hear gurgling or bubbling
from the high-voltage battery.
SWITCHING THE HAZARD
FLASHERS ON AND OFF The hazard flasher button is on
the instrument panel. Press the
button to switch the hazard
flashers on if your vehicle is creating a
safety hazard for other road users.
When you switch the hazard flashers on,
all front and rear direction indicators flash.
Note: The hazard flashers operate when
the ignition is in any position, or if the key is
not in the ignition. The battery loses charge
and could have insufficient power to restart
your vehicle.
Press the button again to switch them off. JUMP STARTING THE VEHICLE
JUMP STARTING PRECAUTIONS WARNING: Batteries normally
produce explosive gases which can
cause personal injury. Therefore, do not
allow flames, sparks or lighted
substances to come near the battery.
When working near the battery, always
shield your face and protect your eyes.
Always provide correct ventilation. WARNING:
Keep batteries out of
reach of children. Batteries contain
sulfuric acid. Avoid contact with skin,
eyes or clothing. Shield your eyes when
working near the battery to protect
against possible splashing of acid
solution. In case of acid contact with skin
or eyes, flush immediately with water for
a minimum of 15 minutes and get prompt
medical attention. If acid is swallowed,
call a physician immediately. WARNING:
Use only adequately
sized cables with insulated clamps. WARNING:
Make sure that the
cables are clear of any moving parts and
fuel delivery system parts. WARNING: Connect batteries with
only the same nominal voltage. WARNING: If the engine is running
while the hood is open, stay clear of
moving engine components. Failure to
follow this warning could result in serious
personal injury or death.
Do not attempt to push-start an automatic
transmission vehicle. This could cause
transmission damage.
280
2022 Maverick (CFE) Canada/United States of America, enUSA, Edition date: 202106, First-Printing Crash and Breakdown Information
Page 287 of 533
HOW DOES THE POST-CRASH
ALERT SYSTEM WORK
The system is designed to turn the hazard
flashers on and to intermittently sound the
horn in the event of a serious impact that
deploys an airbag or the seatbelt
pretensioners.
POST-CRASH ALERT SYSTEM
LIMITATIONS
Depending on applicable laws in the
country your vehicle was built for, the horn
does not sound in the event of a serious
impact.
SWITCHING THE POST-CRASH
ALERT SYSTEM OFF
Press the hazard flasher switch or the
unlock button on the remote control to
switch the system off.
Note:
The alert turns off when the vehicle
battery runs out of charge.
AUTOMATIC CRASH SHUTOFF
WHAT IS AUTOMATIC CRASH
SHUTOFF
The automatic crash shutoff is designed
to stop the fuel going to the engine in the
event of a moderate or severe crash.
Note: Not every impact causes a shutoff. AUTOMATIC CRASH SHUTOFF
PRECAUTIONS WARNING: If your vehicle has been
involved in a crash, have the fuel system
checked. Failure to follow this instruction
could result in fire, personal injury or
death.
RE-ENABLING YOUR VEHICLE
1. Switch the ignition off.
2. Attempt to start your vehicle.
3. Switch the ignition off.
4. Attempt to start your vehicle.
Note: If your vehicle does not start after the
third attempt, have your vehicle checked as
soon as possible.
RECOVERY TOWING
ACCESSING THE FRONT TOWING
POINT WARNING: Using recovery hooks
is dangerous and should only be done by
a person familiar with proper vehicle
recovery safety practices. Improper use
of recovery hooks may cause hook failure
or separation from the vehicle and could
result in serious injury or death. WARNING:
Slowly remove the
slack from the recovery strap prior to
pulling. Failure to do so can introduce
significantly higher loads which can
cause the recovery hooks to break off, or
the recovery strap to fail which can cause
serious injury or death.
284
2022 Maverick (CFE) Canada/United States of America, enUSA, Edition date: 202106, First-Printing Crash and Breakdown Information
Page 300 of 533
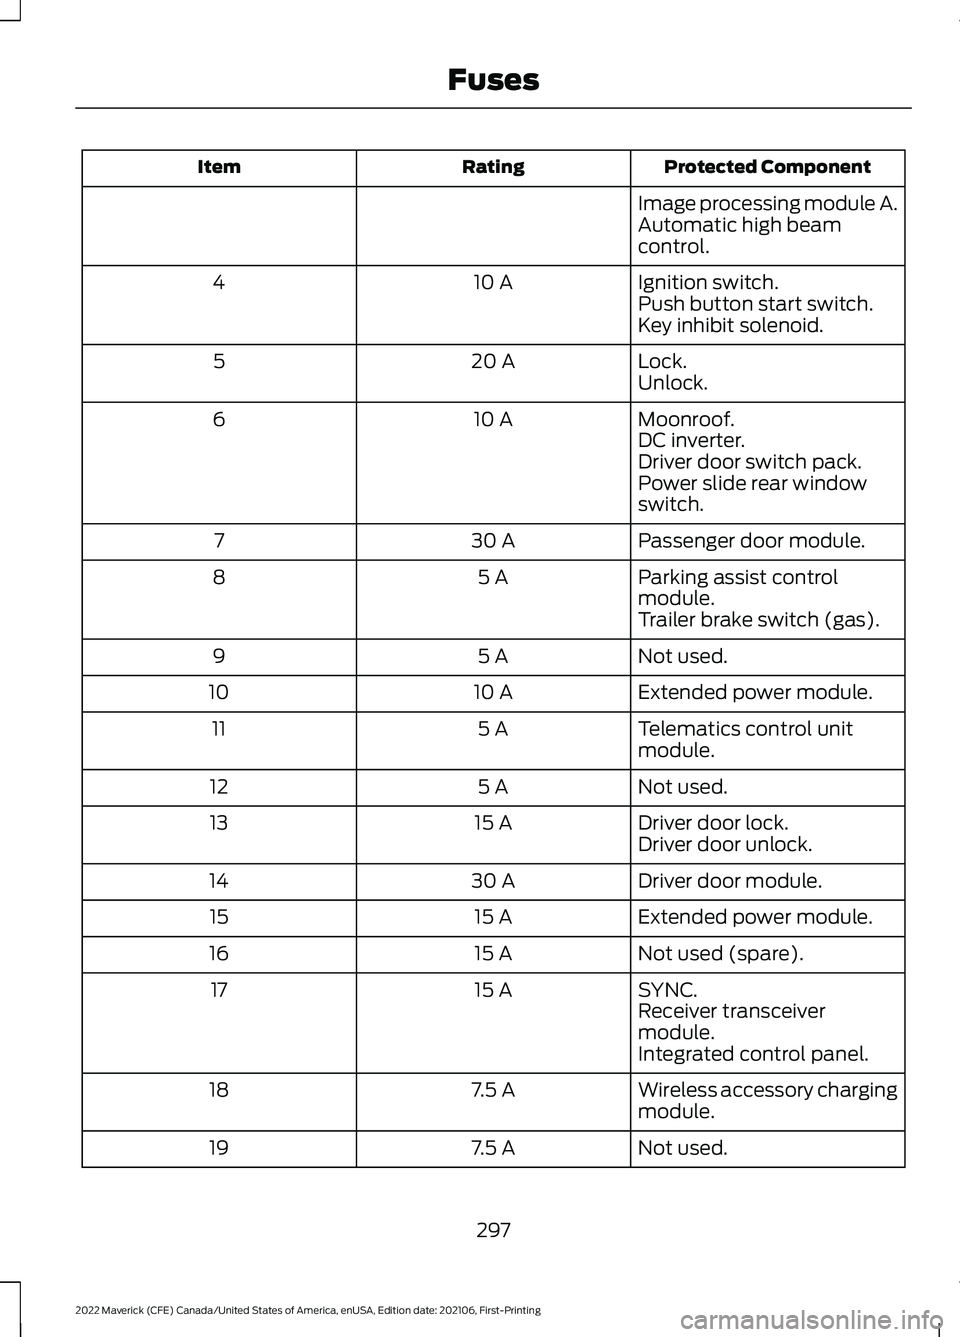
Protected Component
Rating
Item
Image processing module A.
Automatic high beam
control.
Ignition switch.
10 A
4
Push button start switch.
Key inhibit solenoid.
Lock.
20 A
5
Unlock.
Moonroof.
10 A
6
DC inverter.
Driver door switch pack.
Power slide rear window
switch.
Passenger door module.
30 A
7
Parking assist control
module.
5 A
8
Trailer brake switch (gas).
Not used.
5 A
9
Extended power module.
10 A
10
Telematics control unit
module.
5 A
11
Not used.
5 A
12
Driver door lock.
15 A
13
Driver door unlock.
Driver door module.
30 A
14
Extended power module.
15 A
15
Not used (spare).
15 A
16
SYNC.
15 A
17
Receiver transceiver
module.
Integrated control panel.
Wireless accessory charging
module.
7.5 A
18
Not used.
7.5 A
19
297
2022 Maverick (CFE) Canada/United States of America, enUSA, Edition date: 202106, First-Printing Fuses
Page 380 of 533
Selecting a Radio Station From a List
1. Select Sources.
2. Select a radio source.
3. Select
Browse.
4. Select a radio station from the list.
Manually Changing Radio Stations Rotate the control to change the
frequency.
Automatically Changing Radio
Stations
Press to seek the next station up
the frequency band.
Press and hold to quickly seek
up the frequency band. Press to seek the next station
down the frequency band.
Press and hold to quickly seek
down the frequency band.
Storing a Radio Station
Press and hold one of the preset buttons
on the touchscreen.
Note: The radio could briefly mutes to
indicate the station has been stored. Radio Settings Select the settings option on the
feature bar.
1. Select Radio.
2. Adjust the settings.
CONNECTING A BLUETOOTH®
DEVICE
Go to the settings menu on your device and
switch Bluetooth on. Select the settings options on
the feature bar.
1. Select
Bluetooth.
2. Switch Bluetooth on.
3. Select
Add a Bluetooth Device.
Note: A prompt alerts you to search for your
vehicle on your device.
4. Select your vehicle on your device.
Note: A number appears on your device and
on the touchscreen.
5. Confirm that the number on your device matches the number on the
touchscreen.
Note: The touchscreen indicates that you
have successfully paired your device.
Bluetooth Settings Select the settings option on the
feature bar.
1. Select
Bluetooth.
2. Adjust the settings.
Using Your Cell Phone
Recent Call List
Display and select an entry from a list of
previous calls.
377
2022 Maverick (CFE) Canada/United States of America, enUSA, Edition date: 202106, First-Printing Audio System - Vehicles Without: SYNC 3E290691 E142607
Page 388 of 533
Note:
The audio mutes briefly while the
system saves the preset and returns once it
is stored.
Note: You can save presets from multiple
sources to the memory preset bar.
MUTING THE AUDIO Press the button on the steering
wheel to mute the audio.
Press to mute the signal. Press
again to restore the signal.
ADJUSTING THE SOUND
SETTINGS
Balance and Fade (If Equipped)
1. Access the vehicle drawer on the touchscreen.
2. Press
SETTINGS.
3. Press
Sound.
4. Press
Balance / Fade.
5. Press the arrows to adjust the settings.
Tone Settings
1. Access the vehicle drawer on the touchscreen.
2. Press
SETTINGS.
3. Press
Sound.
4. Press
Tone Settings.
5. Use the slider bar to adjust the settings.
Speed Compensated Volume
1. Access the vehicle drawer on the touchscreen.
2. Press
SETTINGS.
3. Press
Sound.
4. Press
Speed Compensated Volume. 5. Press a setting.
Occupancy Mode
(If Equipped)
1. Access the vehicle drawer on the touchscreen.
2. Press
SETTINGS.
3. Press
Sound.
4. Press
Occupancy Mode.
5. Press a setting.
Sound Mode
(If Equipped)
1. Access the vehicle drawer on the touchscreen.
2. Press
SETTINGS.
3. Press
Sound.
4. Press
Sound Mode.
5. Press a setting.
SETTING THE CLOCK AND
DATE
1. Access the vehicle drawer on the touchscreen.
2. Press
SETTINGS.
3. Press
Clock.
4. Set the time.
Note: The
AM and PM options are not
available if 24-hour mode is on.
5. Press the arrows to adjust the settings.
Switching Automatic Time
Updates On and Off
1. Access the vehicle drawer on the touchscreen.
2. Press
SETTINGS.
3. Press
Clock.
4. Switch
Automatic time zone update
on or off.
385
2022 Maverick (CFE) Canada/United States of America, enUSA, Edition date: 202106, First-Printing Audio System - Vehicles With: SYNC 3