2022 FORD F-650/750 change wheel
[x] Cancel search: change wheelPage 155 of 379
•
The stability control and traction
control systems do not enhance your
vehicle's ability to maintain traction of
the wheels.
If a driving condition activates either the
stability control or the traction control
system you may experience the following
conditions:
• The stability and traction control light
flashes rapidly.
• Your vehicle slows down.
• Reduced engine power.
The stability control system has several
features built into it to help you maintain
control of your vehicle:
Electronic Stability Control
The system enhances your vehicle ’s ability
to prevent skids or lateral slides by
applying brakes to one or more of the
wheels individually and, if necessary,
reducing engine power.
Roll Stability Control
The system enhances your vehicle ’s ability
to prevent rollovers by detecting your
vehicle ’s motion and the rate at which it
changes by applying the brakes to one or
more wheels individually.
Traction Control
The system enhances your vehicle ’s ability
to maintain traction of the wheels by
detecting and controlling wheel spin. See
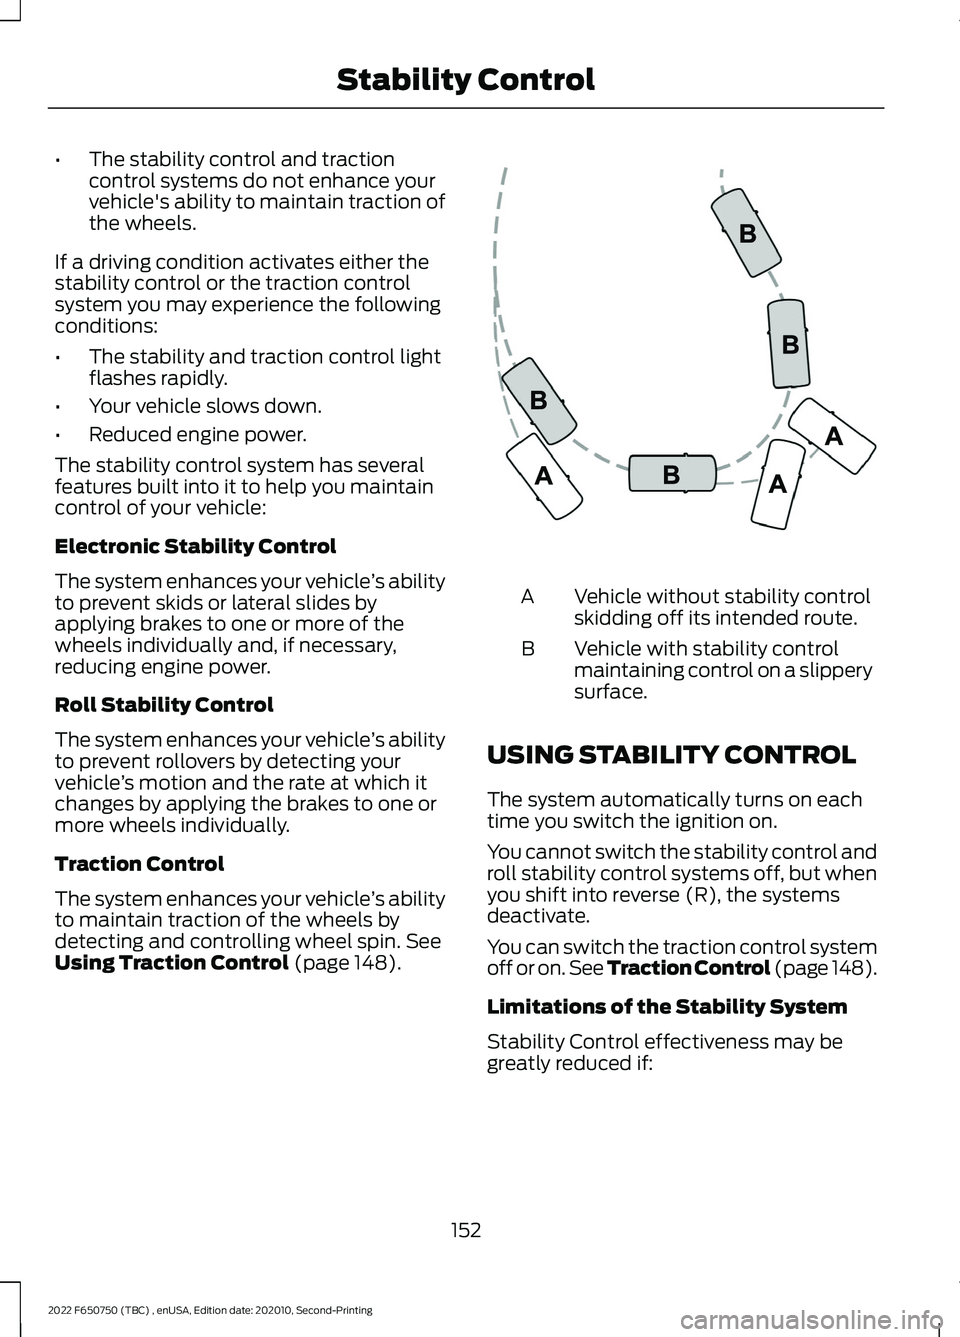
Using Traction Control (page 148). Vehicle without stability control
skidding off its intended route.
A
Vehicle with stability control
maintaining control on a slippery
surface.
B
USING STABILITY CONTROL
The system automatically turns on each
time you switch the ignition on.
You cannot switch the stability control and
roll stability control systems off, but when
you shift into reverse (R), the systems
deactivate.
You can switch the traction control system
off or on. See Traction Control (page 148).
Limitations of the Stability System
Stability Control effectiveness may be
greatly reduced if:
152
2022 F650750 (TBC) , enUSA, Edition date: 202010, Second-Printing Stability ControlE72903
Page 156 of 379
•
Your load shifts due to improper
retention, accident damage or the
inherently mobile nature of some loads,
for example, hanging meat, live
animals or partially laden tankers.
• Your vehicle or load has an unusually
high or off-set center of gravity (CG).
• Your brakes are not properly adjusted
or maintained.
• One side of your vehicle drops off the
pavement at an angle that is too great
to be counteracted by a reduction in
speed.
To Maximize the Effectiveness Of
Stability Control
• Make sure that the weight of your load
is evenly distributed, from front to back,
side to side and you secure it properly
at all times.
• Exercise extreme caution at all times
while driving and avoid sharp turns,
sudden steering inputs or abrupt lane
changes at high speeds, particularly if:
•Hauling loads that can shift.
• Your vehicle or load has a high or
off-set center of gravity when
loaded.
• You are towing doubles or triples.
ESC Usage with Tractor/Trailer
The ESC system is designed to work with
trailer air brake systems. We do not
recommend its use with any other trailer
brake system.
ESC and Towing with Non-tractor
Trucks (Straight or Kick-up Frame)
Non-tractor Trucks (Straight or Kick-up
Frame) with air brake ESC, should not be
used for towing any type of trailer. Chassis Modifications
Stability Control is specifically calibrated
and validated only for your vehicle's
original configuration. If you alter your
vehicle's chassis components, for example,
a wheel base extension or reduction, tag
axle addition or removal, a major body
change such as conversion of a tractor into
a truck. Ford Motor Company is not
responsible for the performance of the
stability control system if you modify any
major components such as axle,
suspension or steering system.
153
2022 F650750 (TBC) , enUSA, Edition date: 202010, Second-Printing Stability Control
Page 163 of 379
WHAT IS CRUISE CONTROL
Cruise control lets you maintain a set
speed without keeping your foot on the
accelerator pedal.
Requirements
Use cruise control when the vehicle speed
is greater than 20 mph (30 km/h).
SWITCHING CRUISE CONTROL
ON AND OFF WARNING:
Do not use cruise
control on winding roads, in heavy traffic
or when the road surface is slippery. This
could result in loss of vehicle control,
serious injury or death.
The cruise controls are on the steering
wheel. See
Cruise Control (page 51).
Switching Cruise Control On Press the button.
Switching Cruise Control Off Press the button when the
system is in standby mode.
The system also turns off when you switch
the ignition off.
Note: The set speed erases when you
switch the system off. SETTING THE CRUISE
CONTROL SPEED WARNING:
When you are going
downhill, your vehicle speed could
increase above the set speed. The
system does not apply the brakes.
Drive to the speed you prefer. Press either button to set the
current speed.
Take your foot off the accelerator pedal.
Note: The indicator changes color in the
information display.
Changing the Set Speed Press and release the button to
increase the set speed in small
increments.
Press and hold the button to accelerate.
Release the button when you reach your
preferred speed. Press and release the button to
decrease the set speed in small
increments.
Press and hold the button to decelerate.
Release the button when you reach your
preferred speed.
Note: If you accelerate by pressing the
accelerator pedal, the set speed does not
change. When you release the accelerator
pedal, your vehicle returns to the speed that
you previously set.
160
2022 F650750 (TBC) , enUSA, Edition date: 202010, Second-Printing Cruise Control - Vehicles With: Cruise ControlE265296 E265297
Page 185 of 379

GENERAL DRIVING POINTS
General Information
•
Accelerate smoothly and evenly. Rapid
acceleration increases fuel
consumption without increasing engine
performance.
• When approaching a hill, press the
accelerator smoothly to start the
incline at full power, and then shift
down as needed to maintain vehicle
speed.
• When going down a hill, or long steep
grades, prevent overspeeding of the
engine. Normally, choose the same
gear to descend the hill that you use to
ascend the hill. The engine governor
has no control over engine speed when
it is being pushed by a loaded vehicle.
• Do not operate in a gear that permits
an engine speed more than the
maximum governed speed or high-idle
RPM (no load).
• Always shift to a lower gear at high
altitudes to prevent engine smoking.
Backing Up WARNING: All vehicles have blind
spots. To reduce the risk of severe injury
or property damage, never move your
vehicle to the side or rear or change lanes
without being sure your way is clear on
both sides and to your rear. WARNING:
To reduce the risk of
the possibility of personal injury while
backing up the vehicle, always be sure
your vehicle ’s path is clear. Before backing up your vehicle, be sure you
can do so safely. If anything behind the cab
limits your view, do not rely on mirrors
alone to make sure that your intended path
is clear. If other people are in the vicinity,
have someone standing well behind your
vehicle and outside of your intended path
(visible through an exterior mirror) guide
you as you back up.
Although OSHA or some governmental
regulations may require the use of an
electrical or mechanical back up alarm to
warn bystanders, such an alarm does not
guarantee that the intended path is clear.
When in doubt, get out of your vehicle and
visually check the intended path is clear.
Back up slowly as to allow others time to
move, if necessary.
If you install an electrical back up alarm,
connect it to the backup lamp circuit.
Parking
WARNING:
When parking your
vehicle, do not leave the transmission in
gear; if the key is in the on position and
the vehicle rolls, the engine could start.
Failure to follow these instructions could
result in an unattended vehicle moving,
possibly causing personal injury or
property damage.
Always use the parking brake. When
parking on a grade, block the wheels and
turn the front wheels to one side so that if
your vehicle rolls, the front tires act against
the curb to stop your vehicle. The front
wheels are more effective at stopping a
rolling vehicle than the rear wheels.
182
2022 F650750 (TBC) , enUSA, Edition date: 202010, Second-Printing Driving Hints
Page 189 of 379

Avoid driving too fast during the first
1,000 mi (1,600 km). Vary your speed
frequently and change up through the
gears early. Do not labor the engine.
Drive your new vehicle at least
1,000 mi
(1,600 km) before towing a trailer. Make
sure you use the specified engine oil. See
Engine Oil Capacity and Specification
(page
290).
Do not add friction modifier compounds
or special break-in oils during the first few
thousand miles (kilometers) of operation.
These additives may prevent piston ring
seating.
DRIVING THROUGH WATER WARNING:
Do not drive through
flowing or deep water as you may lose
control of your vehicle.
Note: Driving through standing water can
cause vehicle damage.
Note: Engine damage can occur if water
enters the air filter.
Before driving through standing water,
check the depth. Never drive through water
that is higher than the bottom of the wheel
hubs. When driving through standing water, drive
very slowly and do not stop your vehicle.
Your brake performance and traction may
be limited. After driving through water and
as soon as it is safe to do so:
•
Lightly press the brake pedal to dry the
brakes and to check that they work.
• Check that the horn works.
• Check that the exterior lights work.
• Turn the steering wheel to check that
the steering power assist works.
Operation in Standing Water
Ingestion of water into the diesel engine
can result in immediate and severe
damage to the engine. If driving through
water, slow down to avoid splashing water
into the intake. If the engine stalls, and you
suspect ingestion of water into the engine,
do not try to restart the engine. Consult
your dealer for service immediately.
Your fuel tank vents to the atmosphere by
valves on top of the tank and through the
fuel cap. If water reaches the top of the
tank, the valves may pull water into the
fuel tank. Water in the fuel can cause
performance issues and damage the fuel
injection system.
186
2022 F650750 (TBC) , enUSA, Edition date: 202010, Second-Printing Driving HintsE176913
Page 212 of 379

VEHICLE INSPECTION
INFORMATION
To make sure your vehicle is ready to
operate, conduct a pre-trip inspection at
the beginning of each work period. Follow
the steps listed in this section to verify a
proper vehicle inspection procedure.
WARNING: Exercise great caution
when working on a vehicle equipped with
an automatic fan clutch. The fan starts
in motion only after the engine coolant
reaches a predetermined temperature
or the refrigerant pressure (if equipped
with air conditioning) reaches a
predetermined setting. The fan starts at
this point with no advance warning.
Never reach near, or permit objects to
protrude into, the fan blade radius while
the engine is running as this could result
in vehicle damage, personal injury or
death. WARNING:
Do not operate the
vehicle if any suspension conditions
listed in the following charts are evident.
Loss of steering or suspension could
result in property damage, personal injury
or death. WARNING:
If a wheel must be
changed, obtain expert tire service help.
Mounting and un-mounting of tires
should only be performed by a qualified
technician using necessary safety
procedures and equipment, otherwise
the result could be property damage,
personal injury or death.
Note: Always make sure you apply the
parking brake before starting the engine. Engine compartment (with engine off)
Use the dipstick to verify the oil level is in the proper operating
range. See
Engine Oil Dipstick (page 223).
Engine oil
Look through the plastic reservoir and verify the coolant level
is within the proper operating range. Do not remove the
pressure cap until the coolant has cooled. See
Engine
Coolant Check (page 237).
Engine coolant
Verify that the fluid level is in the proper operating range. See
Power Steering Fluid Check
(page 244).
Power steering fluid
Remove the master cylinder caps and inspect the fluid level.
See
Brake Fluid Check (page 243).
Brake fluid
209
2022 F650750 (TBC) , enUSA, Edition date: 202010, Second-Printing Vehicle Inspection Guide
Page 229 of 379
•
Sustained, high-speed driving at the
gross vehicle weight rating.
• Use of fuels with sulfur content other
than ultra-low sulfur diesel (ULSD).
• Use of high-sulfur diesel fuel.
Only use engine oil that meets our
specifications. See Capacities and
Specifications (page 286).
OIL CHANGE INDICATOR
RESET
Base Cluster
Use the information display controls on
the steering wheel to reset the oil change
indicator.
From the main menu scroll to: Action and Description
Message
Press the right arrow button,
then from this menu scroll
to the following message.
Settings
Press the down arrow
button, then from this menu
scroll to the following
message.
Vehicle
Press the right arrow button,
then from this menu scroll
to the following message.
Oil Life
Reset
Press and hold the
OK
button until the instrument
cluster displays the
following message.
Oil Life
Hold to
Reset
Press and hold the
OK
button until the instrument
cluster displays the
following message.
Oil Life
Hold OK
to Reset Action and Description
Message
Reset Complete
If the instrument cluster
displays the following
message, repeat the
process.
Reset Cancelled
High Series Cluster
Use the information display controls on
the steering wheel to reset the oil change
indicator.
From the main menu scroll to: Action and Description
Message
Press the down arrow
button, then from this menu
scroll to the following
message.
Truck Info
Press the
OK button.
Mainten-
ance
Monitor
Press the down arrow
button, then from this menu
scroll to the following
message.
Oil Life:
xxx%
Press the
OK button.
Oil Life
Press and hold the
OK
button until the instrument
cluster displays the
following message.
Oil Life
Hold OK to
Reset
Oil Life: 100%
When the oil change indic-
ator resets, the instrument
cluster displays 100%.
Repeat the process if the oil
change indicator does not
reset.
226
2022 F650750 (TBC) , enUSA, Edition date: 202010, Second-Printing Maintenance
Page 247 of 379
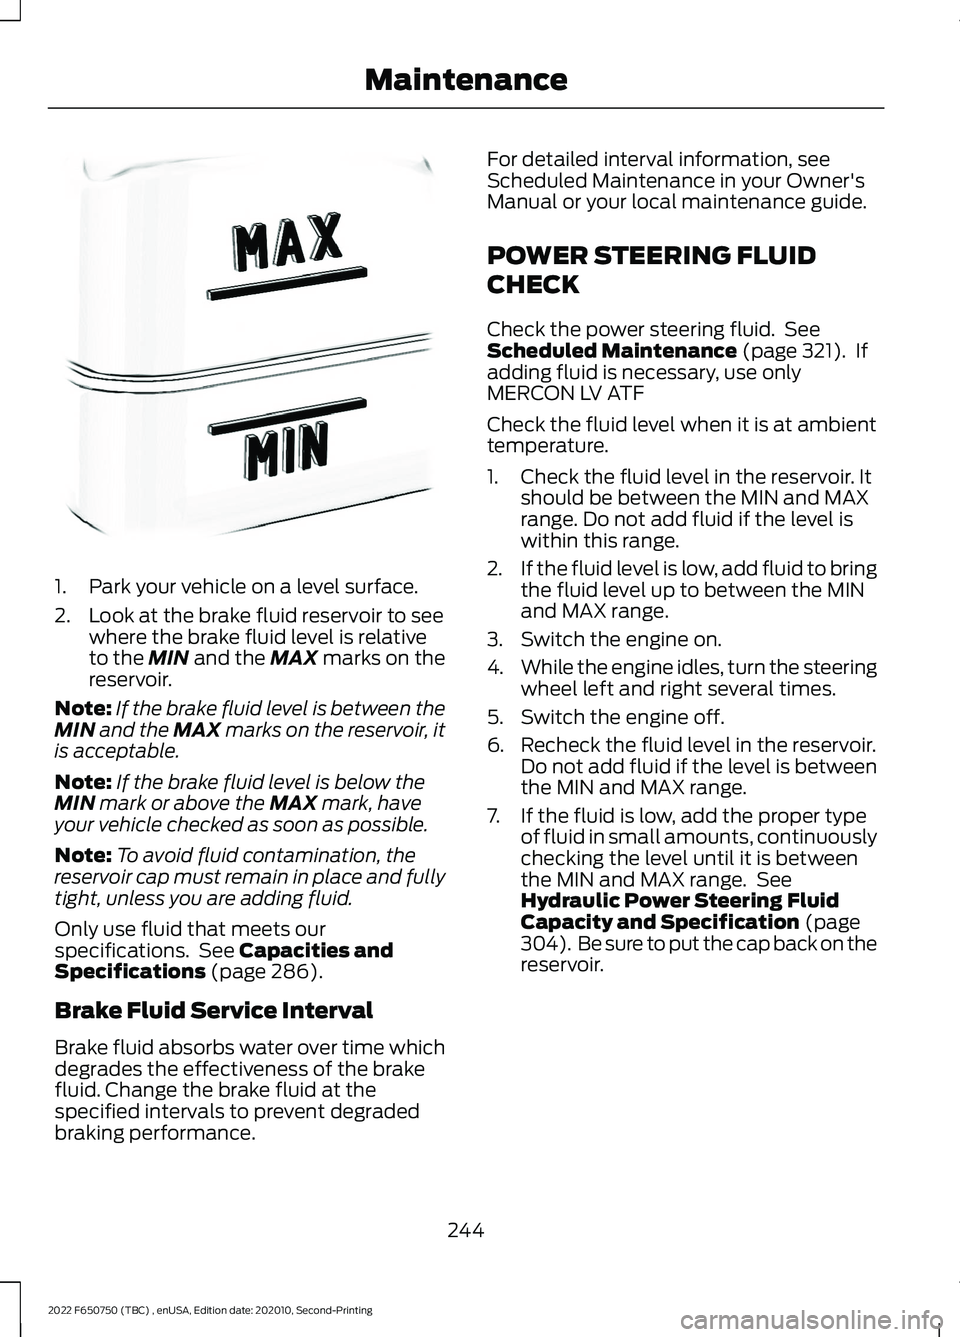
1. Park your vehicle on a level surface.
2. Look at the brake fluid reservoir to see
where the brake fluid level is relative
to the MIN and the MAX marks on the
reservoir.
Note: If the brake fluid level is between the
MIN
and the MAX marks on the reservoir, it
is acceptable.
Note: If the brake fluid level is below the
MIN
mark or above the MAX mark, have
your vehicle checked as soon as possible.
Note: To avoid fluid contamination, the
reservoir cap must remain in place and fully
tight, unless you are adding fluid.
Only use fluid that meets our
specifications. See
Capacities and
Specifications (page 286).
Brake Fluid Service Interval
Brake fluid absorbs water over time which
degrades the effectiveness of the brake
fluid. Change the brake fluid at the
specified intervals to prevent degraded
braking performance. For detailed interval information, see
Scheduled Maintenance in your Owner's
Manual or your local maintenance guide.
POWER STEERING FLUID
CHECK
Check the power steering fluid. See
Scheduled Maintenance
(page 321). If
adding fluid is necessary, use only
MERCON LV ATF
Check the fluid level when it is at ambient
temperature.
1. Check the fluid level in the reservoir. It should be between the MIN and MAX
range. Do not add fluid if the level is
within this range.
2. If the fluid level is low, add fluid to bring
the fluid level up to between the MIN
and MAX range.
3. Switch the engine on.
4. While the engine idles, turn the steering
wheel left and right several times.
5. Switch the engine off.
6. Recheck the fluid level in the reservoir. Do not add fluid if the level is between
the MIN and MAX range.
7. If the fluid is low, add the proper type of fluid in small amounts, continuously
checking the level until it is between
the MIN and MAX range. See
Hydraulic Power Steering Fluid
Capacity and Specification
(page
304). Be sure to put the cap back on the
reservoir.
244
2022 F650750 (TBC) , enUSA, Edition date: 202010, Second-Printing MaintenanceE170684