2022 FORD F-650/750 remove seats
[x] Cancel search: remove seatsPage 34 of 379
Contact the manufacturer of your child
restraint for information about ordering a
tether strap, or to obtain a longer tether
strap if the tether strap on your child
restraint does not reach the appropriate
top tether anchor in the vehicle.
The passenger seats of your vehicle may
have built-in tether strap anchors behind
the seats as described below.
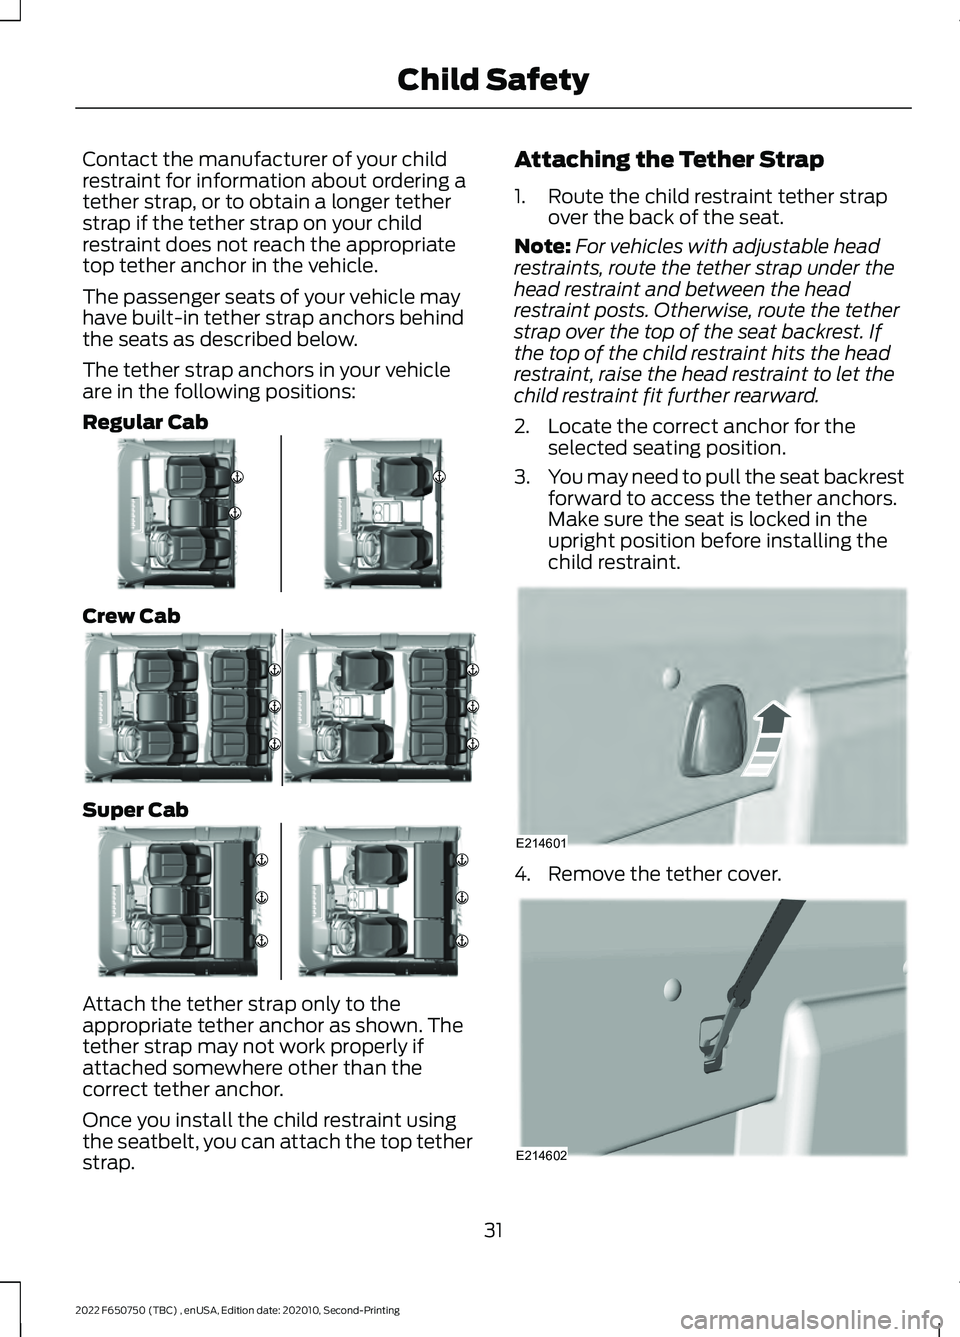
The tether strap anchors in your vehicle
are in the following positions:
Regular Cab
Crew Cab
Super Cab
Attach the tether strap only to the
appropriate tether anchor as shown. The
tether strap may not work properly if
attached somewhere other than the
correct tether anchor.
Once you install the child restraint using
the seatbelt, you can attach the top tether
strap. Attaching the Tether Strap
1. Route the child restraint tether strap
over the back of the seat.
Note: For vehicles with adjustable head
restraints, route the tether strap under the
head restraint and between the head
restraint posts. Otherwise, route the tether
strap over the top of the seat backrest. If
the top of the child restraint hits the head
restraint, raise the head restraint to let the
child restraint fit further rearward.
2. Locate the correct anchor for the selected seating position.
3. You may need to pull the seat backrest
forward to access the tether anchors.
Make sure the seat is locked in the
upright position before installing the
child restraint. 4. Remove the tether cover.
31
2022 F650750 (TBC) , enUSA, Edition date: 202010, Second-Printing Child SafetyE345911 E345904 E345910 E214601 E214602
Page 36 of 379
If your backless booster seat has a
removable shield, remove the shield. If a
vehicle seating position has a low seat
backrest or no head restraint, a backless
booster seat may place your child's head
(as measured at the tops of the ears)
above the top of the seat. In this case,
move the backless booster to another
seating position with a higher seat backrest
or head restraint and lap and shoulder
belts, or consider using a high back booster
seat. •
High back booster seats
If, with a backless booster seat, you cannot
find a seating position that adequately
supports your child's head, a high back
booster seat would be a better choice.
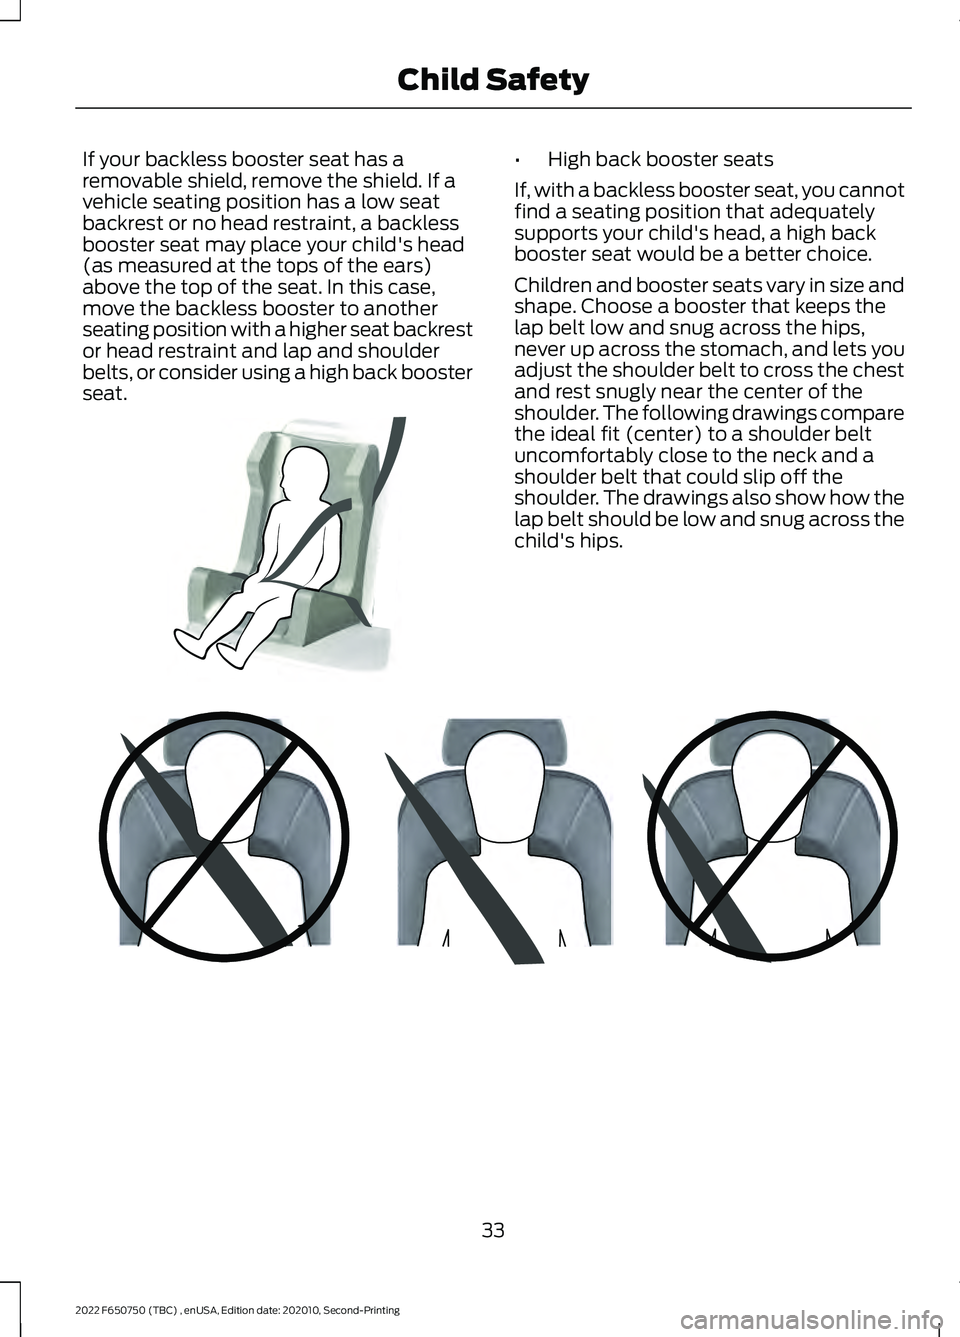
Children and booster seats vary in size and
shape. Choose a booster that keeps the
lap belt low and snug across the hips,
never up across the stomach, and lets you
adjust the shoulder belt to cross the chest
and rest snugly near the center of the
shoulder. The following drawings compare
the ideal fit (center) to a shoulder belt
uncomfortably close to the neck and a
shoulder belt that could slip off the
shoulder. The drawings also show how the
lap belt should be low and snug across the
child's hips. 33
2022 F650750 (TBC) , enUSA, Edition date: 202010, Second-Printing Child SafetyE70710 E142596
Page 41 of 379
•
Height adjuster at the front outboard
seating positions.
• Safety belt pretensioner at the front
outboard seating positions. •
Safety belt warning light and chime.
FASTENING THE SEATBELTS
The front outboard and rear safety
restraints in the vehicle are combination
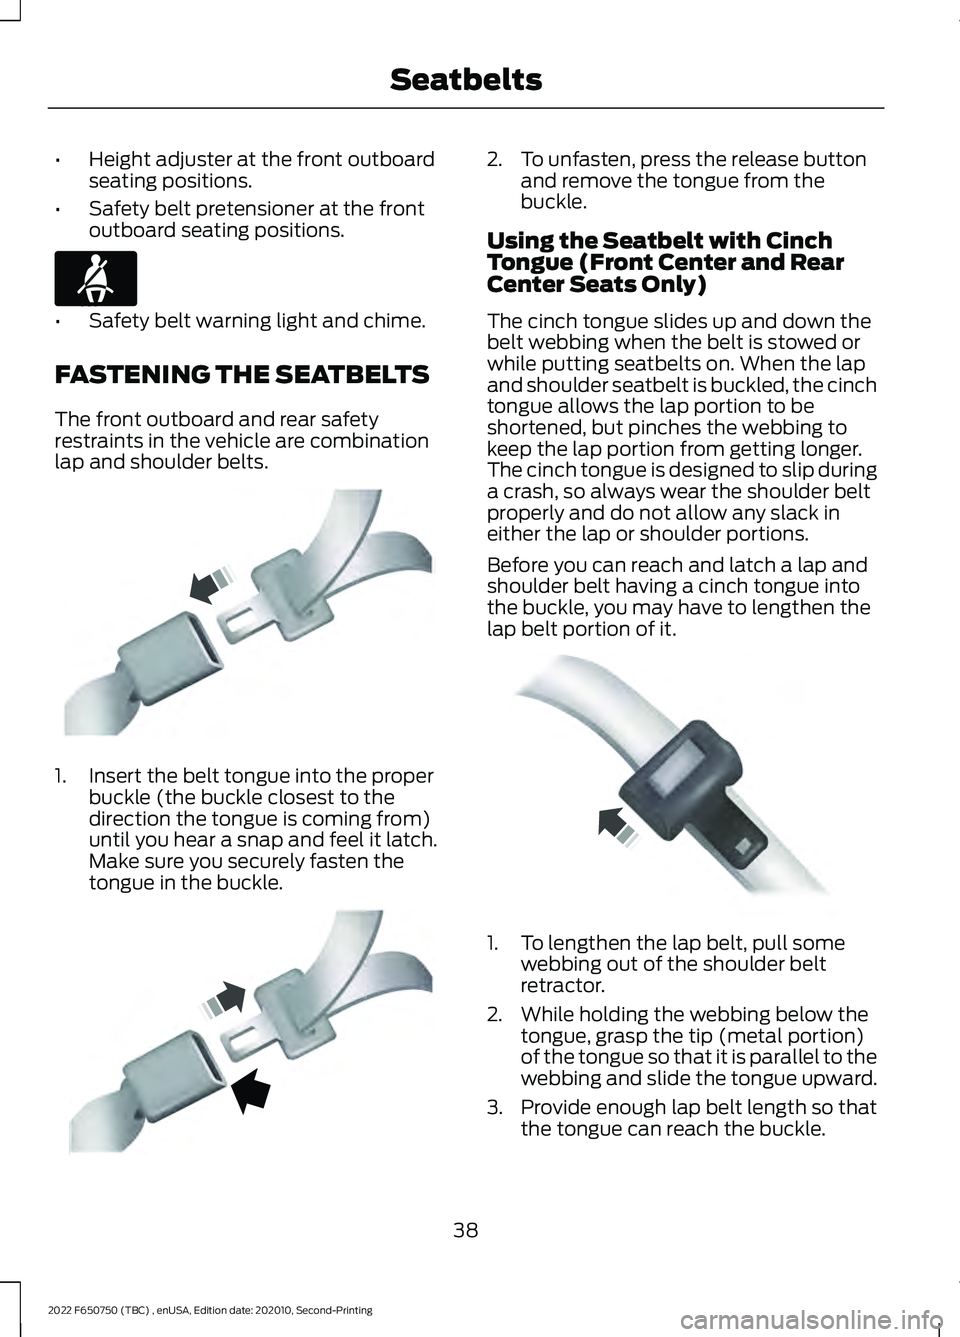
lap and shoulder belts. 1. Insert the belt tongue into the proper
buckle (the buckle closest to the
direction the tongue is coming from)
until you hear a snap and feel it latch.
Make sure you securely fasten the
tongue in the buckle. 2. To unfasten, press the release button
and remove the tongue from the
buckle.
Using the Seatbelt with Cinch
Tongue (Front Center and Rear
Center Seats Only)
The cinch tongue slides up and down the
belt webbing when the belt is stowed or
while putting seatbelts on. When the lap
and shoulder seatbelt is buckled, the cinch
tongue allows the lap portion to be
shortened, but pinches the webbing to
keep the lap portion from getting longer.
The cinch tongue is designed to slip during
a crash, so always wear the shoulder belt
properly and do not allow any slack in
either the lap or shoulder portions.
Before you can reach and latch a lap and
shoulder belt having a cinch tongue into
the buckle, you may have to lengthen the
lap belt portion of it. 1. To lengthen the lap belt, pull some
webbing out of the shoulder belt
retractor.
2. While holding the webbing below the tongue, grasp the tip (metal portion)
of the tongue so that it is parallel to the
webbing and slide the tongue upward.
3. Provide enough lap belt length so that
the tongue can reach the buckle.
38
2022 F650750 (TBC) , enUSA, Edition date: 202010, Second-Printing SeatbeltsE71880 E142587 E142588 E162708
Page 89 of 379

Air directed to the instrument panel and
footwell air vents turns off. You can also
use this setting to defog and clear the
windshield of a thin covering of ice.
Switching Maximum Air
Conditioning On and Off
Press and release the button for
maximum cooling.
The left-hand and right-hand settings set
to LO, recirculated air flows through the
instrument panel air vents, air conditioning
turns on and the blower motor adjusts to
the highest speed.
Switching Recirculated Air On and
Off Press and release the button to
switch between outside air and
recirculated air.
The air currently in the passenger
compartment recirculates. This may
reduce the time needed to cool the interior
(when used with A/C) and reduce
unwanted odors from entering your vehicle.
Note: Recirculated air may turn off (or
prevent you from switching on) in all air flow
modes except MAX A/C to reduce the risk
of fogging. Recirculation may also turn on
and off in various air distribution control
combinations during hot weather in order
to improve cooling efficiency.
HINTS ON CONTROLLING THE
INTERIOR CLIMATE
General Hints
Note: Prolonged use of recirculated air may
cause the windows to fog up.
Note: You may feel a small amount of air
from the footwell air vents regardless of the
air distribution setting. Note:
To reduce humidity build-up inside
your vehicle, do not drive with the system
switched off or with recirculated air always
switched on.
Note: Do not place objects under the front
seats as this may interfere with the airflow
to the rear seats.
Note: Remove any snow, ice or leaves from
the air intake area at the base of the
windshield.
Note: To improve the time to reach a
comfortable temperature in hot weather,
drive with the windows open until you feel
cold air through the air vents.
Quickly Heating the Interior
1. Adjust the blower motor speed to the highest speed setting.
2. Adjust the temperature control to the highest setting.
3. Direct air to the footwell air vents.
Recommended Settings for
Heating
1. Adjust the blower motor speed to the center setting.
2. Adjust the temperature control to the midway point of the hot settings.
3. Direct air to the footwell air vents.
Quickly Cooling the Interior
1. Select MAX A/C.
2. Drive with the windows open for a short
period of time.
Recommended Settings for
Cooling
1. Adjust the blower motor speed to the center setting.
2. Adjust the temperature control to the midway point of the cold settings.
86
2022 F650750 (TBC) , enUSA, Edition date: 202010, Second-Printing Climate Control
Page 92 of 379
Front Seat Adjustable Head Restraint
(If Equipped)
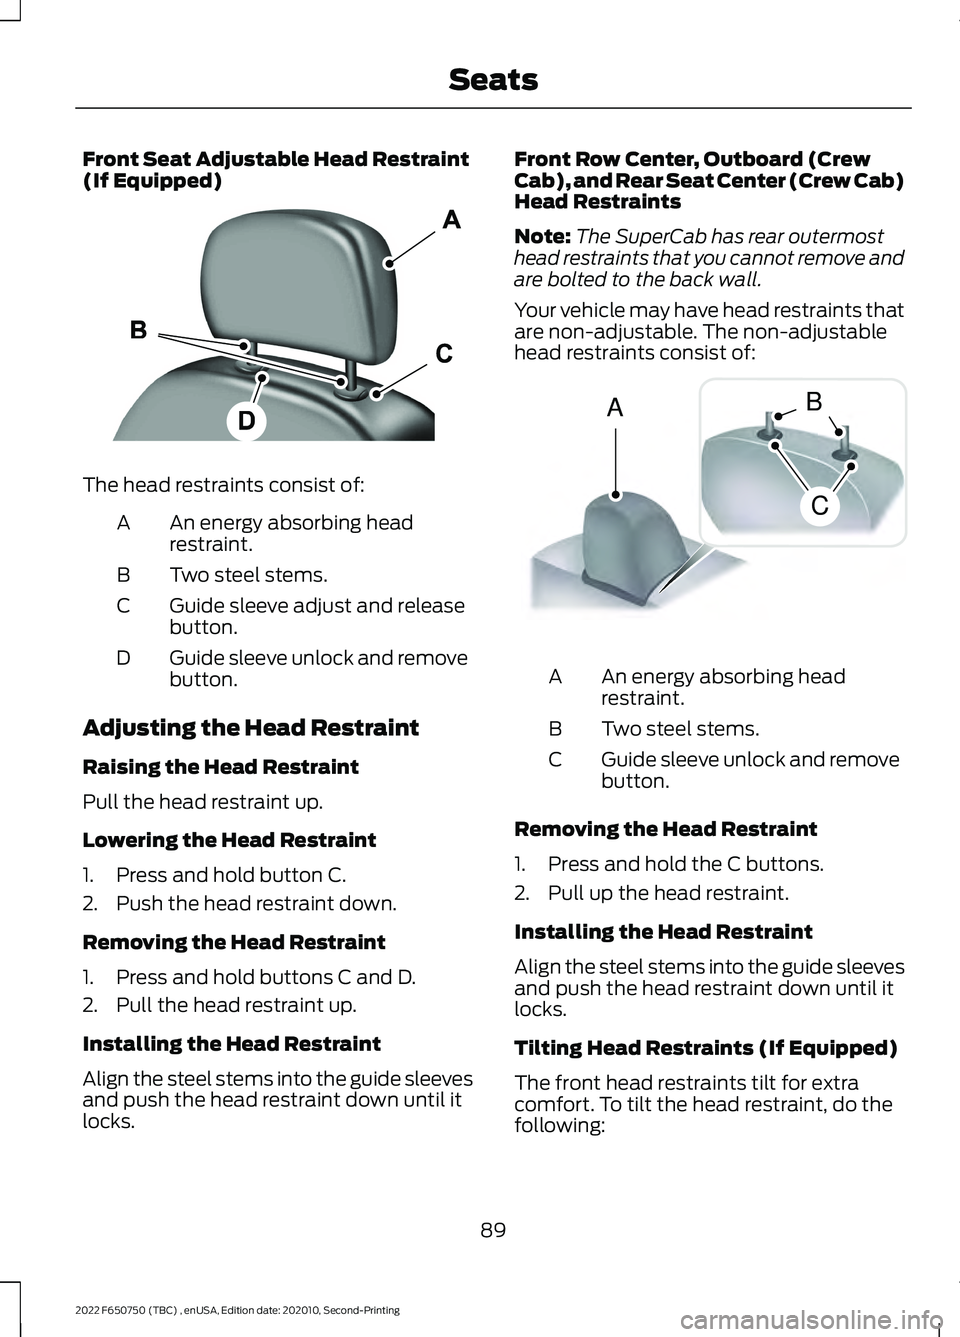
The head restraints consist of:
An energy absorbing head
restraint.
A
Two steel stems.
B
Guide sleeve adjust and release
button.
C
Guide sleeve unlock and remove
button.
D
Adjusting the Head Restraint
Raising the Head Restraint
Pull the head restraint up.
Lowering the Head Restraint
1. Press and hold button C.
2. Push the head restraint down.
Removing the Head Restraint
1. Press and hold buttons C and D.
2. Pull the head restraint up.
Installing the Head Restraint
Align the steel stems into the guide sleeves
and push the head restraint down until it
locks. Front Row Center, Outboard (Crew
Cab), and Rear Seat Center (Crew Cab)
Head Restraints
Note:
The SuperCab has rear outermost
head restraints that you cannot remove and
are bolted to the back wall.
Your vehicle may have head restraints that
are non-adjustable. The non-adjustable
head restraints consist of: An energy absorbing head
restraint.
A
Two steel stems.
B
Guide sleeve unlock and remove
button.
C
Removing the Head Restraint
1. Press and hold the C buttons.
2. Pull up the head restraint.
Installing the Head Restraint
Align the steel stems into the guide sleeves
and push the head restraint down until it
locks.
Tilting Head Restraints (If Equipped)
The front head restraints tilt for extra
comfort. To tilt the head restraint, do the
following:
89
2022 F650750 (TBC) , enUSA, Edition date: 202010, Second-Printing SeatsE138642 A
C
B E162872
Page 123 of 379

1. Remove the diesel exhaust fluid
container cap. Place the spout on to
the container and tighten it until you
feel a strong resistance.
2. Remove the diesel exhaust fluid tank filler cap.
3. Insert the spout into the filler neck until
the seal on the spout seats on to the
filler neck. Pour the fluid into the tank.
When the tank is full the fluid stops. In
case of direct fill tank, the spout does
not seal against the fill tank interface
and does not stop the flowing
automatically.
4. Return the container to the vertical position slightly below the diesel
exhaust fluid filler neck. Allow any fluid
remaining in the spout to drain back in
to the container.
5. Remove the spout from the diesel exhaust fluid filler neck. Replace the
diesel exhaust fluid tank cap.
6. Remove the spout from the diesel exhaust fluid container and replace the
cap.
Note: If there is diesel exhaust fluid left in
the container retain it for later use. The
spout is re-useable. Wash the spout with
clean water prior to storage. Do not use the
diesel exhaust fluid spout with any other
fluid.
Filling the Diesel Exhaust Fluid Tank in
Cold Climates
Diesel exhaust fluid freezes if the ambient
temperature is below 12°F (-11°C). Your
vehicle has a preheating system which
allows diesel exhaust fluid to operate
below
12°F (-11°C). If you do not use your
vehicle for an extended period when the
ambient temperature is below 12°F (-11°C),
the fluid in the tank freezes. If the tank is
overfilled and the fluid freezes it may
damage the tank. This is not covered by
the vehicle warranty. Diesel Exhaust Fluid Warning
Messages and Vehicle Operations WARNING:
Diesel exhaust fluid
must be refilled when low or replaced
when contaminated or your vehicle
speed becomes limited to
50 mph
(80 km/h). In these conditions, drive with
caution and refill diesel exhaust fluid
immediately. If the diesel exhaust fluid
becomes empty or contaminated and
fluid is not replaced, your vehicle
becomes limited to engine idle only once
stopped. In these conditions, be cautious
where you stop your vehicle because you
may not be able to drive long distances
or maintain highway speeds until you
refill or replace the diesel exhaust fluid.
Note: Diluted diesel exhaust fluid must be
drained and replaced. WARNING:
Tampering with or
disabling the selective catalytic
reduction system results in severe
vehicle performance limitation including
eventual speed limiting to
5 mph
(8 km/h).
The information display shows a series of
messages about the amount of diesel
exhaust fluid available. A systems check
displays messages indicating the amount
of diesel exhaust fluid available or displays
a warning message indicating the
approximate distance remaining as the
fluid in the diesel exhaust fluid tank nears
empty. See
Information Messages
(page 74).
120
2022 F650750 (TBC) , enUSA, Edition date: 202010, Second-Printing Engine Emission Control
Page 262 of 379
•
For proper suspension alignment.
Maintain proper alignment at all times.
• U-bolts. After the chassis has been
operating under load for 1,000 mi
(1,600 km) or six months (whichever
comes first), the U-bolt nuts must be
re-torqued. Re-torque the U-bolt nuts
every
37,000 mi (60,000 km)
thereafter. Clean and lubricate the
U-bolt and nut threads and seats to
make sure a like new condition when
re-torqueing. See
Spring U-Bolt
Check (page 259).
FRAME AND TOW HOOK
INSPECTION
Your vehicle's chassis is manufactured
with frame rails of either HSLA steel or
heat-treated steel. Handle each in a
specific manner to make sure maximum
service life. Consult the service manual or
an authorized dealer before attempting
frame repair or modification.
It is important, particularly on vehicles that
use tow hooks frequently, to inspect the
front and rear tow hooks for damage or a
loose mounting.
REAR AXLE FLUID CHECK
Your rear axle may have an optional
synthetic lubricant that allows the use of
extended service intervals. A tag on the
filler plug identifies the use of the synthetic
lubricant.
Only use a lubricant that meets
manufacturer specifications. Use of a
non-approved rear axle lubricant may
cause internal axle component damage.
See
Rear Axle Fluid Capacity and
Specification (page 303).
Checking the Fluid Level
1. Park your vehicle on level ground. 2. Set the parking brake and shift into
position neutral (N) or park (P). Turn
the engine off.
3. Clean any dirt from around the axle filler plug.
4. Remove the filler plug and inspect the lubricant level. It should be at the
bottom of the filler plug opening.
5. Add lubricant, if necessary, through the
filler plug opening.
6. Clean and install the filler plug securely.
Changing the Fluid
Note: Drain the rear axle while the lubricant
is warm.
1. Park your vehicle on level ground.
2. Set the parking brake and shift into position neutral (N) or park (P). Turn
the engine off.
3. Clean any dirt from around the axle filler and drain plugs.
4. Remove the filler and drain plugs. Drain
the lubricant into a suitable container.
Dispose of all used automotive fluids
in a responsible manner following your
local authorized standards.
5. Clean and install the drain plug securely.
6. Add lubricant through the filler plug opening.
7. Clean and install the filler plug securely.
SPRING U-BOLT CHECK
Check and tighten the U-bolt nuts after
your vehicle has been operated under load
for
1,000 mi (1,600 km) or six months,
whichever occurs first.
Check and tighten the U-bolt nuts every
37,000 mi (60,000 km)
.
Check and tighten the U-bolt nuts with
your vehicle at curb height and unloaded.
259
2022 F650750 (TBC) , enUSA, Edition date: 202010, Second-Printing Maintenance
Page 267 of 379
•
Never wash or rinse the engine while it
is hot or running; water in the running
engine may cause internal damage.
• Never wash or rinse any ignition coil,
spark plug wire or spark plug well, or
the area in and around these locations.
• Cover the battery, power distribution
box, and air filter assembly to prevent
water damage when cleaning the
engine.
CLEANING THE WINDOWS AND
WIPER BLADES
Car wash chemicals and environmental
fallout can result in windshield and wiper
blade contamination. Dirty windshield and
wipers will result in poor windshield wiper
operation. Keep the windshield and wiper
blades clean to maintain windshield wiper
performance.
To clean the windshield and wiper blades:
• Clean the windshield with a
non-abrasive glass cleaner. When
cleaning the interior of the windshield,
avoid getting any glass cleaner on the
instrument panel or door panels. Wipe
any glass cleaner off these surfaces
immediately.
• For windshields contaminated with
tree sap, chemicals, wax or bugs, clean
the entire windshield using steel wool
(no greater than 0000 grade) in a
circular motion and rinse with water.
• Clean the wiper blades with isopropyl
rubbing alcohol or windshield washer
concentrate.
Note: Do not use razor blades or other
sharp objects to clean or remove decals
from the inside of the heated rear window.
The vehicle warranty does not cover
damage caused to the heated rear window
grid lines. CLEANING THE INTERIOR WARNING: Do not use cleaning
solvents, bleach or dye on the vehicle's
seatbelts, as these actions may weaken
the belt webbing. WARNING:
On vehicles equipped
with seat-mounted airbags, do not use
chemical solvents or strong detergents.
Such products could contaminate the
side airbag system and affect
performance of the side airbag in a crash.
For fabric, carpets, cloth seats and seats
equipped with side airbags:
• Remove dust and loose dirt with a
vacuum cleaner.
• Remove light stains and soil with
Motorcraft Professional Strength
Carpet & Upholstery Cleaner.
• If grease or tar is present on the
material, spot-clean the area first with
Motorcraft Spot and Stain Remover. In
Canada, use Motorcraft Multi-Purpose
Cleaner.
• If a ring forms on the fabric after spot
cleaning, clean the entire area
immediately (but do not oversaturate)
or the ring will set.
• Do not use household cleaning
products or glass cleaners, which can
stain and discolor the fabric and affect
the flame retardant abilities of the seat
materials.
Mirrors
Do not clean the housing or glass of any
mirror with harsh abrasives, fuel or other
petroleum or ammonia-based cleaning
products.
264
2022 F650750 (TBC) , enUSA, Edition date: 202010, Second-Printing Vehicle Care