2022 FORD F-250 lock
[x] Cancel search: lockPage 388 of 740

9. Press and hold the OK button until a
confirmation message appears in the
information display.
Note: If completed successfully, the
information display shows
Neutral Tow
Enabled Leave Transmission in Neutral.
This indicates that your vehicle is safe to
tow with all wheels on the ground.
Note: If you do not see a confirmation
message in the instrument cluster display,
you must perform the procedure again from
the beginning.
Note: You may hear noise as the transfer
case shifts into its neutral position. This is
normal.
10. Leave the transmission in neutral (N)
and switch your vehicle off by
pressing the push button ignition
switch once without pressing the
brake pedal or turning the key as far
toward the off position.
Note: Vehicles with keys do not turn to the
off position when the transmission is in
neutral (N). You must leave the key in the
ignition when towing. Use the keyless entry
keypad or an extra set of keys to lock and
unlock your vehicle.
Switching
Neutral Tow Off
1. With your vehicle properly secured to the tow vehicle, place your vehicle in
accessory mode by pressing the push
button ignition switch once without
pressing the brake pedal or by turning
the ignition key to the on position.
2. Press and hold the brake pedal.
3. Shift out of neutral (N).
4. Release the brake pedal.
Note: If completed successfully, the
instrument cluster displays 2H and Neutral
Tow Disabled
. Note:
You must perform the switching
neutral tow on and switching neutral tow
off procedures again from the beginning if
the indicator light and message do not
display.
Note: You may hear a noise as the transfer
case shifts out of its neutral position. This
is normal.
5. Apply the parking brake, then disconnect your vehicle from the tow
vehicle.
6. Release the parking brake, start the engine, and shift into drive (D) to make
sure the transfer case is out of the
neutral tow position.
7. If the transfer case does not successfully shift out of its neutral
position, set the parking brake. Have
your vehicle checked as soon as
possible.
Resolving the
Shift Delayed Pull
Forward Message
1. Press and hold the brake pedal.
2. Start your vehicle.
3. Shift into neutral (N).
4. With the vehicle running, shift into drive
(D) and let the vehicle roll forward up
to
3 ft (1 m).
Note: You may hear a noise as the transfer
case shifts out of its neutral position. This
is normal.
5. Make sure the instrument cluster displays
Neutral Tow Disabled.
385
2022 Super Duty (TFE) Canada/United States of America, enUSA, Edition date: 202103, First-Printing Towing Your Vehicle
Page 389 of 740
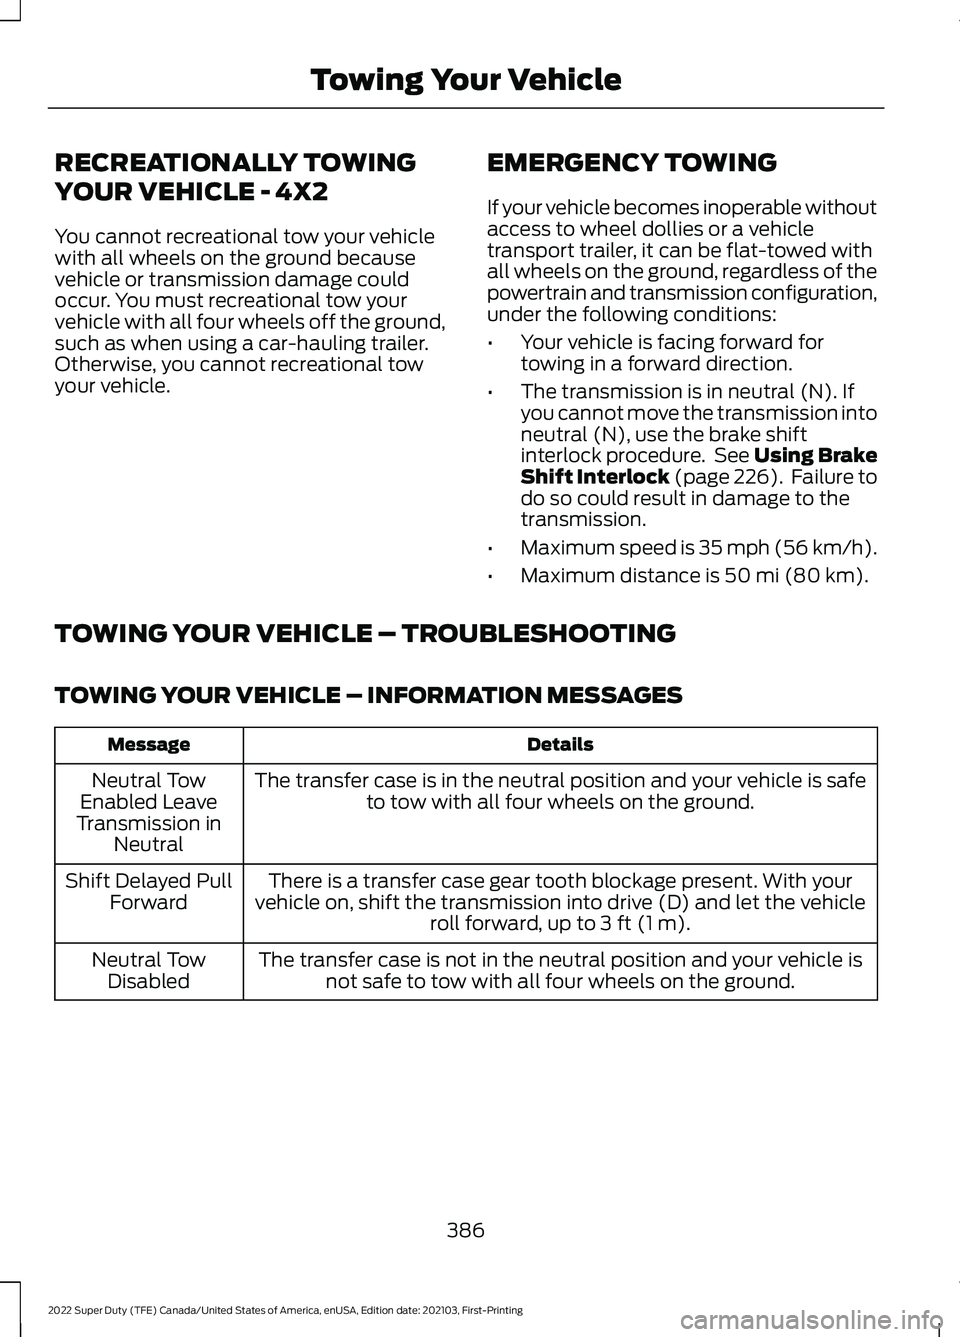
RECREATIONALLY TOWING
YOUR VEHICLE - 4X2
You cannot recreational tow your vehicle
with all wheels on the ground because
vehicle or transmission damage could
occur. You must recreational tow your
vehicle with all four wheels off the ground,
such as when using a car-hauling trailer.
Otherwise, you cannot recreational tow
your vehicle.
EMERGENCY TOWING
If your vehicle becomes inoperable without
access to wheel dollies or a vehicle
transport trailer, it can be flat-towed with
all wheels on the ground, regardless of the
powertrain and transmission configuration,
under the following conditions:
•
Your vehicle is facing forward for
towing in a forward direction.
• The transmission is in neutral (N). If
you cannot move the transmission into
neutral (N), use the brake shift
interlock procedure. See Using Brake
Shift Interlock (page 226). Failure to
do so could result in damage to the
transmission.
• Maximum speed is 35 mph (56 km/h).
• Maximum distance is
50 mi (80 km).
TOWING YOUR VEHICLE – TROUBLESHOOTING
TOWING YOUR VEHICLE – INFORMATION MESSAGES Details
Message
The transfer case is in the neutral position and your vehicle is safeto tow with all four wheels on the ground.
Neutral Tow
Enabled Leave
Transmission in Neutral
There is a transfer case gear tooth blockage present. With your
vehicle on, shift the transmission into drive (D) and let the vehicle roll forward, up to
3 ft (1 m).
Shift Delayed Pull
Forward
The transfer case is not in the neutral position and your vehicle isnot safe to tow with all four wheels on the ground.
Neutral Tow
Disabled
386
2022 Super Duty (TFE) Canada/United States of America, enUSA, Edition date: 202103, First-Printing Towing Your Vehicle
Page 391 of 740

IDENTIFYING THE FUSES IN THE UNDER HOOD FUSE BOX
Protected Component
Rating
Item
Power point 4.
20 A
1
Power point 3.
20 A
2
Spot light module.
10 A
3
Four-wheel drive vacuum
solenoid.
10 A
4
Active front steering.
40 A
5
Snow plow.
10 A
6
Trailer tow battery charge.
30 A
7
Anti-lock brake system
module.
10 A
8
388
2022 Super Duty (TFE) Canada/United States of America, enUSA, Edition date: 202103, First-Printing FusesE306306
Page 393 of 740
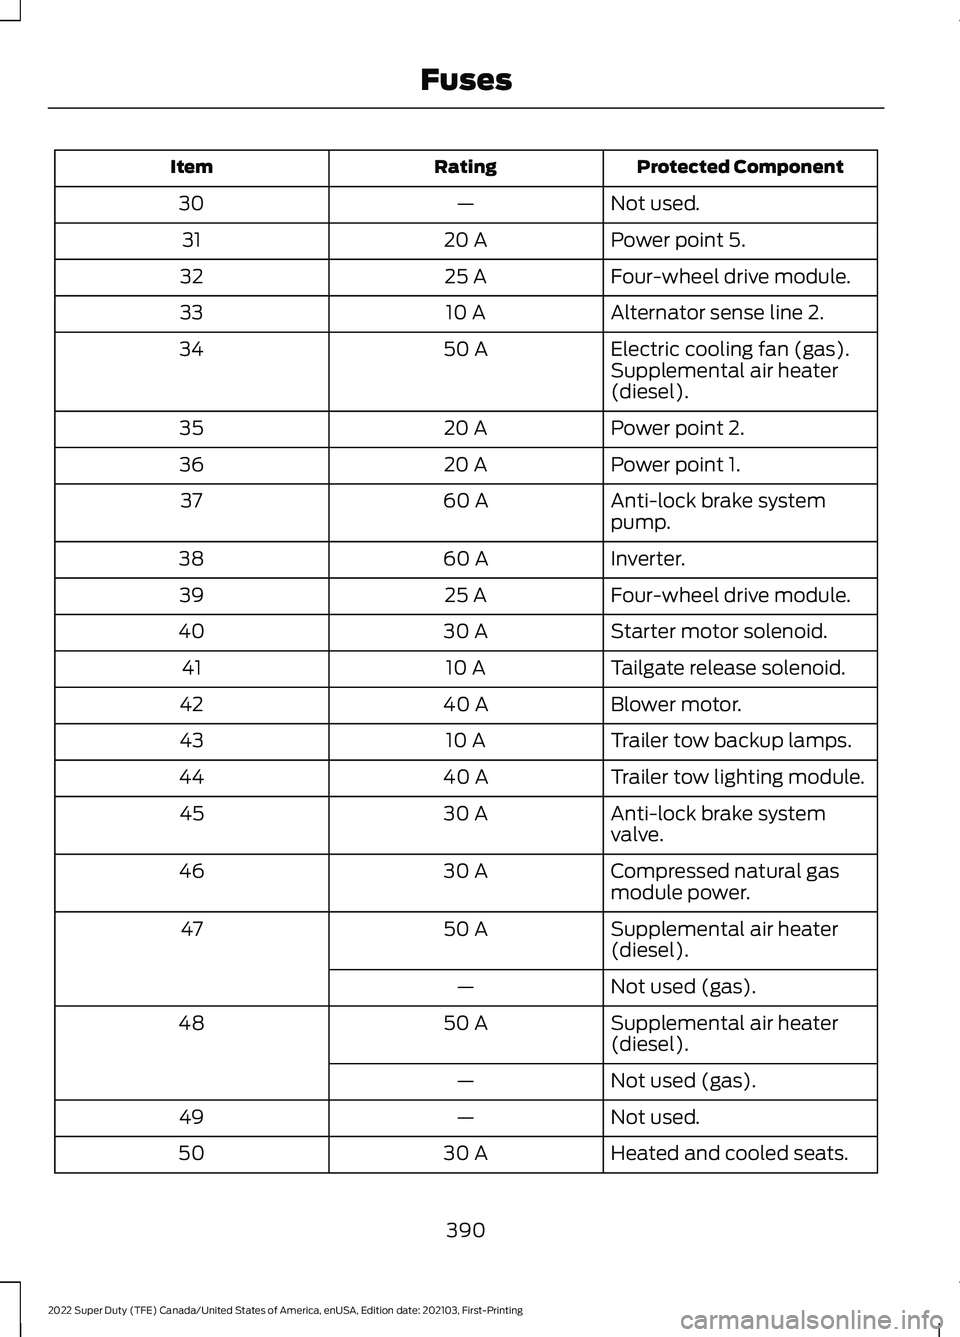
Protected Component
Rating
Item
Not used.
—
30
Power point 5.
20 A
31
Four-wheel drive module.
25 A
32
Alternator sense line 2.
10 A
33
Electric cooling fan (gas).
50 A
34
Supplemental air heater
(diesel).
Power point 2.
20 A
35
Power point 1.
20 A
36
Anti-lock brake system
pump.
60 A
37
Inverter.
60 A
38
Four-wheel drive module.
25 A
39
Starter motor solenoid.
30 A
40
Tailgate release solenoid.
10 A
41
Blower motor.
40 A
42
Trailer tow backup lamps.
10 A
43
Trailer tow lighting module.
40 A
44
Anti-lock brake system
valve.
30 A
45
Compressed natural gas
module power.
30 A
46
Supplemental air heater
(diesel).
50 A
47
Not used (gas).
—
Supplemental air heater
(diesel).
50 A
48
Not used (gas).
—
Not used.
—
49
Heated and cooled seats.
30 A
50
390
2022 Super Duty (TFE) Canada/United States of America, enUSA, Edition date: 202103, First-Printing Fuses
Page 399 of 740
MAINTENANCE PRECAUTIONS
Service your vehicle regularly to help
maintain its roadworthiness and resale
value. There is a large network of
authorized dealers that are there to help
you with their professional servicing
expertise. We believe that their specially
trained technicians are best qualified to
service your vehicle properly and expertly.
They are supported by a wide range of
highly specialized tools developed
specifically for servicing your vehicle.
If your vehicle requires professional service,
an authorized dealer can provide the
necessary parts and service. Check your
warranty information to find out which
parts and services are covered.
Use only recommended fuels, lubricants,
fluids and service parts conforming to
specifications. See Capacities and
Specifications (page 467).
• Do not work on a hot engine.
• Make sure that nothing gets caught in
moving parts.
• Do not work on a vehicle with the
engine running in an enclosed space,
unless you are sure you have enough
ventilation.
• Keep all open flames and other burning
material, such as cigarettes, away from
the battery and all fuel related parts.
• Set the parking brake, shift the
transmission to park (P) and block the
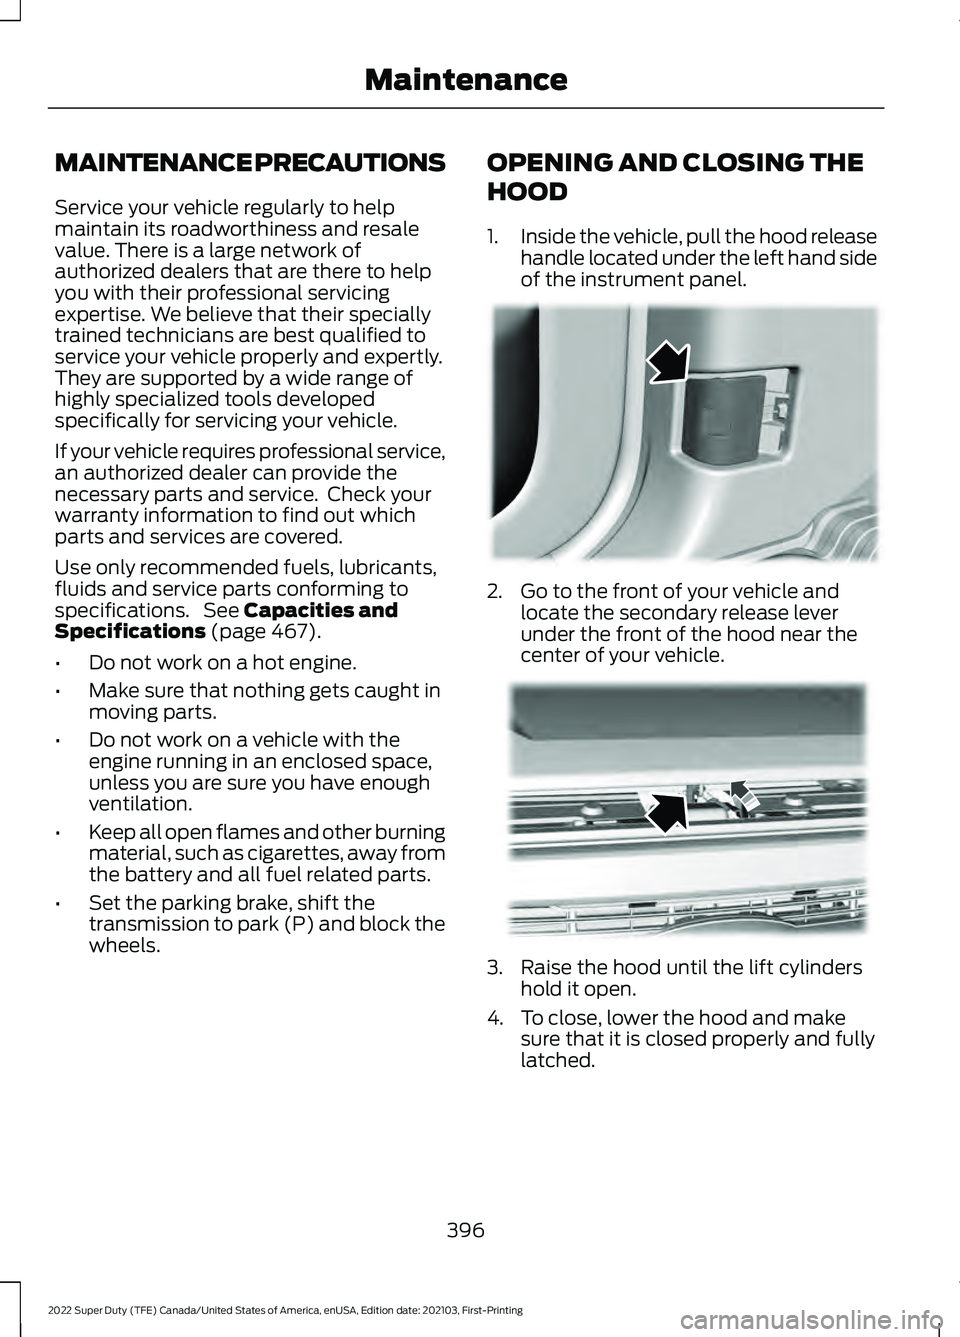
wheels. OPENING AND CLOSING THE
HOOD
1.
Inside the vehicle, pull the hood release
handle located under the left hand side
of the instrument panel. 2. Go to the front of your vehicle and
locate the secondary release lever
under the front of the hood near the
center of your vehicle. 3. Raise the hood until the lift cylinders
hold it open.
4. To close, lower the hood and make sure that it is closed properly and fully
latched.
396
2022 Super Duty (TFE) Canada/United States of America, enUSA, Edition date: 202103, First-Printing Maintenance E166491 E190266
Page 404 of 740

Note:
The oil consumption of new engines
reaches its normal level after approximately
3,000 mi (5,000 km).
ADDING ENGINE OIL WARNING: Do not remove the filler
cap when the engine is running. WARNING:
Do not add engine oil
when the engine is hot. Failure to follow
this instruction could result in personal
injury.
Do not use supplemental engine oil
additives because they are unnecessary
and could lead to engine damage that the
vehicle warranty may not cover.
1. Clean the area surrounding the engine oil filler cap before you remove it.
2. Remove the engine oil filler cap.
3. Add engine oil that meets our specifications. See
Engine Oil (page
401).
4. Reinstall the engine oil filler cap. Turn it clockwise until you feel a strong
resistance.
Note: Do not add oil further than the
maximum mark. Oil levels above the
maximum mark may cause engine damage.
Note: Immediately soak up any oil spillage
with an absorbent cloth.
RESETTING THE ENGINE OIL
CHANGE REMINDER - VEHICLES
WITH: 2.3 INCH SCREEN/4.2 INCH
SCREEN
1. Press the Menu button on the steering
wheel to enter the information display
main menu.
2. Select
Truck Info.
3. Select
Oil Life. 4. Select
Reset Oil Life.
5. Press and hold the OK button until the
system reset confirmation appears.
RESETTING THE ENGINE OIL
CHANGE REMINDER - VEHICLES
WITH: 8 INCH SCREEN
Depending on your cluster, there are two
paths to reset the engine oil change
reminder.
Path 1
1. Press the Menu button on the steering
wheel to enter the information display
main menu.
2. Select
Settings.
3. Select
Vehicle Maintenance.
4. Select
Oil Life.
5. Press and hold the OK button until the
system reset confirmation appears.
Path 2
1. Press the Menu button on the steering
wheel to enter the information display
main menu.
2. Select
Truck Info.
3. Select
Engine Information.
4. Press and hold the OK button until the
system reset confirmation appears.
ENGINE OIL CAPACITY AND
SPECIFICATION
For filling information, please refer to the
Capacities and Specifications section of
your owner's manual. See
Engine Oil
Capacity and Specification (page 401).
401
2022 Super Duty (TFE) Canada/United States of America, enUSA, Edition date: 202103, First-Printing Maintenance
Page 406 of 740
3.
Replace the coolant reservoir cap. Turn
the cap clockwise until it contacts the
hard stop.
4. Check the coolant level in the coolant reservoir the next few times you drive
your vehicle. If necessary, repeat step
2.
If you have to add more than 1.1 qt (1 L) of
engine coolant per month, have your
vehicle checked as soon as possible.
Operating an engine with a low level of
coolant can result in engine overheating
and possible engine damage.
In case of emergency, you can add a large
amount of water without engine coolant
in order to reach a vehicle service location.
Service your vehicle as soon as possible.
Water alone, without engine coolant, can
cause engine damage from corrosion,
overheating or freezing.
Do not use the following as a coolant
substitute, as they can cause engine
damage from overheating or freezing:
• Alcohol.
• Methanol.
• Brine.
• Any coolant mixed with alcohol or
methanol antifreeze.
Do not add extra inhibitors or additives to
the coolant. These can be harmful and
compromise the corrosion protection of
the coolant.
Severe Climates
If you drive in extremely cold climates, you
may need to increase the coolant
concentration above 50%.
Note: A coolant concentration of 60%
provides improved freeze point protection.
Coolant concentrations above 60%
decrease the overheat protection
characteristics of the coolant and could
cause engine damage. If you drive in extremely hot climates, you
may need to decrease the coolant
concentration to 40%.
Note:
A coolant concentration of 40%
provides improved overheat protection.
Coolant concentrations below 40%
decrease the overheat and corrosion
protection characteristics of the coolant and
could cause engine damage.
Coolant Change
Change the coolant at specific mileage
intervals. Refer to the scheduled
maintenance information. See
Normal
Scheduled Maintenance (page 628).
Note: Dispose of used coolant in the
appropriate manner.
Follow your community's regulations and
standards for recycling and disposing of
automotive fluids.
Fail-Safe Cooling
Fail-safe cooling allows you to temporarily
drive your vehicle before any incremental
component damage occurs. The fail-safe
distance depends on ambient
temperature, vehicle load and terrain.
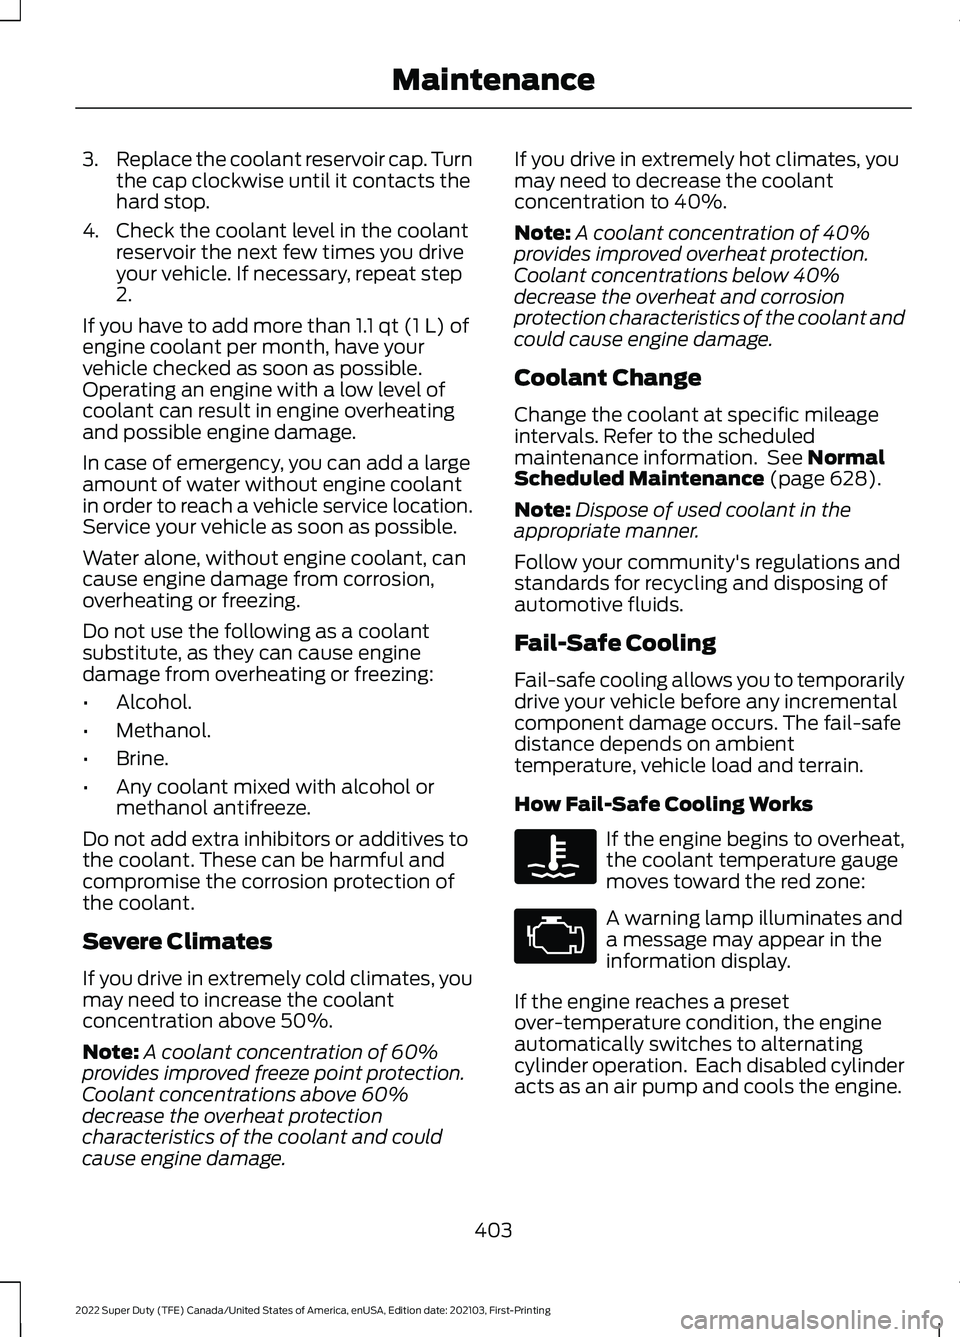
How Fail-Safe Cooling Works If the engine begins to overheat,
the coolant temperature gauge
moves toward the red zone:
A warning lamp illuminates and
a message may appear in the
information display.
If the engine reaches a preset
over-temperature condition, the engine
automatically switches to alternating
cylinder operation. Each disabled cylinder
acts as an air pump and cools the engine.
403
2022 Super Duty (TFE) Canada/United States of America, enUSA, Edition date: 202103, First-Printing Maintenance
Page 411 of 740
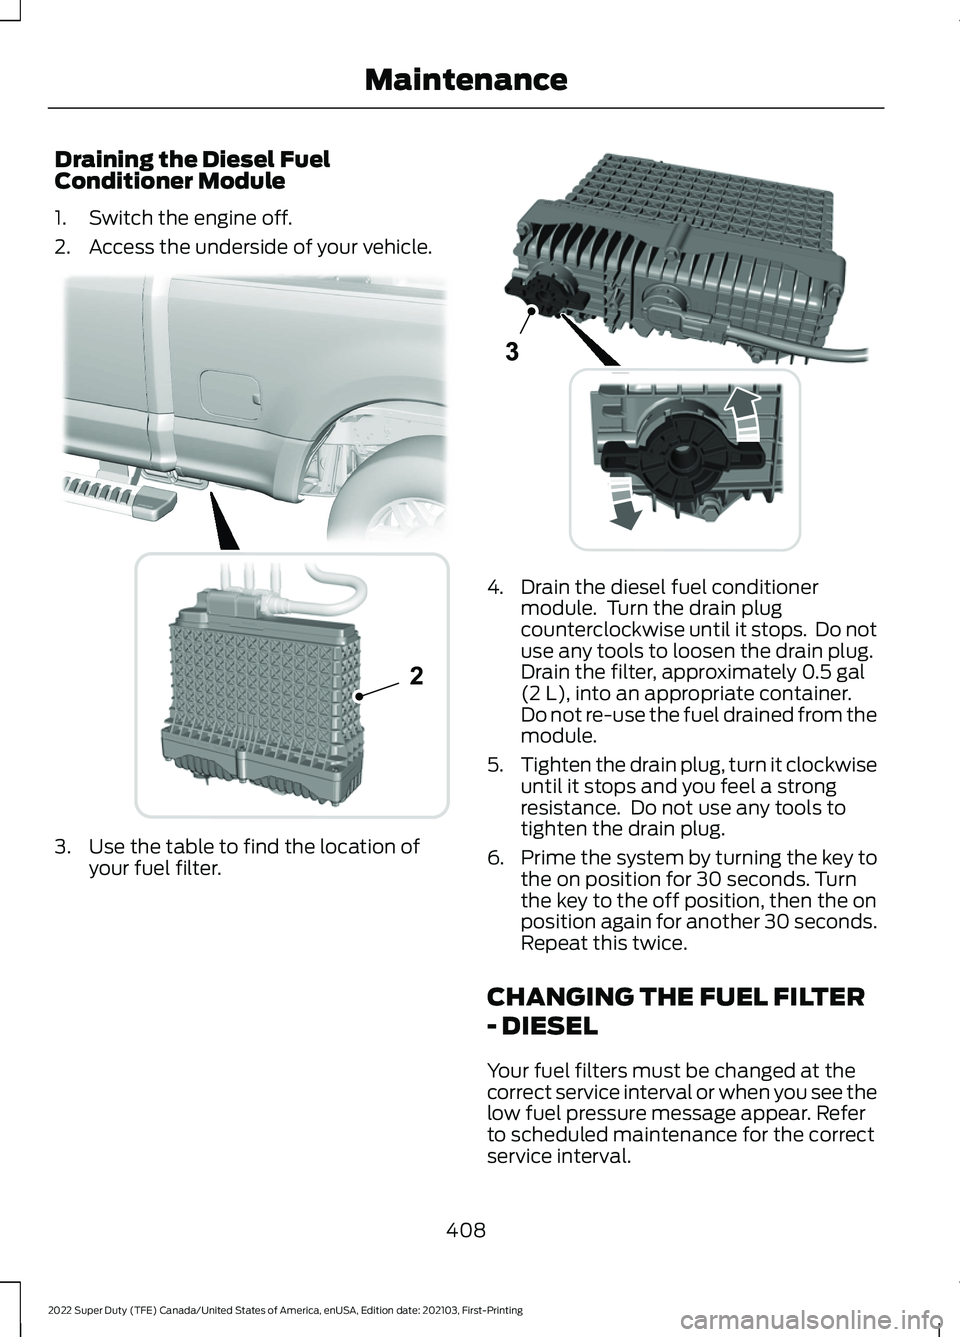
Draining the Diesel Fuel
Conditioner Module
1. Switch the engine off.
2. Access the underside of your vehicle.
3. Use the table to find the location of
your fuel filter. 4. Drain the diesel fuel conditioner
module. Turn the drain plug
counterclockwise until it stops. Do not
use any tools to loosen the drain plug.
Drain the filter, approximately 0.5 gal
(2 L), into an appropriate container.
Do not re-use the fuel drained from the
module.
5. Tighten the drain plug, turn it clockwise
until it stops and you feel a strong
resistance. Do not use any tools to
tighten the drain plug.
6. Prime the system by turning the key to
the on position for 30 seconds. Turn
the key to the off position, then the on
position again for another 30 seconds.
Repeat this twice.
CHANGING THE FUEL FILTER
- DIESEL
Your fuel filters must be changed at the
correct service interval or when you see the
low fuel pressure message appear. Refer
to scheduled maintenance for the correct
service interval.
408
2022 Super Duty (TFE) Canada/United States of America, enUSA, Edition date: 202103, First-Printing Maintenance2 E226475 E269861