2022 CHEVROLET MALIBU clock
[x] Cancel search: clockPage 11 of 351
Chevrolet Malibu Owner Manual (GMNA-Localizing-U.S./Canada-
14584249) - 2021 - CRC - 11/9/20
10 Keys, Doors, and Windows
heard. Passive locking will then remain
disabled until
Qon the interior door is
pressed, or until the vehicle is turned on.
Remote Left In Vehicle Alert
When the vehicle is turned off and an RKE
transmitter is left in the vehicle, the horn
will chirp three times after all doors are
closed. To turn on or off see Vehicle
Personalization 0100.
Remote No Longer In Vehicle Alert
If the vehicle is on with a door open, and
then all doors are closed, the vehicle will
check for an RKE transmitter inside. If an
RKE transmitter is not detected, the Driver
Information Center (DIC) will display NO
REMOTE DETECTED and the horn will chirp
three times.
This occurs only once each time the vehicle
is driven. See Vehicle Personalization 0100.
Keyless Trunk Opening
Press the touch pad on the rear of the trunk
to open it if the RKE transmitter is within
1 m (3 ft) of the trunk.
Key Access
To access a vehicle with a weak transmitter
battery, see Door Locks014.
Programming Transmitters to the Vehicle
Only RKE transmitters programmed to the
vehicle will work. If a transmitter is lost or
stolen, a replacement can be purchased and
programmed through your dealer. The
vehicle can be reprogrammed so that lost or
stolen transmitters no longer work. Any
remaining transmitters will need to be
reprogrammed. Each vehicle can have up to
eight transmitters matched to it.
Programming with Recognized Transmitters
A new transmitter can be programmed to
the vehicle when there are two recognized
transmitters. To program, the vehicle must
be off and all of the transmitters, both
currently recognized and new, must be
with you.
1. Place the two recognized transmitters in the cupholder.
2. Remove the key lock cylinder cap on the driver door handle. See Door Locks014.
Insert the vehicle key of the new
transmitter into the key lock cylinder on
the outside of the driver door and turn
the key counterclockwise five times
within 10 seconds.
The DIC displays READY FOR REMOTE #2,
3, 4 or 5.
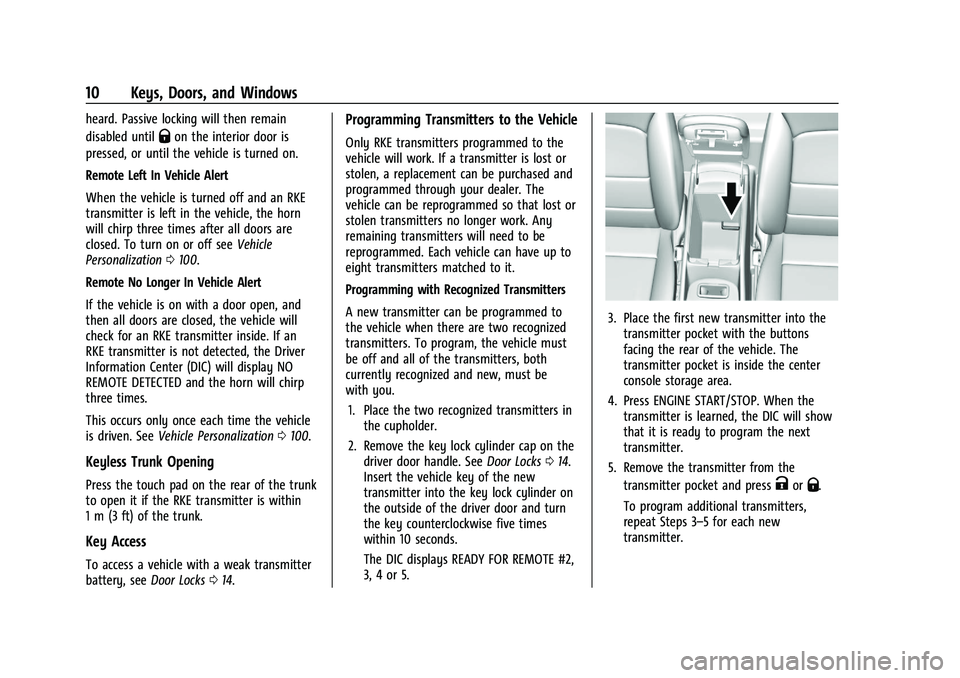
3. Place the first new transmitter into the transmitter pocket with the buttons
facing the rear of the vehicle. The
transmitter pocket is inside the center
console storage area.
4. Press ENGINE START/STOP. When the transmitter is learned, the DIC will show
that it is ready to program the next
transmitter.
5. Remove the transmitter from the transmitter pocket and press
KorQ.
To program additional transmitters,
repeat Steps 3–5 for each new
transmitter.
Page 12 of 351
Chevrolet Malibu Owner Manual (GMNA-Localizing-U.S./Canada-
14584249) - 2021 - CRC - 11/9/20
Keys, Doors, and Windows 11
When all additional transmitters are
programmed, press and hold ENGINE
START/STOP for 12 seconds to exit
programming mode.
6. Put the key back into the transmitter.
7. Replace the key lock cylinder cap. See Door Locks 014.
Programming without Recognized
Transmitters
If two currently recognized transmitters are
not available, follow this procedure to
program up to eight transmitters. This
feature is not available in Canada. This
procedure will take approximately
30 minutes to complete. The vehicle must
be off and all of the transmitters to be
programmed must be with you. 1. Remove the key lock cylinder cap on the driver door handle. See Door Locks014.
Insert the vehicle key of the transmitter
into the key lock cylinder on the outside
of the driver door and turn the key
counterclockwise five times within
10 seconds.
The DIC displays REMOTE LEARN
PENDING, PLEASE WAIT. 2. Wait for 10 minutes until the DIC
displays PRESS ENGINE START BUTTON TO
LEARN and then press ENGINE
START/STOP.
The DIC will again display REMOTE LEARN
PENDING, PLEASE WAIT.
3. Repeat Step 2 two additional times. After the third time, all previously known
transmitters will no longer work with the
vehicle. Remaining transmitters can be
relearned during the next steps.
The DIC should now display READY FOR
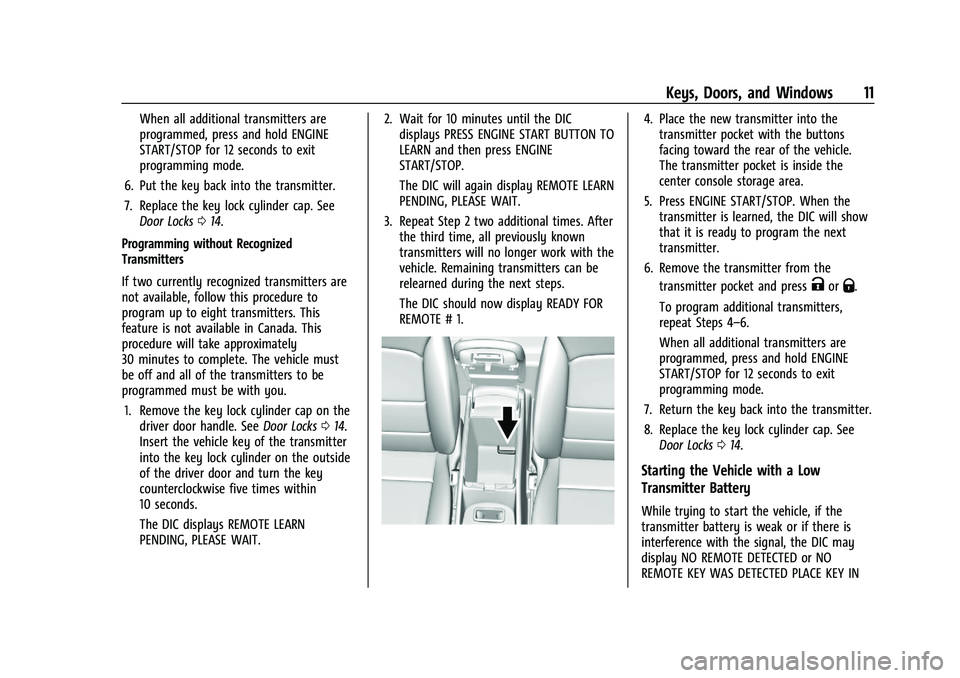
REMOTE # 1.4. Place the new transmitter into thetransmitter pocket with the buttons
facing toward the rear of the vehicle.
The transmitter pocket is inside the
center console storage area.
5. Press ENGINE START/STOP. When the transmitter is learned, the DIC will show
that it is ready to program the next
transmitter.
6. Remove the transmitter from the transmitter pocket and press
KorQ.
To program additional transmitters,
repeat Steps 4–6.
When all additional transmitters are
programmed, press and hold ENGINE
START/STOP for 12 seconds to exit
programming mode.
7. Return the key back into the transmitter.
8. Replace the key lock cylinder cap. See Door Locks 014.
Starting the Vehicle with a Low
Transmitter Battery
While trying to start the vehicle, if the
transmitter battery is weak or if there is
interference with the signal, the DIC may
display NO REMOTE DETECTED or NO
REMOTE KEY WAS DETECTED PLACE KEY IN
Page 75 of 351
Chevrolet Malibu Owner Manual (GMNA-Localizing-U.S./Canada-
14584249) - 2021 - CRC - 11/9/20
74 Instruments and Controls
Instruments and Controls
Controls
Steering Wheel Adjustment . . . . . . . . . . . . . 75
Steering Wheel Controls . . . . . . . . . . . . . . . . 75
Heated Steering Wheel . . . . . . . . . . . . . . . . . 75
Horn . . . . . . . . . . . . . . . . . . . . . . . . . . . . . . . . . . . . 75
Windshield Wiper/Washer . . . . . . . . . . . . . . 75
Clock . . . . . . . . . . . . . . . . . . . . . . . . . . . . . . . . . . . 76
Power Outlets . . . . . . . . . . . . . . . . . . . . . . . . . . 77
Wireless Charging . . . . . . . . . . . . . . . . . . . . . . 78
Warning Lights, Gauges, and Indicators
Warning Lights, Gauges, andIndicators . . . . . . . . . . . . . . . . . . . . . . . . . . . . 80
Instrument Cluster . . . . . . . . . . . . . . . . . . . . . 80
Speedometer . . . . . . . . . . . . . . . . . . . . . . . . . . . 82
Odometer . . . . . . . . . . . . . . . . . . . . . . . . . . . . . . 82
Trip Odometer . . . . . . . . . . . . . . . . . . . . . . . . . . 82
Tachometer . . . . . . . . . . . . . . . . . . . . . . . . . . . . 83
Fuel Gauge . . . . . . . . . . . . . . . . . . . . . . . . . . . . . 83
Engine Coolant Temperature Gauge . . . . 84
Voltmeter Gauge (Uplevel Cluster Only) . . . . . . . . . . . . . . . . . . . . . . . . . 84
Seat Belt Reminders . . . . . . . . . . . . . . . . . . . . 85
Airbag Readiness Light . . . . . . . . . . . . . . . . . 85
Passenger Airbag Status Indicator . . . . . . 86
Charging System Light . . . . . . . . . . . . . . . . . 86
Malfunction Indicator Lamp (Check Engine Light) . . . . . . . . . . . . . . . . . . . . . . . . . 87 Brake System Warning Light . . . . . . . . . . . 88
Electric Parking Brake Light . . . . . . . . . . . . . 89
Service Electric Parking Brake Light . . . . . 89
Antilock Brake System (ABS) Warning
Light . . . . . . . . . . . . . . . . . . . . . . . . . . . . . . . . . 89
Lane Keep Assist (LKA) Light . . . . . . . . . . . 90
Vehicle Ahead Indicator . . . . . . . . . . . . . . . . 90
Pedestrian Ahead Indicator . . . . . . . . . . . . . 90
Traction Off Light . . . . . . . . . . . . . . . . . . . . . . 90
StabiliTrak OFF Light . . . . . . . . . . . . . . . . . . . . 91
Traction Control System (TCS)/StabiliTrak Light . . . . . . . . . . . . . . . . . . . . . . . . . . . . . . . . . . 91
Engine Coolant Temperature Warning Light (Uplevel Only) . . . . . . . . . . . . . . . . . . 91
Tire Pressure Light . . . . . . . . . . . . . . . . . . . . . . 92
Engine Oil Pressure Light . . . . . . . . . . . . . . . 92
Low Fuel Warning Light . . . . . . . . . . . . . . . . 92
Security Light . . . . . . . . . . . . . . . . . . . . . . . . . . 93
High-Beam On Light . . . . . . . . . . . . . . . . . . . . 93
Lamps On Reminder . . . . . . . . . . . . . . . . . . . . 93
Cruise Control Light . . . . . . . . . . . . . . . . . . . . 93
Door Ajar Light (Uplevel) . . . . . . . . . . . . . . . 94
Information Displays
Driver Information Center (DIC) (Base Level) . . . . . . . . . . . . . . . . . . . . . . . . . . . . . . . . . 94
Driver Information Center (DIC) (Uplevel) . . . . . . . . . . . . . . . . . . . . . . . . . . . . . 96
Vehicle Messages
Vehicle Messages . . . . . . . . . . . . . . . . . . . . . . 99
Engine Power Messages . . . . . . . . . . . . . . . . 99
Vehicle Speed Messages . . . . . . . . . . . . . . . 100
Vehicle Personalization
Vehicle Personalization . . . . . . . . . . . . . . . . 100
Page 77 of 351
Chevrolet Malibu Owner Manual (GMNA-Localizing-U.S./Canada-
14584249) - 2021 - CRC - 11/9/20
76 Instruments and Controls
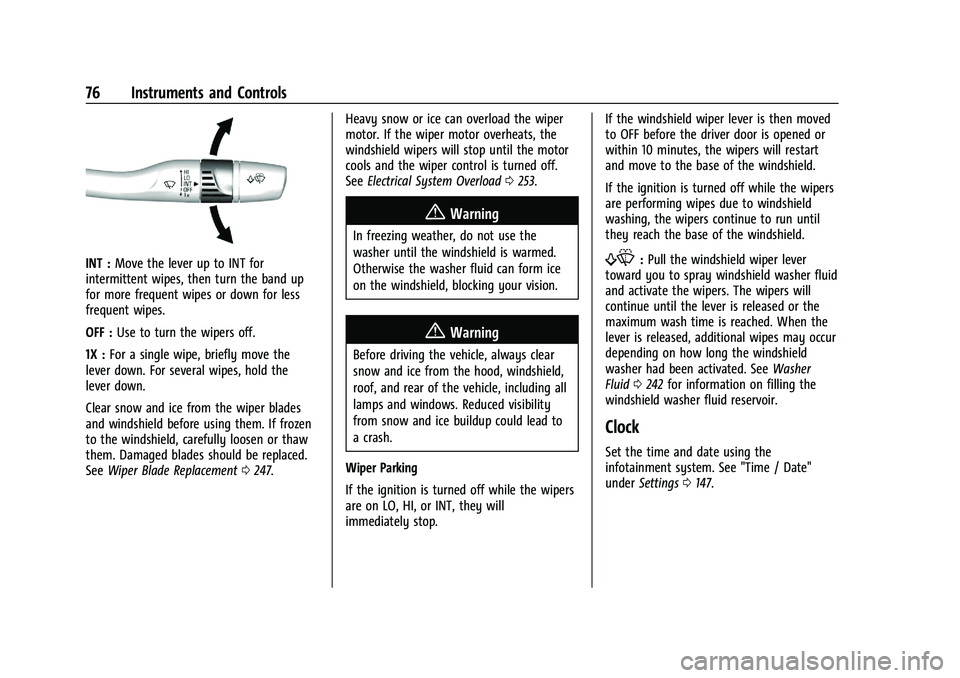
INT :Move the lever up to INT for
intermittent wipes, then turn the band up
for more frequent wipes or down for less
frequent wipes.
OFF : Use to turn the wipers off.
1X : For a single wipe, briefly move the
lever down. For several wipes, hold the
lever down.
Clear snow and ice from the wiper blades
and windshield before using them. If frozen
to the windshield, carefully loosen or thaw
them. Damaged blades should be replaced.
See Wiper Blade Replacement 0247. Heavy snow or ice can overload the wiper
motor. If the wiper motor overheats, the
windshield wipers will stop until the motor
cools and the wiper control is turned off.
See
Electrical System Overload 0253.
{Warning
In freezing weather, do not use the
washer until the windshield is warmed.
Otherwise the washer fluid can form ice
on the windshield, blocking your vision.
{Warning
Before driving the vehicle, always clear
snow and ice from the hood, windshield,
roof, and rear of the vehicle, including all
lamps and windows. Reduced visibility
from snow and ice buildup could lead to
a crash.
Wiper Parking
If the ignition is turned off while the wipers
are on LO, HI, or INT, they will
immediately stop. If the windshield wiper lever is then moved
to OFF before the driver door is opened or
within 10 minutes, the wipers will restart
and move to the base of the windshield.
If the ignition is turned off while the wipers
are performing wipes due to windshield
washing, the wipers continue to run until
they reach the base of the windshield.
f:
Pull the windshield wiper lever
toward you to spray windshield washer fluid
and activate the wipers. The wipers will
continue until the lever is released or the
maximum wash time is reached. When the
lever is released, additional wipes may occur
depending on how long the windshield
washer had been activated. See Washer
Fluid 0242 for information on filling the
windshield washer fluid reservoir.
Clock
Set the time and date using the
infotainment system. See "Time / Date"
under Settings 0147.
Page 108 of 351
Chevrolet Malibu Owner Manual (GMNA-Localizing-U.S./Canada-
14584249) - 2021 - CRC - 11/9/20
Lighting 107
The hazard warning flashers turn on
automatically if the airbags deploy.
Turn and Lane-Change Signals
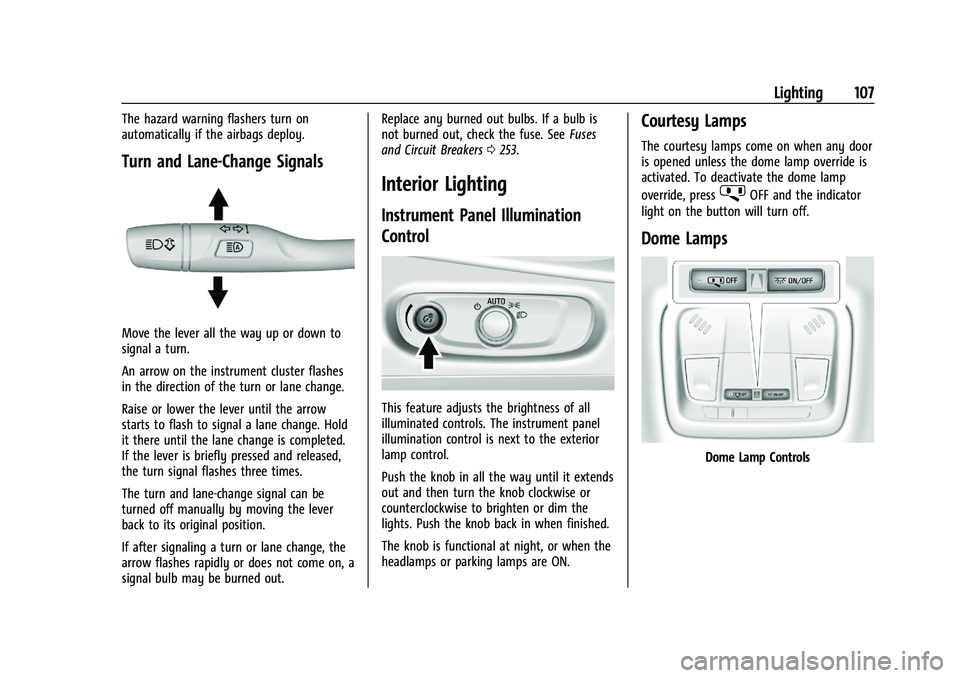
Move the lever all the way up or down to
signal a turn.
An arrow on the instrument cluster flashes
in the direction of the turn or lane change.
Raise or lower the lever until the arrow
starts to flash to signal a lane change. Hold
it there until the lane change is completed.
If the lever is briefly pressed and released,
the turn signal flashes three times.
The turn and lane-change signal can be
turned off manually by moving the lever
back to its original position.
If after signaling a turn or lane change, the
arrow flashes rapidly or does not come on, a
signal bulb may be burned out.Replace any burned out bulbs. If a bulb is
not burned out, check the fuse. See
Fuses
and Circuit Breakers 0253.
Interior Lighting
Instrument Panel Illumination
Control
This feature adjusts the brightness of all
illuminated controls. The instrument panel
illumination control is next to the exterior
lamp control.
Push the knob in all the way until it extends
out and then turn the knob clockwise or
counterclockwise to brighten or dim the
lights. Push the knob back in when finished.
The knob is functional at night, or when the
headlamps or parking lamps are ON.
Courtesy Lamps
The courtesy lamps come on when any door
is opened unless the dome lamp override is
activated. To deactivate the dome lamp
override, press
jOFF and the indicator
light on the button will turn off.
Dome Lamps
Dome Lamp Controls
Page 148 of 351
Chevrolet Malibu Owner Manual (GMNA-Localizing-U.S./Canada-
14584249) - 2021 - CRC - 11/9/20
Infotainment System 147
2. Select Phones
3. Touch
4next to the phone to be
disconnected.
4. Turn off Apple CarPlay or Android Auto.
Press
{on the center stack to return to the
Home Page.
Features are subject to change. For further
information on how to set up Android Auto
and Apple CarPlay in the vehicle, see
my.chevrolet.com.
Android Auto is provided by Google and is
subject to Google’s terms and privacy policy.
Apple CarPlay is provided by Apple and is
subject to Apple’s terms and privacy policy.
Data plan rates apply. For Android Auto
support and to see if your phone is
compatible, see https://support.google.com/
androidauto. For Apple CarPlay support and
to see if your phone is compatible, see
www.apple.com/ios/carplay/. Apple or
Google may change or suspend availability
at any time. Android Auto, Android, Google,
Google Play, and other marks are
trademarks of Google Inc.; Apple CarPlay is a
trademark of Apple Inc. Press
{on the center stack to exit Android
Auto or Apple CarPlay. To enter back into
Android Auto or Apple CarPlay, press and
hold
{on the center stack.
Apple CarPlay and Android Auto can be
disabled from the infotainment system. To
do this, touch Home, Settings, and then
touch the Apps tab along the top of the
display. Use the On/Off toggled to turn off
Apple CarPlay or Android Auto.
Settings
Certain settings can be managed in the
Owner Center sites when an account is
established, and may be modified if other
users have accessed the vehicle or created
accounts. This may result in changes to the
security or functionality of the infotainment
system. Some settings may also be
transferred to a new vehicle, if equipped. For
instructions, in the U.S. see
my.chevrolet.com or in Canada see
mychevrolet.ca or monchevrolet.ca.
Refer to the User Terms and Privacy
Statement for important details. To view,
touch the Settings icon on the Home Page
of the infotainment display. The settings menu may be organized into
three categories. Select the desired category
by touching System, Apps, or Vehicle.
To access the personalization menus:
1. Touch Settings on the Home Page on the infotainment display.
2. Touch the desired category to display a list of available options.
3. Touch to select the desired feature setting.
4. Touch the options on the infotainment display to disable or enable a feature.
5. Touchzto go to the top level of the
Settings menu.
System
The menu may contain the following:
Time / Date
Use the following features to set the clock:
.Automatic Time and Date: Touch Off or
On to enable or disable automatic update
of the time and date. When this feature
is on, the time and date cannot be
manually set.
.Set Time: Touch to manually set the time
using the controls on the infotainment
display.
Page 149 of 351
Chevrolet Malibu Owner Manual (GMNA-Localizing-U.S./Canada-
14584249) - 2021 - CRC - 11/9/20
148 Infotainment System
.Set Date: Touch to manually set the date
using the controls on the infotainment
display.
.Automatic Time Zone (If Equipped): Touch
Off or On to disable or enable automatic
update of the time zone based on vehicle
location. When this feature is on, the
time zone cannot be manually set.
.Select Time Zone: Touch to manually set
the time zone. Touch a time zone from
the list.
.Use 24-hour Format: Touch to specify the
clock format shown.
Touch Off or On to disable or enable.
Language
This will set the display language used on
the infotainment display. It may also use
the selected language for voice recognition
and audio feedback. Touch Language and
touch the appropriate language.
Phones
Touch to connect to a different cell phone or
mobile device source, disconnect a cell
phone or media device, or delete a cell
phone or media device. Wi-Fi Networks
This will show connected and available Wi-Fi
networks.
If a 4G LTE data package is not active on the
vehicle, the infotainment system can be
connected to an external protected Wi-Fi
network, such as a mobile device or home
hotspot, to utilize connected services.
Wi-Fi Hotspot
Touch and the following may display:.Wi-Fi Services: This allows devices to use
the vehicle hotspot.
Touch the controls on the infotainment
display to disable or enable.
.Wi-Fi Name: Touch to change the vehicle
Wi-Fi name.
.Wi-Fi Password: Touch to change the
vehicle Wi-Fi password.
.Connected Devices: Touch to show
connected devices.
.Share Hotspot Data: Touch On to allow
devices to use the vehicle hotspot and its
data, or touch Off to allow devices to
only use the vehicle hotspot but not
its data.Privacy
Touch and the following may display:
.Location Services: This setting enables or
disables sharing of vehicle location
outside the vehicle. Emergency services
will not be affected when Off is selected.
.Data Services: If equipped, this setting
determines if data sharing can be used by
features including Wi-Fi, Hotspot, and
applications. Touch Off to disable data
services. Emergency services and phone
calls, such as calls with OnStar Advisors or
others, will not be affected when Off is
selected.
.Voice Recognition Sharing: This setting
determines if voice commands can be
shared with a cloud-based voice
recognition system. Touch Off to prevent
the sharing and possible recording of your
voice commands with this system. This
may limit the system’s ability to
understand your voice commands and
may disable some features.
.Types: This setting lists all
Android-defined as dangerous permissions
currently used by the infotainment
system, the number of applications that
Page 165 of 351
Chevrolet Malibu Owner Manual (GMNA-Localizing-U.S./Canada-
14584249) - 2021 - CRC - 11/9/20
164 Climate Controls
Climate Controls
Climate Control Systems
Climate Control Systems . . . . . . . . . . . . . . 164
Dual Automatic Climate ControlSystem . . . . . . . . . . . . . . . . . . . . . . . . . . . . . . 166
Air Vents
Air Vents . . . . . . . . . . . . . . . . . . . . . . . . . . . . . . 169
Maintenance
Passenger Compartment Air Filter . . . . . 170
Service . . . . . . . . . . . . . . . . . . . . . . . . . . . . . . . . . 171
Climate Control Systems
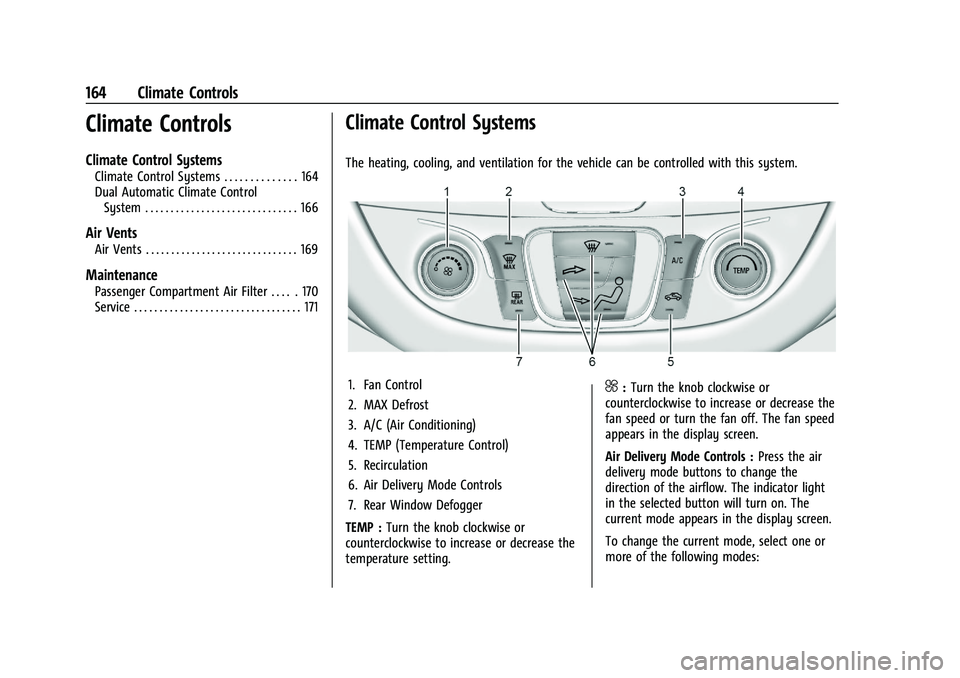
The heating, cooling, and ventilation for the vehicle can be controlled with this system.
1. Fan Control
2. MAX Defrost
3. A/C (Air Conditioning)
4. TEMP (Temperature Control)
5. Recirculation
6. Air Delivery Mode Controls
7. Rear Window Defogger
TEMP : Turn the knob clockwise or
counterclockwise to increase or decrease the
temperature setting.^: Turn the knob clockwise or
counterclockwise to increase or decrease the
fan speed or turn the fan off. The fan speed
appears in the display screen.
Air Delivery Mode Controls : Press the air
delivery mode buttons to change the
direction of the airflow. The indicator light
in the selected button will turn on. The
current mode appears in the display screen.
To change the current mode, select one or
more of the following modes: