2022 CHEVROLET MALIBU clock
[x] Cancel search: clockPage 168 of 351
Chevrolet Malibu Owner Manual (GMNA-Localizing-U.S./Canada-
14584249) - 2021 - CRC - 11/9/20
Climate Controls 167
The fan, air delivery mode, air conditioning,
driver and passenger temperatures, and Sync
settings can be controlled by touching
CLIMATE on the infotainment Home Page or
the climate button in the climate control
display application tray. A selection can then
be made on the front climate control page
displayed. See the infotainment manual.
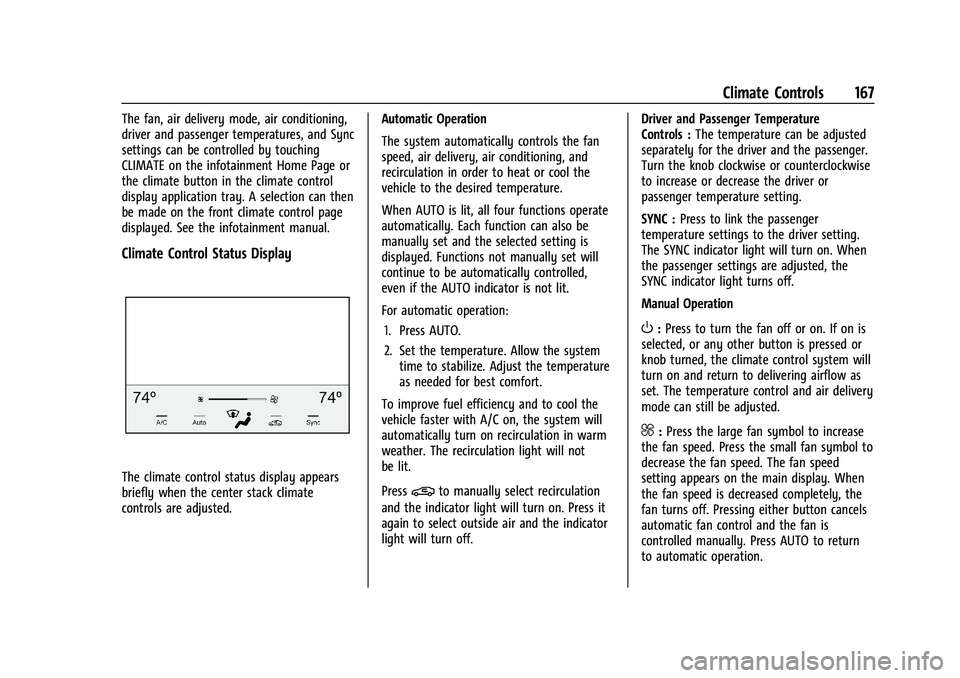
Climate Control Status Display
The climate control status display appears
briefly when the center stack climate
controls are adjusted.Automatic Operation
The system automatically controls the fan
speed, air delivery, air conditioning, and
recirculation in order to heat or cool the
vehicle to the desired temperature.
When AUTO is lit, all four functions operate
automatically. Each function can also be
manually set and the selected setting is
displayed. Functions not manually set will
continue to be automatically controlled,
even if the AUTO indicator is not lit.
For automatic operation:
1. Press AUTO.
2. Set the temperature. Allow the system time to stabilize. Adjust the temperature
as needed for best comfort.
To improve fuel efficiency and to cool the
vehicle faster with A/C on, the system will
automatically turn on recirculation in warm
weather. The recirculation light will not
be lit.
Press@to manually select recirculation
and the indicator light will turn on. Press it
again to select outside air and the indicator
light will turn off. Driver and Passenger Temperature
Controls :
The temperature can be adjusted
separately for the driver and the passenger.
Turn the knob clockwise or counterclockwise
to increase or decrease the driver or
passenger temperature setting.
SYNC : Press to link the passenger
temperature settings to the driver setting.
The SYNC indicator light will turn on. When
the passenger settings are adjusted, the
SYNC indicator light turns off.
Manual Operation
O: Press to turn the fan off or on. If on is
selected, or any other button is pressed or
knob turned, the climate control system will
turn on and return to delivering airflow as
set. The temperature control and air delivery
mode can still be adjusted.
^: Press the large fan symbol to increase
the fan speed. Press the small fan symbol to
decrease the fan speed. The fan speed
setting appears on the main display. When
the fan speed is decreased completely, the
fan turns off. Pressing either button cancels
automatic fan control and the fan is
controlled manually. Press AUTO to return
to automatic operation.
Page 242 of 351
Chevrolet Malibu Owner Manual (GMNA-Localizing-U.S./Canada-
14584249) - 2021 - CRC - 11/9/20
Vehicle Care 241
Warning (Continued)
including the pressure cap, is hot. Wait
for the cooling system and pressure cap
to cool.
Caution
Failure to follow the specific coolant fill
procedure could cause the engine to
overheat and could cause system
damage. If coolant is not visible in the
surge tank, contact your dealer.
The coolant surge tank pressure cap can be
removed when the cooling system, including
the surge tank pressure cap and upper
radiator hose, is no longer hot.
1. Turn the pressure cap slowly counterclockwise. If a hiss is heard, wait
for that to stop. A hiss means there is
still some pressure left. 2. Keep turning the cap and remove it.
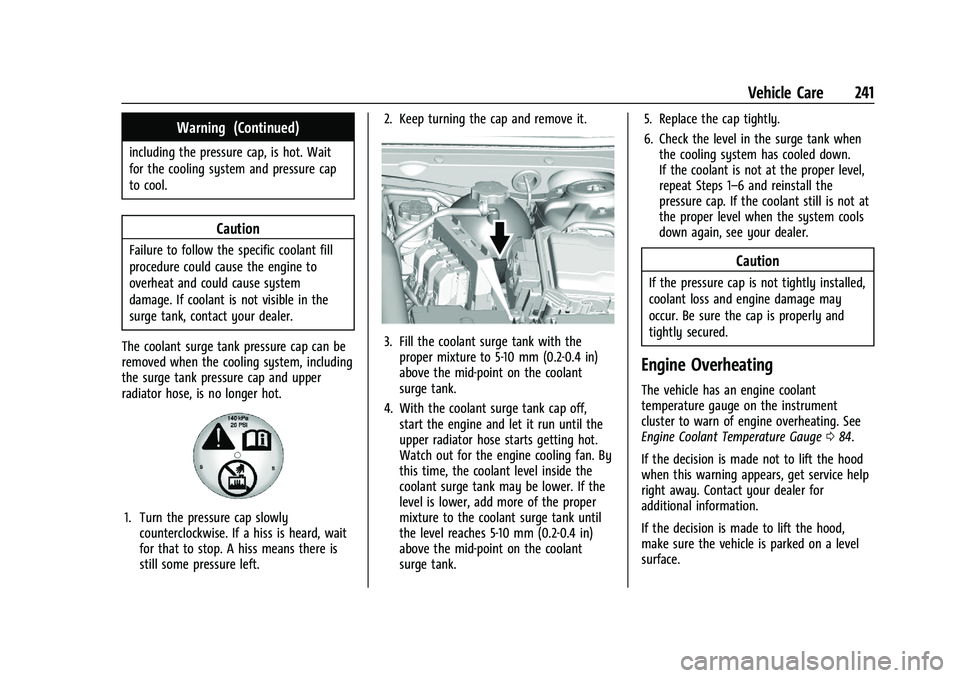
3. Fill the coolant surge tank with the
proper mixture to 5-10 mm (0.2-0.4 in)
above the mid-point on the coolant
surge tank.
4. With the coolant surge tank cap off, start the engine and let it run until the
upper radiator hose starts getting hot.
Watch out for the engine cooling fan. By
this time, the coolant level inside the
coolant surge tank may be lower. If the
level is lower, add more of the proper
mixture to the coolant surge tank until
the level reaches 5-10 mm (0.2-0.4 in)
above the mid-point on the coolant
surge tank. 5. Replace the cap tightly.
6. Check the level in the surge tank when
the cooling system has cooled down.
If the coolant is not at the proper level,
repeat Steps 1–6 and reinstall the
pressure cap. If the coolant still is not at
the proper level when the system cools
down again, see your dealer.
Caution
If the pressure cap is not tightly installed,
coolant loss and engine damage may
occur. Be sure the cap is properly and
tightly secured.
Engine Overheating
The vehicle has an engine coolant
temperature gauge on the instrument
cluster to warn of engine overheating. See
Engine Coolant Temperature Gauge 084.
If the decision is made not to lift the hood
when this warning appears, get service help
right away. Contact your dealer for
additional information.
If the decision is made to lift the hood,
make sure the vehicle is parked on a level
surface.
Page 251 of 351
Chevrolet Malibu Owner Manual (GMNA-Localizing-U.S./Canada-
14584249) - 2021 - CRC - 11/9/20
250 Vehicle Care
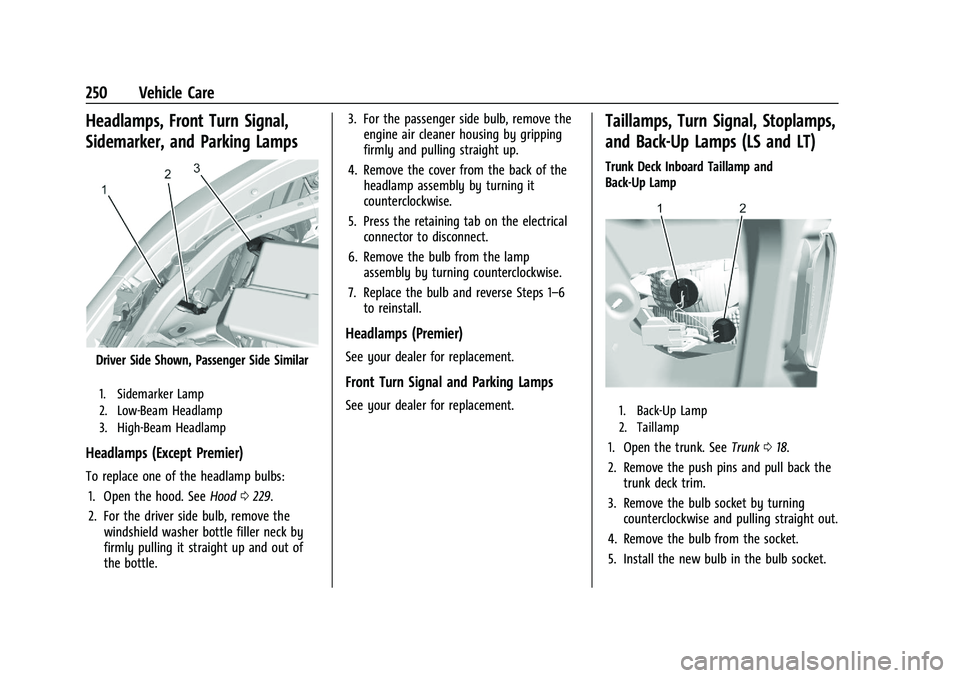
Headlamps, Front Turn Signal,
Sidemarker, and Parking Lamps
Driver Side Shown, Passenger Side Similar
1. Sidemarker Lamp
2. Low-Beam Headlamp
3. High-Beam Headlamp
Headlamps (Except Premier)
To replace one of the headlamp bulbs:1. Open the hood. See Hood0229.
2. For the driver side bulb, remove the windshield washer bottle filler neck by
firmly pulling it straight up and out of
the bottle. 3. For the passenger side bulb, remove the
engine air cleaner housing by gripping
firmly and pulling straight up.
4. Remove the cover from the back of the headlamp assembly by turning it
counterclockwise.
5. Press the retaining tab on the electrical connector to disconnect.
6. Remove the bulb from the lamp assembly by turning counterclockwise.
7. Replace the bulb and reverse Steps 1–6 to reinstall.
Headlamps (Premier)
See your dealer for replacement.
Front Turn Signal and Parking Lamps
See your dealer for replacement.
Taillamps, Turn Signal, Stoplamps,
and Back-Up Lamps (LS and LT)
Trunk Deck Inboard Taillamp and
Back-Up Lamp
1. Back-Up Lamp
2. Taillamp
1. Open the trunk. See Trunk018.
2. Remove the push pins and pull back the trunk deck trim.
3. Remove the bulb socket by turning counterclockwise and pulling straight out.
4. Remove the bulb from the socket.
5. Install the new bulb in the bulb socket.
Page 252 of 351
Chevrolet Malibu Owner Manual (GMNA-Localizing-U.S./Canada-
14584249) - 2021 - CRC - 11/9/20
Vehicle Care 251
6. Install the bulb socket by turningclockwise.
7. Install the trunk deck trim.
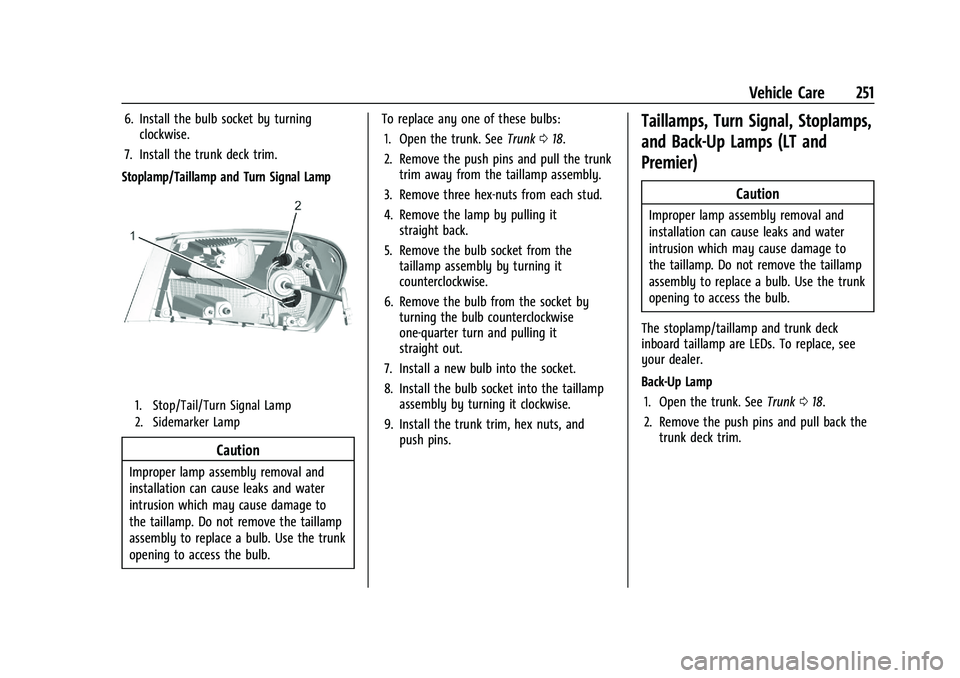
Stoplamp/Taillamp and Turn Signal Lamp
1. Stop/Tail/Turn Signal Lamp
2. Sidemarker Lamp
Caution
Improper lamp assembly removal and
installation can cause leaks and water
intrusion which may cause damage to
the taillamp. Do not remove the taillamp
assembly to replace a bulb. Use the trunk
opening to access the bulb. To replace any one of these bulbs:
1. Open the trunk. See Trunk018.
2. Remove the push pins and pull the trunk trim away from the taillamp assembly.
3. Remove three hex-nuts from each stud.
4. Remove the lamp by pulling it straight back.
5. Remove the bulb socket from the taillamp assembly by turning it
counterclockwise.
6. Remove the bulb from the socket by turning the bulb counterclockwise
one-quarter turn and pulling it
straight out.
7. Install a new bulb into the socket.
8. Install the bulb socket into the taillamp assembly by turning it clockwise.
9. Install the trunk trim, hex nuts, and push pins.
Taillamps, Turn Signal, Stoplamps,
and Back-Up Lamps (LT and
Premier)
Caution
Improper lamp assembly removal and
installation can cause leaks and water
intrusion which may cause damage to
the taillamp. Do not remove the taillamp
assembly to replace a bulb. Use the trunk
opening to access the bulb.
The stoplamp/taillamp and trunk deck
inboard taillamp are LEDs. To replace, see
your dealer.
Back-Up Lamp 1. Open the trunk. See Trunk018.
2. Remove the push pins and pull back the trunk deck trim.
Page 253 of 351
Chevrolet Malibu Owner Manual (GMNA-Localizing-U.S./Canada-
14584249) - 2021 - CRC - 11/9/20
252 Vehicle Care
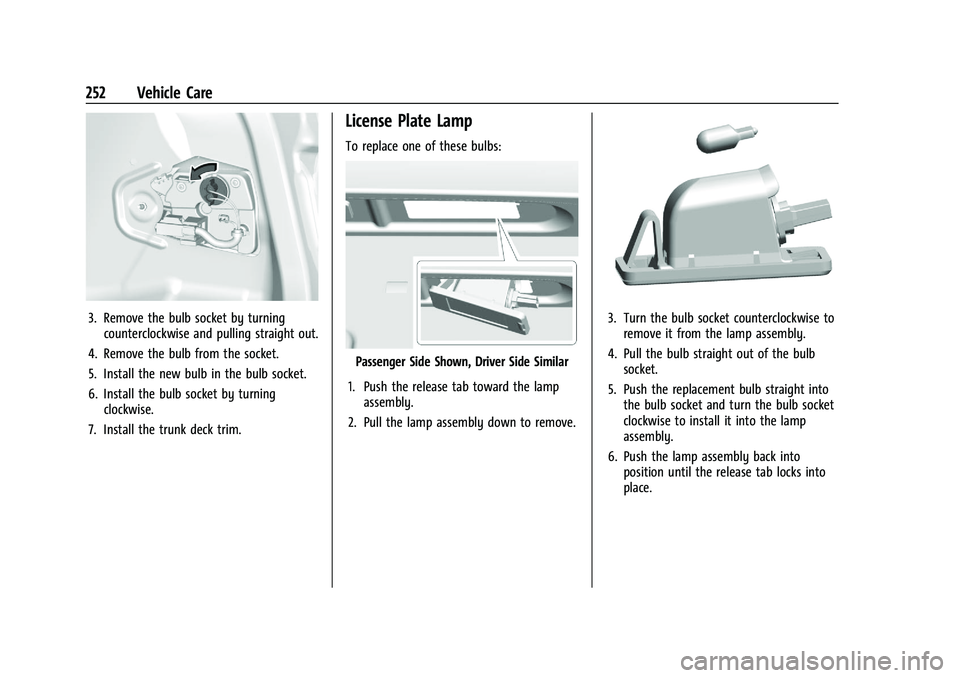
3. Remove the bulb socket by turningcounterclockwise and pulling straight out.
4. Remove the bulb from the socket.
5. Install the new bulb in the bulb socket.
6. Install the bulb socket by turning clockwise.
7. Install the trunk deck trim.
License Plate Lamp
To replace one of these bulbs:
Passenger Side Shown, Driver Side Similar
1. Push the release tab toward the lamp assembly.
2. Pull the lamp assembly down to remove.
3. Turn the bulb socket counterclockwise to remove it from the lamp assembly.
4. Pull the bulb straight out of the bulb socket.
5. Push the replacement bulb straight into the bulb socket and turn the bulb socket
clockwise to install it into the lamp
assembly.
6. Push the lamp assembly back into position until the release tab locks into
place.
Page 282 of 351
Chevrolet Malibu Owner Manual (GMNA-Localizing-U.S./Canada-
14584249) - 2021 - CRC - 11/9/20
Vehicle Care 281
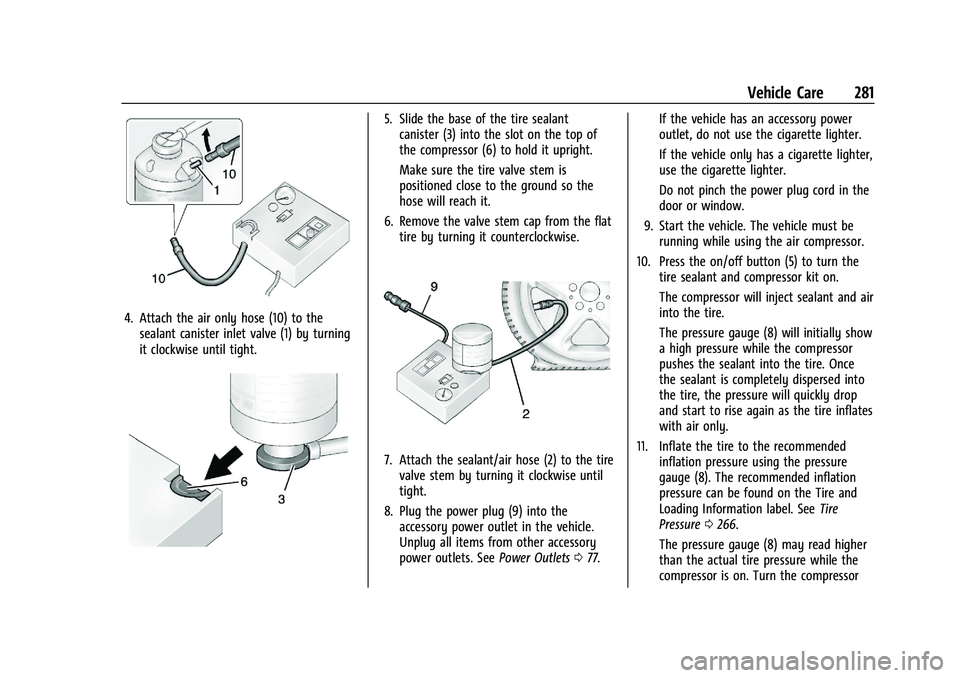
4. Attach the air only hose (10) to thesealant canister inlet valve (1) by turning
it clockwise until tight.
5. Slide the base of the tire sealantcanister (3) into the slot on the top of
the compressor (6) to hold it upright.
Make sure the tire valve stem is
positioned close to the ground so the
hose will reach it.
6. Remove the valve stem cap from the flat tire by turning it counterclockwise.
7. Attach the sealant/air hose (2) to the tirevalve stem by turning it clockwise until
tight.
8. Plug the power plug (9) into the accessory power outlet in the vehicle.
Unplug all items from other accessory
power outlets. See Power Outlets077. If the vehicle has an accessory power
outlet, do not use the cigarette lighter.
If the vehicle only has a cigarette lighter,
use the cigarette lighter.
Do not pinch the power plug cord in the
door or window.
9. Start the vehicle. The vehicle must be running while using the air compressor.
10. Press the on/off button (5) to turn the tire sealant and compressor kit on.
The compressor will inject sealant and air
into the tire.
The pressure gauge (8) will initially show
a high pressure while the compressor
pushes the sealant into the tire. Once
the sealant is completely dispersed into
the tire, the pressure will quickly drop
and start to rise again as the tire inflates
with air only.
11. Inflate the tire to the recommended inflation pressure using the pressure
gauge (8). The recommended inflation
pressure can be found on the Tire and
Loading Information label. See Tire
Pressure 0266.
The pressure gauge (8) may read higher
than the actual tire pressure while the
compressor is on. Turn the compressor
Page 283 of 351
Chevrolet Malibu Owner Manual (GMNA-Localizing-U.S./Canada-
14584249) - 2021 - CRC - 11/9/20
282 Vehicle Care
off to get an accurate pressure reading.
The compressor may be turned on/off
until the correct pressure is reached.
Caution
If the recommended pressure cannot be
reached after approximately 25 minutes,
the vehicle should not be driven farther.
The tire is too severely damaged and the
tire sealant and compressor kit cannot
inflate the tire. Remove the power plug
from the accessory power outlet and
unscrew the inflating hose from the tire
valve. SeeRoadside Assistance Program
0 323.
12. Press the on/off button (5) to turn the tire sealant and compressor kit off.
The tire is not sealed and will continue
to leak air until the vehicle is driven and
the sealant is distributed in the tire.
Therefore, Steps 13–21 must be done
immediately after Step 12.
Be careful while handling the tire sealant
and compressor kit as it could be warm
after usage.
13. Unplug the power plug (9) from the accessory power outlet in the vehicle. 14. Turn the sealant/air hose (2)
counterclockwise to remove it from the
tire valve stem.
15. Replace the tire valve stem cap.
16. Remove the tire sealant canister (4) from the slot on top of the compressor (6).
17. Turn the air only hose (10) counterclockwise to remove it from the
tire sealant canister inlet valve (1).
18. Turn the sealant/air hose (2) clockwise onto the sealant canister inlet valve (1)
to prevent sealant leakage.
19. Return the air only hose (10) and power plug (9) back to their original storage
location.
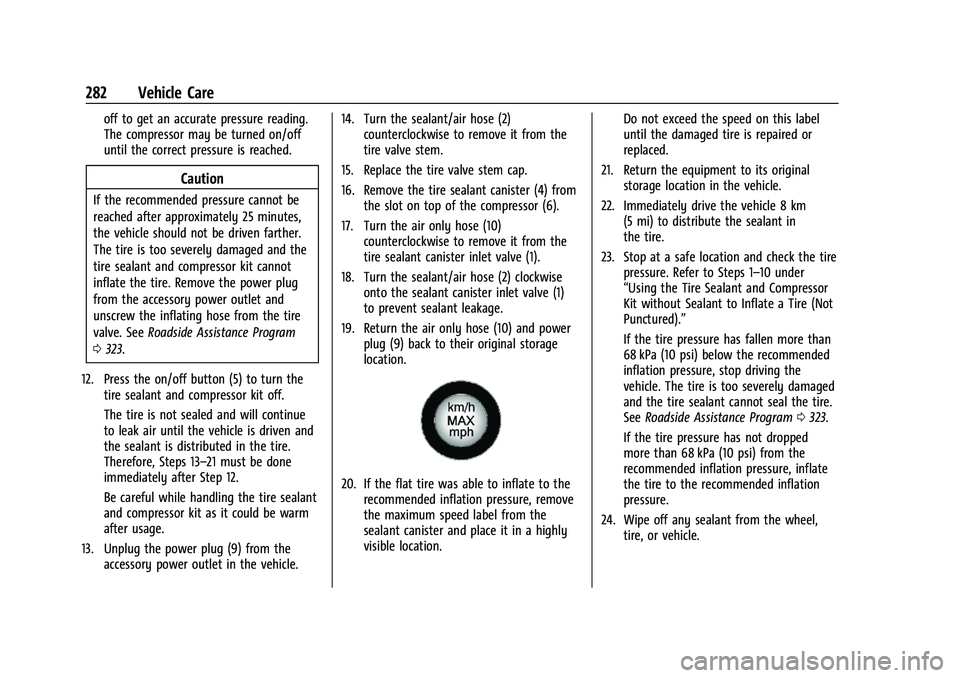
20. If the flat tire was able to inflate to therecommended inflation pressure, remove
the maximum speed label from the
sealant canister and place it in a highly
visible location. Do not exceed the speed on this label
until the damaged tire is repaired or
replaced.
21. Return the equipment to its original storage location in the vehicle.
22. Immediately drive the vehicle 8 km (5 mi) to distribute the sealant in
the tire.
23. Stop at a safe location and check the tire pressure. Refer to Steps 1–10 under
“Using the Tire Sealant and Compressor
Kit without Sealant to Inflate a Tire (Not
Punctured).”
If the tire pressure has fallen more than
68 kPa (10 psi) below the recommended
inflation pressure, stop driving the
vehicle. The tire is too severely damaged
and the tire sealant cannot seal the tire.
SeeRoadside Assistance Program 0323.
If the tire pressure has not dropped
more than 68 kPa (10 psi) from the
recommended inflation pressure, inflate
the tire to the recommended inflation
pressure.
24. Wipe off any sealant from the wheel, tire, or vehicle.
Page 284 of 351
Chevrolet Malibu Owner Manual (GMNA-Localizing-U.S./Canada-
14584249) - 2021 - CRC - 11/9/20
Vehicle Care 283
25. Dispose of the used tire sealantcanister (4) at a local dealer or in
accordance with local state codes and
practices.
26. Replace it with a new canister available from your dealer.
27. After temporarily sealing a tire using the tire sealant and compressor kit, take the
vehicle to an authorized dealer within
161 km (100 mi) of driving to have the
tire repaired or replaced.
Using the Tire Sealant and Compressor
Kit without Sealant to Inflate a Tire (Not
Punctured)
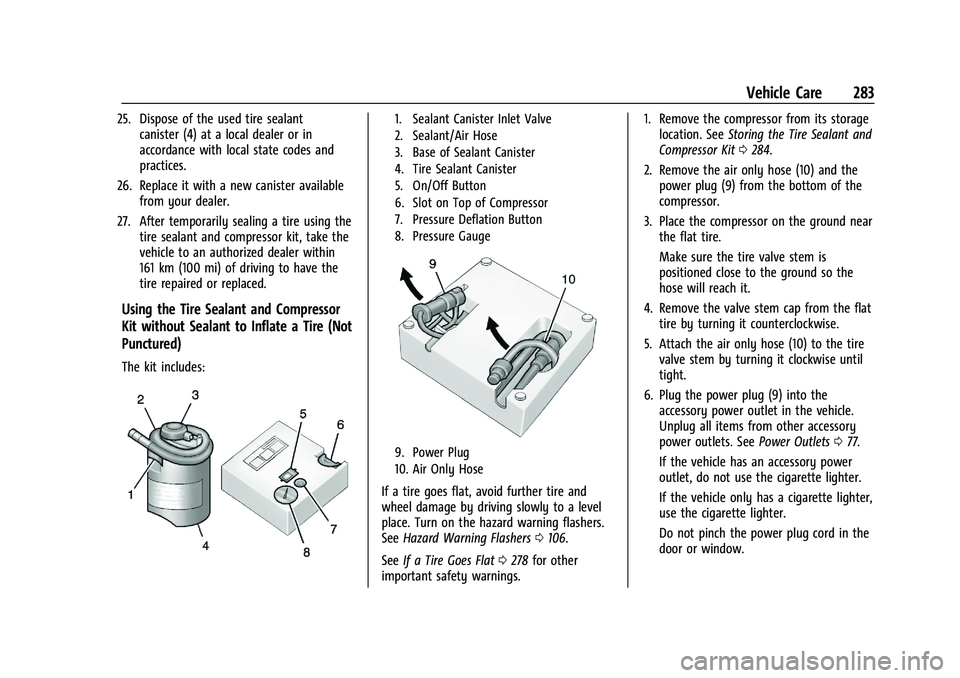
The kit includes:
1. Sealant Canister Inlet Valve
2. Sealant/Air Hose
3. Base of Sealant Canister
4. Tire Sealant Canister
5. On/Off Button
6. Slot on Top of Compressor
7. Pressure Deflation Button
8. Pressure Gauge
9. Power Plug
10. Air Only Hose
If a tire goes flat, avoid further tire and
wheel damage by driving slowly to a level
place. Turn on the hazard warning flashers.
SeeHazard Warning Flashers 0106.
See If a Tire Goes Flat 0278 for other
important safety warnings. 1. Remove the compressor from its storage
location. See Storing the Tire Sealant and
Compressor Kit 0284.
2. Remove the air only hose (10) and the power plug (9) from the bottom of the
compressor.
3. Place the compressor on the ground near the flat tire.
Make sure the tire valve stem is
positioned close to the ground so the
hose will reach it.
4. Remove the valve stem cap from the flat tire by turning it counterclockwise.
5. Attach the air only hose (10) to the tire valve stem by turning it clockwise until
tight.
6. Plug the power plug (9) into the accessory power outlet in the vehicle.
Unplug all items from other accessory
power outlets. See Power Outlets077.
If the vehicle has an accessory power
outlet, do not use the cigarette lighter.
If the vehicle only has a cigarette lighter,
use the cigarette lighter.
Do not pinch the power plug cord in the
door or window.