2022 CHEVROLET MALIBU wheel bolts
[x] Cancel search: wheel boltsPage 224 of 351
Chevrolet Malibu Owner Manual (GMNA-Localizing-U.S./Canada-
14584249) - 2021 - CRC - 11/9/20
Driving and Operating 223
Making TurnsCaution
Turn more slowly and make wider arcs
when towing a trailer to prevent damage
to your vehicle. Making very sharp turns
could cause the trailer to contact the
vehicle.
Make wider turns than normal when towing,
so trailer will not go over soft shoulders,
over curbs, or strike road signs, trees,
or other objects. Always signal turns well in
advance. Do not steer or brake suddenly.
Driving on Grades
Reduce speed and shift to a lower gear
before starting down a long or steep
downhill grade. If the transmission is not
shifted down, the brakes may overheat and
result in reduced braking efficiency.
The vehicle can tow in D (Drive). Shift the
transmission to a lower gear if the
transmission shifts too often under heavy
loads and/or hilly conditions.
When towing at higher altitudes, engine
coolant will boil at a lower temperature
than at lower altitudes. If the engine is
turned off immediately after towing at high altitude on steep uphill grades, the vehicle
could show signs similar to engine
overheating. To avoid this, let the engine
run, preferably on level ground, with the
transmission in P (Park) for a few minutes
before turning the engine off. If the
overheat warning comes on, see
Engine
Overheating 0241.
Parking on Hills
{Warning
To prevent serious injury or death,
always park your vehicle and trailer on a
level surface when possible.
When parking your vehicle and your trailer
on a hill: 1. Press the brake pedal, but do not shift into P (Park) yet. Turn the wheels into
the curb if facing downhill or into traffic
if facing uphill.
2. Have someone place chocks under the trailer wheels.
3. When the wheel chocks are in place, gradually release the brake pedal to
allow the chocks to absorb the load of
the trailer. 4. Reapply the brake pedal. Then apply the
parking brake and shift into P (Park).
5. Release the brake pedal.
Leaving After Parking on a Hill
1. Apply and hold the brake pedal.
.Start the engine.
.Shift into a gear.
.Release the parking brake.
2. Let up on the brake pedal.
3. Drive slowly until the trailer is clear of the chocks.
4. Stop and have someone pick up and store the chocks.
Maintenance When Trailer Towing
The vehicle needs service more often when
used to tow trailers. See Maintenance
Schedule 0304. It is especially important to
check the automatic transmission fluid,
engine oil, axle lubricant, belts, cooling
system, and brake system before and during
each trip.
Check periodically that all nuts and bolts on
the trailer hitch are tight.
Page 274 of 351
Chevrolet Malibu Owner Manual (GMNA-Localizing-U.S./Canada-
14584249) - 2021 - CRC - 11/9/20
Vehicle Care 273
Check that all wheel nuts are properly
tightened. See“Wheel Nut Torque”
under Capacities and Specifications
0 317, and “Removing the Flat Tire and
Installing the Spare Tire” underTire
Changing 0285.
{Warning
Rust or dirt on a wheel, or on the
parts to which it is fastened, can
cause wheel nuts to become loose
over time. The wheel could come off
and cause a crash. When changing a
wheel, remove any rust or dirt from
places where the wheel attaches to
the vehicle. In an emergency, a cloth
or paper towel can be used; however,
use a scraper or wire brush later to
remove all rust or dirt.
Lightly coat the inner diameter of the
wheel hub opening with wheel bearing
grease after a wheel change or tire
rotation to prevent corrosion or rust
buildup.
{Warning
Do not apply grease to the wheel
mounting surface, wheel conical
seats, or the wheel nuts or bolts.
Grease applied to these areas could
cause a wheel to become loose or
come off, resulting in a crash.
When It Is Time for New Tires
Factors, such as maintenance, temperatures,
driving speeds, vehicle loading, and road
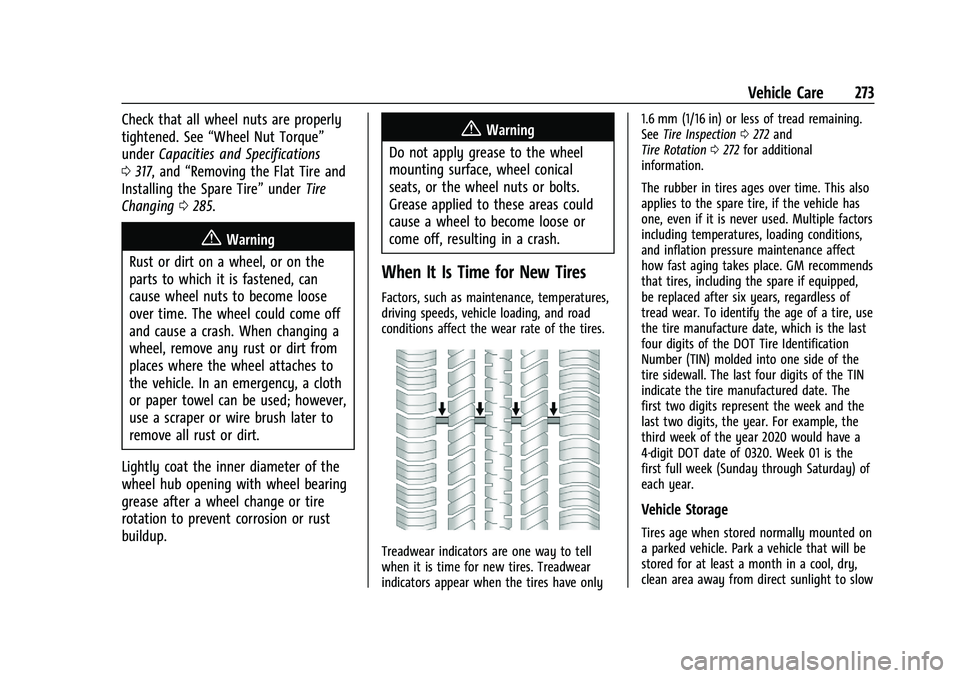
conditions affect the wear rate of the tires.
Treadwear indicators are one way to tell
when it is time for new tires. Treadwear
indicators appear when the tires have only 1.6 mm (1/16 in) or less of tread remaining.
See
Tire Inspection 0272 and
Tire Rotation 0272 for additional
information.
The rubber in tires ages over time. This also
applies to the spare tire, if the vehicle has
one, even if it is never used. Multiple factors
including temperatures, loading conditions,
and inflation pressure maintenance affect
how fast aging takes place. GM recommends
that tires, including the spare if equipped,
be replaced after six years, regardless of
tread wear. To identify the age of a tire, use
the tire manufacture date, which is the last
four digits of the DOT Tire Identification
Number (TIN) molded into one side of the
tire sidewall. The last four digits of the TIN
indicate the tire manufactured date. The
first two digits represent the week and the
last two digits, the year. For example, the
third week of the year 2020 would have a
4-digit DOT date of 0320. Week 01 is the
first full week (Sunday through Saturday) of
each year.
Vehicle Storage
Tires age when stored normally mounted on
a parked vehicle. Park a vehicle that will be
stored for at least a month in a cool, dry,
clean area away from direct sunlight to slow
Page 277 of 351
Chevrolet Malibu Owner Manual (GMNA-Localizing-U.S./Canada-
14584249) - 2021 - CRC - 11/9/20
276 Vehicle Care
conditions on a specified government
test course. For example, a tire graded
150 would wear one and one-half (1½)
times as well on the government course
as a tire graded 100. The relative
performance of tires depends upon the
actual conditions of their use, however,
and may depart significantly from the
norm due to variations in driving habits,
service practices and differences in road
characteristics and climate.
Traction
The traction grades, from highest to
lowest, are AA, A, B, and C. Those
grades represent the tire's ability to
stop on wet pavement as measured
under controlled conditions on specified
government test surfaces of asphalt and
concrete. A tire marked C may have
poor traction performance. Warning:
The traction grade assigned to this tire
is based on straight-ahead braking
traction tests, and does not include
acceleration, cornering, hydroplaning,
or peak traction characteristics.Temperature
The temperature grades are A (the
highest), B, and C, representing the
tire's resistance to the generation of
heat and its ability to dissipate heat
when tested under controlled conditions
on a specified indoor laboratory test
wheel. Sustained high temperature can
cause the material of the tire to
degenerate and reduce tire life, and
excessive temperature can lead to
sudden tire failure. The grade C
corresponds to a level of performance
which all passenger car tires must meet
under the Federal Motor Safety
Standard No. 109. Grades B and A
represent higher levels of performance
on the laboratory test wheel than the
minimum required by law. Warning:
The temperature grade for this tire is
established for a tire that is properly
inflated and not overloaded. Excessive
speed, underinflation, or excessive
loading, either separately or in
combination, can cause heat buildup
and possible tire failure.Wheel Alignment and Tire
Balance
The tires and wheels were aligned and
balanced at the factory to provide the
longest tire life and best overall
performance. Adjustments to wheel
alignment and tire balancing are not
necessary on a regular basis. Consider an
alignment check if there is unusual tire wear
or the vehicle is significantly pulling to one
side or the other. Some slight pull to the
left or right, depending on the crown of the
road and/or other road surface variations
such as troughs or ruts, is normal. If the
vehicle is vibrating when driving on a
smooth road, the tires and wheels may
need to be rebalanced. See your dealer for
proper diagnosis.
Wheel Replacement
Replace any wheel that is bent, cracked,
or badly rusted or corroded. If wheel nuts
keep coming loose, the wheel, wheel bolts,
and wheel nuts should be replaced. If the
wheel leaks air, replace it. Some aluminum
wheels can be repaired. See your dealer if
any of these conditions exist.
Page 278 of 351
Chevrolet Malibu Owner Manual (GMNA-Localizing-U.S./Canada-
14584249) - 2021 - CRC - 11/9/20
Vehicle Care 277
Your dealer will know the kind of wheel that
is needed.
Each new wheel should have the same
load-carrying capacity, diameter, width,
offset, and be mounted the same way as
the one it replaces.
Replace wheels, wheel bolts, wheel nuts,
or Tire Pressure Monitor System (TPMS)
sensors with new GM original equipment
parts.
{Warning
Using the wrong replacement wheels,
wheel bolts, or wheel nuts can be
dangerous. It could affect the braking and
handling of the vehicle. Tires can lose air,
and cause loss of control, causing a crash.
Always use the correct wheel, wheel
bolts, and wheel nuts for replacement.
Caution
The wrong wheel can also cause
problems with bearing life, brake cooling,
speedometer or odometer calibration,
headlamp aim, bumper height, vehicle
ground clearance, and tire or tire chain
clearance to the body and chassis.
Used Replacement Wheels
{Warning
Replacing a wheel with a used one is
dangerous. How it has been used or how
far it has been driven may be unknown.
It could fail suddenly and cause a crash.
When replacing wheels, use a new GM
original equipment wheel.
Tire Chains
{Warning
If the vehicle has 245/45R18 or 245/40R19
size tires, do not use tire chains. There is
not enough clearance. Tire chains used on
a vehicle without the proper amount of
clearance can cause damage to the
brakes, suspension, or other vehicle parts.
The area damaged by the tire chains
could cause loss of control and a crash.
Use another type of traction device only
if its manufacturer recommends it for the
vehicle's tire size combination and road
conditions. Follow that manufacturer's
instructions. To avoid vehicle damage,
drive slow and readjust or remove the(Continued)
Warning (Continued)
traction device if it contacts the vehicle.
Do not spin the wheels. If traction
devices are used, install them on the
front tires.
Caution
If the vehicle is equipped with a tire size
other than 245/45R18 or 245/40R19, use
tire chains only where legal and only
when necessary. Use low profile chains
that add no more than 12 mm thickness
to the tire tread and inner sidewall. Use
chains that are the proper size for the
tires. Install them on the tires of the
front axle. Do not use chains on the tires
of the rear axle. Tighten them as tightly
as possible with the ends securely
fastened. Drive slowly and follow the
chain manufacturer's instructions. If the
chains contact the vehicle, stop and
retighten them. If the contact continues,
slow down until it stops. Driving too fast
or spinning the wheels with chains on
will damage the vehicle.
Page 286 of 351
Chevrolet Malibu Owner Manual (GMNA-Localizing-U.S./Canada-
14584249) - 2021 - CRC - 11/9/20
Vehicle Care 285
Tire Changing
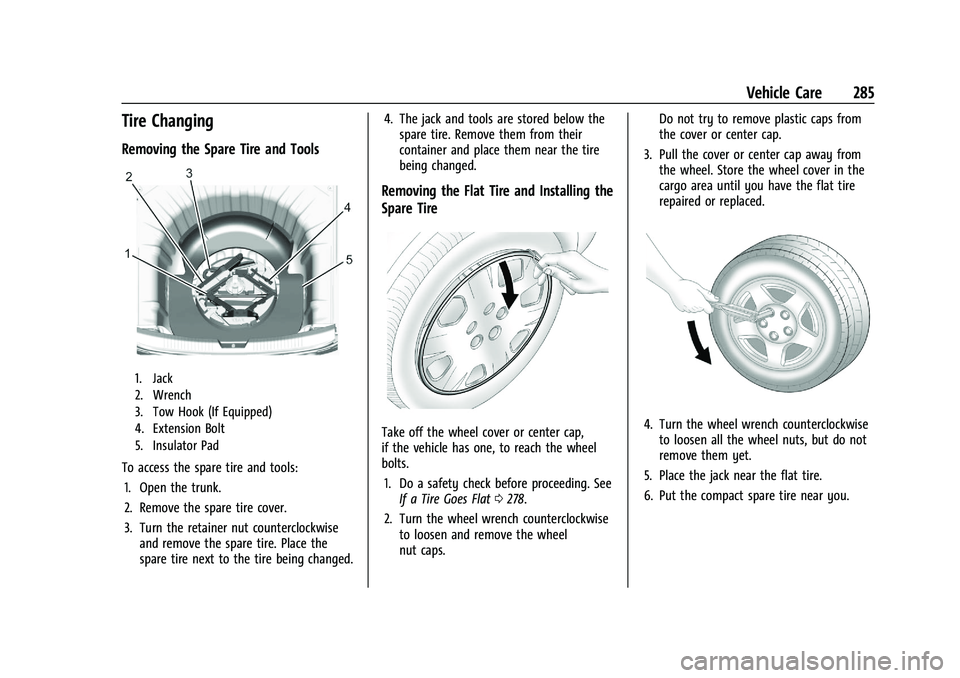
Removing the Spare Tire and Tools
1. Jack
2. Wrench
3. Tow Hook (If Equipped)
4. Extension Bolt
5. Insulator Pad
To access the spare tire and tools:1. Open the trunk.
2. Remove the spare tire cover.
3. Turn the retainer nut counterclockwise and remove the spare tire. Place the
spare tire next to the tire being changed. 4. The jack and tools are stored below the
spare tire. Remove them from their
container and place them near the tire
being changed.
Removing the Flat Tire and Installing the
Spare Tire
Take off the wheel cover or center cap,
if the vehicle has one, to reach the wheel
bolts.
1. Do a safety check before proceeding. See If a Tire Goes Flat 0278.
2. Turn the wheel wrench counterclockwise to loosen and remove the wheel
nut caps. Do not try to remove plastic caps from
the cover or center cap.
3. Pull the cover or center cap away from the wheel. Store the wheel cover in the
cargo area until you have the flat tire
repaired or replaced.4. Turn the wheel wrench counterclockwiseto loosen all the wheel nuts, but do not
remove them yet.
5. Place the jack near the flat tire.
6. Put the compact spare tire near you.
Page 288 of 351
Chevrolet Malibu Owner Manual (GMNA-Localizing-U.S./Canada-
14584249) - 2021 - CRC - 11/9/20
Vehicle Care 287
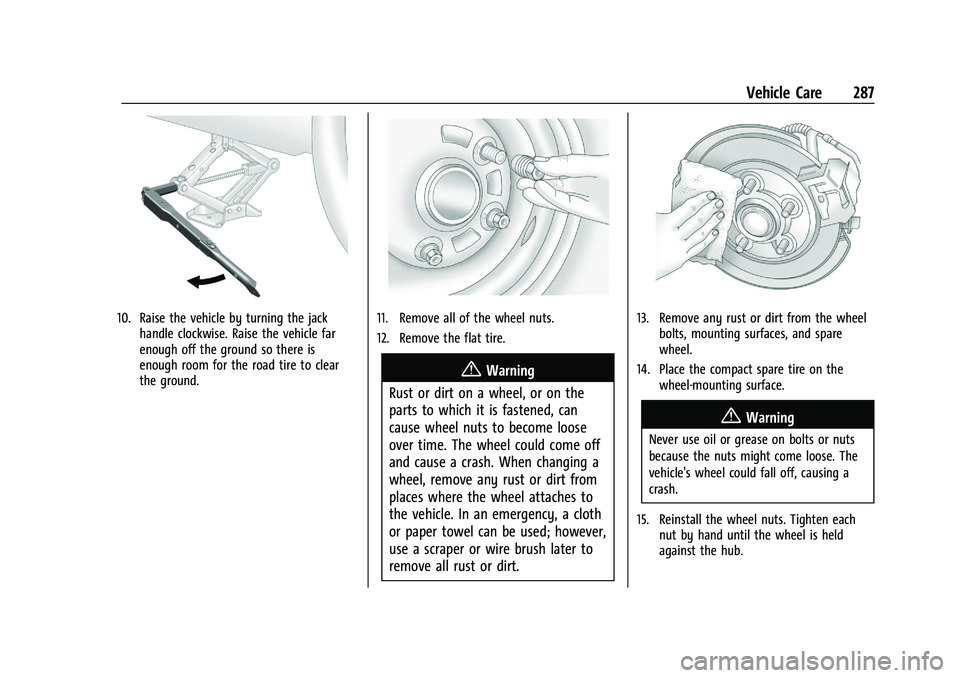
10. Raise the vehicle by turning the jackhandle clockwise. Raise the vehicle far
enough off the ground so there is
enough room for the road tire to clear
the ground.11. Remove all of the wheel nuts.
12. Remove the flat tire.
{Warning
Rust or dirt on a wheel, or on the
parts to which it is fastened, can
cause wheel nuts to become loose
over time. The wheel could come off
and cause a crash. When changing a
wheel, remove any rust or dirt from
places where the wheel attaches to
the vehicle. In an emergency, a cloth
or paper towel can be used; however,
use a scraper or wire brush later to
remove all rust or dirt.
13. Remove any rust or dirt from the wheel bolts, mounting surfaces, and spare
wheel.
14. Place the compact spare tire on the wheel-mounting surface.
{Warning
Never use oil or grease on bolts or nuts
because the nuts might come loose. The
vehicle's wheel could fall off, causing a
crash.
15. Reinstall the wheel nuts. Tighten each nut by hand until the wheel is held
against the hub.