2022 CHEVROLET MALIBU automatic transmission
[x] Cancel search: automatic transmissionPage 190 of 351
Chevrolet Malibu Owner Manual (GMNA-Localizing-U.S./Canada-
14584249) - 2021 - CRC - 11/9/20
Driving and Operating 189
Warning (Continued)
sure the vehicle will not move, even
when you are on fairly level ground,
always set the parking brake and move
the shift lever to P (Park). SeeShifting
Into Park 0186 and
Driving Characteristics and Towing Tips
0 221.
Make sure the shift lever is fully in P (Park)
before starting the engine. The vehicle has
an automatic transmission shift lock control
system. With the ignition on, fully apply the
regular brake, then press the button on the
shift lever before shifting from P (Park).
If you cannot shift out of P (Park), ease
pressure on the shift lever, then push the
shift lever all the way into P (Park) as you
maintain brake application. Then press the
shift lever button and move the shift lever
into another gear. See Shifting out of Park
0 187.
R : Use this gear to back up.
Caution
Shifting to R (Reverse) while the vehicle is
moving forward could damage the
transmission. The repairs would not be
covered by the vehicle warranty. Shift to
R (Reverse) only after the vehicle is
stopped.
To rock the vehicle back and forth to get
out of snow, ice, or sand without damaging
the transmission, see If the Vehicle Is Stuck
0 178.
N : In this position, the engine does not
connect with the wheels. To restart the
engine when the vehicle is already moving,
use N (Neutral) only.
{Warning
Shifting into a drive gear while the
engine is running at high speed is
dangerous. Unless your foot is firmly on
the brake pedal, the vehicle could move
very rapidly. You could lose control and
hit people or objects. Do not shift into a
drive gear while the engine is running at
high speed.
Caution
Shifting out of P (Park) or N (Neutral) with
the engine running at high speed may
damage the transmission. The repairs
would not be covered by the vehicle
warranty. Be sure the engine is not
running at high speed when shifting the
vehicle.
Caution
A transmission hot message may display
if the automatic transmission fluid is too
hot. Driving under this condition can
damage the vehicle. Stop and idle the
engine to cool the automatic
transmission fluid. This message clears
when the transmission fluid has cooled
sufficiently.
D : This position is for normal driving.
If more power is needed for passing, press
the accelerator pedal down.
Caution
If the vehicle does not shift gears, the
transmission could be damaged. Have the
vehicle serviced right away.
Page 191 of 351
Chevrolet Malibu Owner Manual (GMNA-Localizing-U.S./Canada-
14584249) - 2021 - CRC - 11/9/20
190 Driving and Operating
If the vehicle is stopped on a hill, with your
foot off the brake pedal, the vehicle may
roll. This is normal and is due to the torque
converter designed to improve fuel economy
and performance. Use the brake to hold the
vehicle on a hill. Do not use the accelerator
pedal.
L :This position gives you access to gear
ranges. This provides more engine braking
but lower fuel economy than D (Drive). You
can use it on very steep hills, or in deep
snow or mud. See Manual Mode0190.
Operating Modes : The transmission may
operate in a lower gear than normal to
improve vehicle performance. The engine
speed may be higher and there may be an
increase in noise during the following
conditions:
.When climbing a grade
.When driving downhill
.When driving in hot temperatures, or at
high altitude
Manual Mode
Electronic Range Select (ERS) Mode
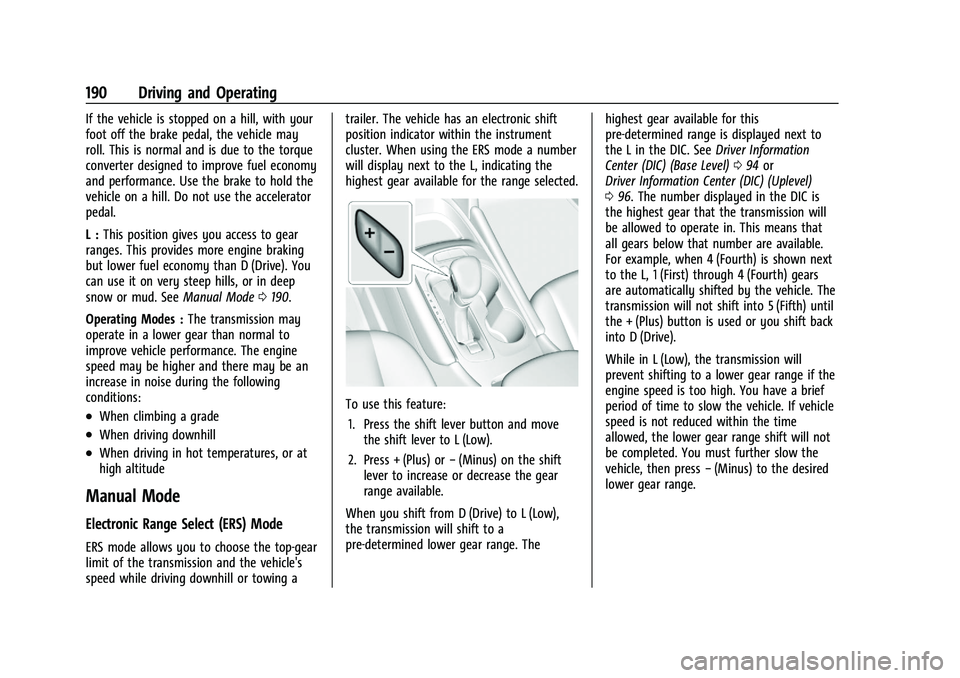
ERS mode allows you to choose the top-gear
limit of the transmission and the vehicle's
speed while driving downhill or towing a trailer. The vehicle has an electronic shift
position indicator within the instrument
cluster. When using the ERS mode a number
will display next to the L, indicating the
highest gear available for the range selected.
To use this feature:
1. Press the shift lever button and move the shift lever to L (Low).
2. Press + (Plus) or −(Minus) on the shift
lever to increase or decrease the gear
range available.
When you shift from D (Drive) to L (Low),
the transmission will shift to a
pre-determined lower gear range. The highest gear available for this
pre-determined range is displayed next to
the L in the DIC. See
Driver Information
Center (DIC) (Base Level) 094 or
Driver Information Center (DIC) (Uplevel)
0 96. The number displayed in the DIC is
the highest gear that the transmission will
be allowed to operate in. This means that
all gears below that number are available.
For example, when 4 (Fourth) is shown next
to the L, 1 (First) through 4 (Fourth) gears
are automatically shifted by the vehicle. The
transmission will not shift into 5 (Fifth) until
the + (Plus) button is used or you shift back
into D (Drive).
While in L (Low), the transmission will
prevent shifting to a lower gear range if the
engine speed is too high. You have a brief
period of time to slow the vehicle. If vehicle
speed is not reduced within the time
allowed, the lower gear range shift will not
be completed. You must further slow the
vehicle, then press −(Minus) to the desired
lower gear range.
Page 198 of 351
Chevrolet Malibu Owner Manual (GMNA-Localizing-U.S./Canada-
14584249) - 2021 - CRC - 11/9/20
Driving and Operating 197
Ending Cruise Control
There are four ways to end cruise control:
.Step lightly on the brake pedal.
.Press*.
.Shift the transmission to N (Neutral).
.Press5to turn cruise control system off
completely.
Erasing Speed Memory
The cruise control set speed is erased from
memory if
5is pressed or if the vehicle is
turned off.
Adaptive Cruise Control
(Advanced)
If equipped with Adaptive Cruise Control
(ACC), it allows you to select the cruise
control set speed and following gap. Read
this entire section before using this system.
The following gap is the following time
between your vehicle and a vehicle detected
directly ahead in your path moving in the
same direction. If no vehicle is detected in
your path, ACC works like regular cruise
control. ACC uses camera and radar sensors.
See Radio Frequency Statement 0328. If a vehicle is detected in your path, ACC can
apply acceleration or limited, moderate
braking to maintain the selected following
gap. To disengage ACC, apply the brake.
If ACC is controlling your vehicle speed
when the Traction Control System (TCS) or
StabiliTrak/Electronic Stability Control (ESC)
system activates, the ACC may automatically
disengage. See
Traction Control/Electronic
Stability Control 0193. When road
conditions allow ACC to be safely used, the
ACC can be turned back on.
Disabling the TCS or StabiliTrak/ESC system
will disengage and prevent engagement
of ACC.
ACC can reduce the need for you to
frequently brake and accelerate, especially
when used on expressways, freeways, and
interstate highways. When used on other
roads, you may need to take over the
control of braking or acceleration more
often.
{Warning
ACC has limited braking ability and may
not have time to slow the vehicle down
enough to avoid a collision with another
vehicle you are following. This can occur
(Continued)
Warning (Continued)
when vehicles suddenly slow or stop
ahead, or enter your lane. Also see
“Alerting the Driver”in this section.
Complete attention is always required
while driving and you should be ready to
take action and apply the brakes. See
Defensive Driving 0173.
{Warning
ACC will not detect or brake for children,
pedestrians, animals, or other objects.
Do not use ACC when:
.On winding and hilly roads or when
the sensors are blocked by snow, ice,
or dirt. The system may not detect a
vehicle ahead. Keep the entire front of
the vehicle clean.
.Visibility is low, such as in fog, rain,
or snow conditions. ACC performance
is limited under these conditions.
.On slippery roads where fast changes
in tire traction can cause excessive
wheel slip.
Page 222 of 351
Chevrolet Malibu Owner Manual (GMNA-Localizing-U.S./Canada-
14584249) - 2021 - CRC - 11/9/20
Driving and Operating 221
When towing with the 2.0L L4 engine, only
use unleaded gasoline with an octane rating
of 89 or higher. Using gasoline with a lower
octane rating while towing may damage the
engine and may not be covered by the
vehicle warranty. SeeRecommended Fuel
(1.5L Engine) 0218 or
Recommended Fuel (2.0L Engine) 0218.
Driving Characteristics and
Towing Tips
{Warning
You can lose control when towing a
trailer if the correct equipment is not
used or the vehicle is not driven properly.
For example, if the trailer is too heavy or
the trailer brakes are inadequate for the
load, the vehicle may not stop as
expected. You and others could be
seriously injured. The vehicle may also be
damaged, and the repairs would not be
covered by the vehicle warranty. Pull a
trailer only if all the steps in this section
have been followed. Ask your dealer for
advice and information about towing a
trailer with the vehicle.
Driving with a Trailer
Trailering is different than just driving the
vehicle by itself. Trailering means changes in
handling, acceleration, braking, durability,
and fuel economy. Successful, safe trailering
takes correct equipment, and it has to be
used properly.
The following information has many
time-tested, important trailering tips and
safety rules. Many of these are important
for your safety and that of your passengers.
Read this section carefully before pulling a
trailer.
When towing a trailer:
.Become familiar with and follow all state
and local laws that apply to trailer
towing. These requirements vary from
state to state.
.State laws may require the use of
extended side view mirrors. Even if not
required, you should install extended side
view mirrors if your visibility is limited or
restricted while towing.
.Do not tow a trailer during the first
800 km (500 mi) of vehicle use to prevent
damage to the engine, axle, or other
parts.
.It is recommended to perform the first oil
change before heavy towing.
.During the first 800 km (500 mi) of trailer
towing, do not drive over 80 km/h
(50 mph) and do not make starts at full
throttle.
.Vehicles can tow in D (Drive). If the
transmission downshifts too often, a
lower gear may be selected using Manual
Mode See Manual Mode 0190.
If equipped, the following driver assistance
features should be turned off when towing
a trailer:
.Adaptive Cruise Control (ACC)
.Super Cruise Control
.Lane Keep Assist (LKA)
.Park Assist
.Automatic Parking Assist (APA)
.Reverse Automatic Braking (RAB)
If equipped, the following driver assistance
features should be turned to alert or off
when towing a trailer:
.Automatic Emergency Braking (AEB)
.Intelligent Brake Assist (IBA)
.Front Pedestrian Braking (FPB)
Page 224 of 351
Chevrolet Malibu Owner Manual (GMNA-Localizing-U.S./Canada-
14584249) - 2021 - CRC - 11/9/20
Driving and Operating 223
Making TurnsCaution
Turn more slowly and make wider arcs
when towing a trailer to prevent damage
to your vehicle. Making very sharp turns
could cause the trailer to contact the
vehicle.
Make wider turns than normal when towing,
so trailer will not go over soft shoulders,
over curbs, or strike road signs, trees,
or other objects. Always signal turns well in
advance. Do not steer or brake suddenly.
Driving on Grades
Reduce speed and shift to a lower gear
before starting down a long or steep
downhill grade. If the transmission is not
shifted down, the brakes may overheat and
result in reduced braking efficiency.
The vehicle can tow in D (Drive). Shift the
transmission to a lower gear if the
transmission shifts too often under heavy
loads and/or hilly conditions.
When towing at higher altitudes, engine
coolant will boil at a lower temperature
than at lower altitudes. If the engine is
turned off immediately after towing at high altitude on steep uphill grades, the vehicle
could show signs similar to engine
overheating. To avoid this, let the engine
run, preferably on level ground, with the
transmission in P (Park) for a few minutes
before turning the engine off. If the
overheat warning comes on, see
Engine
Overheating 0241.
Parking on Hills
{Warning
To prevent serious injury or death,
always park your vehicle and trailer on a
level surface when possible.
When parking your vehicle and your trailer
on a hill: 1. Press the brake pedal, but do not shift into P (Park) yet. Turn the wheels into
the curb if facing downhill or into traffic
if facing uphill.
2. Have someone place chocks under the trailer wheels.
3. When the wheel chocks are in place, gradually release the brake pedal to
allow the chocks to absorb the load of
the trailer. 4. Reapply the brake pedal. Then apply the
parking brake and shift into P (Park).
5. Release the brake pedal.
Leaving After Parking on a Hill
1. Apply and hold the brake pedal.
.Start the engine.
.Shift into a gear.
.Release the parking brake.
2. Let up on the brake pedal.
3. Drive slowly until the trailer is clear of the chocks.
4. Stop and have someone pick up and store the chocks.
Maintenance When Trailer Towing
The vehicle needs service more often when
used to tow trailers. See Maintenance
Schedule 0304. It is especially important to
check the automatic transmission fluid,
engine oil, axle lubricant, belts, cooling
system, and brake system before and during
each trip.
Check periodically that all nuts and bolts on
the trailer hitch are tight.
Page 228 of 351
Chevrolet Malibu Owner Manual (GMNA-Localizing-U.S./Canada-
14584249) - 2021 - CRC - 11/9/20
Vehicle Care 227
Vehicle Care
General Information
General Information . . . . . . . . . . . . . . . . . . . 228
California Proposition 65 Warning . . . . . 228
California Perchlorate MaterialsRequirements . . . . . . . . . . . . . . . . . . . . . . . . 228
Accessories and Modifications . . . . . . . . . 229
Vehicle Checks
Doing Your Own Service Work . . . . . . . . 229
Hood . . . . . . . . . . . . . . . . . . . . . . . . . . . . . . . . . . 229
Engine Compartment Overview . . . . . . . . 231
Engine Oil . . . . . . . . . . . . . . . . . . . . . . . . . . . . . 234
Engine Oil Life System . . . . . . . . . . . . . . . . 236
Automatic Transmission Fluid . . . . . . . . . 236
Engine Air Filter Life System . . . . . . . . . . . 237
Engine Air Cleaner/Filter . . . . . . . . . . . . . . . 237
Cooling System . . . . . . . . . . . . . . . . . . . . . . . . 238
Engine Overheating . . . . . . . . . . . . . . . . . . . . 241
Washer Fluid . . . . . . . . . . . . . . . . . . . . . . . . . . 242
Brakes . . . . . . . . . . . . . . . . . . . . . . . . . . . . . . . . . 243
Brake Fluid . . . . . . . . . . . . . . . . . . . . . . . . . . . . 243
Battery - North America . . . . . . . . . . . . . . . 244
Automatic Transmission Shift Lock Control Function Check . . . . . . . . . . . . . . 247
Park Brake and P (Park) Mechanism Check . . . . . . . . . . . . . . . . . . . . . . . . . . . . . . . . 247
Wiper Blade Replacement . . . . . . . . . . . . . 247
Windshield Replacement . . . . . . . . . . . . . . 248 Gas Strut(s) . . . . . . . . . . . . . . . . . . . . . . . . . . . 248
Headlamp Aiming
Front Headlamp Aiming . . . . . . . . . . . . . . . 249
Bulb Replacement
Bulb Replacement . . . . . . . . . . . . . . . . . . . . . 249
Halogen Bulbs . . . . . . . . . . . . . . . . . . . . . . . . . 249
LED Lighting . . . . . . . . . . . . . . . . . . . . . . . . . . . 249
Headlamps, Front Turn Signal,
Sidemarker, and Parking Lamps . . . . . . 250
Taillamps, Turn Signal, Stoplamps, and Back-Up Lamps (LS and LT) . . . . . . . . . . 250
Taillamps, Turn Signal, Stoplamps, and Back-Up Lamps (LT and Premier) . . . . . 251
License Plate Lamp . . . . . . . . . . . . . . . . . . . . 252
Electrical System
High Voltage Devices and Wiring . . . . . . 253
Electrical System Overload . . . . . . . . . . . . . 253
Fuses and Circuit Breakers . . . . . . . . . . . . . 253
Engine Compartment Fuse Block . . . . . . 254
Instrument Panel Fuse Block . . . . . . . . . . . 258
Wheels and Tires
Tires . . . . . . . . . . . . . . . . . . . . . . . . . . . . . . . . . . 259
All-Season Tires . . . . . . . . . . . . . . . . . . . . . . . 260
Winter Tires . . . . . . . . . . . . . . . . . . . . . . . . . . 260
Low-Profile Tires . . . . . . . . . . . . . . . . . . . . . . . 261
Tire Sidewall Labeling . . . . . . . . . . . . . . . . . 261
Tire Designations . . . . . . . . . . . . . . . . . . . . . . 263 Tire Terminology and Definitions . . . . . . 263
Tire Pressure . . . . . . . . . . . . . . . . . . . . . . . . . . 266
Tire Pressure for High-Speed
Operation . . . . . . . . . . . . . . . . . . . . . . . . . . . 267
Tire Pressure Monitor System . . . . . . . . . 268
Tire Pressure Monitor Operation . . . . . . 269
Tire Inspection . . . . . . . . . . . . . . . . . . . . . . . . . 272
Tire Rotation . . . . . . . . . . . . . . . . . . . . . . . . . . 272
When It Is Time for New Tires . . . . . . . . 273
Buying New Tires . . . . . . . . . . . . . . . . . . . . . 274
Different Size Tires and Wheels . . . . . . . . 275
Uniform Tire Quality Grading . . . . . . . . . . 275
Wheel Alignment and Tire Balance . . . . 276
Wheel Replacement . . . . . . . . . . . . . . . . . . . 276
Tire Chains . . . . . . . . . . . . . . . . . . . . . . . . . . . . 277
If a Tire Goes Flat . . . . . . . . . . . . . . . . . . . . . 278
Tire Sealant and Compressor Kit . . . . . . . 279
Storing the Tire Sealant and
Compressor Kit . . . . . . . . . . . . . . . . . . . . . . 284
Tire Changing . . . . . . . . . . . . . . . . . . . . . . . . . 285
Compact Spare Tire . . . . . . . . . . . . . . . . . . . 289
Jump Starting
Jump Starting - North America . . . . . . . . 290
Towing the Vehicle
Towing the Vehicle . . . . . . . . . . . . . . . . . . . . 292
Recreational Vehicle Towing . . . . . . . . . . . 293
Page 237 of 351
Chevrolet Malibu Owner Manual (GMNA-Localizing-U.S./Canada-
14584249) - 2021 - CRC - 11/9/20
236 Vehicle Care
Used oil can be a threat to the environment.
If you change your own oil, be sure to drain
all the oil from the filter before disposal.
Never dispose of oil by putting it in the
trash or pouring it on the ground, into
sewers, or into streams or bodies of water.
Recycle it by taking it to a place that
collects used oil.
Engine Oil Life System
When to Change Engine Oil
This vehicle has a computer system that
indicates when to change the engine oil and
filter. This is based on a combination of
factors which include engine revolutions,
engine temperature, and miles driven. Based
on driving conditions, the mileage at which
an oil change is indicated can vary
considerably. For the oil life system to work
properly, the system must be reset every
time the oil is changed.
When the system has calculated that oil life
has been diminished, it indicates that an oil
change is necessary. A CHANGE ENGINE OIL
SOON message displays. Change the oil as
soon as possible within the next 1 000 km
(600 mi). It is possible that, if driving under
the best conditions, the oil life system may
indicate that an oil change is not necessaryfor up to a year. The engine oil and filter
must be changed at least once a year and,
at this time, the system must be reset. Your
dealer has trained service people who will
perform this work and reset the system.
It is also important to check the oil regularly
over the course of an oil drain interval and
keep it at the proper level.
If the system is ever reset accidentally, the
oil must be changed at 5 000 km (3,000 mi)
since the last oil change. Remember to reset
the oil life system whenever the oil is
changed.
How to Reset the Engine Oil Life System
1. Using the DIC controls on the right side
of the steering wheel, display
REMAINING OIL LIFE on the DIC. See
Driver Information Center (DIC) (Base
Level) 094 or
Driver Information Center (DIC) (Uplevel)
0 96. When remaining oil life is low, the
CHANGE ENGINE OIL SOON message will
appear on the display.
2. Press
Von the DIC controls and hold
down for a few seconds to clear the
CHANGE ENGINE OIL SOON message and
reset the oil life at 100%. Be careful not to reset the oil life display
accidentally at any time other than after
the oil is changed. It cannot be reset
accurately until the next oil change.
The system is reset when the CHANGE
ENGINE OIL SOON message is off and the
REMAINING OIL LIFE message is displayed.
If the CHANGE ENGINE OIL SOON message
comes back on when the vehicle is started,
the engine oil life system has not been
reset. Repeat the procedure.
Automatic Transmission Fluid
It is not necessary to check the transmission
fluid level. A transmission fluid leak is the
only reason for fluid loss. If a leak occurs,
take the vehicle to your dealer and have it
repaired as soon as possible.
Caution
Use of the incorrect automatic
transmission fluid may damage the
vehicle, and the damage may not be
covered by the vehicle warranty. Always
use the correct automatic transmission
fluid. See Recommended Fluids and
Lubricants 0312.
Page 248 of 351
Chevrolet Malibu Owner Manual (GMNA-Localizing-U.S./Canada-
14584249) - 2021 - CRC - 11/9/20
Vehicle Care 247
For vehicles equipped with the 2.0L engine:1. Install the negative battery cable clamp to the negative battery post.
2. Tighten the negative battery cable nut.
3. Turn the ignition on.
Automatic Transmission Shift Lock
Control Function Check
{Warning
When you are doing this inspection, the
vehicle could move suddenly. If the
vehicle moves, you or others could be
injured.
1. Before starting this check, be sure there is enough room around the vehicle.
It should be parked on a level surface.
2. Apply the parking brake. Be ready to apply the regular brake immediately if
the vehicle begins to move.
3. With the engine off, turn the ignition on, but do not start the engine. Without
applying the regular brake, try to move
the shift lever out of P (Park) with
normal effort. If the shift lever moves
out of P (Park), contact your dealer for
service.
Park Brake and P (Park)
Mechanism Check
{Warning
When you are doing this check, the
vehicle could begin to move. You or
others could be injured and property
could be damaged. Make sure there is
room in front of the vehicle in case it
begins to roll. Be ready to apply the
regular brake at once should the vehicle
begin to move.
Park on a fairly steep hill, with the vehicle
facing downhill. Keeping your foot on the
regular brake, set the parking brake.
.To check the parking brake's holding
ability: With the engine running and the
transmission in N (Neutral), slowly remove
foot pressure from the regular brake
pedal. Do this until the vehicle is held by
the parking brake only.
.To check the P (Park) mechanism's holding
ability: With the engine running, shift to
P (Park). Then release the parking brake
followed by the regular brake.
Contact your dealer if service is required.
Wiper Blade Replacement
Windshield wiper blades should be inspected
for wear or cracking.
It is a good idea to clean the wiper blade
assembly on a regular basis. When worn,
or when cleaning is ineffective, replace the
wiper blade. For proper windshield wiper
blade length and type, see Maintenance
Replacement Parts 0313.
Caution
Allowing the wiper arm to touch the
windshield when no wiper blade is
installed could damage the windshield.
Any damage that occurs would not be
covered by the vehicle warranty. Do not
allow the wiper arm to touch the
windshield.
To replace the wiper blade: 1. Pull the wiper assembly away from the windshield.