2022 CHEVROLET MALIBU radio
[x] Cancel search: radioPage 8 of 351
Chevrolet Malibu Owner Manual (GMNA-Localizing-U.S./Canada-
14584249) - 2021 - CRC - 11/9/20
Keys, Doors, and Windows 7
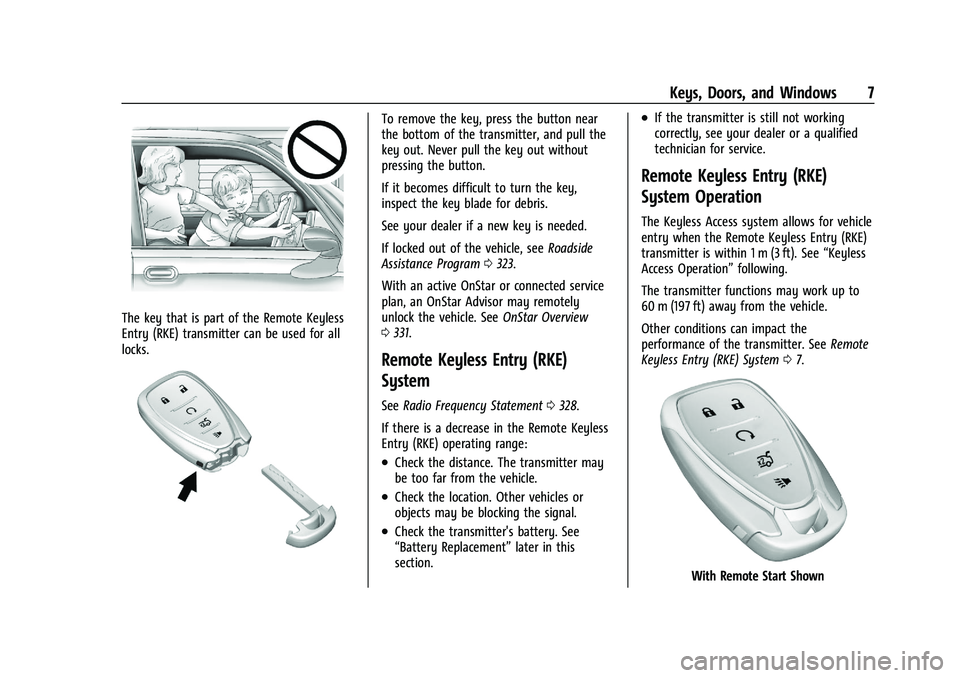
The key that is part of the Remote Keyless
Entry (RKE) transmitter can be used for all
locks.
To remove the key, press the button near
the bottom of the transmitter, and pull the
key out. Never pull the key out without
pressing the button.
If it becomes difficult to turn the key,
inspect the key blade for debris.
See your dealer if a new key is needed.
If locked out of the vehicle, seeRoadside
Assistance Program 0323.
With an active OnStar or connected service
plan, an OnStar Advisor may remotely
unlock the vehicle. See OnStar Overview
0 331.
Remote Keyless Entry (RKE)
System
See Radio Frequency Statement 0328.
If there is a decrease in the Remote Keyless
Entry (RKE) operating range:
.Check the distance. The transmitter may
be too far from the vehicle.
.Check the location. Other vehicles or
objects may be blocking the signal.
.Check the transmitter's battery. See
“Battery Replacement” later in this
section.
.If the transmitter is still not working
correctly, see your dealer or a qualified
technician for service.
Remote Keyless Entry (RKE)
System Operation
The Keyless Access system allows for vehicle
entry when the Remote Keyless Entry (RKE)
transmitter is within 1 m (3 ft). See “Keyless
Access Operation” following.
The transmitter functions may work up to
60 m (197 ft) away from the vehicle.
Other conditions can impact the
performance of the transmitter. See Remote
Keyless Entry (RKE) System 07.
With Remote Start Shown
Page 21 of 351
Chevrolet Malibu Owner Manual (GMNA-Localizing-U.S./Canada-
14584249) - 2021 - CRC - 11/9/20
20 Keys, Doors, and Windows
.Use the Keyless Access system,
if equipped.
.With a door open, press the
inside
Q.
3. After 30 seconds the alarm system will arm, and the indicator light will begin to
slowly flash indicating the alarm system
is operating. Pressing
Qon the RKE
transmitter a second time will bypass
the 30-second delay and immediately
arm the alarm system.
The vehicle alarm system will not arm if the
doors are locked with the key.
If the driver door is opened without first
unlocking with the RKE transmitter, the horn
will chirp and the lights will flash to indicate
pre-alarm. If the vehicle is not started,
or the door is not unlocked by pressing
K
on the RKE transmitter during the 10-second
pre-alarm, the alarm will be activated.
If a door, the hood, or the trunk is opened
without first disarming the system, the turn
signals will flash and the horn will sound for
about 30 seconds. The alarm system will
then re-arm to monitor for the next
unauthorized event.
Disarming the Alarm System
Do one of the following to disarm the alarm
system or turn off the alarm if it has been
activated:
.PressKon the RKE transmitter.
.Unlock the vehicle using the Keyless
Access system, if equipped.
.Start the vehicle.
To avoid setting off the alarm by accident:
.Lock the vehicle after all occupants have
left the vehicle and all doors are closed.
.Always unlock a door with the RKE
transmitter or use the Keyless Access
system, if equipped.
Unlocking the driver door with the key will
not disarm the system or turn off the alarm.
How to Detect a Tamper Condition
IfKis pressed on the RKE transmitter and
the horn chirps and the lights flash three
times, an alarm occurred previously while
the alarm system was armed.
If the alarm has been activated, a message
will appear on the Driver Information
Center (DIC).
Immobilizer
See Radio Frequency Statement 0328.
Immobilizer Operation
This vehicle has a passive theft-deterrent
system.
The system does not have to be manually
armed or disarmed.
The vehicle is automatically immobilized
when the transmitter leaves the vehicle.
The immobilization system is disarmed
when the ignition button is pushed in and a
valid transmitter is in the vehicle.
The security light on the instrument cluster
comes on when there is a problem with
arming or disarming the theft-deterrent
system.
The system has one or more transmitters
matched to an immobilizer control unit in
the vehicle. Only a correctly matched
Page 79 of 351
Chevrolet Malibu Owner Manual (GMNA-Localizing-U.S./Canada-
14584249) - 2021 - CRC - 11/9/20
78 Instruments and Controls
supply and the indicator light turns off. To
reset the circuit, unplug the item and plug it
back in or turn the Retained Accessory
Power (RAP) off and then back on. See
Retained Accessory Power (RAP)0186. The
power restarts when equipment using 150
watts or less is plugged into the outlet and
a system fault is not detected.
The power outlet is not designed for the
following, and may not work properly if
they are plugged in:
.Equipment with high initial peak wattage,
such as compressor-driven refrigerators
and electric power tools
.Other equipment requiring an extremely
stable power supply, such as
microcomputer-controlled electric blankets
and touch sensor lamps
.Medical equipment
See High Voltage Devices and Wiring 0253.
Wireless Charging
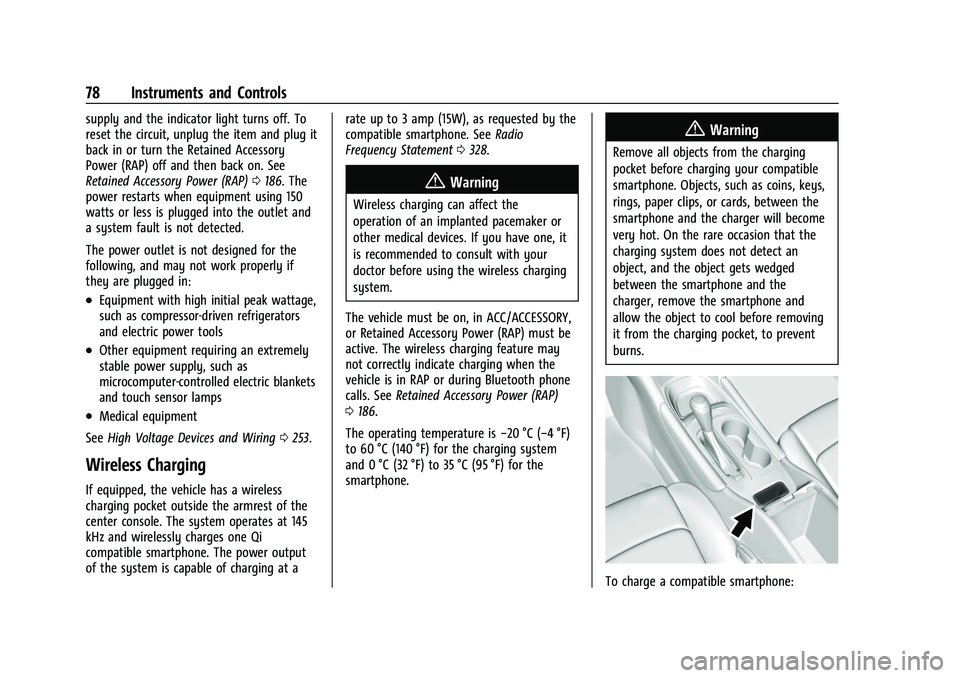
If equipped, the vehicle has a wireless
charging pocket outside the armrest of the
center console. The system operates at 145
kHz and wirelessly charges one Qi
compatible smartphone. The power output
of the system is capable of charging at a rate up to 3 amp (15W), as requested by the
compatible smartphone. See
Radio
Frequency Statement 0328.
{Warning
Wireless charging can affect the
operation of an implanted pacemaker or
other medical devices. If you have one, it
is recommended to consult with your
doctor before using the wireless charging
system.
The vehicle must be on, in ACC/ACCESSORY,
or Retained Accessory Power (RAP) must be
active. The wireless charging feature may
not correctly indicate charging when the
vehicle is in RAP or during Bluetooth phone
calls. See Retained Accessory Power (RAP)
0 186.
The operating temperature is −20 °C (−4 °F)
to 60 °C (140 °F) for the charging system
and 0 °C (32 °F) to 35 °C (95 °F) for the
smartphone.
{Warning
Remove all objects from the charging
pocket before charging your compatible
smartphone. Objects, such as coins, keys,
rings, paper clips, or cards, between the
smartphone and the charger will become
very hot. On the rare occasion that the
charging system does not detect an
object, and the object gets wedged
between the smartphone and the
charger, remove the smartphone and
allow the object to cool before removing
it from the charging pocket, to prevent
burns.
To charge a compatible smartphone:
Page 83 of 351
Chevrolet Malibu Owner Manual (GMNA-Localizing-U.S./Canada-
14584249) - 2021 - CRC - 11/9/20
82 Instruments and Controls
.Options
Audio
In the main view of the Audio app, press
w
orxto scroll through radio stations or
move to the next/previous track of a CD/
USB/Bluetooth device that is connected to
the vehicle. Press
Vto select the Audio app,
then press
pto enter the Audio menu. In
the Audio menu browse for music, select
from the favorites, or change the audio
source.
Phone
Press
Vto select the Phone app, then press
pto enter the Phone menu. In the Phone
menu, if there is no active phone call, view
recent calls, scroll through contacts, or select
from the favorites. If there is an active call,
mute or unmute the phone or switch to
handset or handsfree operation.
Navigation
Press
Vto select the Navigation app, then
press
pto enter the Navigation menu.
If there is an active route, press
Vto cancel
or resume route guidance or turn the voice
prompts on/off. Options
Press
Vto select the Options app. Usew
orxto scroll through the items in the
Options menu.
Units : Press
pwhile Units is displayed to
enter the Units menu. Choose U.S. or metric
units by pressing
Vwhile the desired item
is highlighted.
Display Themes : Press
pwhile Display
Themes is displayed to enter the menu.
Choose Sport or Touring by pressing
V
while the desired item is highlighted.
Pocket Gauges : Press
pwhile Pocket
Gauges is displayed to enter the menu and
select gauges that can be displayed on the
left or right of the display area. If equipped,
choose oil temperature, battery voltage, fuel
range, or fuel economy.
Info Pages : Press
pwhile Info Pages is
displayed to enter the Info Pages menu and
select the items to be displayed in the Info
app. See Driver Information Center (DIC)
(Base Level) 094 or
Driver Information Center (DIC) (Uplevel)
0 96. Speed Warning :
The Speed Warning display
allows the driver to set a speed that they
do not want to exceed. To set the Speed
Warning, press
pwhen Speed Warning is
displayed. Press
worxto adjust the
value. Press
Vto set the speed. Once the
speed is set, this feature can be turned off
by pressing
Vwhile viewing this page.
If the selected speed limit is exceeded, a
pop-up warning is displayed with a chime.
Speedometer
The speedometer shows the vehicle's speed
in either kilometers per hour (km/h) or
miles per hour (mph).
Odometer
The odometer shows how far the vehicle has
been driven, in either kilometers or miles.
Trip Odometer
The trip odometer shows how far the
vehicle has been driven since the trip
odometer was last reset.
The trip odometer is accessed and reset
through the Driver Information Center (DIC).
Page 86 of 351
Chevrolet Malibu Owner Manual (GMNA-Localizing-U.S./Canada-
14584249) - 2021 - CRC - 11/9/20
Instruments and Controls 85
Readings outside the normal operating
range can also occur when a large number
of electrical accessories are operating in the
vehicle and the engine is left idling for an
extended period. This condition is normal
since the charging system is not able to
provide full power at engine idle. As engine
speeds are increased, this condition should
correct itself as higher engine speeds allow
the charging system to create maximum
power.
The vehicle can only be driven for a short
time with the readings outside the normal
operating range. If the vehicle must be
driven, turn off all accessories, such as the
radio and air conditioner, and unplug all
chargers and accessories.
Readings outside the normal operating
range indicate a possible problem in the
electrical system. Have the vehicle serviced
as soon as possible.
Seat Belt Reminders
Driver Seat Belt Reminder Light
There is a driver seat belt reminder light on
the instrument cluster.
When the vehicle is started, this light
flashes and a chime may come on to remind
the driver to fasten their seat belt.
Then the light stays on solid until the belt is
buckled. This cycle may continue several
times if the driver remains or becomes
unbuckled while the vehicle is moving.
If the driver seat belt is buckled, neither the
light nor the chime comes on.
Front Passenger Seat Belt Reminder
Light
The vehicle may have a front passenger seat
belt reminder light near the passenger
airbag status indicator. SeePassenger
Sensing System 050.
When the vehicle is started, this light
flashes and a chime may come on to remind
passengers to fasten their seat belt.
Then the light stays on solid until the belt is
buckled. This cycle continues several times if
the front passenger remains or becomes
unbuckled while the vehicle is moving.
If the front passenger seat belt is buckled,
neither the chime nor the light comes on.
The front passenger seat belt reminder light
and chime may come on if an object is put
on the seat such as a briefcase, handbag,
grocery bag, laptop, or other electronic
device. To turn off the reminder light and/or
chime, remove the object from the seat or
buckle the seat belt.
Airbag Readiness Light
This light shows if there is an electrical
problem with the airbag system. The system
check includes the airbag sensor(s),
passenger sensing system, the pretensioners,
the airbag modules, the wiring, and the
crash sensing and diagnostic module. For
more information on the airbag system, see
Airbag System 045.
Page 88 of 351
Chevrolet Malibu Owner Manual (GMNA-Localizing-U.S./Canada-
14584249) - 2021 - CRC - 11/9/20
Instruments and Controls 87
If the light stays on, or comes on while
driving, there may be a problem with the
electrical charging system. Have it checked
by your dealer. Driving while this light is on
could drain the battery.
When this light comes on, or is flashing, the
Driver Information Center (DIC) also displays
a message.
If a short distance must be driven with the
light on, be sure to turn off all accessories,
such as the radio and air conditioner. Find a
safe place to stop the vehicle.
Malfunction Indicator Lamp
(Check Engine Light)
This light is part of the vehicle’s emission
control on-board diagnostic system. If this
light is on while the engine is running, a
malfunction has been detected and the
vehicle may require service. The light should
come on to show that it is working when
the ignition is in Service Mode. SeeIgnition
Positions 0182.
Malfunctions are often indicated by the
system before any problem is noticeable.
Being aware of the light and seeking service
promptly when it comes on may prevent
damage.
Caution
If the vehicle is driven continually with
this light on, the emission control system
may not work as well, the fuel economy
may be lower, and the vehicle may not
run smoothly. This could lead to costly
repairs that might not be covered by the
vehicle warranty.
Caution
Modifications to the engine, transmission,
exhaust, intake, or fuel system, or the
use of replacement tires that do not
meet the original tire specifications, can
cause this light to come on. This could
(Continued)
Caution (Continued)
lead to costly repairs not covered by the
vehicle warranty. This could also affect
the vehicle’s ability to pass an Emissions
Inspection/Maintenance test. See
Accessories and Modifications 0229.
If the light is flashing : A malfunction has
been detected that could damage the
emission control system and increase vehicle
emissions. Diagnosis and service may be
required.
To help prevent damage, reduce vehicle
speed and avoid hard accelerations and
uphill grades. If towing a trailer, reduce the
amount of cargo being hauled as soon as
possible.
If the light continues to flash, find a safe
place to park. Turn the vehicle off and wait
at least 10 seconds before restarting the
engine. If the light is still flashing, follow
the previous guidelines and see your dealer
for service as soon as possible.
If the light is on steady : A malfunction has
been detected. Diagnosis and service may be
required.
Check the following:
Page 111 of 351
Chevrolet Malibu Owner Manual (GMNA-Localizing-U.S./Canada-
14584249) - 2021 - CRC - 11/9/20
110 Infotainment System
Infotainment System
Introduction
Introduction . . . . . . . . . . . . . . . . . . . . . . . . . . . 110
Overview . . . . . . . . . . . . . . . . . . . . . . . . . . . . . . . 111
Steering Wheel Controls . . . . . . . . . . . . . . . 112
Using the System . . . . . . . . . . . . . . . . . . . . . . 113
Software Updates . . . . . . . . . . . . . . . . . . . . . . 116
Radio
AM-FM Radio . . . . . . . . . . . . . . . . . . . . . . . . . . 116
HD Radio Technology . . . . . . . . . . . . . . . . . . 117
Radio Data System (RDS) . . . . . . . . . . . . . . 118
Satellite Radio . . . . . . . . . . . . . . . . . . . . . . . . . 118
Radio Reception . . . . . . . . . . . . . . . . . . . . . . . . 119
Backglass Antenna . . . . . . . . . . . . . . . . . . . . . 119
Multi-Band Antenna . . . . . . . . . . . . . . . . . . . 120
Audio Players
Avoiding Untrusted Media Devices . . . . 120
USB Port . . . . . . . . . . . . . . . . . . . . . . . . . . . . . . 120
Auxiliary Jack . . . . . . . . . . . . . . . . . . . . . . . . . . 123
Bluetooth Audio . . . . . . . . . . . . . . . . . . . . . . . 123
OnStar System
OnStar System . . . . . . . . . . . . . . . . . . . . . . . . 124
Navigation
Using the Navigation System . . . . . . . . . . 124
Maps . . . . . . . . . . . . . . . . . . . . . . . . . . . . . . . . . . 127
Navigation Symbols . . . . . . . . . . . . . . . . . . . 128Destination . . . . . . . . . . . . . . . . . . . . . . . . . . . . 129
OnStar System . . . . . . . . . . . . . . . . . . . . . . . . 134
Global Positioning System (GPS) . . . . . . . 135
Vehicle Positioning . . . . . . . . . . . . . . . . . . . . . 135
Problems with Route Guidance . . . . . . . . 135
If the System Needs Service . . . . . . . . . . . 136
Map Data Updates . . . . . . . . . . . . . . . . . . . . 136
Database Coverage Explanations . . . . . . . 136
Voice Recognition
Voice Recognition . . . . . . . . . . . . . . . . . . . . . . 136
Phone
Bluetooth (Overview) . . . . . . . . . . . . . . . . . . 141
Bluetooth (Pairing and Using a
Phone) . . . . . . . . . . . . . . . . . . . . . . . . . . . . . . . 142
Apple CarPlay and Android Auto . . . . . . 146
Settings
Settings . . . . . . . . . . . . . . . . . . . . . . . . . . . . . . . 147
Teen Driver . . . . . . . . . . . . . . . . . . . . . . . . . . . . 153
Trademarks and License Agreements
Trademarks and License Agreements . . . . . . . . . . . . . . . . . . . . . . . . . . 156
Introduction
Read the following pages to become familiar
with the features.
{Warning
Taking your eyes off the road for too
long or too often while using any
infotainment feature can cause a crash.
You or others could be injured or killed.
Do not give extended attention to
infotainment tasks while driving. Limit
your glances at the vehicle displays and
focus your attention on driving. Use voice
commands whenever possible.
The infotainment system has built-in
features intended to help avoid distraction
by disabling some features when driving.
These features may gray out when they are
unavailable. Many infotainment features are
also available through the instrument cluster
and steering wheel controls.
Page 112 of 351
Chevrolet Malibu Owner Manual (GMNA-Localizing-U.S./Canada-
14584249) - 2021 - CRC - 11/9/20
Infotainment System 111
Before driving:
.Become familiar with the operation,
center stack controls, steering wheel
controls, and infotainment display.
.Set up the audio by presetting favorite
stations, setting the tone, and adjusting
the speakers.
.Set up phone numbers in advance so they
can be called easily by pressing a single
control or by using a single voice
command.
See Distracted Driving 0173.
Active Noise Cancellation (ANC)
If equipped, ANC reduces engine noise in the
vehicle’s interior. ANC requires the
factory-installed audio system, radio,
speakers, amplifier (if equipped), induction
system, and exhaust system to work
properly. Deactivation is required by your
dealer if related aftermarket equipment is
installed.
Overview
Infotainment System
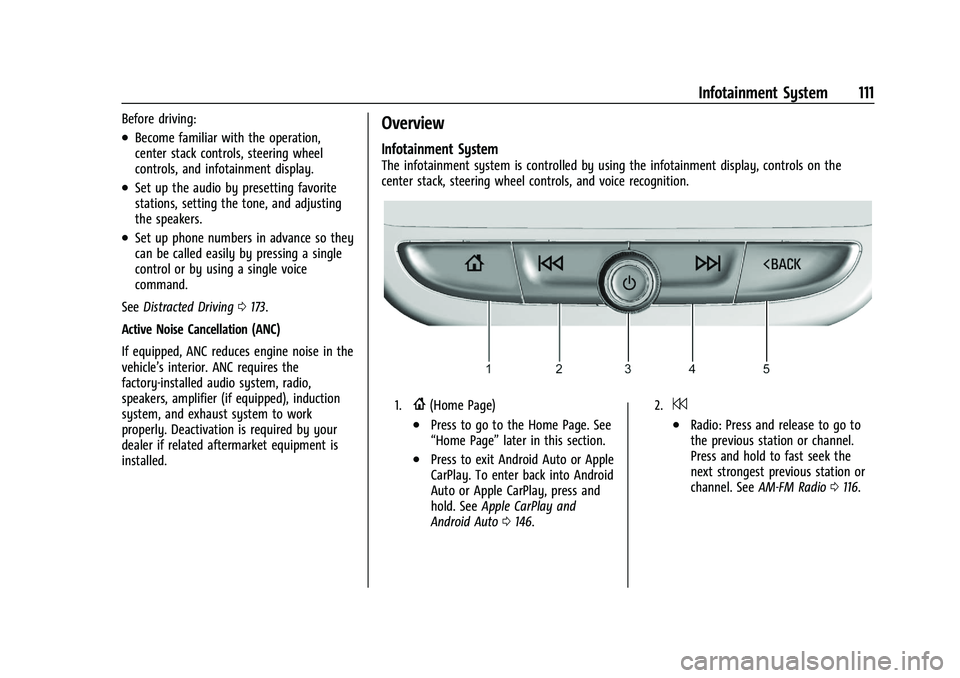
The infotainment system is controlled by using the infotainment display, controls on the
center stack, steering wheel controls, and voice recognition.
1.{(Home Page)
.Press to go to the Home Page. See
“Home Page” later in this section.
.Press to exit Android Auto or Apple
CarPlay. To enter back into Android
Auto or Apple CarPlay, press and
hold. SeeApple CarPlay and
Android Auto 0146.
2.7
.Radio: Press and release to go to
the previous station or channel.
Press and hold to fast seek the
next strongest previous station or
channel. See AM-FM Radio 0116.