2022 CHEVROLET MALIBU automatic transmission
[x] Cancel search: automatic transmissionPage 257 of 351
Chevrolet Malibu Owner Manual (GMNA-Localizing-U.S./Canada-
14584249) - 2021 - CRC - 11/9/20
256 Vehicle Care
The vehicle may not be equipped with all of
the fuses, relays, and features shown.Fuses Usage
1 –
2 –
3 Antilock brake system pump/Electric brake
booster
5 –
6 Rear closure 7 –
8 Memory seat module
9 –
10 –
11 DC DC converter 1
12 Rear window defogger
13 Heated mirrors
14 –
15 Passive entry/Passive start
16 Front wiper 17 Passenger power seat Fuses
Usage
18 Antilock brake system valve
19 Driver power seat 21 Sunroof
22 Parking lamp
23 Automatic headlamp leveling/Adaptive forward
lighting
24 –
26 Transmission control module/Ignition
27 Instrument panel/Body/ Ignition
28 –
29 Rear vision camera/ Ventilated seats
30 Malfunction indicator lamp/Ignition
32 Canister vent solenoid/Evap leak check module
33 Front heated seat
34 – Fuses
Usage
35 Body control module 6/ Body control module 7
36 Fuel module
38 –
39 –
40 Steering column lock 41 –
43 Heated steering wheel
44 Headlamp leveling 45 –
46 Engine control module/ Ignition
47 –
48 –
49 DC DC converter 2 50 –
51 –
52 –
53 –
54 –
Page 258 of 351
Chevrolet Malibu Owner Manual (GMNA-Localizing-U.S./Canada-
14584249) - 2021 - CRC - 11/9/20
Vehicle Care 257
FusesUsage
55 –
56 Starter motor 57 –
58 –
59 High-beam headlamps Left/ Right
60 Cooling fan 61 –
62 –
63 –
65 Air conditioning
67 –
68 –
69 –
70 –
72 Starter pinion
74 –
75 Engine control module main
76 Engine control module sense Fuses
Usage
78 Horn
79 Washer pump 81 Transmission control module/Engine control
module
82 –
83 Ignition coil
84 Powertrain on engine 85 Shunt
86 Shunt 87 –
88 Aeroshutter
89 –
91 –
92 –
93 Automatic headlamp leveling
95 –
96 –
97 –
99 Coolant pump Relays
Usage
4 –
20 Rear window defogger 25 Front wiper control31 Run/Crank
37 Front wiper speed
42 –
64 Starter motor
66 Powertrain 71 –
73 Air conditioning
80 Starter pinion
90 –
94 –
98 –
Page 260 of 351
Chevrolet Malibu Owner Manual (GMNA-Localizing-U.S./Canada-
14584249) - 2021 - CRC - 11/9/20
Vehicle Care 259
FusesUsage
F13 –
F14 –
F15 Transmission control module (with Stop/Start
option)
F16 Amplifier F17 Seat power lumbar
F18 –
F19 –
F20 Body control module 1 (without Stop/Start option)
F21 Body control module 4
F22 –
F23 Electric steering column lock
F24 Sensing and diagnostic module/Automatic
occupant sensing (Airbag)
F25 Data link connector
F26 –
F27 AC DC inverter
F28 – Fuses
Usage
F29 Body control module 8
F30 Overhead console F31 Steering wheel controls
F32 –
F33 Heating, ventilation, and air conditioning
F34 Central gateway module F35 –
F36 Wireless charger/USB charger
F37 –
F38 OnStar
F39 Display
F40 Obstacle detection F41 Body control module 1 (with Stop/Start option)
F42 Radio
F43 –
F44 Console accessory power outlet–rear Relays
Usage
K1 –
K2 Interruptible retained accessory power
K3 –
K4 –
K5 –
Wheels and Tires
Tires
Every new GM vehicle has high-quality
tires made by a leading tire
manufacturer. See the warranty manual
for information regarding the tire
warranty and where to get service. For
additional information refer to the tire
manufacturer.
{Warning
.Poorly maintained and improperly
used tires are dangerous.
(Continued)
Page 264 of 351
Chevrolet Malibu Owner Manual (GMNA-Localizing-U.S./Canada-
14584249) - 2021 - CRC - 11/9/20
Vehicle Care 263
(7) TPC Spec (Tire Performance Criteria
Specification)
:Original equipment tires
designed to GM's specific tire
performance criteria have a TPC
specification code molded onto the
sidewall. GM's TPC specifications meet
or exceed all federal safety guidelines.
Tire Designations
Tire Size
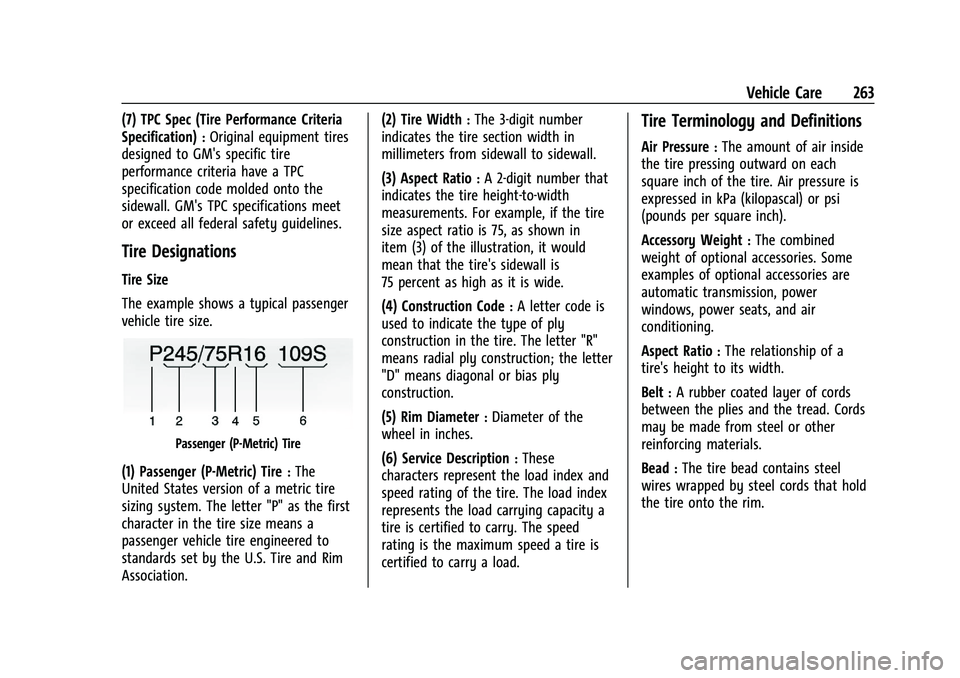
The example shows a typical passenger
vehicle tire size.
Passenger (P-Metric) Tire
(1) Passenger (P-Metric) Tire:The
United States version of a metric tire
sizing system. The letter "P" as the first
character in the tire size means a
passenger vehicle tire engineered to
standards set by the U.S. Tire and Rim
Association. (2) Tire Width
:The 3-digit number
indicates the tire section width in
millimeters from sidewall to sidewall.
(3) Aspect Ratio
:A 2-digit number that
indicates the tire height-to-width
measurements. For example, if the tire
size aspect ratio is 75, as shown in
item (3) of the illustration, it would
mean that the tire's sidewall is
75 percent as high as it is wide.
(4) Construction Code
:A letter code is
used to indicate the type of ply
construction in the tire. The letter "R"
means radial ply construction; the letter
"D" means diagonal or bias ply
construction.
(5) Rim Diameter
:Diameter of the
wheel in inches.
(6) Service Description
:These
characters represent the load index and
speed rating of the tire. The load index
represents the load carrying capacity a
tire is certified to carry. The speed
rating is the maximum speed a tire is
certified to carry a load.
Tire Terminology and Definitions
Air Pressure:The amount of air inside
the tire pressing outward on each
square inch of the tire. Air pressure is
expressed in kPa (kilopascal) or psi
(pounds per square inch).
Accessory Weight
:The combined
weight of optional accessories. Some
examples of optional accessories are
automatic transmission, power
windows, power seats, and air
conditioning.
Aspect Ratio
:The relationship of a
tire's height to its width.
Belt
:A rubber coated layer of cords
between the plies and the tread. Cords
may be made from steel or other
reinforcing materials.
Bead
:The tire bead contains steel
wires wrapped by steel cords that hold
the tire onto the rim.
Page 279 of 351
Chevrolet Malibu Owner Manual (GMNA-Localizing-U.S./Canada-
14584249) - 2021 - CRC - 11/9/20
278 Vehicle Care
If a Tire Goes Flat
It is unusual for a tire to blow out while
driving, especially if the tires are maintained
properly. SeeTires0259. If air goes out of
a tire, it is much more likely to leak out
slowly. But if there is ever a blowout, here
are a few tips about what to expect and
what to do:
If a front tire fails, the flat tire creates a
drag that pulls the vehicle toward that side.
Take your foot off the accelerator pedal and
grip the steering wheel firmly. Steer to
maintain lane position, and then gently
brake to a stop, well off the road,
if possible.
A rear blowout, particularly on a curve, acts
much like a skid and may require the same
correction as used in a skid. Stop pressing
the accelerator pedal and steer to straighten
the vehicle. It may be very bumpy and
noisy. Gently brake to a stop, well off the
road, if possible.
{Warning
Driving on a flat tire will cause
permanent damage to the tire.
Re-inflating a tire after it has been driven
(Continued)
Warning (Continued)
on while severely underinflated or flat
may cause a blowout and a serious crash.
Never attempt to re-inflate a tire that has
been driven on while severely
underinflated or flat. Have your dealer or
an authorized tire service center repair or
replace the flat tire as soon as possible.
{Warning
Lifting a vehicle and getting under it to
do maintenance or repairs is dangerous
without the appropriate safety equipment
and training. If a jack is provided with
the vehicle, it is designed only for
changing a flat tire. If it is used for
anything else, you or others could be
badly injured or killed if the vehicle slips
off the jack. If a jack is provided with the
vehicle, only use it for changing a
flat tire.
If a tire goes flat, avoid further tire and
wheel damage by driving slowly to a level
place, well off the road, if possible. Turn on
the hazard warning flashers. See Hazard
Warning Flashers 0106.
{Warning
Changing a tire can be dangerous. The
vehicle can slip off the jack and roll over
or fall causing injury or death. Find a
level place to change the tire. To help
prevent the vehicle from moving:
1. Set the parking brake firmly.
2. Put an automatic transmission in P (Park) or a manual transmission in
1 (First) or R (Reverse).
3. Turn off the engine and do not restart while the vehicle is raised.
4. Do not allow passengers to remain in the vehicle.
5. Place wheel blocks, if equipped, on both sides of the tire at the opposite
corner of the tire being changed.
This vehicle may come with a jack and spare
tire or a tire sealant and compressor kit. To
use the jacking equipment to change a spare
tire safely, follow the instructions below.
Then see Tire Changing 0285. To use the
tire sealant and compressor kit, see Tire
Sealant and Compressor Kit 0279.
Page 292 of 351
Chevrolet Malibu Owner Manual (GMNA-Localizing-U.S./Canada-
14584249) - 2021 - CRC - 11/9/20
Vehicle Care 291
The jump start negative ground terminal for
the discharged battery is on the shock tower
on the driver side of the engine
compartment.1. Check the other vehicle. It must have a 12-volt battery with a negative ground
system.
Caution
If the other vehicle does not have a
12-volt system with a negative ground,
both vehicles can be damaged. Only use
a vehicle that has a 12-volt system with a
negative ground for jump starting.
2. Position the two vehicles so that they are not touching.
3. Set the parking brake firmly on both vehicles. Put an automatic transmission
in P (Park) or a manual transmission in
Neutral before setting the parking brake.
Caution
If any accessories are left on or plugged
in during the jump starting procedure,
they could be damaged. The repairs
would not be covered by the vehicle
(Continued)
Caution (Continued)
warranty. Whenever possible, turn off or
unplug all accessories on either vehicle
when jump starting.
4. Turn the ignition off and switch off all lights and accessories in both vehicles,
except the hazard warning flashers if
needed.
{Warning
An electric fan can start up even when
the engine is not running and can injure
you. Keep hands, clothing, and tools
away from any underhood electric fan.
{Warning
Using a match near a battery can cause
battery gas to explode. People have been
hurt doing this, and some have been
blinded. Use a flashlight if you need
more light.
(Continued)
Warning (Continued)
Battery fluid contains acid that can burn
you. Do not get it on you. If you
accidentally get it in your eyes or on
your skin, flush the place with water and
get medical help immediately.
{Warning
Fans or other moving engine parts can
injure you badly. Keep your hands away
from moving parts once the engine is
running.
5. Connect the red positive (+) cable to the positive (+) or remote positive (+)
terminal of the discharged battery.
6. Connect the other end of the positive (+) cable to the positive (+) terminal of the
good battery. Use a remote positive (+)
terminal if the vehicle has one.
7. Connect one end of the black negative (−) cable to the negative (−) terminal of
the good battery.
8. Connect the other end of the negative (−) cable to the negative (–) ground
terminal for the discharged battery.
Page 306 of 351
Chevrolet Malibu Owner Manual (GMNA-Localizing-U.S./Canada-
14584249) - 2021 - CRC - 11/9/20
Service and Maintenance 305
Air Conditioning Desiccant (Replace Every
Seven Years)
The air conditioning system requires
maintenance every seven years. This service
requires replacement of the desiccant to
help the longevity and efficient operation of
the air conditioning system. This service can
be complex. See your dealer.
Tire Rotation and Required Services
Every 12 000 km (7,500 mi)
Rotate the tires, if recommended for the
vehicle, and perform the following services.
SeeTire Rotation 0272.
.Check engine oil level and oil
life percentage. If needed, change engine
oil and filter, and reset oil life system.
See Engine Oil 0234 and
Engine Oil Life System 0236.
.If equipped with the engine air filter life
system, check the air filter
life percentage. If necessary, replace the
engine air filter and reset the engine air
filter life system. See Engine Air Filter Life
System 0237. If the vehicle is not
equipped with the engine air filter life
system, inspect the engine air cleaner
filter. See Engine Air Cleaner/Filter 0237.
.Check engine coolant level. See Cooling
System 0238.
.Check windshield washer fluid level. See
Washer Fluid 0242.
.Check tire inflation pressures. See Tire
Pressure 0266.
.Inspect tire wear. See Tire Inspection
0 272.
.Visually check for fluid leaks.
.Inspect brake system. See Exterior Care
0 295.
.Visually inspect steering, suspension, and
chassis components for damage, including
cracks or tears in the rubber boots, loose
or missing parts, or signs of wear at least
once a year. See Exterior Care0295.
.Inspect power steering for proper
attachment, connections, binding, leaks,
cracks, chafing, etc.
.Visually inspect halfshafts and drive
shafts for excessive wear, lubricant leaks,
and/or damage including: tube dents or
cracks, constant velocity joint or universal
joint looseness, cracked or missing boots,
loose or missing boot clamps, center
bearing excessive looseness, loose or
missing fasteners, and axle seal leaks.
.Check restraint system components. See
Safety System Check 044.
.Visually inspect fuel system for damage
or leaks.
.Visually inspect exhaust system and
nearby heat shields for loose or damaged
parts.
.Lubricate body components. See Exterior
Care 0295.
.Check automatic transmission shift lock
control function. See Automatic
Transmission Shift Lock Control Function
Check 0247.
.Check parking brake and automatic
transmission park mechanism. See Park
Brake and P (Park) Mechanism Check
0 247.
.Check accelerator pedal for damage, high
effort, or binding. Replace if needed.
.Visually inspect gas strut for signs of
wear, cracks, or other damage. Check the
hold open ability of the strut. If the hold
open ability is low, service the gas strut.
See Gas Strut(s) 0248.
.Check tire sealant expiration date,
if equipped. See Tire Sealant and
Compressor Kit 0279.
.Inspect sunroof track and seal,
if equipped. See Sunroof025.
Page 309 of 351
Chevrolet Malibu Owner Manual (GMNA-Localizing-U.S./Canada-
14584249) - 2021 - CRC - 11/9/20
308 Service and Maintenance
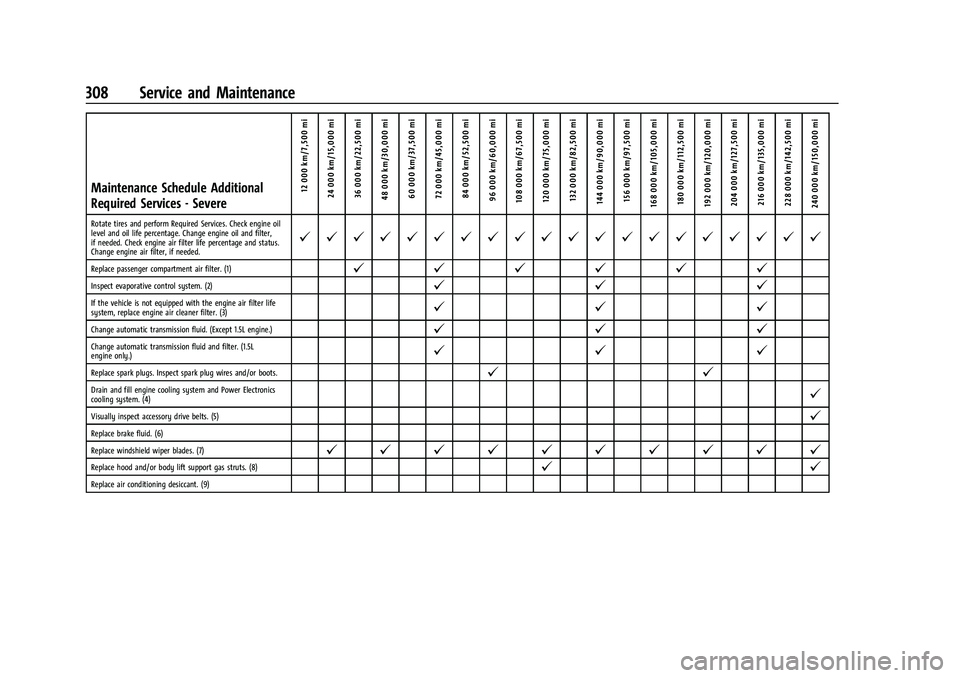
Maintenance Schedule Additional
Required Services - Severe12 000 km/7,500 mi
24 000 km/15,000 mi
36 000 km/22,500 mi
48 000 km/30,000 mi 60 000 km/37,500 mi
72 000 km/45,000 mi84 000 km/52,500 mi
96 000 km/60,000 mi
108 000 km/67,500 mi 120 000 km/75,000 mi 132 000 km/82,500 mi
144 000 km/90,000 mi 156 000 km/97,500 mi
168 000 km/105,000 mi 180 000 km/112,500 mi
192 000 km/120,000 mi 204 000 km/127,500 mi 216 000 km/135,000 mi
228 000 km/142,500 mi
240 000 km/150,000 mi
Rotate tires and perform Required Services. Check engine oil
level and oil life percentage. Change engine oil and filter,
if needed. Check engine air filter life percentage and status.
Change engine air filter, if needed.@ @ @ @ @ @ @ @ @ @ @ @ @ @ @ @ @ @ @ @
Replace passenger compartment air filter. (1)@ @@@@@
Inspect evaporative control system. (2)@ @@
If the vehicle is not equipped with the engine air filter life
system, replace engine air cleaner filter. (3)@@@
Change automatic transmission fluid. (Except 1.5L engine.)@@@
Change automatic transmission fluid and filter. (1.5L
engine only.)@@@
Replace spark plugs. Inspect spark plug wires and/or boots.@ @
Drain and fill engine cooling system and Power Electronics
cooling system. (4)@
Visually inspect accessory drive belts. (5)@
Replace brake fluid. (6)
Replace windshield wiper blades. (7)
@ @ @ @ @ @ @ @ @ @
Replace hood and/or body lift support gas struts. (8)@ @
Replace air conditioning desiccant. (9)