2022 CHEVROLET CORVETTE lock
[x] Cancel search: lockPage 172 of 338

Chevrolet Corvette Owner Manual (GMNA-Localizing-U.S./Canada/Mexico-
15342622) - 2022 - CRC - 5/4/21
Climate Controls 171
If equipped with heated outside mirrors,
press
1REAR to turn them on or off. See
Heated Mirrors 025.
Caution
Using a razor blade or sharp object to
clear the inside rear window can damage
the rear window defogger. Repairs would
not be covered by the vehicle warranty.
Do not clear the inside rear window with
sharp objects.
Remote Start Climate Control Operation :
If equipped with remote start, the climate
control system may run when the vehicle is
started remotely. If equipped with heated or
ventilated seats or a heated steering wheel,
these features may come on during a
remote start. See Remote Vehicle Start 012,
Heated and Ventilated Front Seats 044, and
Heated Steering Wheel 074.
Afterblow Feature
If equipped, under certain conditions, the
fan may stay on or may turn on and off
several times after you turn off and lock the
vehicle. This is normal.
Air Vents
Use the tab on the air outlets to change the
direction of the airflow or shut the outlet.
Operation Tips
.Clear away any ice, snow, or leaves from
the air inlets at the base of the
windshield that may block the flow of air
into the vehicle.
.Clear snow off the hood to improve
visibility and help decrease moisture
drawn into the vehicle.
.Use of non-GM approved hood deflectors
may adversely affect the performance of
the system.
.Keep the areas around the base of the
infotainment display and under the seats
clear to optimize air circulation.
Maintenance
Passenger Compartment Air Filter
The passenger compartment air filter
reduces dust, pollen, and other airborne
irritants from outside air that are pulled into
the vehicle. Reductions in airflow, which
may occur more often in dusty areas,
indicate that the filter may need to be
replaced. See Maintenance Schedule 0292.
Caution
Driving without a passenger compartment
air filter in place can cause water and
small particles, like paper and leaves, to
be pulled into your climate control
system which may cause damage to it.
Make sure you always replace the old
filter with a new one.
The passenger compartment air filter is
located under the hood between the battery
and windshield. See Underhood
Compartment Overview 0231.
Page 174 of 338
Chevrolet Corvette Owner Manual (GMNA-Localizing-U.S./Canada/Mexico-
15342622) - 2022 - CRC - 5/4/21
Driving and Operating 173
Driving and Operating
Driving Information
Driving for Better Fuel Economy . . . . . . . 174
Distracted Driving . . . . . . . . . . . . . . . . . . . . . 174
Defensive Driving . . . . . . . . . . . . . . . . . . . . . . 175
Impaired Driving . . . . . . . . . . . . . . . . . . . . . . . 175
Control of a Vehicle . . . . . . . . . . . . . . . . . . . . 175
Braking . . . . . . . . . . . . . . . . . . . . . . . . . . . . . . . . 175
Steering . . . . . . . . . . . . . . . . . . . . . . . . . . . . . . . 175
Off-Road Recovery . . . . . . . . . . . . . . . . . . . . . 176
Loss of Control . . . . . . . . . . . . . . . . . . . . . . . . . 177
Track Events and CompetitiveDriving . . . . . . . . . . . . . . . . . . . . . . . . . . . . . . . 177
Driving on Wet Roads . . . . . . . . . . . . . . . . . 183
Hill and Mountain Roads . . . . . . . . . . . . . . 184
Winter Driving . . . . . . . . . . . . . . . . . . . . . . . . . 185
If the Vehicle Is Stuck . . . . . . . . . . . . . . . . . 186
Vehicle Load Limits . . . . . . . . . . . . . . . . . . . . 186
Starting and Operating
New Vehicle Break-In . . . . . . . . . . . . . . . . . . 189
Front Air Dam (and Splitter) . . . . . . . . . . . 190
Composite Materials . . . . . . . . . . . . . . . . . . 190
Ignition Positions . . . . . . . . . . . . . . . . . . . . . . 190
Starting the Engine . . . . . . . . . . . . . . . . . . . . 192
Retained Accessory Power (RAP) . . . . . . . 193
Shifting Into Park . . . . . . . . . . . . . . . . . . . . . . 193
Shifting out of Park . . . . . . . . . . . . . . . . . . . 194
Parking over Things That Burn . . . . . . . . 194 Active Fuel Management . . . . . . . . . . . . . . 194
Extended Parking . . . . . . . . . . . . . . . . . . . . . . 194
Engine Exhaust
Engine Exhaust . . . . . . . . . . . . . . . . . . . . . . . . 195
Running the Vehicle While Parked . . . . . 195
Dual Clutch Transmission
Dual Clutch Transmission . . . . . . . . . . . . . . 195
Manual Mode . . . . . . . . . . . . . . . . . . . . . . . . . 198
Brakes
Electric Brake Boost . . . . . . . . . . . . . . . . . . . 202
Antilock Brake System (ABS) . . . . . . . . . . 202
Electric Parking Brake . . . . . . . . . . . . . . . . . 203
Brake Assist . . . . . . . . . . . . . . . . . . . . . . . . . . . 204
Hill Start Assist (HSA) . . . . . . . . . . . . . . . . . 204
Ride Control Systems
Traction Control/Electronic Stability
Control . . . . . . . . . . . . . . . . . . . . . . . . . . . . . . 205
Hill Rollback Control . . . . . . . . . . . . . . . . . . 206
Driver Mode Control . . . . . . . . . . . . . . . . . . 206
Front Lift System . . . . . . . . . . . . . . . . . . . . . . 212
Competitive Driving Mode . . . . . . . . . . . . . 213
Limited-Slip Differential (Without Z51) . . . . . . . . . . . . . . . . . . . . . . . . 216
Limited-Slip Differential (With Z51) . . . . . 216
Cruise Control
Cruise Control . . . . . . . . . . . . . . . . . . . . . . . . . 216
Driver Assistance Systems
Driver Assistance Systems . . . . . . . . . . . . . 218
Assistance Systems for Parking or Backing . . . . . . . . . . . . . . . . . . . . . . . . . . . . . . 220
Rear Vision Camera (RVC) . . . . . . . . . . . . . 220
Curb View Camera . . . . . . . . . . . . . . . . . . . . . 221
Park Assist . . . . . . . . . . . . . . . . . . . . . . . . . . . . . 222
Rear Cross Traffic Alert (RCTA) System . . . . . . . . . . . . . . . . . . . . . . . . . . . . . . 222
Side Blind Zone Alert (SBZA) . . . . . . . . . . . 222
Fuel
Top Tier Fuel . . . . . . . . . . . . . . . . . . . . . . . . . . 224
Recommended Fuel . . . . . . . . . . . . . . . . . . . . 224
Prohibited Fuels . . . . . . . . . . . . . . . . . . . . . . . 224
Fuels in Foreign Countries . . . . . . . . . . . . . 225
Fuel Additives . . . . . . . . . . . . . . . . . . . . . . . . . 225
Filling the Tank . . . . . . . . . . . . . . . . . . . . . . . . 225
Filling a Portable Fuel Container . . . . . . . 226
Trailer Towing
General Towing Information . . . . . . . . . . . 227
Conversions and Add-Ons
Add-On Electrical Equipment . . . . . . . . . . . 227
Page 177 of 338

Chevrolet Corvette Owner Manual (GMNA-Localizing-U.S./Canada/Mexico-
15342622) - 2022 - CRC - 5/4/21
176 Driving and Operating
Electric Power Steering
The vehicle has electric power steering.
It does not have power steering fluid.
Regular maintenance is not required.
If power steering assist is lost due to a
system malfunction, the vehicle can be
steered, but may require increased effort.
If the steering assist is used for an extended
period of time while the vehicle is not
moving, power assist may be reduced.
If the steering wheel is turned until it
reaches the maximum rotation and is held
at that position for an extended period of
time, power steering assist may be reduced.Normal use of the power steering assist
should return when the system cools down.
See your dealer if there is a problem.
Dynamic Rack Travel
If equipped with Magnetic Ride Control,
Dynamic Rack Travel (DRT) is a steering
system feature which enhances driving by
providing additional maximum steering
wheel rotation to allow a tighter turning
radius during low speed driving conditions.
If the vehicle speed increases or if the
suspension encounters significant wheel
travel, such as a driveway, while at
maximum steering rotation, DRT may gently
push the steering back a small amount to
prevent the front tires from contacting the
vehicle. This is normal operation. There is no
customer interface or display for this
feature. DRT is not available when in
Track Mode.
Curve Tips
.Take curves at a reasonable speed.
.Reduce speed before entering a curve.
.Maintain a reasonable and steady speed
through the curve.
.Wait until the vehicle is out of the curve
before accelerating gently into the
straightaway.
Steering in Emergencies
.There are some situations when steering
around a problem may be more effective
than braking.
.Holding both sides of the steering wheel
allows you to turn 180 degrees without
removing a hand.
.The Antilock Brake System (ABS) allows
steering while braking.
Off-Road Recovery
Page 178 of 338
Chevrolet Corvette Owner Manual (GMNA-Localizing-U.S./Canada/Mexico-
15342622) - 2022 - CRC - 5/4/21
Driving and Operating 177
The vehicle's right wheels can drop off the
edge of a road onto the shoulder while
driving. Follow these tips:1. Ease off the accelerator and then, if there is nothing in the way, steer the
vehicle so that it straddles the edge of
the pavement.
2. Turn the steering wheel about one-eighth of a turn, until the right front
tire contacts the pavement edge.
3. Turn the steering wheel to go straight down the roadway.
Loss of Control
Skidding
There are three types of skids that
correspond to the vehicle's three control
systems:
.Braking Skid —wheels are not rolling.
.Steering or Cornering Skid —too much
speed or steering in a curve causes tires
to slip and lose cornering force.
.Acceleration Skid —too much throttle
causes the driving wheels to spin. Defensive drivers avoid most skids by taking
reasonable care suited to existing conditions,
and by not overdriving those conditions. But
skids are always possible.
If the vehicle starts to slide, follow these
suggestions:
.Ease your foot off the accelerator pedal
and steer the way you want the vehicle
to go. The vehicle may straighten out. Be
ready for a second skid if it occurs.
.Slow down and adjust your driving
according to weather conditions. Stopping
distance can be longer and vehicle control
can be affected when traction is reduced
by water, snow, ice, gravel, or other
material on the road. Learn to recognize
warning clues
—such as enough water,
ice, or packed snow on the road to make
a mirrored surface —and slow down
when you have any doubt.
.Try to avoid sudden steering, acceleration,
or braking, including reducing vehicle
speed by shifting to a lower gear. Any
sudden changes could cause the tires to
slide.
Remember: Antilock brakes help avoid only
the braking skid.
Track Events and Competitive
Driving
Vehicles without Z51 package should not be
used for track events and competitive
driving.
{Danger
High-performance features are intended
for use only on closed tracks by
experienced and qualified drivers and
should not be used on public roads.
High-speed driving, aggressive cornering,
hard braking, and other high-performance
driving can be dangerous. Improper driver
inputs for the conditions may result in
loss of control of the vehicle, which could
injure or kill you or others. Always drive
safely.
Participating in track events or other
competitive driving without following the
instructions provided may affect the vehicle
warranty. See the warranty manual before
using the vehicle for racing or other
competitive driving. See Competitive Driving
Mode 0213.
Page 181 of 338
Chevrolet Corvette Owner Manual (GMNA-Localizing-U.S./Canada/Mexico-
15342622) - 2022 - CRC - 5/4/21
180 Driving and Operating
to be replaced, use GM-approved brake pads.
If this is not done, the brake fade warning
system may not function properly.
Stage 1 :The Driver Information Center (DIC)
displays a “Reduce Braking to Avoid
Overheating” message and brake pedal
effort and travel is increased. When the
message displays, the driver should decrease
brake pedal pressure.
Stage 2 : The Driver Information Center
(DIC) displays a “Brakes Overheated Service
Now” message that the brake fluid
temperature is excessive and is about to
boil. The system increases brake pedal effort
and travel, and will also limit vehicle speed.
The driver should immediately start a cool
down lap if on the track. If this message
displays, take the vehicle to be serviced at
your dealer.
Brake Burnishing
New brake pads must be burnished before
racing or other competitive driving.
Caution
Performing the brake burnish procedure
on a base brake system can result in
brake damage.
Caution
The new vehicle break-in period should be
completed before performing the brake
burnish procedure, otherwise damage
may occur to the powertrain/engine. See
New Vehicle Break-In 0189.
Caution
Brake pedal fade will occur during any
track burnish procedure and can cause
brake pedal travel and force to increase.
This could extend stopping distance until
the brakes are fully burnished.
When this procedure is performed as
instructed, it will not damage the brakes.
The brake pads will smoke and produce an
odor. The braking force and pedal travel
may increase. After the procedure, the brake
pads may appear white at the rotor contact.
Perform this procedure only on dry
pavement, in a safe manner, and in
compliance with all local and state
ordinances/laws regarding motor vehicle
operation. Brake Burnishing Procedure
This brake burnish procedure should only be
run on vehicles with the J55 Z51 factory
equipped brake system.
1. Using the G-Force Gauge in the HUD display, apply the brakes 25 times
starting at 100 km/h (60 mph) to
50 km/h (30 mph) while decelerating at
0.4 g. See Head-Up Display (HUD) 094.
This is a medium brake application. Drive
for at least 1 km (0.6 mi) between
applying the brakes. This first step may
be skipped if there are more than
320 km (200 mi) on the brake pads.
2. Apply the brakes 25 times starting at 100 km/h (60 mph) to 25 km/h (15 mph)
while decelerating at 0.8 g. This is a hard
brake application without activating the
Antilock Brake System (ABS). Drive for at
least 1 km (0.6 mi) between applications.
Depending on conditions, some increase
in brake pedal travel and brake pedal
force may be experienced.
3. Cool down: Drive at 100 km/h (60 mph) for approximately 15 km (10 mi) without
using the brakes.
Page 182 of 338
Chevrolet Corvette Owner Manual (GMNA-Localizing-U.S./Canada/Mexico-
15342622) - 2022 - CRC - 5/4/21
Driving and Operating 181
4. Apply the brakes 25 times from100 km/h (60 mph) to 50 km/h (30 mph)
while decelerating at 0.4 g. This is a
medium brake application. Drive for at
least 1 km (0.6 mi) between applications.
As with all high performance brake systems,
some amount of brake squeal is normal.
Alternative Closed Course Brake Burnishing
Procedure
This brake burnish procedure should only be
run on vehicles with the J55 Z51 factory
equipped brake system.
This procedure should only be run on a
track and only on dry pavement. Brake
pedal fade will occur during this track
burnish procedure and can cause brake pedal
travel and force to increase. This could
extend stopping distance until the brakes
are fully burnished. 1. Start track lapping at lower speeds and lower braking efforts for three minutes
of driving. Allow for increased braking
distances due to reduced brake output. 2. After Step 1, increase speed and braking
effort for the next six minutes of
lapping, gradually ending up at 90%
effort. Continue to allow for increased
braking distance due to reduced brake
output.
3. Cool the brakes by lapping with minimal light braking for six minutes.
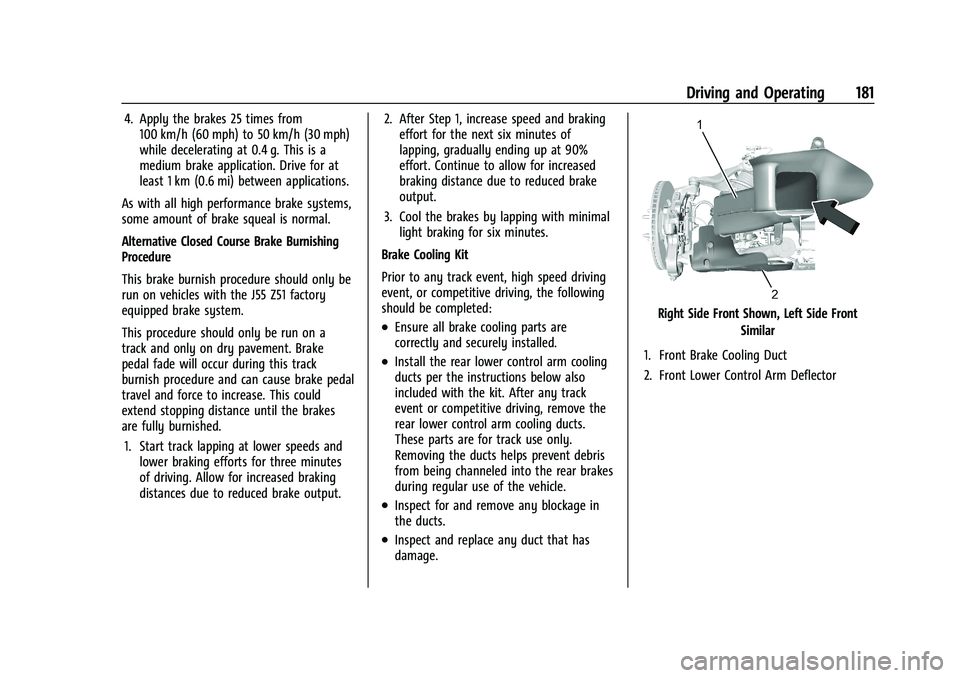
Brake Cooling Kit
Prior to any track event, high speed driving
event, or competitive driving, the following
should be completed:
.Ensure all brake cooling parts are
correctly and securely installed.
.Install the rear lower control arm cooling
ducts per the instructions below also
included with the kit. After any track
event or competitive driving, remove the
rear lower control arm cooling ducts.
These parts are for track use only.
Removing the ducts helps prevent debris
from being channeled into the rear brakes
during regular use of the vehicle.
.Inspect for and remove any blockage in
the ducts.
.Inspect and replace any duct that has
damage.
Right Side Front Shown, Left Side Front Similar
1. Front Brake Cooling Duct
2. Front Lower Control Arm Deflector
Page 183 of 338

Chevrolet Corvette Owner Manual (GMNA-Localizing-U.S./Canada/Mexico-
15342622) - 2022 - CRC - 5/4/21
182 Driving and Operating
Right Side Rear Shown, Left Side Rear Similar3. Rear Knuckle Mounted Cooling Duct
4. Rear Lower Control Arm Cooling Duct
Shock Spring Seat Adjustment
The front shocks, on vehicles without
hydraulic front lift and rear shocks, have
threaded spring seats that allow adjustment
of the preload on the coil springs. The
vehicle corner weights can be adjusted for
track use. If the vehicle trim height is
modified, it should be returned to normal
trim height before street use. The spring seat can be adjusted
approximately 20 mm (0.8 in) up or down
from the nominal position. Each complete
turn of the spring seat will change the
vehicle height approximately 1.5 mm
(0.06 in). When adjusting the seat to the
upper limit, lift the dust boot and ensure
the seat does not thread off the center
support tube (stop adjustment when threads
no longer visible). When adjusting the seat
to the lower limit, leave approximately
10 mm (0.4 in) of thread visible for the
lower lock nut to have full thread
engagement.
The following procedure can be complex and
should only be performed by trained
personnel. See your dealer.
To adjust the lower spring seat:
1. Raise the vehicle so the tires are completely off the ground.
Front Shown, Rear Similar
2. Loosen the lower spring seat lock nut (2).
3. Thread the lower spring seat lock nut (2) downward off of the threads to its
resting location on the shoulder of the
center support tube.
4. While holding the center support tube holes, turn the spring seat (1) upward to
increase spring preload, or downward to
decrease spring preload.
5. Thread the lower lock nut (2) back on to the center support tube and torque it
against the spring seat (1) to 25 Y
(18.4 lb ft).
Page 186 of 338
Chevrolet Corvette Owner Manual (GMNA-Localizing-U.S./Canada/Mexico-
15342622) - 2022 - CRC - 5/4/21
Driving and Operating 185
Winter Driving
Driving on Snow or IceCaution
To avoid damage to the wheels and
brake components, always clear snow and
ice from inside the wheels and
underneath the vehicle before driving.
Snow or ice between the tires and the road
creates less traction or grip, so drive
carefully. Wet ice can occur at about 0 °C
(32 °F) when freezing rain begins to fall.
Avoid driving on wet ice or in freezing rain
until roads can be treated.
For Slippery Road Driving:
.Accelerate gently. Accelerating too quickly
causes the wheels to spin and makes the
surface under the tires slick.
.Turn on Traction Control. See Traction
Control/Electronic Stability Control 0205.
.The Antilock Brake System (ABS) improves
vehicle stability during hard stops, but
the brakes should be applied sooner than
when on dry pavement. See Antilock
Brake System (ABS) 0202.
.Allow greater following distance and
watch for slippery spots. Icy patches can
occur on otherwise clear roads in shaded
areas. The surface of a curve or an
overpass can remain icy when the
surrounding roads are clear. Avoid sudden
steering maneuvers and braking while
on ice.
.Turn off cruise control.
.Turn on Weather Mode. See Driver Mode
Control 0206.
Blizzard Conditions
Stop the vehicle in a safe place and signal
for help. Stay with the vehicle unless there
is help nearby. If possible, use Roadside
Assistance. See Roadside Assistance Program
0 310. To get help and keep everyone in the
vehicle safe:
.Turn on the hazard warning flashers.
.Tie a red cloth to an outside mirror.
{Warning
Snow can trap engine exhaust under the
vehicle. This may cause exhaust gases to
get inside. Engine exhaust contains
(Continued)
Warning (Continued)
carbon monoxide (CO), which cannot be
seen or smelled. It can cause
unconsciousness and even death.
If the vehicle is stuck in snow:
.Clear snow from the base of the
vehicle, especially any blocking the
exhaust pipe.
.Open a window about 5 cm (2 in) on
the vehicle side that is away from the
wind, to bring in fresh air.
.Fully open the air outlets on or under
the instrument panel.
.Adjust the climate control system to
circulate the air inside the vehicle and
set the fan speed to the highest
setting. See“Climate Control Systems.”
For more information about CO, see
Engine Exhaust 0195.
To save fuel, run the engine for short
periods to warm the vehicle and then shut
the engine off and partially close the
window. Moving about to keep warm also
helps.