2022 CHEVROLET CORVETTE lock
[x] Cancel search: lockPage 70 of 338

Chevrolet Corvette Owner Manual (GMNA-Localizing-U.S./Canada/Mexico-
15342622) - 2022 - CRC - 5/4/21
Seats and Restraints 69
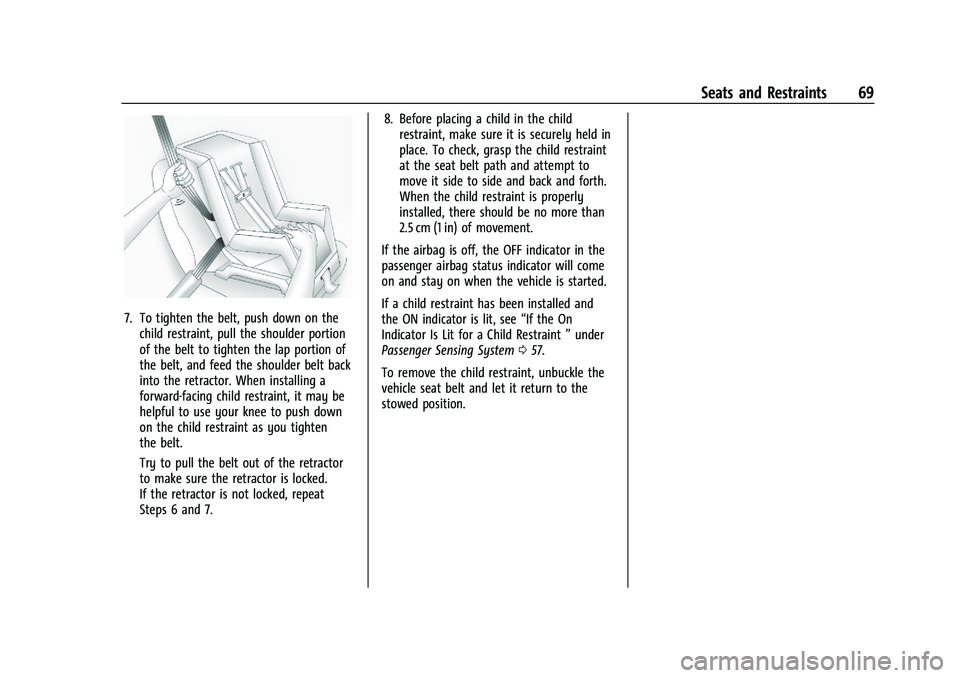
7. To tighten the belt, push down on thechild restraint, pull the shoulder portion
of the belt to tighten the lap portion of
the belt, and feed the shoulder belt back
into the retractor. When installing a
forward-facing child restraint, it may be
helpful to use your knee to push down
on the child restraint as you tighten
the belt.
Try to pull the belt out of the retractor
to make sure the retractor is locked.
If the retractor is not locked, repeat
Steps 6 and 7. 8. Before placing a child in the child
restraint, make sure it is securely held in
place. To check, grasp the child restraint
at the seat belt path and attempt to
move it side to side and back and forth.
When the child restraint is properly
installed, there should be no more than
2.5 cm (1 in) of movement.
If the airbag is off, the OFF indicator in the
passenger airbag status indicator will come
on and stay on when the vehicle is started.
If a child restraint has been installed and
the ON indicator is lit, see “If the On
Indicator Is Lit for a Child Restraint ”under
Passenger Sensing System 057.
To remove the child restraint, unbuckle the
vehicle seat belt and let it return to the
stowed position.
Page 71 of 338

Chevrolet Corvette Owner Manual (GMNA-Localizing-U.S./Canada/Mexico-
15342622) - 2022 - CRC - 5/4/21
70 Storage
Storage
Storage Compartments
Storage Compartments . . . . . . . . . . . . . . . . . 70
Glove Box . . . . . . . . . . . . . . . . . . . . . . . . . . . . . . 70
Cupholders . . . . . . . . . . . . . . . . . . . . . . . . . . . . . 70
Front Storage . . . . . . . . . . . . . . . . . . . . . . . . . . 70
Rear Storage . . . . . . . . . . . . . . . . . . . . . . . . . . . . 71
Center Console Storage . . . . . . . . . . . . . . . . . 72
Additional Storage Features
Cargo Tie-Downs . . . . . . . . . . . . . . . . . . . . . . . . 72
Convenience Net . . . . . . . . . . . . . . . . . . . . . . . . 72
Storage Compartments{
Warning
Do not store heavy or sharp objects in
storage compartments. In a crash, these
objects may cause the cover to open and
could result in injury.
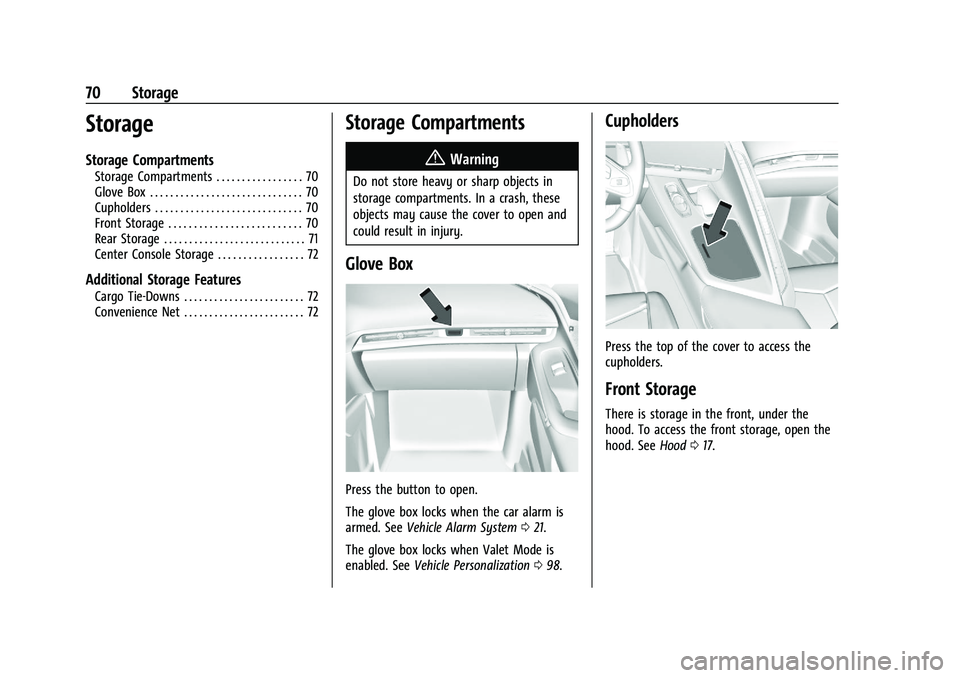
Glove Box
Press the button to open.
The glove box locks when the car alarm is
armed. See Vehicle Alarm System 021.
The glove box locks when Valet Mode is
enabled. See Vehicle Personalization 098.
Cupholders
Press the top of the cover to access the
cupholders.
Front Storage
There is storage in the front, under the
hood. To access the front storage, open the
hood. See Hood017.
Page 73 of 338

Chevrolet Corvette Owner Manual (GMNA-Localizing-U.S./Canada/Mexico-
15342622) - 2022 - CRC - 5/4/21
72 Storage
Center Console Storage
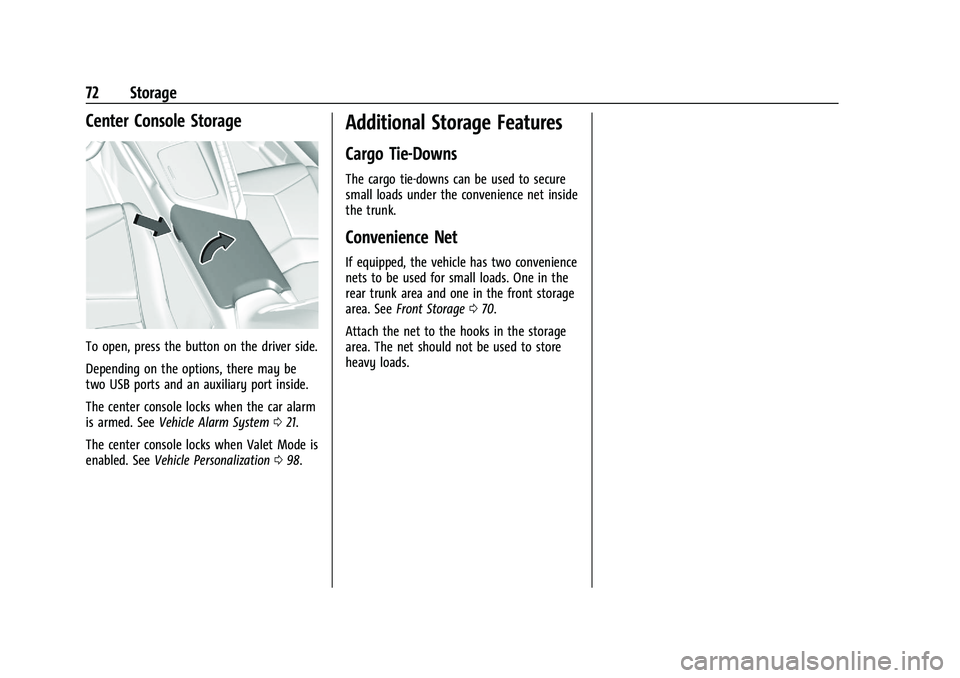
To open, press the button on the driver side.
Depending on the options, there may be
two USB ports and an auxiliary port inside.
The center console locks when the car alarm
is armed. SeeVehicle Alarm System 021.
The center console locks when Valet Mode is
enabled. See Vehicle Personalization 098.
Additional Storage Features
Cargo Tie-Downs
The cargo tie-downs can be used to secure
small loads under the convenience net inside
the trunk.
Convenience Net
If equipped, the vehicle has two convenience
nets to be used for small loads. One in the
rear trunk area and one in the front storage
area. See Front Storage 070.
Attach the net to the hooks in the storage
area. The net should not be used to store
heavy loads.
Page 74 of 338

Chevrolet Corvette Owner Manual (GMNA-Localizing-U.S./Canada/Mexico-
15342622) - 2022 - CRC - 5/4/21
Instruments and Controls 73
Instruments and Controls
Controls
Steering Wheel Adjustment . . . . . . . . . . . . 74
Steering Wheel Controls . . . . . . . . . . . . . . . . 74
Heated Steering Wheel . . . . . . . . . . . . . . . . . 74
Horn . . . . . . . . . . . . . . . . . . . . . . . . . . . . . . . . . . . 74
Windshield Wiper/Washer . . . . . . . . . . . . . . 74
Compass . . . . . . . . . . . . . . . . . . . . . . . . . . . . . . . . 75
Clock . . . . . . . . . . . . . . . . . . . . . . . . . . . . . . . . . . . 75
Power Outlets . . . . . . . . . . . . . . . . . . . . . . . . . . 76
Wireless Charging . . . . . . . . . . . . . . . . . . . . . . 77
Warning Lights, Gauges, and Indicators
Warning Lights, Gauges, andIndicators . . . . . . . . . . . . . . . . . . . . . . . . . . . . . 79
Instrument Cluster . . . . . . . . . . . . . . . . . . . . . 80
Speedometer . . . . . . . . . . . . . . . . . . . . . . . . . . . 83
Odometer . . . . . . . . . . . . . . . . . . . . . . . . . . . . . . 83
Trip Odometer . . . . . . . . . . . . . . . . . . . . . . . . . . 83
Tachometer . . . . . . . . . . . . . . . . . . . . . . . . . . . . 83
Fuel Gauge . . . . . . . . . . . . . . . . . . . . . . . . . . . . . 83
Engine Coolant Temperature Gauge . . . . 84
Transmission Temperature Gauge . . . . . . 84
Seat Belt Reminders . . . . . . . . . . . . . . . . . . . . 84
Airbag Readiness Light . . . . . . . . . . . . . . . . . 85
Passenger Airbag Status Indicator . . . . . . 85
Charging System Light . . . . . . . . . . . . . . . . . 86
Malfunction Indicator Lamp (Check Engine Light) . . . . . . . . . . . . . . . . . . . . . . . . . 86 Front Lift System Light . . . . . . . . . . . . . . . . . 88
Brake System Warning Light . . . . . . . . . . . 88
Electric Parking Brake Light . . . . . . . . . . . . . 89
Service Electric Parking Brake Light . . . . . 89
Antilock Brake System (ABS) Warning
Light . . . . . . . . . . . . . . . . . . . . . . . . . . . . . . . . . 89
Performance Shifting Light . . . . . . . . . . . . . 89
Traction Off Light . . . . . . . . . . . . . . . . . . . . . . 90
Traction Control System (TCS)/Electronic Stability Control Light . . . . . . . . . . . . . . . . 90
Electronic Stability Control (ESC) Off Light . . . . . . . . . . . . . . . . . . . . . . . . . . . . . . . . . 90
Tire Pressure Light . . . . . . . . . . . . . . . . . . . . . . 91
Engine Oil Pressure Light . . . . . . . . . . . . . . . 91
Security Light . . . . . . . . . . . . . . . . . . . . . . . . . . . 91
High-Beam On Light . . . . . . . . . . . . . . . . . . . . 92
Lamps On Reminder . . . . . . . . . . . . . . . . . . . . 92
Cruise Control Light . . . . . . . . . . . . . . . . . . . . 92
Door Ajar Light . . . . . . . . . . . . . . . . . . . . . . . . . 92
Information Displays
Driver Information Center (DIC) . . . . . . . . . 92
Head-Up Display (HUD) . . . . . . . . . . . . . . . . 94
Vehicle Messages
Vehicle Messages . . . . . . . . . . . . . . . . . . . . . . . 97
Engine Power Messages . . . . . . . . . . . . . . . . 98
Vehicle Speed Messages . . . . . . . . . . . . . . . . 98
Vehicle Personalization
Vehicle Personalization . . . . . . . . . . . . . . . . . 98
Universal Remote System
Universal Remote System . . . . . . . . . . . . . 102
Universal Remote System Programming . . . . . . . . . . . . . . . . . . . . . . . . 102
Universal Remote System Operation . . . . . . . . . . . . . . . . . . . . . . . . . . . 104
Page 76 of 338

Chevrolet Corvette Owner Manual (GMNA-Localizing-U.S./Canada/Mexico-
15342622) - 2022 - CRC - 5/4/21
Instruments and Controls 75
INT :Move the lever up to INT for
intermittent wipes, then turn the
Nband
up for more frequent wipes or down for less
frequent wipes.
OFF : Use to turn the wipers off.
1X : For a single wipe, briefly move the
wiper lever down. For several wipes, hold
the wiper lever down.
f: Pull the windshield wiper lever
toward you to spray washer fluid and
activate the wipers. The wipers will continue
until the lever is released or the maximum
wash time is reached. When the lever is
released, additional wipes may occur
depending on how long the windshield
washer had been activated. See Washer
Fluid 0246 for information on filling the
windshield washer fluid reservoir.
Clear snow and ice from the wiper blades
and windshield before using them. If frozen
to the windshield, carefully loosen or thaw
them. Damaged blades should be replaced.
See Wiper Blade Replacement 0250.
Heavy snow or ice can overload the wiper
motor.
{Warning
In freezing weather, do not use the
washer until the windshield is warmed.
Otherwise the washer fluid can form ice
on the windshield, blocking your vision.
{Warning
Before driving the vehicle, always clear
snow and ice from the hood, windshield,
washer nozzles, roof, and rear of the
vehicle, including all lamps and windows.
Reduced visibility from snow and ice
buildup could lead to a crash.
Wiper Parking
If the ignition is turned off while the wipers
are on LO, HI, or INT, they will
immediately stop.
If the windshield wiper lever is then moved
to OFF before the driver door is opened or
within 10 minutes, the wipers will restart
and move to the base of the windshield.
If the ignition is turned off while the wipers
are performing wipes due to windshield
washing, the wipers continue to run until
they reach the base of the windshield.
Compass
The vehicle may have a compass display on
the center stack. The compass receives its
heading and other information from the
Global Positioning System (GPS) antenna,
Electronic Stability Control, and vehicle
speed information.
The compass system is designed to operate
for a certain number of miles or degrees of
turn before needing a signal from the GPS
satellites. When the compass display shows
CAL, drive the vehicle for a short distance in
an open area where it can receive a GPS
signal. The compass system will
automatically determine when a GPS signal
is restored and provide a heading again.
Clock
Set the time and date using the
infotainment system. See "Time / Date"
under Settings 0151.
Page 82 of 338

Chevrolet Corvette Owner Manual (GMNA-Localizing-U.S./Canada/Mexico-
15342622) - 2022 - CRC - 5/4/21
Instruments and Controls 81
.Info Pages: The selected Driver
Information Center (DIC) displays can be
viewed. SeeDriver Information Center
(DIC) 092.
.Performance
.Audio
.Options
.Simplify
Performance
Press the thumbwheel to enter the
Performance menu. Scroll through the
available items.
G-force : Gives the driver an indication of
the vehicle performance in cornering. The
G-force gauge will show as an info tile on
the left side of the cluster, if selected.
Friction Bubble : A four quadrant visual
display, indicative of the four corners of the
car, with a “bubble”showing where the
most inertia is being exerted on the vehicle.
Performance Timer : Press the thumbwheel
to enter the setup menu, then select Set
Start Speed. Scroll to desired Start Speed,
then press the thumbwheel to save it. While
on this menu, to change the End Speed,
scroll to End Speed and use the thumbwheel
to scroll to desired End Speed. Press the thumbwheel to save it. On the next
acceleration, the performance timer will
record the time. Pressing the thumbwheel
while the timer is running will cancel the
timer if done before reaching the End Speed.
Lap Timer (without PDR) :
Press
Twhen
Lap Timer is displayed to start, stop, or reset
the lap timer. Press the thumbwheel while
the Lap Timer page is active to start the
timer. If the lap timer is active, pressing the
thumbwheel will stop the current lap timer
and start a new lap. Pressing the
thumbwheel within 10 seconds after
completing the last lap (Stop Lap Timer
option is displayed), the Lap Timer will stop.
Lap Timer (with PDR) : The lap times
recorded with the PDR system will
automatically be displayed in this window.
This only happens if a track has been
selected in the PDR system and a video
recording is started. See Performance Data
Recorder (PDR) 0140.
Oil Temperature : Shows the current oil
temperature in either degrees Celsius (°C) or
degrees Fahrenheit (°F).
Oil Pressure : Shows the current oil pressure
in either kilopascal (kPa) or in pounds per
square inch (psi). Battery Voltage :
Shows the current battery
voltage.
Transmission Fluid Temperature : Shows the
temperature of the transmission fluid in
either degrees Celsius (°C) or degrees
Fahrenheit (°F).
Tire Status : Shows individual tire pressures
and overall temperature as either Cold, Cool,
Normal, Warm, or Hot. Normal is typical for
normal driving while Warm is typical for
aggressive driving. Unknown may be
displayed if tire temperature information is
unavailable.
eLSD (Z51 Only) : Displays the amount of
rear differential coupling when the Electronic
Limited-Slip Differential (eLSD) is active and
functioning during vehicle operation.
A reading of 1% is an open differential and
100% is locked. It is normal for the value to
make small or large changes due to driving
conditions and driver inputs. See Limited-Slip
Differential (Without Z51) 0216 or
Limited-Slip Differential (With Z51) 0216.
Front Lift : During a driver requested Front
Lift (if equipped), the driver may
"remember" using the
S, or dismiss the
display by pressing the thumbwheel. When
the Front Lift is Raised due to location, the
Page 90 of 338

Chevrolet Corvette Owner Manual (GMNA-Localizing-U.S./Canada/Mexico-
15342622) - 2022 - CRC - 5/4/21
Instruments and Controls 89
Electric Parking Brake Light
MetricEnglish
This light comes on when the parking brake
is applied. If the light continues flashing
after the parking brake is released, or while
driving, there is a problem with the Electric
Parking Brake system. A message may also
display in the Driver Information
Center (DIC).
If the light does not come on, or remains
flashing, see your dealer.
Service Electric Parking Brake
Light
This light should come on briefly when the
vehicle is turned on. If it does not come on,
have it fixed so it will be ready to warn if
there is a problem.
If this light stays on or comes on while
driving, there is a problem with the Electric
Parking Brake (EPB). Take the vehicle to a
dealer as soon as possible. In addition to the
parking brake, other safety functions that
utilize the EPB may also be degraded.
A message may also display in the Driver
Information Center (DIC). See Electric Parking
Brake 0203.
Antilock Brake System (ABS)
Warning Light
This warning light should come on briefly
when the vehicle is turned on. If the light
does not come on, have it fixed so it will be
ready to warn if there is a problem. If the light comes on while driving, safely
stop as soon as it is possible and turn off
the vehicle. Then turn on the vehicle again
to reset the system.
If the ABS warning light stays on, or comes
on again while driving, the vehicle needs
service. A chime may also sound when the
light stays on.
If the ABS warning light is the only light on,
the vehicle has regular brakes, but ABS is
not functioning.
If both the ABS warning light and the brake
system warning light are on, ABS is not
functioning and there is a problem with the
regular brakes. See your dealer for service.
See
Brake System Warning Light 088.
Performance Shifting Light
If equipped, this light may display green
when Sport Mode is activated and certain
driving conditions are met. Sport Mode
detects when the vehicle is being driven in a
Page 101 of 338

Chevrolet Corvette Owner Manual (GMNA-Localizing-U.S./Canada/Mexico-
15342622) - 2022 - CRC - 5/4/21
100 Instruments and Controls
Touch Off or On.
Side Blind Zone Alert
This allows this feature to be turned on or
off. SeeSide Blind Zone Alert (SBZA) 0222.
Touch Off or On.
Rear Cross Traffic Alert
This setting specifies if an alert will display
when the vehicle detects approaching rear
cross traffic when in R (Reverse). See Rear
Cross Traffic Alert (RCTA) System 0222.
Touch Off or On.
Comfort and Convenience
Touch and the following may display:
.Chime Volume
.Reverse Tilt Mirror
.Remote Mirror Folding
Chime Volume
This setting determines the chime volume
level.
Touch the controls on the infotainment
system to adjust the volume. Reverse Tilt Mirror
When on, the driver, passenger, or both
driver and passenger outside mirrors will tilt
downward when the vehicle is shifted into
R (Reverse) to improve visibility of the
ground near the rear wheels. They may
move from their tilted position when the
vehicle is shifted out of R (Reverse) or
turned off. See
Reverse Tilt Mirrors 025.
Touch Off, On - Driver and Passenger, On -
Driver, or On - Passenger.
Remote Mirror Folding
When on, the outside mirrors will
automatically fold or unfold when the
Qor
Kon the remote key is pressed. See
Folding Mirrors 024.
Touch Off or On.
Lighting
Touch and the following may display:
.Vehicle Locator Lights
.Exit Lighting
Vehicle Locator Lights
This setting flashes the vehicle’s headlamps
and taillamps when
Kis pressed on the
remote key. Touch Off or On.
Exit Lighting
This setting specifies how long the
headlamps stay on after the vehicle is
turned off and exited.
Touch Off, 30 Seconds, 60 Seconds,
or 120 Seconds.
Power Door Locks
Touch and the following may display:
.Auto Door Unlock
.Delayed Door Lock
Auto Door Unlock
This setting allows selection of which doors
will automatically unlock when the vehicle is
shifted into P (Park).
Touch Off, All Doors, or Driver Door.
Delayed Door Lock
This setting delays the locking of the vehicle
doors.
Touch Off or On.
Remote Lock, Unlock, and Start
Touch and the following may display:
.Remote Unlock Light Feedback