2022 ALFA ROMEO GIULIA stop start
[x] Cancel search: stop startPage 175 of 248

173
To use your Tire Service Kit, proceed as follows:
1. Apply the Electric Park Brake.
2. Insert the sealant cartridge containing thesealing fluid in the proper compressor holder,
pushing down hard. Unscrew the tire valve
cap, take out the filler tube and tighten the
fitting on the tire valve.
Attaching Filler Tube To Deflated Tire 3. Make sure the power switch of the
compressor is in the O (off) position.
4. Insert the plug into the power outlet in the center console, then start the engine.
Center Console Power Outlet
5. Start the compressor by placing the power switch in the I (on) position.
6. Inflate the tire to the pressure indicated on the tire placard, located on the driver’s side
B-pillar or the rear edge of the driver’s side
door
Ú
page 209. In order to obtain a more
precise reading, check the pressure value on
pressure gauge with the compressor off. Air Compressor
7. If the pressure is not at least 26.1 psi (1.8 bar) after 15 minutes, disengage the
compressor from the valve and power outlet.
Then, move the vehicle forwards approxi -
mately 33 ft (10 m) in order to distribute the sealant inside the tire evenly, and then
repeat the inflation operation.
8. If you still cannot obtain a pressure of at least 26 psi (1.8 bar) within 15 minutes of turning
the compressor on, do not drive the vehicle,
and contact an authorized dealer.
9. Drive the vehicle for about 5 miles (8 km), stop, apply the electric park brake, and
recheck the tire pressure.
10. If the pressure is less than 26 psi (1.8 bar), DO NOT drive the vehicle, and see an autho -
rized dealer.
Tire Service Kit Sealant solution contains
latex. In case of an allergic reaction or rash,
consult a physician immediately. Keep Tire
Service Kit out of reach of children. If
swallowed, rinse mouth immediately with
plenty of water and drink plenty of water. Do
not induce vomiting! Consult a physician
immediately.
1 — Sealant Cartridge
2 — Filler Tube
WARNING!
5 — Power Switch
6 — Pressure Gauge
22_GA_OM_EN_USC_t.book Page 173
Page 180 of 248

IN CASE OF EMERGENCY
178
If frequent jump starting is required to start your
vehicle, you should have the battery and charging
system inspected at an authorized dealer.
BUMP STARTING
Never jump start the engine by pushing, towing or
coasting downhill.
NOTE:
You cannot start a vehicle with an automatic
transmission by pushing it.
IF YOUR ENGINE
OVERHEATS
Engine overheating may occur in situations of
extreme environmental temperatures, frequent
engine stops/starts, or driving in heavy traffic. If
the engine becomes overheated, the Engine
Temperature Warning Light in the instrument
cluster will illuminate along with a dedicated
message
Ú
page 70.
If the vehicle is overheating, it will need to be
serviced by an authorized dealer. In any of the following situations, you can reduce
the potential for overheating by taking the
appropriate action.
On the highways — slow down.
In city traffic — while stopped, place the
transmission in NEUTRAL, but do not increase
engine idle speed.
NOTE:
There are steps that you can take to slow down
an impending overheat condition:
If your Air Conditioner (A/C) is on, turn it off.
The A/C system adds heat to the engine
cooling system and turning the A/C off can
help remove this heat.
You can also turn the temperature control to
maximum heat, the mode control to floor and
the blower control to high. This allows the
heater core to act as a supplement to the
radiator and aids in removing heat from the
engine cooling system.
If Steam Is Coming From The Engine
Compartment
Do not go near the front of the vehicle. Stop the
engine. Wait until the steam dissipates. Then,
open the hood and start the engine.
If Neither Coolant Nor Steam Is Escaping
Open the hood and idle the engine until it cools.
NOTE:
If the cooling fan does not operate while the
engine is running, the engine temperature will
increase. Stop the engine and contact an
authorized dealer.
If the engine continues to overheat or
frequently overheats, have the cooling system
inspected. The engine could be seriously
damaged unless repairs are made. Contact an
authorized dealer.
CAUTION!
Accessories plugged into the vehicle power
outlets draw power from the vehicle’s battery,
even when not in use (i.e., cellular phones,
etc.). Eventually, if plugged in long enough
without engine operation, the vehicle’s battery
will discharge sufficiently to degrade battery
life and/or prevent the engine from starting.
WARNING!
You or others can be badly burned by hot
engine coolant (antifreeze) or steam from your
radiator. If you see or hear steam coming from
under the hood, do not open the hood until
the radiator has had time to cool. Never try to
open a cooling system pressure cap when the
radiator or coolant bottle is hot.
CAUTION!
Driving with a hot cooling system could
damage your vehicle. If temperature gauge
reads “H”, pull over and stop the vehicle. Idle
the vehicle with the air conditioner turned off
until the pointer drops back into the normal
range. If the pointer remains on the “H”, turn
the engine off immediately, and call for
service.
22_GA_OM_EN_USC_t.book Page 178
Page 196 of 248

SERVICING AND MAINTENANCE
194
Function Deactivation
The function is deactivated if:
More than two minutes passes before placing
the ignition in the STOP position after having
raised the lever and putting the wipers into
service position.
The ignition is placed in the ACC position and
the windshield wiper control is used.
If, after using the function, the ignition is set back
to ACC with the blades in a position other than
rest position (at the base of the windshield), they
will only return to rest position following a
command given using the stalk (stalk upwards,
into unstable position) or when a speed of 3 mph
(5 km/h) is exceeded.
Replacing The Windshield Wiper Blades
Proceed as follows:
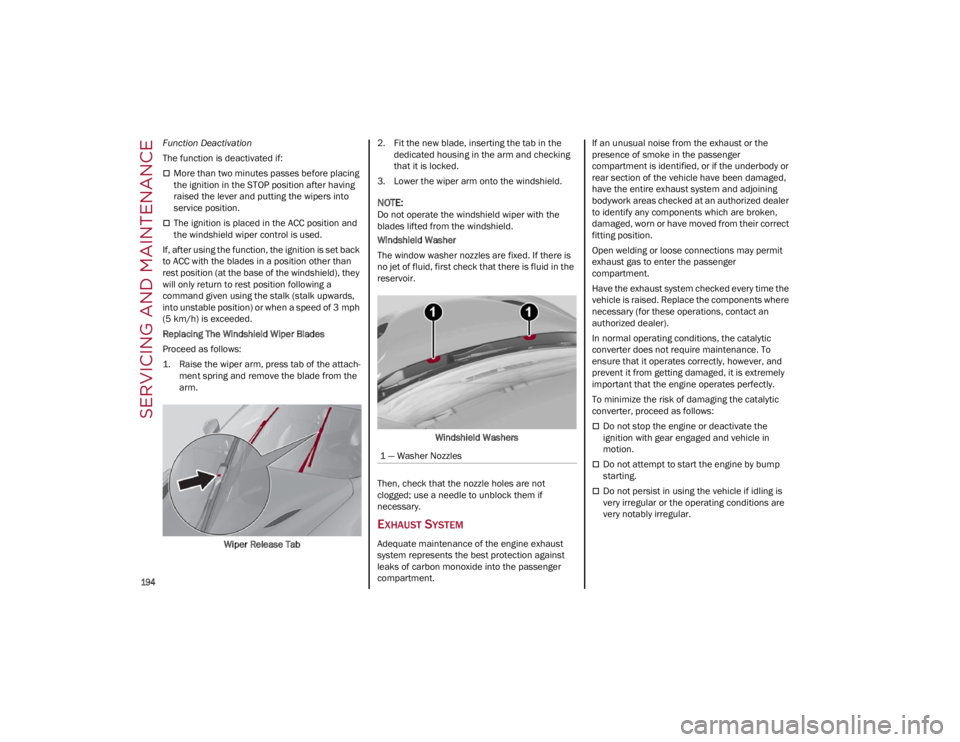
1. Raise the wiper arm, press tab of the attach -
ment spring and remove the blade from the
arm.
Wiper Release Tab 2. Fit the new blade, inserting the tab in the
dedicated housing in the arm and checking
that it is locked.
3. Lower the wiper arm onto the windshield.
NOTE:
Do not operate the windshield wiper with the
blades lifted from the windshield.
Windshield Washer
The window washer nozzles are fixed. If there is
no jet of fluid, first check that there is fluid in the
reservoir.
Windshield Washers
Then, check that the nozzle holes are not
clogged; use a needle to unblock them if
necessary.
EXHAUST SYSTEM
Adequate maintenance of the engine exhaust
system represents the best protection against
leaks of carbon monoxide into the passenger
compartment. If an unusual noise from the exhaust or the
presence of smoke in the passenger
compartment is identified, or if the underbody or
rear section of the vehicle have been damaged,
have the entire exhaust system and adjoining
bodywork areas checked at an authorized dealer
to identify any components which are broken,
damaged, worn or have moved from their correct
fitting position.
Open welding or loose connections may permit
exhaust gas to enter the passenger
compartment.
Have the exhaust system checked every time the
vehicle is raised. Replace the components where
necessary (for these operations, contact an
authorized dealer).
In normal operating conditions, the catalytic
converter does not require maintenance. To
ensure that it operates correctly, however, and
prevent it from getting damaged, it is extremely
important that the engine operates perfectly.
To minimize the risk of damaging the catalytic
converter, proceed as follows:
Do not stop the engine or deactivate the
ignition with gear engaged and vehicle in
motion.
Do not attempt to start the engine by bump
starting.
Do not persist in using the vehicle if idling is
very irregular or the operating conditions are
very notably irregular.
1 — Washer Nozzles
22_GA_OM_EN_USC_t.book Page 194
Page 224 of 248

SERVICING AND MAINTENANCE
222
PRESERVING THE BODYWORK
Paint
Touch up abrasions and scratches immediately
to prevent the formation of rust.
Maintenance of paintwork consists of washing
the car: the frequency depends on the conditions
and environment where the car is used. For
example, it is advisable to wash the vehicle more
often in areas with high levels of atmospheric
pollution or salted roads.
Some parts of the vehicle may be covered with a
matte paint which, in order to be maintained
intact, requires special care.
To correctly wash the vehicle, follow these
instructions:
If high pressure jets or cleaners are used to
wash the vehicle, keep a distance of at least
15 inches (40 cm) from the bodywork to avoid
damage or alteration. Build up of water could
cause damage to the vehicle in the long term.
To make it easier to remove any dirt deposits
in the area where the blades are normally
located it is recommended to position the
windshield wipers vertically (service position).
Wash the bodywork using a low pressure jet of
water if possible.
Wipe a sponge with a slightly soapy solution
over the bodywork, frequently rinsing the
sponge.
Rinse well with water and dry with a leather
chamois.
Dry the less visible parts (e.g. door frames, hood,
headlight frames, etc.) with special care, as water
may stagnate more easily in these areas. Do not wash the car after it has been left in the sun or
with the hood hot: this may alter the shine of the
paintwork.
Exterior plastic parts must be cleaned in the
same way as the rest of the vehicle.
If washing the car in a service that moves the car,
for cars with automatic transmissions, PARK (P)
must be cut out. You have to shut off the engine
in the following conditions: car stopped,
transmission in NEUTRAL (N), push the starter
button for at least three seconds.
NOTE:
Avoid parking under trees; the resin dropped by
trees makes the paintwork go opaque and
increases the possibility of corrosion.
Windows
Use specific detergents and clean cloths to
prevent scratching or altering the transparency.
Front Headlights
Use a soft cloth soaked in water and detergent for
washing cars.
NOTE:
Never use aromatic substances (e.g. gasoline)
or ketones (e.g. acetone) for cleaning the
plastic lenses of the headlights.
When cleaning with a pressure washer, keep
the pressure washer at least eight inches
(20 cm) away from the headlights. Engine Compartment
At the end of every Winter, wash the engine
compartment thoroughly, taking care not to aim
the jet of water directly at the electronic control
units or at the windshield wiper motors. Have this
operation performed at a specialized workshop.
For further information
Ú
page 191.
NOTE:
The washing should take place with the engine
cold and the ignition device in the STOP position.
After the washing operation, make sure that the
various protections (e.g. rubber caps and guards)
have not been removed or damaged.
INTERIORS
Periodically check the cleanliness of the interior,
beneath the mats, which could cause oxidation of
the sheet metal.
SEATS AND FABRIC PARTS
Remove dust with a soft brush or a vacuum
cleaner. Rub the seats with a sponge moistened
with a solution of water and neutral detergent.
Cleaning heat press images on seats — if equipped:
Due to the color, opacity and wear-resistant
protection with which the heat press images on
some seats are made, they may be subject to
temporary scratching if they are touched by finger
nails, keys, or other hard objects. In such cases,
the visible signs do not impair the profiled
images, and can easily be removed by wiping the
affected area with a microfiber cloth moistened
with water (not dry) to restore the seat to its
original condition. The microfiber cloth must not
have been previously soaked in other substances
or detergents.
CAUTION!
Wipe the rear window inside gently with a
cloth following the direction of the filaments to
avoid damaging the heating device.
22_GA_OM_EN_USC_t.book Page 222
Page 244 of 248

242
INDEX
R
Radial Ply Tires ...........................................214
Radio Transmitters And Mobile Phones ....... 4
Rear Camera ..............................................122
Rear Cross Path .........................................132
Reformulated Gasoline .............................. 230
Refueling Procedure ..................................124
Refueling The Vehicle ................................ 123
Refuelling.................................................... 231
Reminder, Seat Belt ...................................144
Remote ControlStarting System........................................ 23
Remote Keyless Entry .................................. 19
Remote Starting Exit Remote Start Mode .......................... 23
Remote Starting System ....................... 23, 81
Remote Trunk Release ................................ 61
Replacement Bulbs...........................202, 204
Replacement Tires ..................................... 215
Reporting Safety Defects ...........................237
Restraints, Child .........................................157
Rims And Tires ...........................................206
S
Safety Checks Inside Vehicle ....................166
Safety Checks Outside Vehicle.................. 167
Safety Defects, Reporting ..........................237
Safety Information, Tire .............................206
Safety Tips ..................................................165
Safety, Exhaust Gas ...................................167
Saving Fuel .................................................126
Scheduled Servicing ..................................182
Scheduled Servicing Program (2.0 T4
MAir Engine Versions) ................................ 183 Scheduled Servicing Program (2.9 V6
Gasoline Engine Versions) ........................ 185
Seat Belt Reminder ......................................71
Seat Belts.......................................... 144, 166
Child Restraints ..................................... 157
Energy Management Feature ............... 148
Front Seat ..................................... 144, 145
Inspection .............................................. 166
Lap/Shoulder Belt Untwisting .............. 146
Lap/Shoulder Belts ............................... 145
Pregnant Women................................... 148
Pretensioners ........................................ 148
Rear Seat ............................................... 145
Reminder ............................................... 144
Seat Belt Pretensioner .......................... 148
Untwisting Procedure ............................ 146
Seats ............................................... 30, 31, 33 Adjustment ................................. 30, 31, 33
Head Restraints .......................................35
Heated ...................................................... 35
Power ........................................................33
Security Alarm............................................... 24
Service Assistance .................................... 236
Service Contract ........................................ 236
Service Manuals ........................................ 238
Servicing Procedures ................................ 192
Shoulder Belts ........................................... 145
Signals, Turn ........................................74, 167
Snow Chains .............................................. 218
Snow Tires.................................................. 218
Spare Tires ................................................. 216 Speed Control
Accel/Decel .............................................. 99
Accel/Decel (ACC Only) ......................... 102
Cancel....................................................... 99Distance Setting (ACC Only) .................. 103
Resume .................................................... 99
Set ............................................................ 98
Speed Control (Cruise Control) ................... 97
Starting Button....................................................... 22Cold Weather ........................................... 82
Remote ..................................................... 23
Starting The Engine ..................................... 81
Steering Tilt Column ............................................... 28
Wheel, Heated ......................................... 29
Wheel, Tilt ................................................ 28
Steering System ......................................... 226
Stop/Start System ....................................... 94
Storage Console .................................................... 55
Glove Compartment ................................ 55
Suggestions For Driving............................. 126
Sun Roof .................................................58, 60
Sun Visor ...................................................... 37
Supplemental Restraint System –
Air Bag ........................................................ 150
Suspension ................................................ 226
Symbol Glossary .......................................... 14
Symbols ........................................................... 6
System, Remote Starting ............................ 23
22_GA_OM_EN_USC_t.book Page 242